

I think it’s safe to say I began working with winches at an earlier age than most people, when I got a job at age nine helping to cut trees for pulpwood. Taken under the wing of an old Maine woodsman, the lesson with a chainsaw over, we jumped in a 1935 6×6 truck and headed into the woods.
The truck had a PTO (power take off) winch that was as old as the truck, its wire rope blackened with age, pitch, dirt and grease. After cutting, the tree butts all needed to point in the same direction so we could slip the rope’s choker cables over the butts, four to ten of them at a time. Once that was done, the winch was engaged—and we ran like hell as the logs were drawn to the winch and the truck was drawn to the logs. Where you ran and how fast were fairly important things. The rope would vibrate and melt the ice on it and ping and pop and fling dirt and pitch everywhere. Then, and only if the tree butts were lined up right, would we drag the lot, called a “twitch,” towards the cutting “yahd.” Of course, frequently something would part, sending the rusty rope flying at us. The force of the rope was usually not that bad unless it hit you in the face. What would be worse was if you got between the rope and some immovable object when the PTO was engaged. Thankfully these instances were not too common, but once or twice a day it was close enough to make you appreciate not being there. I distinctly remember three ropes parting one day before lunch, and a choker cable cinch link shooting straight through the driver’s front tire.
So, why the journey down memory lane? First, to illustrate that just because it was done that way does not mean it was the best way. Second, to cement the need for forethought and care whenever you even think you might possibly, maybe have to use your winch. Third, to ensure that you know and maintain your equipment. Fourth, it’s fun to talk about the stupid things you did and lived to tell about later.
In this article I’ll assume that you’ve read the literature that came with your winch, that you know the gross (loaded) weight of your vehicle, and have matched the winch to that weight and installed it properly to a frame-mounted bumper. This information should be at the tip of your fingers. I’ll also assume you know the pulling power and speed of the winch, and the size and strength of the rope required.
In my last article for Overland Journal I stated that you need to take responsibility for your own actions whenever you start using recovery gear. In that case I was referring to the Hi-Lift Jack. A winch is just the same: Sign your own mental waiver. What I will describe below are not necessarily any manufacturer’s sanctioned methods. I developed my method by learning from others, working as a logger and commercial fisherman, and getting professional training from a number of sources. Many years later I started OEX. Thirty-plus years experience in this field has given me time for a lot of repetition and “scientific” tweaking to improve how the winch is used. After each winching exercise—and there are hundreds a year—I ask myself could we have improved on that to make it safer and more effective. Do not forget, you must take full responsibility for all your actions. Neither the winch maker nor rigging manufacturer nor I nor Overland Journal can be held responsible in any way for your actions. Sign your own mental waiver or don’t read on.
Definitions:
I would like to set out some basic vocabulary here to help you along.
- Rope – this is synonymous with line or cable. A winch rope can be synthetic or metal (wire).
- Spool – the inner tube to which the rope is attached and on or off of which it winds during operation. Synonymous with Drum.
- Wrap – One turn of rope around the spool.
- Layer – One complete series of wraps around the spool or on top of another layer.
- Free spool – A winch set with the brake free, allowing the rope to be pulled out manually.
- Engaged – Free spool is off and the motor mechanism is engaged to either winch in or winch out the rope.
- Main Rig – The winch is one end of the main rig and the other is the hook at the end of the rope. The relationship between the winch and the rope end and how it is anchored is the main rig.
- Sub-Rig – Any attachment points put onto the main rig, such as a pulley block, shackle, or strap used to change winching direction for a short distance.
- Parachute Rig – Any item used to slow the progress of a broken line in motion. A parachute rig uses weight and wind resistance to help minimize the distance and energy of a broken rope or bit of hardware.
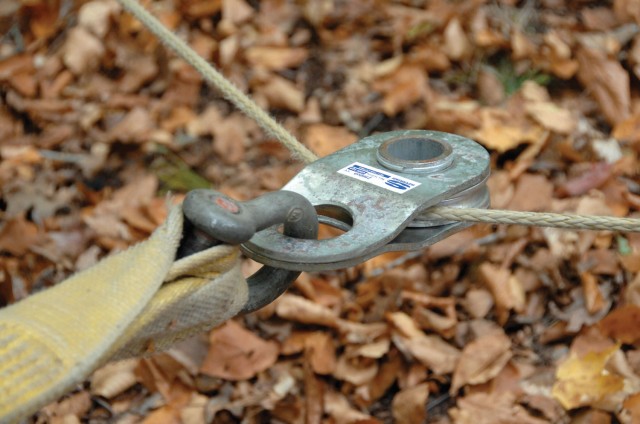
- Pulley Block – A pulley designed to attach to a rope anywhere along its length. Synonymous with Snatch Block or Swivel Pulley
- D-shackle – These are used to attach any straps or ropes together instead of knots or girth hitches.
- Hands in – A hand signal communication of your intent to touch the rope on the winch’s surface. This hand signal tells the winch control operator to hold the control in sight of the signaler, without any finger contact with the trigger.
- Burr – Any broken surface wire on metal rope. These make metal rope behave like barbed wire.
- Advantage – Any routing of the rope which increases the pulling power of the entire rig. This is not to be confused with reducing the load on a particular section of the rope.
- Dressed – This describes a rope stowed on the spool when the winch is not being used, i.e. reeled all the way up. To re-dress is to spool in the rope neatly after use, or, during use, to better organize the rope for a pull.
- Roller fairlead –The four rollers that help guide the winch rope on or off the winch.
- Hawse fairlead – Like the roller fairlead, but without the rollers. Essentially just an oval hole with smooth edges to lead the rope in and out.
Winching Mantra
To save space I will bullet the basic operational aspects of a winch to keep in mind. These will be explained in depth later, but suffice to say these should be your mantra when winching:
- Slow down, chill out, then make a plan
- Always wear gloves.
- Never put a rope between your legs.
- Never let a rope slide through your hands.
- Stabilize the vehicle before you do anything else.
- Define why you are stuck before you grab gear– never make assumptions.
- Slow down, chill out, then make a plan.
- Gather all needed gear in advance (best if it’s all in one bag).
- Always arrange a straight line pull.
- Pull out most of your rope, but leave 10 wraps.
- Keep contact tension on the rope, especially metal rope.
- Stay at least twice the stopping distance of the winch motor away from the fairlead.
- Set a parachute rig between each anchor point, turn or fulcrum.
- Use hand signals; no shouting.
- Envision the places where you could get hurt if the rigging fails, and do not go anywhere near them.
- Arrange a closed-rope system. Avoid open hooks when possible.
- Never tow with a winch.
- Never lower a load with a winch
- Slow down and methodically implement your plan.
The winch review in Overland Journal’s gear issue described the different types of winch, so I won’t cover the same material. This article focuses on the most common type used in ground vehicle recovery: the electric winch.
Basic concepts and premises
First and foremost, a winch is designed to bring things to it. It is not designed to move itself. We all use it this way, but it is not made to do this. While this may seem a trivial point, it does make a difference in the way you operate the winch and the method used. It’s especially important when determining if and where to put a pulley block to increase the advantage of the pull. It is also important to realize that the winch “wants” the rope to be spooled in at right angles to the spool face. Its design is such that any angle other than this will reduce the winch’s pulling power and increase stress on the rope. So with this in mind, here are a few premises.
Premise One: Always rig a straight-line pull to the face of the winch.
If you do not—and I am sure we all have ignored this or worked in ignorance—then pay very close attention, because you have changed the physics of the entire rig, as well as the way the winch was designed to work.
Premise Two: Pull out all your rope except for 10 wraps.
Let’s assume you have a 9,000-pound winch mounted to your vehicle. That does not mean that the winch will always pull 9,000 pounds, but instead that it is capable of pulling that much under certain circumstances. A 9,000-pound winch is rated to pull that much with a single layer of rope on the spool. As you add layers you effectively increase the diameter of the spool and decrease its pulling power. An average 9,000-pound winch holding 100 feet of rope will have at least three or four layers of rope on the spool when dressed. Each layer reduces the pulling power of the winch by approximately 11 to 13 percent. So at the end of an 80-foot pull, your winch’s power is reduced by half. By pulling out all the rope to expose the spool surface you have all the power intended by the winch design. Make very sure you leave 10 wraps on the spool since this is what takes the load of the rope on the spool, not the attachment fastener (bolt, Allen key, screw, etc). Most manufacturers suggest leaving five to seven wraps; I use 10 to be safe.
In addition to the power issue, when the rope forms a second layer of wraps the rope will try to cleave its way through the ropes below it. The physics of pulleys explains that when force is exerted on a pulley the force is concentrated at the center of the pulley, in a winch’s case the center of the spool. Imagine you take one of those tubes of cookie dough and wrap a wire around it. If you anchor one end and pull on the other the wire will cut straight through your dough; this principle is the same on a winch, but the rope will slide, cut, kink, burr or melt its way through anything under it. The result is not just one burr, kink, melted spot (synthetic rope), but many more depending on the position of the rope and the number of layers. So again, pull out your rope to the last ten wraps. If you are forced to lay rope on top of itself then you must make sure the wraps are very tight and the layers are solid. Re-dressing your rope after the pull is not as much of an issue. You can get it in anyway you like when it is under minimal or zero load because the next time you use it the rope will be pulled back out to the best starting point.
Premise Three: Pulleys only add advantage if they move with or relative to the load.
There is a general misunderstanding out there about the physics of pulleys. I will address this below, but just remember one thing: The pulley either needs to move with the mass or you need a double line pull in order to gain any mechanical advantage.
Premise Four: Better safe than sorry.
All gear should be twice as strong as the estimated load. Yes, this might be overkill, but it’s what I do and make sure all my guys do it as well. You can rig to increase the advantage of your system and increase your safety margin.
A couple other notes:
With the exception of worm-drive models such as the Superwinch Husky, winches are designed to pull in; they are not designed to lower loads. They are also designed to hold a load, but they will not take the shock loads produced when towing a vehicle. Never tow a vehicle using any winch.
Winch kit
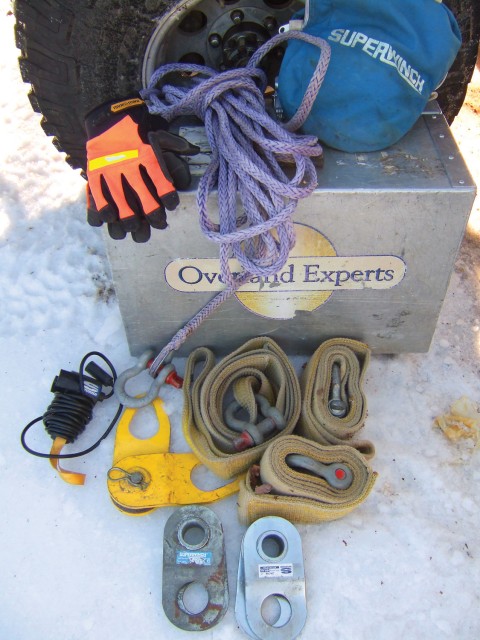
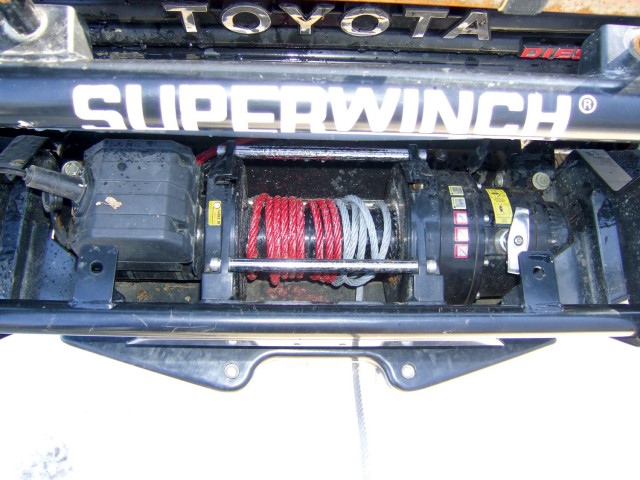
In order to even contemplate using a winch, you will need several accessories. A fairly well-supplied winching bag includes the following: proper gloves; three D-shackles (9,500-pound working load or WL); three 3-inch straps (20,000-pound WL), three 5/16-inch pulley blocks (19,250 pounds WL) and one 50-foot 5/16-inch synthetic rope extension (13,700lbs WL). I prefer to use synthetic rope, which is stronger per unit measurement and lighter to carry. Synthetic rope does not burr or rust. It has less mass, and therefore holds less energy when it parts—less energy equals less damage. However, synthetic rope insulates the spool of the winch, compared to metal which conducts heat way from the spool. Winches that have the brake in the spool, or are designed to dissipate heat at the spool, can heat up dramatically with synthetic rope. The heat will compromise the winch and the rope at the same time. Ask your winch manufacturer about this, and also consult the synthetic rope manufacturer.
Winch Recovery
Several independent factors combine to determine the difficulty of any winch recovery:
General vehicle resistance
Tire pressure and construction, and general friction in the drivetrain can add up to a good amount of added resistance. How much? On a theoretically perfectly flat, hard road with a perfectly frictionless drive train and frictionless tires, etc, the vehicle will need just a minute amount of force to overcome its potential energy. But on 33-inch mud-terrain tires at 15 psi, added to the resistance of bearings, seals, rotating differentials, etc., it starts to add up.
Resistance of terrain
The substrate under the vehicle has a great effect on resistance in any recovery. All things being equal (tire pressure, slope, etc.) flat, firm ground has the least effect; deep mud or snow has the greatest. A 5,000-pound Land Rover D90 on firm, flat ground can be pushed by a human because there is not much resistance; the person need move perhaps only seven percent of the total weight, or about 350 pounds. However, plop the vehicle in a mud hole and we could be looking at 2,500 pounds or more. As a general rule, figure you need to pull seven percent of the weight of the vehicle on firm ground, 50 percent or more in deep mud or snow.
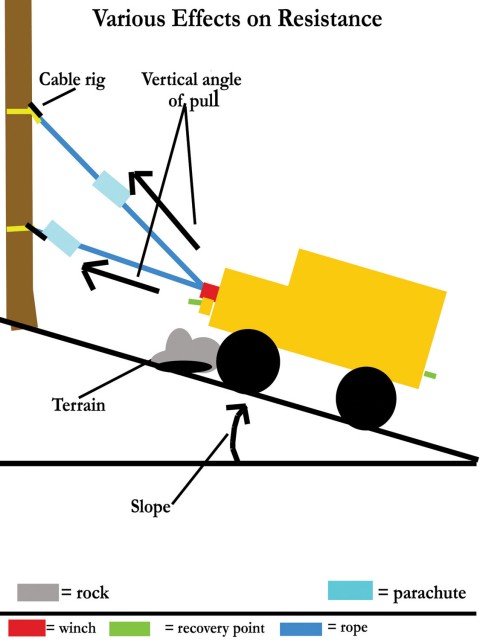
Resistance of slope
Slopes obviously add resistance to the load on a winch. The steeper the slope, the more of the mass of the vehicle the winch will need to move. A vehicle of 5,000 pounds on a 35-degree slope creates a resistance of approximately 3,000 pounds due to the slope alone. As another general guide: A zero-degree slope has little effect on the resistance, which is determined instead by the vehicle’s inherent resistance and the substrate. On a 45-degree slope (also called a 100-percent slope, as it rises one unit of measurement for every unit forward) you’ll be pulling about 75 percent of the weight of the vehicle, and by 60 degrees you’ll be pulling the entire weight.
Winching angle
Ideally the winch rope should leave the fairlead at a 90-degree angle to the spool. This is known as a straight-line pull. As that angle changes and the line is no longer coming straight off the spool, you will encounter problems. First, power is lost due to the angle itself. Second the diameter of the spool is effectively increased, so more power is lost. Finally, you risk bunching up your rope to one side of the spool. The result is increased spool diameter (reduced pulling power), and an increased likelihood of cleaving the rope under your incoming wraps. The loss in power from the angle is less of an issue than the bunching effect.
The physics of pulleys
Endless debate rages in the 4WD world regarding pulleys and the advantage they give to recovery situations. I hope the following helps clear up misconceptions.
It’s been noted repeatedly that a pulley does not offer any mechanical advantage unless it moves with the load being shifted. For example, if you try to lift a weight by hand by running a rope from the weight through a pulley on an overhead beam and back down to you, then pulling on the rope, you gain no advantage whatsoever. Likewise, if you run your winch rope from the winch through a pulley attached to a tree, then straight back to a fixed anchor near your vehicle—say another tree—you have gained no advantage. In fact, if your vehicle is putting 5,000 pounds of strain on the winch, running the rope through a pulley and back to a fixed anchor very nearly doubles the strain on the tree and pulley while doing you no good. That’s because the tree and pulley experience 5,000 pounds of pull from the winch as well as, in effect, 5,000 pounds of pull from the fixed anchor. Actually, by doing this you’ll decrease your mechanical advantage by a factor determined by the diameter of the pulley, the inherent friction in the pulley, and the actual angle between the rope on either side of the pulley.
Let’s look at this more closely. As the angle between the “two” ropes, meaning the rope on one side of the pulley compared to the other side (yes I know its one rope, but it makes it easier to explain this way) goes from zero (i.e. straight through pulley) to 180 degrees (a u-turn around pulley), the strain on the tree (along with the tree saver, D-shackle, and pulley) increases. At 90 degrees redirection angle the force on the tree is almost 40 percent more than the total load, or around 7,000 pounds from the example above, while at 180 degrees it’s 100 percent more.
In all the above cases the load on winch itself will only be as much as the strain on the line, 5,000 pounds. But you have not increased your pulling power at all. However, a redirected pull to a fixed anchor still has its uses: More rope off the spool means more power, and the rope adds up on the spool slower (1/2 the rate) than if you were anchored to your own bumper. This “slower add up” allows for a longer pull (twice as long) with less line on the spool—i.e. more power for longer.
Now lets rig it differently. If you run a rope from your winch to a pulley and back to your vehicle, and the two lines are as close as possible to parallel, now you have increased your mechanical advantage. The reason is that both the winch side anchor and the bumper side anchor are moving and shortening. They are both doing work or applying force. This makes the load on “each” rope half as much. You do not get a precise 2:1 advantage, but you very get close if the ropes are parallel. So your winch now has two times the potential pull power. Yet your pulley/strap/D-shackle on the tree will not be subject to additional force. The pulley on the tree becomes the “moving pulley” and this, in this example; gives a 2:1 mechanical advantage. The speed of pull will be reduced by half.
You also gain a 2:1 advantage if you attach a pulley to the bumper of a stuck vehicle, then run a winch rope from a recovery vehicle through the pulley and back to the bumper of the winching vehicle. If you add another pulley to the winching vehicle, and run the rope through that and back to the stuck vehicle, you have gained a 3:1 advantage. In this situation, counting the number of lines between the stuck vehicle and the winching vehicle will give you the mechanical advantage.
Here’s an easy way to remember all this: Just count the number of lines that get shorter with the movement of the vehicle being pulled, and you’ll have your mechanical advantage.
Winch before you winch
Now we’re ready to look at some actual winching scenarios, but first I’d like to go over a methodology I follow whenever I’m presented with an obstacle or situation that might lead to a winching session. I teach it to my students as well, and refer to it as “Winch before you winch.”
That might sound odd, but the intent is to get you to think about the consequences before you find yourself stuck and looking for an anchor point. It may not seem like these steps will help you understand how to winch; however, they are steps that will prepare you to winch and, hopefully, allow you to think ahead so you do not have to winch. Driving well in the backcountry is not made up of a bunch of distinct skills; it is made of one mind set of continuously interdependent skill sets.
There are five steps to this method.
First, should you be there? In other words, is it the correct area, weather, time of day? Do you have the right equipment, communications, and first aid kit? Are your skills or the set of skills of your group adequate for the trail or road you are considering (first-aid training, 4WD driver training, etc.)? This is the most important step, and it should come to mind before you ever leave camp on a trail run.
Second, are you sure you actually want to get through the obstacle in front of you? In other words, do you know what is coming up? Never enter a marginal area to find you need to back out two miles. Usually this means you either have good local knowledge, or you do a fast huff on foot through the next half-mile until you can assess if you can at least turn around.
Three, how exactly will you drive the specific obstacle in front of you? Get out and walk it. Make your plan based on your vehicle, skill level, and equipment. Before you move, imagine the worst-case scenario. This scenario is where you develop a preliminary recovery plan. In other words, mentally set up your recovery in advance for all the spots that could “get you.” If you are not sure where those areas are, walk it again and use your head. If you cannot survive or accept the consequences of the worst-case scenario, then never drive it. This is your plan.
Four, drive your plan. Do not let fear or peer-pressure convince you to change the plan. Fear will speak lies to you. The only reason to diverge from your plan is if the worst-case scenario threatens to occur or has occurred. No worries, because you have a plan for this as well . . . right?
Five, fix it if you mess it up. You should carry out some environmental stewardship; be responsible and accountable. At the least realize that the abuse you did, not matter how small, will just be enhanced by the drivers behind you. If you popped out the only rock that flattened your suspension, allowing you to get up with out wheel spin, put it back.
Think before you move. Winch before you winch. Drive before you drive. Fail before you fail.
Winching in action
Walking through some winching scenarios should help cement all this information into a clear base on which to practice. My goal here is to walk you through specific set-ups. The first few set ups will be more detailed. As I present the others they will get simpler or at least shorter since much of the lingo and techniques will be familiar.
Single-line pull

A single-line pull is always an option if the terrain and slope resistance, etc., do not exceed one half of your gear’s load ratings. So let’s say you drove to a base of a muddy hill and considered your five steps and eyed the trees or rocks or sand (to plant your Pull-Pal or ground anchors) so you know what tree to use at what point, and more importantly determined if there are no suitable trees or rocks or ground in the area you need there to be. So you were prepped, found a suitable tree, and you had a plan—and you tried the hill and found yourself thoroughly stuck halfway up, unable to initiate a failed-hill maneuver and back down.
Scenario: First, chill out and take your time. As a trail leader, or even driving by myself, I would already have had my winch kit out and stowed near my potential anchor point. If the hill was very risky and I was willing to take the chance anyway, I might also have set up a preventer. A preventer is a strap, kinetic rope, or some other temporary anchor to attach to your vehicle to “prevent” you from turning sidewise or some other bad thing after your forward motion has ended, and hopefully before any rearward motion begins. The preventer should be hooked up as soon as you have failed and if you are somewhat stable. If you are alone (which you should endeavor to never be in such a situation), it can be nerve-wracking to exit a very unstable vehicle and set up a preventer. Set it up first and at least you’re a bit ahead of the game.
So, your spotter has attached the preventer, if needed, and of course he or she has good tough gloves on. Next, your spotter should help stabilize the vehicle more thoroughly, and you as the driver either settle the vehicle onto the preventer, or wheel chocks, or whatever you have. If this does not appear possible, you must stay in the vehicle with the brake on and while your friend hooks you up. (This brings up an important point: Share your plan if you are using a spotter. Agree on the plan before you drive the obstacle.) For now let’s assume you can get out and set up your own winching rig. If there is a group of people around, you are now in charge of making sure you do not kill someone. Get everyone away from the recovery area and the “Harm Radius.” Make sure you have only one or two people helping you, and no crowd giving advice. You are in charge of the recovery, so keep it that way.
First figure out why you are actually stuck. Do not assume anything, but instead get your gloves on and grab your shovel. Take your time determining the true cause of your “stuckness.” Now is the time to choose the safest recovery method by decreasing order of ease and inherent safety: first, a kinetic rope, then the winch, and last a Hi-Lift jack. This is a winching article, so—with your accessory bag in hand and gloves on, pick or reconfirm your recovery anchor point(s) and make sure you have all the equipment you need before you grab the rope and move. (Note: Never go behind your vehicle to retrieve your equipment if you neglected to get it out first. If the vehicle is in a very tenuous position, it’s better to use your friends’ gear than risk getting behind a vehicle, or even into one that’s less than perfectly stabilized.) Stow your shovel (always finish one thing before you start another—stay linear, stay logical, stay focused), then place the winch in free-spool. This will allow you to pull the rope off the spool—usually. There are some exceptions. Some winches are much harder to pull rope off of than others, and they all get very stubborn when temperatures drop below zero. Once some Special Operations personnel I was training were surprised to fail a free-spooling challenge I set for them—four guys to pull out 30 feet of rope. It was 18°F. At low temperatures the lubrication inside the winch becomes viscous, often making free-spooling functionally impossible. There are some things that can help this. You can re-grease with lower-temperature rated oil, or, as they do in Iceland, you can use graphite powders. Of course, these changes will most likely void your warranty, but . . . Contact your winch manufacturer for more ideas. If it is very cold, running the winch while it’s in free-spool mode will help warm up the lubrication and allow free-spooling. Otherwise you will need to power or winch out to get the line out. Winches—with the exception of worm-drive models—notoriously do not like being powered out for long, so take care. (This is especially true in high temperatures. In desert heat you can smell unhappy winches from great distances.) If you need to power-out the winch to pull rope, remember once finished to place the winch control in a safe place were the trigger has no way of getting touched and “bumping” the winch.
As soon as you have the rope in your hand, remember it is now live, and can become “hot” or under tension at any time should the vehicle shift, the winch control bump the winch motor, etc. What this means is that any rope at any time should be treated like it can go hot at random. Therefore never let a rope get between your legs, and do not step across any winch line that is hooked up. If you absolutely have to step across it, step on it. If it goes hot and you are stepping on it, you will be pushed into the air more likely than ripped by the rope or pinned against something. Get into the habit of grabbing the winch rope by the outer most part of the hook, thimble or shackle. Having a grip on the outer end will allow the rope to pull out of your hand should it get hot, lessening the chance your hand will get caught between the hook and an object such as the roller fairlead. Some hooks now come with safety straps to facilitate easy handling.
Synthetic line is very slippery, and you might be tempted to wrap the rope around your hand to gain a better grip. Don’t do it. I had a close call while scalloping as a commercial fisherman. I was almost dragged overboard when my leg tangled in a winch line. A vigilant, fast-acting captain saved my life that day.
Pull the rope to your anchor point. If you’re having a difficult time handling the rope, put it over your shoulder and lean forward as you walk. Once at your anchor point, drop the rope, and remember it can go hot any time so treat it accordingly. Open your gear bag and remove one 10- to 20-foot three-inch tree-saver strap. A three-inch strap is usually rated at about 20,000 pounds, but make sure it is from a reputable manufacture and is labeled to handle this load.
Position your strap to give the most straight pull as well as the optimum vertical angle. I usually wrap the strap around itself so that under load it grips the tree rather than sliding down. This can be done to help raise the nose of the vehicle up a bit and/or to raise the rope so it does not come in contact with the ground and chafe or even part. This “cable rigging” is a technique adapted from logging. You can go too far with this and pull a The Gods Must Be Crazy scene, so take care. That said, I have shimmied up trees to cable the rig and relieve a good bit of terrain resistance. It works well if you slow down and consider all the forces involved, as well as the worst-case scenarios. Remember, and remind everyone around you of the possibility that the anchor strap and rope could slide down with great force. Evergreens, especially spruce and fir trees, love to let the strap break through the bark. The strap will take off the bark like paper off a straw. Not good for you, and deadly for the tree. Do not attach to a tree or anything else out there if you cannot minimize damage or avoid it entirely.
If you need to use a rock, make sure you can loop the strap around it so it won’t come off. I use two straps, and wrap the rock like a present with the straps crossing in the back. The two straps seem to help hold one another on the rock. If the rock looks like it will cause chaffing or cutting, you can use a chain instead; however, as a general rule I do not use chain in recovery with anything but the Hi-Lift Jack. Chain gives little to no warning when it parts. It just explodes, and since it has a high mass, it holds more energy, energy that can hurt you. Straps hiss and ping when they get close to parting, metal rope sounds like a bad radio station with pings and pops, and synthetic rope will get hot, vibrate, and hum. Chain is silent. Since it does not flex and it is not malleable it comes off things all at once, while soft things often slide and roll giving some warning. So take care on sharp rock; use chain, but use it wisely and as a last resort. If I could, I would rather reposition an anchor vehicle or let the person behind me winch me up ahead with a redirected pull.
Let’s assume the tree is fine and you have secured the tree saver. Next attach both loop ends to your D-shackle. Most D-shackles used in the 4×4 world are the threaded clevis pin type. If this is the case, tighten the clevis pin fully and then loosen it at least a half turn (Always secure a D-shackle in this manner as a matter of habit). The forces on the D-shackle are huge, and any slight geometric change in the shackle body will cause the clevis pin to be very difficult to un-thread. Loosening it a bit minimizes this chance. Now rotate the shackle 180 degrees, so the pin is on the tree saver side and the arched side is toward the winch’s hook. The metal edge of the hook or thimble has very little surface contact with the shackle; by moving it to the arch side it will self-center to the apex of the arch, keeping the shackle in a better geometric position. Also, if the hook is on the clevis pin it will slide to the corner under tension, possibly buggering the exposed threads of the pin. Finally, the strap will have a much larger contact patch with the clevis pin.
A word on winch rope hooks. I am a firm believer that better safety means better recovery and a high average rate of movement. To this end, a winch rope’s hook or thimble should be closable. If at all possible, your entire rig system should be a closed system. Open hooks break easier and can come loose if slack gets into the system. I personally use thimbles and D-shackles and avoid open hooks. Here in New England swing-gate hooks tend to rust, so I do not use those either. Open hooks love to break, whether you overload them or position them incorrectly. If slack forms in the rope, an open hook can reposition itself in all kinds of nooks and crannies. Then the load re-establishes itself, and bang. If you have an open hook, replace it with a closable one that is strong and able to take the load in any direction. Open hooks that have spring loaded clips do not really constitute a closed system. Yes, they will hold the hook in place when slack forms, but they do not strengthen the hook as a whole.
If you must use an open hook, always remember that the hook tends to break at its narrowest diameter, the last one-third or so toward the tip. If it does this, the rope will be flung in an arc away from the opening of the hook. What does this mean? Once you have the rig set up, and your parachute rigs are in place, you have to predict the places where the rope and gear will go if something parts, and do not stand in those places. This holds true especially for the open hook. Position the hook so if it does break the rope will swing in a direction away from anyone nearby. If you are hooking vertically, always point the hook end up to the sky; should it fail, the hook and rope will be propelled into the ground and dissipate the energy there, not in your windshield or body.
At this point you have your rigging set up. Plug in your winch control, if you have not already done so. I route my control wire up to my bumper-mounted Hi-Lift and secure the wire with some simple knot or hitch. Should you trip on the wire or get it caught, the knot will take the load instead of breaking the plug. Routing the wire up and away from the winch itself is very important. Do not let the wire near the spool where it can get “eaten.”
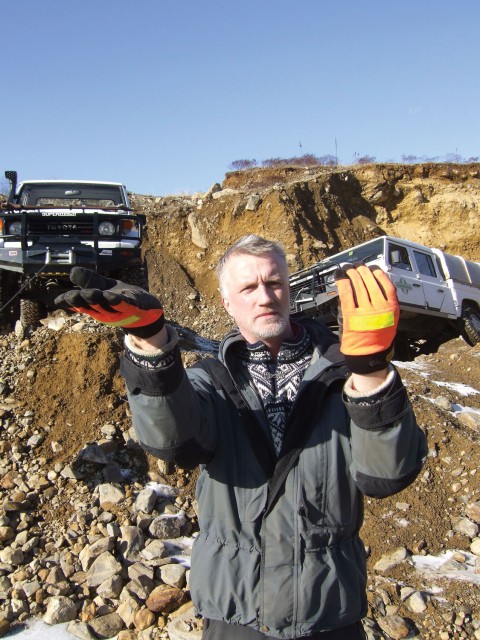
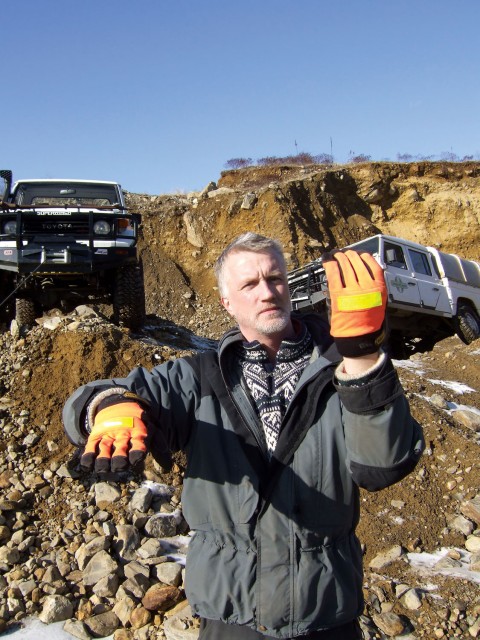
If you are directing your spotter or some other individual holding the controller, or inversely if you are being directed, use hand signals. Clear hand signals communications are much easier to understand than shouted directions, and impossible to misinterpret.
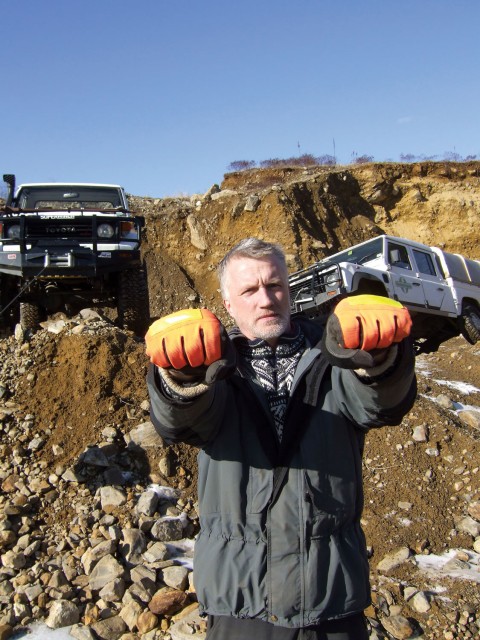
Driving hand signals are simple. Always have gloves on (light colored gloves are best). Raise your hands to head height and make sure the driver can see them.
Come forward
Back up
Turn right/left
Right wheel coming up a rock
Left wheel coming down a rock
Stop
Come forward this much
Front wheels will drop this much
Slow or easy does it
Now these need to be combined with winching signals. I use my right hand for the winch and my left for the driving action. There are times when you need three things or more happening at once. With two hands this can be challenging, so there are times when signals are implied. If you do not understand a signal, stop and wave the spotter to the window to chat it out. Refer to the pictures to see the winching signals. Remember, as a driver, your spotter often cannot see you inside the vehicle due to the windshield reflection, so the signal for all set or okay is a thumbs-up out the window.
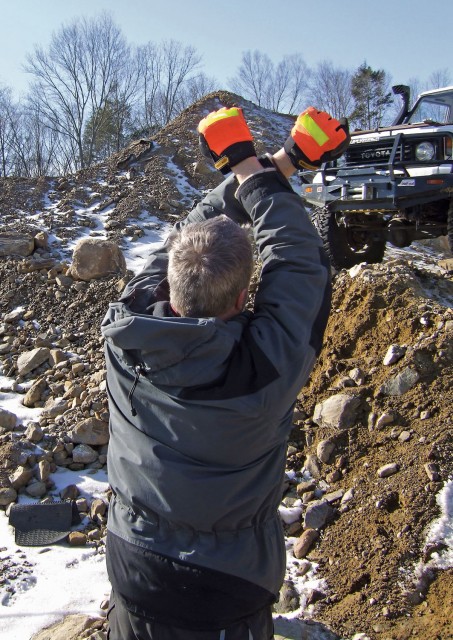
Winch in
Winch out
Little bump of winch in or out
Stop winching
Hands in
Stop winching and Stop Driving
Both arms crossed and hands held in fists is a very important signal: It means stop winching and stop driving. In other words everything halts because something odd is up. Everyone in the world will stop if you do this signal. Of equal importance is the “hands–in” signal. This means you need to get your hands onto the spool to clear a kink, or redress the winch. The operator needs to then hang the winch control out the window holding it by the wire, so you know the trigger cannot get bumped accidentally. As you can imagine it can get fairly confusing so, in line with your plan and mental approach, go slow and be clear. Do not rush, and do not let others rush you. When training I tend to over-punctuate my hand signals to keep things crystal clear. This works very well with drivers new to spotting and/or hand signals. As he or she picks up the language communication will get more fluid. But if things start to get precarious, revert to the punctuated style.

Back up
Drive Forward, left wheel coming up
Drive forward, left wheel coming down

Drive forward, turn right
Stop Driving

Winch in, turn left
Stop driving and stop winching
At this point you are going to start winching in rope. The rig is now live, and this means you need to get everyone in the safe spots. Look at the rig, imagine where everything will go should there be a catastrophic failure, and do not let people be there. Safe places are inside a vehicle, behind a large tree or rock, and of course far away from the rig. If you are doing a series of turns and redirections, the shape the rig forms (i.e. a triangle, or a quadrilateral, etc), will always implode on failure. So never be inside the shape.
Now winch in, first taking up the slack with small bumps of the winch (the hand signal is the tapping together of your fingers and thumb, like mimicking someone talking. Each tap signals a tap on the controller). Once the rig is taut, check everything for issues such as odd gear twists, bad open hook sets, or ropes on ground/tree/vehicles. This is an important safety step; get others to help you if the rig is wide-spread. If there are rig/gear issues, winch out to take tension off, and fix the problem. Once you are satisfied, set a parachute rig on your rope. This is an object you drape over the rope half way between each set of turns or fulcrums. A parachute rig needs to be large enough to, first, offer wind resistance, and then and only then have some mass to it. Blankets, carpet squares, floor mats, a few tree savers, clothing—these all work. If you are running rope at a steep angle up or down hill, the parachute rig often slides into your fairlead or to some other spot. Take a tree saver and tie in on the rope with a tight half hitch, then drape your parachute rig over it. It will hold it from sliding so you do not have to reset too often.
The driver now gets in the vehicle with the winch control, and watches the spotter’s signals. The spotter signals the driver to winch in and steer as needed. The spotter needs to keep an eye on the spool and entire rig as he or she signals the driver. The spotter’s responsibility is to keep the rope from bunching, keep the layers to a minimum, signal to steer the vehicle to spool and dress the winch as rope comes in (i.e. have the driver do slight zigzags so the rope spools nicely), signal driver to avoid any terrain/slope/resistance issue along the way.
The driver’s responsibility is to keep the edge off the load with a touch of throttle, without spinning the wheels. This reduces the strain on the winch and rig, but there is a fine line between taking the edge off and causing slack, which creates instant problems. If fine control is not possible, it’s best to let the winch do the work and keep the revs up to charge your electrical system during the session. Remember, spinning wheels do very little to help forward motion if the vehicle has no established inertia. Spinning also decreases control of steering and lateral resistance, making the vehicle “walk” to one side or the other.
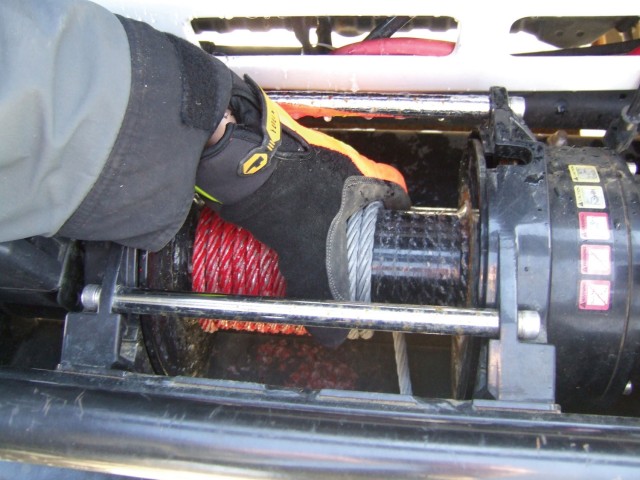
As a spotter I prefer a winch with a very open spool, so I can see if kinking, over-layering, or bunching occurs. An open top also allows me to get my hands onto the winch to sort out a messy dressing, crosses, wedges or pinches. If the pull is a long one, at some point there will be too much rope on the spool. Avoid this if possible. If you are still stuck, the winching must be stopped, the vehicle must be stabilized (move preventer or chocks, etc), and the tension taken off so the spotter can pull out rope and reset the rig with fewer layers on the spool. The best way to do this is to add a pulley sub-rig to your main rig, and re-anchor to another spot some distance away. The new anchor point is far enough away to “un-layer” the spool. Attach the hook/thimble as you would any other anchor point. Reassess lines of attack, add another parachute rig, step away, take up slack, check the rig, and continue winching.
When you see the rope bunching or layering you will need to redress the winch. Take off the slack (stabilize vehicle, etc.) and signal hands in. Disengage the winch to free spool and pull out the offending portion of rope. Let the rope fall in a pile on the ground away from your feet. Do not let anyone grab, coil or walk off distance to keep the rope neat, there is no need. Just lay it onto itself; as long as you take it back up in reverse order there will be no tangles or knots. Once the mess is clear, engage the winch to winch in and step back two times the stopping distance. Remember to keep constant tension on the rope—especially with metal, since it likes to spring off the spool due to metal memory. Lean your body back against the rope in your hands. Give the signal to winch in, feed the rope, hand over hand without letting it slide in your gloved hands, into the winch in a neat even wrap layer. You need to zigzag the rope as you hand it in so the spool is neat and uniform. If you are finished winching and are just replacing all the rope, you do not have to be too neat since that line will be coming off the next time you use it. However, it is nice to have a neat redress to keep a minimum of the rope’s surface area exposed, since metal rope will rust, and synthetic rope will degrade in UV.
If you hear the winch slowing down or straining, your engine revs are not high enough or you are overloading the winch. Often the overloading is caused by a rock or hole you did not take into account. Remember there are four wheels to watch. If you hear the rope starting to ping and hiss or vibrate, watch out—it might be ready to let go. If possible, stop, slacken the rig, and correct the problem. If the rope is touching something and you cannot redirect it off the spot, stop, slacken, and place something smooth under the line at that spot (log, mat, pelican case, or something, but do not damage the environment).
When the vehicle is unstuck, do not let anyone grab the rope as you drive forward. Instead, the spotter should direct the driver over the rope so it goes under the vehicle without getting sucked into the drive train. If you don’t have a spotter and cannot see the line, stop right there and stabilize the vehicle, then get out and redress/stow the line so you can drive on. Get well away from the difficult area before you remove the rope and rig. It’s not uncommon to watch someone take the rig apart, redress the winch, then begin to drive again, only to get stuck again or slide into a more difficult and dangerous situation.
Once you have reached 100-percent safety, gather your gear and redress completely. Stow all gear properly. If, however, you suspect you will need to winch others through the same spot, or you see a spot 20 feet away where you might need the winch again, then wrap your rope loosely, but securely, on your bumper and place the needed gear near your next anchor point. Do not drive far with the winch rope wrapped on the bumper. An exposed winch rope can get pinched by a rock, tangled on a tree or person, etc. Have pride in doing it right or don’t bother.
Double-line pull
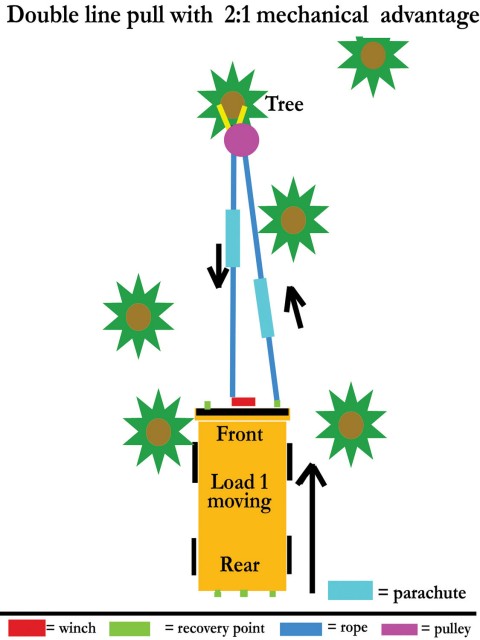
Use a double-line pull whenever you can. It allows for a straighter pull, to reduce strain in the winch and rope. It also allows you to get more rope out to achieve better power. The setup is the same as a single-line pull, but you route the rope from the winch to a pulley and back to the vehicle again. Remember, two lines shortening equals a 2:1 advantage.
Off-line pulls
It would be wonderful if every winch pull were either a perfectly straight line, or easy to set up straight with a redirected pull. Unfortunately that’s not the case, and often you’ll need to use an anchor that’s 10 or 20 annoying degrees off-line. By doing so you will lose power and add stress to the rope, as well as your winch and mounting system on the bumper. Bumpers are not made to take as much force to the sides, so you could easily bend your frame horns or foul your winch bumper mount by bending the mounting plates and hardware. With the rope all bunching on one side, redressing is necessary much more often. As the rope comes into the spool, watch for pinching and heat build-up. I watched a brand new Amsteel rope overheat and part during a climb in Moab. Hawse fairleads, especially, allow heat build up, since the metal contact point does not rotate but holds heat as it conducts it away from the line. Metal rope loves to kink and do the “gift-wrapping ribbon twirl” (like when you run a pair of scissors on a ribbon to get it to curl up). Synthetic line, due to its malleable nature, can get caught in roller fairleads that are too loose in clearance for a squeezing rope under 9,000 pounds or more of load.
Off-line pulls should be avoided, but let’s be realistic, if you have no trees and just one rock for an anchor, and it’s a bit too far to the side, you will use it anyway. Just think it over, and over-build your rig to compensate. The winch manufacture is silently screaming, so remember you are on your own and have signed your mental waiver.
Sub–rigs
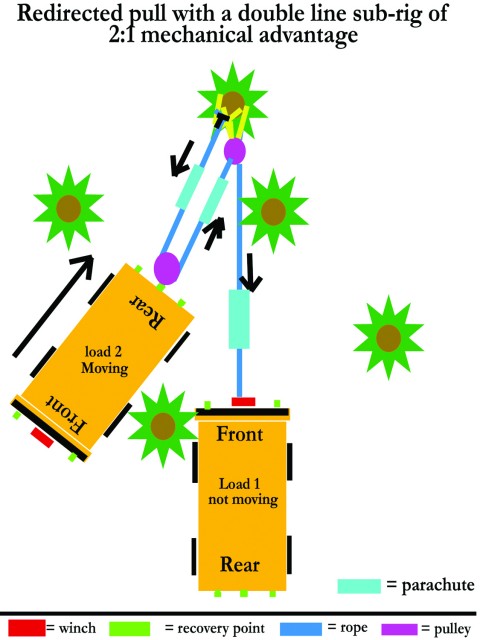
Imagine you have a 95-foot single-line pull up a rocky hill. Along this 95 feet are two places where you need to maneuver around holes and rocks, resulting in a zig-zag route to the top. However, steering while winching, except to make very minor corrections, is difficult and can be dangerous. You don’t want to set up separate winching sections along this path; you want to set up one. This one is the main rig, from the winch to the anchor 95 feet away.
The solution is to use sub-rigs: a pulley attached to an anchor partway up the pull to redirect only a portion of the pull, to get you past an object. Once you’ve cleared the object you stop, slacken the rig, remove the sub-rig, and continue, either on the main rig or another sub-rig. Any time you set up a sub-rig, keep in mind the extra stress on the sub-rig’s anchor, per our discussion of the physics of pulleys.
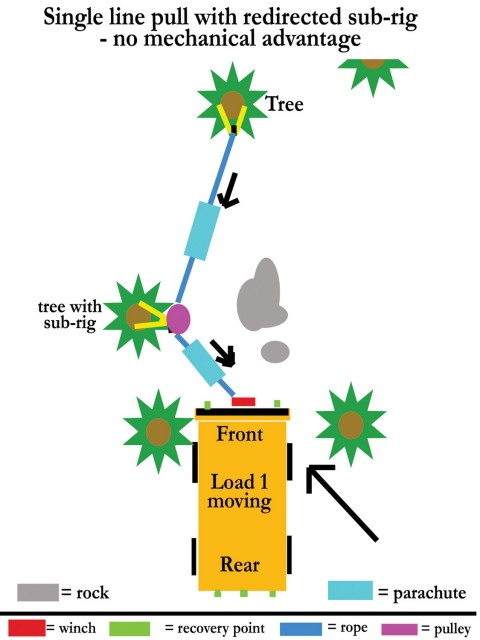
Re-directed pull
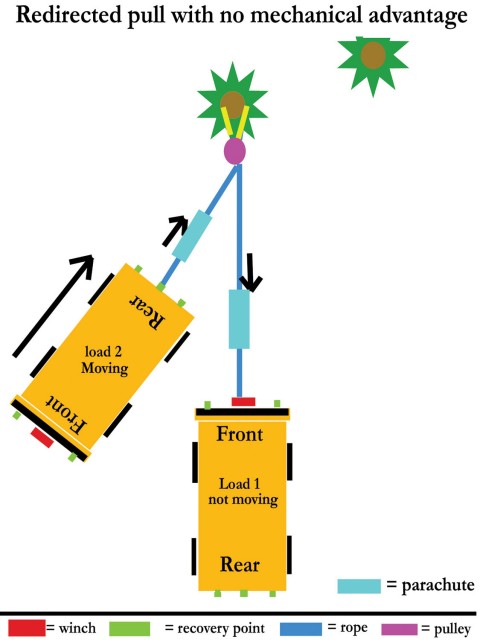
As we’ve already determined, a re-directed pull does not produce any mechanical advantage, and in fact usually results in additional strain on the anchor for the pulley. Nevertheless, re-directed pulls are useful to get more line off the spool, or to set up a straight pull from the winch when it would otherwise be impossible. Just remember the forces acting on your pulley rig.
Picture two vehicles on a hill; the forward one, vehicle one, is stuck. The rear one, vehicle two, will be the recovery vehicle and, runs its winch rope forward past vehicle one to an anchor and back down to the bumper of vehicle one. Vehicle one chocks its tires or uses a tree saver on its rear bumper to an anchor to stop itself from getting pulled up hill. In this case it’s best to have two drivers, and one spotter. The spotter is stationed to see both drivers, the winch spool, and the entire rig if possible. The spotter uses winching hand signals to communicate to driver two, and steering and movement signals to driver one. All normal other winching steps and considerations do not change—parachutes, tension, sub-rigs, etc. If necessary a sub-rig can be added to keep the winch rope clear of vehicle one.
The vital thing to remember here is that, if vehicle one is producing, say, 5,000 pounds of total resistance, the strain on the winch of vehicle two is 5,000 pounds plus some for the resistance in the pulley rig, but, much more importantly, the strain on the re-directing pulley is roughly 10,000 pounds. Be absolutely sure your tree saver, D-shackle, and pulley are rated for double that load.
Rope Care
Finally, here are a few tips on winch rope care:
Winch lines, unless you live in desert areas and have a rope cover, are constantly exposed to the elements. Metal and synthetic also keep humidity close to the winch spool. I have found linseed oil works well to keep rust off metal rope and the spool. Periodic power washing will help keep ropes in better shape. Dirt in rope leads to increased friction, which in turn leads to chafe or heat build up.
Kinks in metal line can be stretched out, but remember that you will get the “tin can” effect if you do not pay attention. When metal rope develops a kink, that spot is forever more susceptible to kinking. Kinking and straightening over and over will weaken the metal, leading to failure.
Burrs are either kinks that have partially broken, or cuts to a rope’s strands. On metal they spell trouble for your body. They will catch your glove and suck the glove into the winch if you are too close, and at the very least they will cut you. At OEX we never use gloves that have snug wrists—the glove needs to come off before your hand is harmed. Remember to never let the rope slide through your hands, but instead feed it in/out hand over hand. This gives you more time to dislodge your glove and/or hand and glove.
How many burrs are too many, resulting in a dangerous rope? Well, any burr means a weak section, so ideally you should replace it. However, one or two broken strands in a wire rope is not critical. At least you will want to smooth down the strands so you do not get hurt. Although fresh galvanized rope burrs are more sanitary than old rusty ones, they burn and sting a lot more.
Synthetic line does not like UV exposure or high heat. If the color is fading or you see actual melting, get a new line. At OEX we replace all our ropes, whether they need it or not, every two years. However, we are using them anywhere from three to seven days a week on 13 vehicles.
Don’t confine your preventive maintenance to the rope. At OEX we were training a team connected to the State Department, who were using rapid-response 4×4 units. These vehicles were not light. We had a redirected pull set up. Everyone was where he should have been, and the exercise was going well when suddenly the pulley exploded, sending some part of itself shooting through the trees. That part flew for what seemed 15 seconds, but was most likely more like two or three. After our shock we stopped everything and tried to figure out what had happened. Where the pulley had been were all the parts of the pulley in a neat pile, with the strap still attached. Two parts were missing: the center sleeve of the pulley and the C-ring that held it on. Somehow the center had come out under force and flew off, leaving everything behind—a bit like pulling a table cloth from under some glasses. The lesson is, make sure your pulley and its C-rings, or cotter pins, are all there and working.
Go do it
In closing, I hope that the description here helps you understand some of the uses and limits of the winch. Get out there and practice before you really need your winch, and stop and think before you do any winching. Clearly I am a firm believer in getting training, and I strongly suggest you contact a reputable trainer to put the lessons here to on-the-ground use.