
Why fit this heavy bumper?
- Animal Strike: The number one reason to buy a bull bar is to protect the radiator and engine vitals from an animal strike. There is a much greater likelihood of hitting a donkey or deer while on an expedition, than to hit another vehicle. An animal impact can rupture the radiator, damage the fan and break intake components, leaving you stranded.
- Vehicle Recovery and Road Repair:
Purchased as a winch bull bar, the ARB can allow fitment of an electric or hydraulic powered winch. Most often, winches are purchased for the rare event when you will need to recover your vehicle from being stuck. In reality (considering expedition travel and “rock crawling” are quite different), the winch will be used ten times more often for road repair. Clearing felled trees, moving rocks in the road, pulling down washed-out embankments with a land anchor, etc.[EDITOR’S NOTE: We’re sorry, this image has been removed.]
Photo: Brian Dearmon
- Trail Protection: Rock impacts, crossing gullies, trees and deep ruts all present the chance of damage to the vehicle’s front end. A heavy duty, full length bumper is designed to take light trail impacts and also help ramp the front end over obstacles, etc.
In technical 4wd competition, I have found the ARB bumper to also provide “endo” protection.[EDITOR’S NOTE: We’re sorry, this image has been removed.]
Expeditions West’s Scott Brady winning the Cliffhanger winch competition during the Outback Challenge. Photo: Option 4×4, France
- Accident Protection: Driving in crowded cities, remote mountain roads and tight traffic can all be prime situations for an accident. Having a stout bumper will help prevent accidents to start with, as locals will give you a slightly wider berth. If a light impact does occur, the chances of any damage are nil.
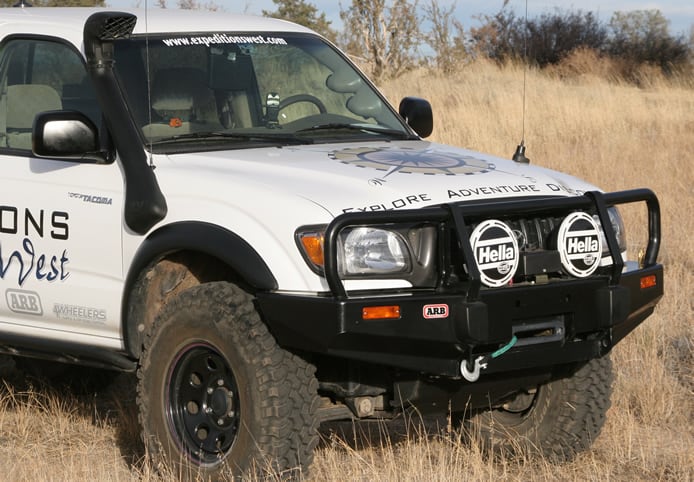
This advantage does require some responsibility though. Drive slow and watch for pedestrians. - Light and Antennae Mounting: The ARB bumper makes for a great light mount, with integrated holes and tabs. Most models mount the lights inside the main bars, protecting them from damage. It is also common to mount CB or VHF/UHF radio antennae to the upper tab, though the ground plane is not ideal.
The ARB bull bar is designed to catch and deflect the animal’s torso, sending the mass of the strike off to the sides or under the chassis.
[EDITOR’S NOTE: We’re sorry, this image has been removed.]
Installation
The ARB bumper is delivered with excellent instructions, high quality installation drawings and a detailed part list. The instructions supplied here are more of a supplement to their process than a replacement.
The ARB comes tightly packed to protect the finish during its journey from AU to the US. Cool to think that at least the bumper has already been to the outback…
[EDITOR’S NOTE: We’re sorry, this image has been removed.]
[EDITOR’S NOTE: We’re sorry, this image has been removed.]
The process starts with the removal of the stock bumper. Access to the first nuts to remove is just in front of the tires, behind the fender liner.
[EDITOR’S NOTE: We’re sorry, this image has been removed.]
Remove the skid plate, as you would for an oil change. The front skid plate cross support is replaced completely.
[EDITOR’S NOTE: We’re sorry, this image has been removed.]
Remove the recovery and tie-down hooks on both frame rails.
[EDITOR’S NOTE: We’re sorry, this image has been removed.]
Remove the bolts holding the bumper frame to the side horn mounts.
[EDITOR’S NOTE: We’re sorry, this image has been removed.]
A plastic tap runs from the lower bumper skirt to the frame. It is easy to remove by using a thin driver to pop out the center retainer. These are on both sides.
[EDITOR’S NOTE: We’re sorry, this image has been removed.]
Remove the wiring connector from the front indicator lights. Retain wiring.
The front bumper will now slide off the support frame.
[EDITOR’S NOTE: We’re sorry, this image has been removed.]
[EDITOR’S NOTE: We’re sorry, this image has been removed.]
Start disassembling the steel bumper cross member by unbolting it from the crush cans.
[EDITOR’S NOTE: We’re sorry, this image has been removed.]
Now the crush can bolts are accessible, and easily removed.
[EDITOR’S NOTE: We’re sorry, this image has been removed.]
[EDITOR’S NOTE: We’re sorry, this image has been removed.]
Now comes the fun stuff: installing the bull bar. New crush blocks are installed, all with the skid plate cross support using supplied hardware.
[EDITOR’S NOTE: We’re sorry, this image has been removed.]
[EDITOR’S NOTE: We’re sorry, this image has been removed.]
The supplied bumper mounts allow for a strong connection to the frame and a crush zone for proper airbag deployment. It bolts to the frame at the recovery points, the new crush blocks and through a new vertical hole drilled in the horn.
[EDITOR’S NOTE: We’re sorry, this image has been removed.]
[EDITOR’S NOTE: We’re sorry, this image has been removed.]
[EDITOR’S NOTE: We’re sorry, this image has been removed.]
[EDITOR’S NOTE: We’re sorry, this image has been removed.]
[EDITOR’S NOTE: We’re sorry, this image has been removed.]
With the bumper mounts installed, it is time to prepare the bull bar for mounting. This starts with the winch. The typical WARN requires the handle to be clocked from the 12:00 position to the 5:00 position by removing all of the alien head bolts on the gearbox cover and then lifting the cover 1/8″ and rotating to the new position. Use caution during the indexing.
[EDITOR’S NOTE: We’re sorry, this image has been removed.]
[EDITOR’S NOTE: We’re sorry, this image has been removed.]
Next, install the controller bracket and then the controller.
[EDITOR’S NOTE: We’re sorry, this image has been removed.]
[EDITOR’S NOTE: We’re sorry, this image has been removed.]
Then, install the bumperettes, which aid in very low speed impacts and to cover the seam weld.
[EDITOR’S NOTE: We’re sorry, this image has been removed.]
Below: Installation of the indicator lights.
[EDITOR’S NOTE: We’re sorry, this image has been removed.]
[EDITOR’S NOTE: We’re sorry, this image has been removed.]
[EDITOR’S NOTE: We’re sorry, this image has been removed.]
[EDITOR’S NOTE: We’re sorry, this image has been removed.]
[EDITOR’S NOTE: We’re sorry, this image has been removed.]
[EDITOR’S NOTE: We’re sorry, this image has been removed.]
I elected to paint the stock grill, as chrome just doesn’t work for me. I used a hammered finish spray paint.
[EDITOR’S NOTE: We’re sorry, this image has been removed.]
[EDITOR’S NOTE: We’re sorry, this image has been removed.]
Take the assembled bumper and lift it onto the mounts. It will weigh from 80-160+ depending on the winch, cable and fairlead chosen. I ultimately changed mine to a Winchline synthetic cable and delrin roller aluminum fairlead to save nearly 30 lbs. from the front end.
There are three bolts per side that secure the bumper. Fortunately, the holes are slotted to allow for some alignment and positioning. This is also the most challenging part of the install, and it helps to have an extra set of hands.
[EDITOR’S NOTE: We’re sorry, this image has been removed.]
Done!
[EDITOR’S NOTE: We’re sorry, this image has been removed.]
Impressions
I am continually impressed with the quality of the ARB products. It is always refreshing to install and use a product designed specifically for your requirements. I recommend installing a high quality coil-over or heavy OME springs to accommodate the weight of the bumper/winch. I also needed to bend the wheel-well side of the bumper metal in slightly to accommodate the large diameter BFGs I run 255/85 R16.
Vendor
- ARB 4×4 Accessories
720 SW 34th Street
Renton, WA 98057
Phone: (425) 264-1391
Toll Free: (866) 293-9078
Fax: (425) 264-1392
Cost
- Retail price of $1,057.11
Part number ARB 3243020
*Pricing subject to change, contact vendor
Weight
- 78 lbs. without winch or lights
Difficulty (Easy, Moderate, Difficult)
- Moderate
Installation Time
- About 4 to 5 hours
Specialty Tools Required
- None
Vehicle
- Expeditions West 2004 Toyota Tacoma Double Cab TRD
Expeditions West Product Rating
Quality
[EDITOR’S NOTE: We’re sorry, this image has been removed.]
Durability
[EDITOR’S NOTE: We’re sorry, this image has been removed.]
Reliability
[EDITOR’S NOTE: We’re sorry, this image has been removed.]
Capability
Increased weight, can be too large for extreme terrain
[EDITOR’S NOTE: We’re sorry, this image has been removed.]
Value
[EDITOR’S NOTE: We’re sorry, this image has been removed.]
Expedition Rating
[EDITOR’S NOTE: We’re sorry, this image has been removed.]
Overall Rating
[EDITOR’S NOTE: We’re sorry, this image has been removed.]