

There are towns in the world that shine as frontiers for overland travel: Moab, Ulaanbaatar, Maun, Arusha, Perth. There are other examples, but they all have something in common: superb 4WD vehicles outfitted for true function. Walk down the streets and you see the the different makes—Toyota, Land Rover, UAZ, Jeep, Mercedes, many you didn’t know existed—and the local nuances of preparation: tire choice, roof racks or no, bull bars or no. Winches? Sand mats? All this you compare to your vision of the ideal overland vehicle.
At least, when I hit a town like this, it’s what I do. And the one thing in my mind that always, always elevates one vehicle above another is a Hi-Lift jack. Where is it mounted? Is it well-used and well-oiled and clean? When I need to outsource in-country vehicles for an expedition, film production, or to set up a local operator for one of my company’s trips, I look very closely at the kit they have, and if there is no Hi-lift, they are put on the shaky end of the list.
So why so much emphasis on a jack?
Simple: The Hi-Lift does everything it’s supposed to do, and more. It is reliable and bulletproof. It is basic—no computer needed to fix it. It is economical. It is indispensable. Along with learning how to drive well, carrying a first aid kit, wearing the correct clothing, and maintaining effective communications, the Hi-Lift jack is a must-have for any serious overlander. It will winch you out, lift you up, turn you over, clamp things together, or pull things apart. It’s truly a jack of all trades—but only when used correctly and safely.
When training drivers, I always start each subject’s lecture with a mantra, a rule or set of rules I demand that each participant know instinctively. For the Hi-Lift class, the following list is vital knowledge.
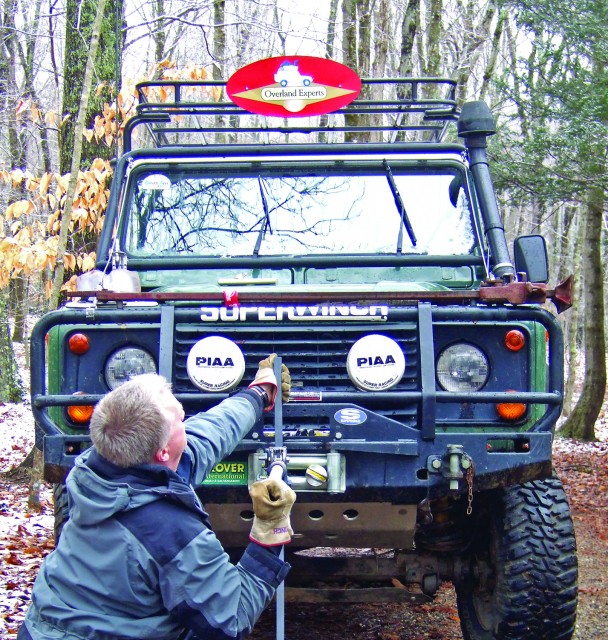
- Never hit the trail without a Hi-Lift and its kit. Design an easily accessible mounting location on your vehicle, as low as possible to optimize the center of gravity, but away from thrown mud and dirt.
- Never use any recovery equipment without first defining the situation and formulating a plan.
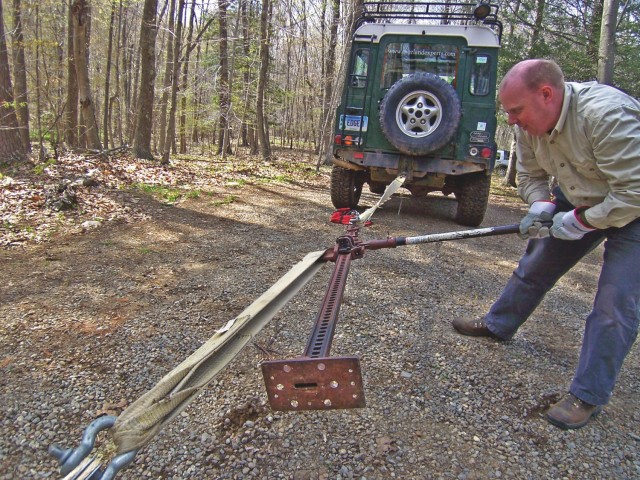
- Always remember: Safety first. (see Fig 11)
- Always make sure the Hi-Lift is well oiled and clean. A dirty jack is a dangerous jack. The best way to keep it clean is to carry it in one of the soft cases available from several suppliers.
- The only safe jack is one with the handle touching the bar and the reverse latch in the up position.
- Always have one hand on the jack; never leave it unattended when under load. The only exception to this is if you are alone.
- Never go in the “No-Go Zone.”
- Always make sure the vehicle is stabilized.
Let’s start with a simple Hi-Lift operation, and suppose you are faced with a vehicle that is high-centered on a tree stump on its transmission or skid plate.
We teach students to choose the recovery method based on safety first. We assume you have the following recovery items: kinetic rope, winch, and Hi-lift jack. Obviously not all vehicles have every one, but you should always have the Hi-Lift. Assuming you have all three, we advise choosing the kinetic rope first, the winch second, and the Hi-lift third. Again this is based on safety: The kinetic rope is quick to deploy, very strong, the operators are inside the vehicle fairly well protected, and the energy of recovery can be elevated incrementally, from gentle to more aggressive. The winch is second choice, since the operator, once the setup is fully rigged and checked, can position him or herself out of harm’s way. Third is the Hi-Lift. Why use it at all, then? Simple: It does what the others do and many things they cannot. It is third because the operator is in there on top of the action. If something goes wrong he or she is just too close to be protected from injury. That said, we teach the use of the Hi-Lift to all our students, and we do it first, before the others, since it most clearly teaches the physics involved in vehicle recovery.
So: You have defined the situation as a vehicle high-centered on a stump. Time to formulate a plan. You have determined that you cannot use a kinetic rope, because the vehicle is firmly grounded on the obstruction and to simply drag the vehicle off could cause damage to the undercarriage. Same reasoning applies to the winch: You don’t want to simply drag the vehicle, and while it is possible to lift a vehicle with a winch, it’s not as easy as it looked in The Gods Must be Crazy.
You have therefore determined that you need to lift the vehicle up and clear the tranny housing enough to place rocks or sand ladders or something under your wheels, to then drive on to get over and past the stump. So how does the Hi-Lift work and how do we work it?
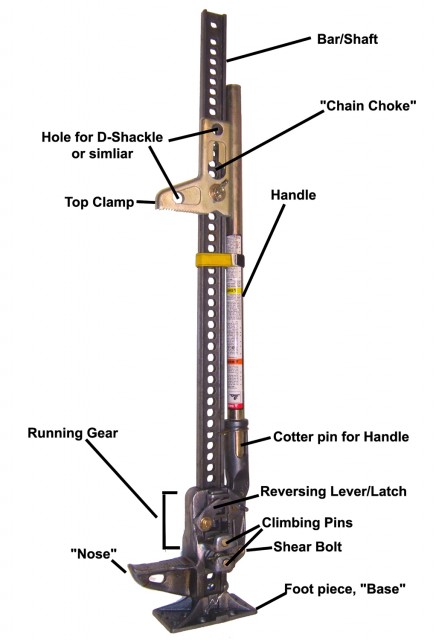
The Hi-Lift jack operates by walking two alternating pins (climbing pins) up the bar’s ladder of holes. One pin holds the load as the other is released and moved to the next hole above when raising a load, or below when lowering a load. The load is lifted by the leverage of the handle and the strength and/or weight of the operator. A shear pin in the mechanism gives way before any critical part of the jack breaks, but this simply freezes the jack in place rather than suddenly dropping the nose and load.
The method I describe may differ from that recommended by the Hi-Lift Jack Company, or other instructors. I approach everything on a scientific basis: method and repeatability. In my experience the following techniques work best and are the safest. However, nothing is foolproof, and the world of vehicle field recovery is not a safe one. Sign your own mental waiver, make a plan, and take things slowly. We, Hi-Lift, and this magazine take no responsibility for your actions.
First, stabilize the vehicle. Use wheel chocks or, if you need to improvise, rocks, pelican cases, etc., to ensure the vehicle cannot roll forward or backward, or walk to the side.
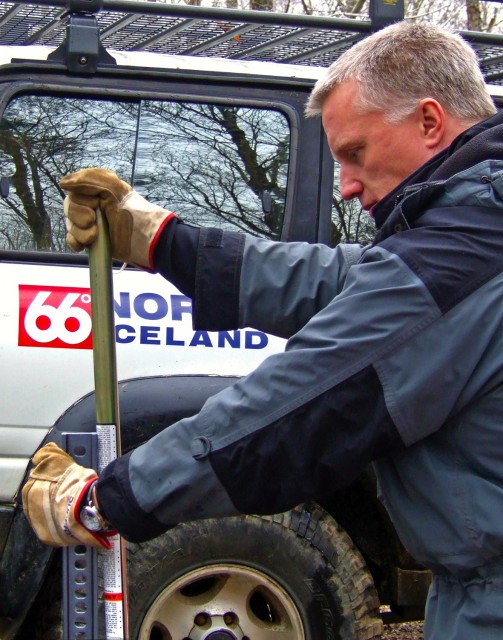
The Jack should have the reversing lever in the up position and the handle parallel with the bar. This position, handle to bar and lever up, is the jack’s only safe mode. The jack should be stored this way and no other. If the jack is under load, as long as you have a hand on the jack and are attending it, this is as safe as it can get. Never leave the jack unattended no matter how it is set up. Use the heel of your gloved hand (you are wearing gloves, aren’t you?) to lift or lower the reversing lever. Should your jack be dirty and the lever takes a good shove to move and closes very fast, you will not have your finger tips inside the gap. When the jack runner and nose assembly is low on the base, you can also use the toe of your boot to lift or strike down the lever.

Set the base of the jack on a level, firmsurface, or make a level, firm surface for it. Set the base on a larger base if needed; this can be the one available from Hi-Lift, or one you make yourself (Two squares of 3/4inch marine plywood glued together to 1 1/2-inch thickness, with two holes for a loop of rope, works very well). If the surface is slippery rock or thick ice, the Jack-all Jack Mate works well. The metal teeth grip rock and ice with surprising strength. Ice can also be carved to accept the jack’s base. Please do not do this to rock—leave no trace.
Position the bar with the final angle of lift in mind. Realize that as you lift the vehicle it will be going up in an arc. The angle of the jack’s bar at the start will not be the same as at the end. In addition, take into account the ground angle the vehicle is sitting on, and allow for the lean you will induce. This takes some practice, so do just that, practice.
Grasp the handle with your free hand and raise the jack’s nose into position under the vehicle’s lifting point. Use a fast pull to get the nose and runner to slide. This will only be possible if the jack is not under load, and the reverse lever is in the up position. Choose the lifting point carefully with regards to the angle of the jack’s base, the angle of the jack, and the angle of the vehicle. Be familiar with your vehicle and make sure your jacking point is up to the stress. Suitable spots are rock sliders, or bumpers with built-in receivers or dedicated Hi-Lift points. Hi-Lift makes a few good attachments for lifting vehicles that don’t have good jack points.
Once the jack is under the jack point, pump the handle a couple of strokes to position the nose snugly, but do not lift any load yet. You may have to bend down to ensure the nose is positioned correctly; this is fine as long as you position yourself correctly when starting the true lift. If you have a companion, hold the jack in the safety position while your companion checks for proper placement.
Check the situation once more before you start to pump the handle in earnest. Think ahead to the worst-case scenario: Where will the jack shoot off to if it or the vehicle slips? Where will you most likely slip and fall as the load gets difficult? Where will the jack pivot should it spin? I use an analogy for some people: If you play chess or checkers, you begin to envision future lines of force or attack from your opponent’s men, and instinctively avoid them. As your experience increases you see these lines faster and with less thought. Recovery is the same, whether using a Hi-Lift, a winch, or a kinetic rope. Visualize these lines of force, and do not allow people in or near them, and do your best to not be in them yourself. You must account for them and position yourself to minimize their effects on your body. I hate to say it, and please remember the mental waiver mentioned earlier, but choose which part of your body would be okay to get hurt and which would not. Choose wisely.
Place your foot against the base and bar interface, and lock your knee. If the jack should spring into your body, your locked knee will help push you with it so the jack does not come in contact with you, or at least does so with less force.
Grasp the top of the bar with your fingers squeezing only the three sides that the handle can’t contact. Do not wrap your thumb around the bar. If your hand should slip off the handle, the handle will spring up extreme force and smack the bar, destroying anything that happens to be in between. This is the area I call the No-Go Zone. No portion of your body should ever be within that zone. Also be aware of the danger zone between the vehicle’s body and the bar, and make sure there is always sufficient gap for your hand. With a correct grip on the bar, lock your elbow, for the same reasons you locked you knee.
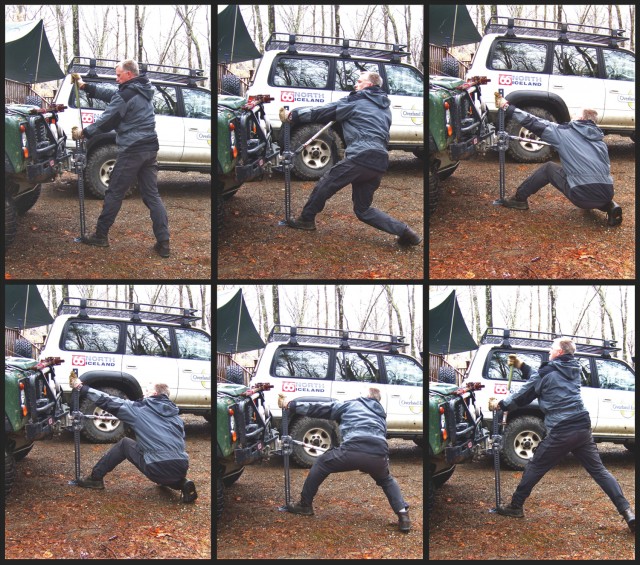
To correctly pump the jack, place your hand far out on the handle to increase leverage. Pull down on the handle instead of pushing down. This is very important; if you get into the habit of pushing down the handle, when the load gets heavy you will be tempted to position your body weight on top of the handle. Logically, if your hand slips off that same handle it will come in contact with your head or body on its speedy return. Please do not take this lightly. As you pull down on the handle keep your head and chest away from the No-Go Zone. The pumping is done in front of your chest and head, not under them.
At some point even the strongest person’s arm muscles alone will not be able to pump anymore. Most people then put their body on top of the handle and push down with their weight; again, this is bad. Instead, pull down the handle to your shoulder and make a unit with your bent arm and shoulder and body (the other hand and arm is still locked at the elbow holding the bar correctly), and then drop your body into a squat. This will pull the handle down and keep you out of the No-Go Zone. You are also hanging on to the handle from a low position and not from up high; thus you are more stable and less likely to slip onto the jack and release the handle. No matter what anyone says, you will not get more leverage from above the handle; gravity and mass are the same above or below the handle. Just remember, would you rather be behind and under the handle when it slips or on top of it?
Once you are in the squat position you will hear the climbing pin click into position. At this point lift the handle up towards the bar. As you lift you will notice there is now no force needed to move the handle and no tension on it. It is being held by the climbing pin. Listen or look for the other click of the second climbing pin. This now means it is ready for another stroke down. Practice makes perfect, and this sequence will become easy and natural.
There will be times when the jacking point on the vehicle (and thus the jack handle at its lowest position on the stroke) is so close to the ground that the squat and pull technique simply will not work. Just remember that if you have to push down on the handle rather than pulling on it, keep all your body parts except those that are absolutely necessary out of the No-Go Zone.
As the vehicle rises, remember that it will become less and less stable. When you have reached your height goal, you’re ready to build up items under the tire so you can drive off the obstacle. Hold the jack in the safe position while your companions get to work. If you are alone, this is a rather nerve-wracking procedure. To be safe, take a tree saver strap and wrap it around the jack/vehicle interface. Do not tie knots, just wrap the strap and cross it on itself; this will keep the jack from flying too far if it should slip. Remember to keep the handle and bar together and the reverse lever up.
Now remind yourself and others of those lines of force; stay out of them as you pile rocks or shovel dirt under your lifted wheel. If you are just trying to get a log out from under the chassis, or shovel the mud or sand on which you are high centered, do not just crawl under the vehicle and start pulling or shoveling. Lower the vehicle’s wheel(s) down first on to some stable base you have built up. Check the vehicle’s stability by shaking and jumping on it. Then, and only then, start groveling under the vehicle and digging and pulling.
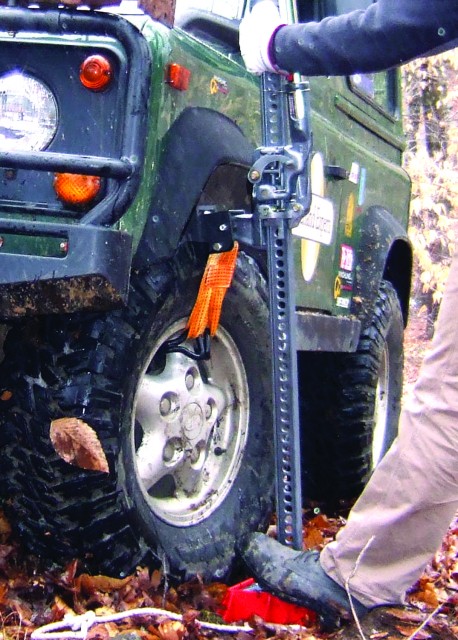
If you’re high-centered on a differential or axle housing, don’t jack up the vehicle by the bumper or frame, since as the vehicle is lifted the axle housing and differential fall way from the vehicle. You will need to lift the vehicle much higher (read less safe) than you need to. Slow down and think, and lift just the wheel nearest the contact point. This can be done a number of ways. Hi-Lift makes an effective and simple attachment for the wheel, but you can also make your own by lacing a tree saver through the spokes of the wheel and out again. Place the two loops over the nose of the jack and lift in this manner. Take care the jack is not pulled into the vehicle’s body work, so position it carefully and, as usual, think ahead. If you have closed steel wheels or some other difficult arrangement, before you set the jack to the chassis, take a link grab chain and loop it around the axle housing to the frame. Take care not to loop around break lines, electric lines, or air locker lines. Make this loop tight as can be (you can use strong ratchets, straps, or rope as well, but know your knots). Now jack up the vehicle, and the axle housing will come with it.
When you’re ready to lower the vehicle, hold the jack with one hand holding the bar and handle together, and strike the reverse lever into the down position using the heel of your hand. You can use you boot as well if the nose assembly is low enough. Keep one hand on the bar with your elbow locked. Keep one leg on the base with the knee locked, and position your body out of the No-Go Zone. Now grasp the handle with your free hand and lower it. When lowering a Hi-Lift the force will not come into action until you have lowered the handle to a horizontal position and pushed it a bit further until you see or hear the climbing pin click. Remember, do not have your body above the handle. After the click raise the handle. As the handle arcs up the force will increase and the handle will be pulling your arm up to the bar. It gets especially strong half way to the bar. This force is significant and if the ground is slippery or you do not weigh much it can move you a good distance so remember to be in the correct position.
Never let go of the handle, and if your hand should slip off, clear away from the jack. Normally the handle just smacks the bar and all is well as long as your hand was in the correct position. However, occasionally what can occur is something I like to call the “Newton Effect.” The handle will spring up to the bar with a huge force and the impact will cause it to bounce back down (Newton’s third law of motion—equal and opposite reaction) to a horizontal position, disengaging the climbing pin and starting the whole cycle over again. The jack will lower itself at a tremendous pace and drop the vehicle. The jack also has been known to shoot out while still Newtoning, flying off in an unpredictable trajectory. Don’t let this scare you; if it happens just clear out. The other people with you should have already been out of harm’s way if you made a good plan and followed it.
Your best situation is to keep a good grip and body angle on the handle, and slowly lower the vehicle and remove the jack. Once the weight is off the jack’s nose the assembly will drop free. If all this is done correctly nothing spectacular should occur. I have illustrated the Newton Effect while training drivers, but it has never happened in a real situation—I guess this is because I illustrate it!
Next, reset the reverse lever to the lift, or up, position and set the jack to the side. Carefully drive off your bridge or out of the high center. Don’t spin your wheels or you’ll be back in the same situation in a millisecond. Once you are out and safe, return to the recovery spot and gather all your equipment. If you made a mess, fix it before you go. Put back rocks, fill holes, etc. This is an absolute must unless you are operating in an emergency situation. Feel free to leave the rocks in position, however, if other vehicles are coming behind you. After all are through, fix your mess.
Winching
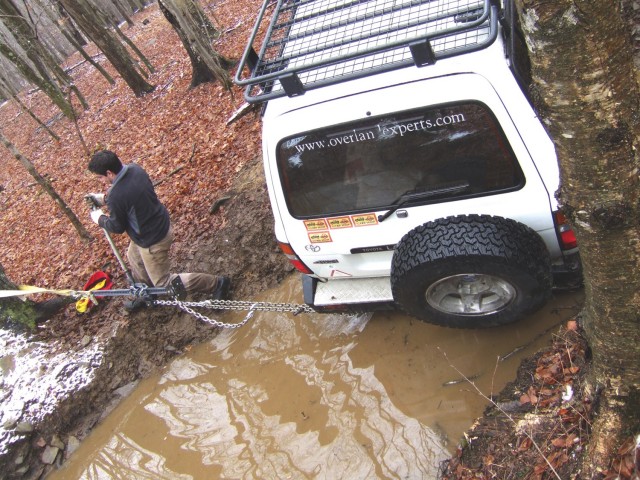
One of the Hi-Lift’s most valuable assets is its ability to be used as a hand winch or come-a-long. Many people ask, “Why not just use your vehicle winch?” One answer is that it is difficult to winch yourself backwards if your winch is permanently mounted on the front bumper. If you simply run the winch cable under the vehicle you stand a good chance of damaging both cable and vehicle, and it puts stress on the winch mount at angles it was not designed to withstand. It is possible to pull a vehicle safely backward with a front-mounted winch, but it takes five pulley blocks and two trees or assisting vehicles in just the right position to set up the complicated rigging to accomplish it. Perhaps the most difficult, yet not uncommon, situation arises is when it’s necessary to drag the rear of the vehicle sideways.
So in comes the Hi-Lift. Perhaps you cut a corner too close or leaned too far into a tree or boulder with the rear of your vehicle. Or perhaps you were too crazy with the throttle on a hill and the front walked out to the side just as you failed the hill. Or you were stupid enough to cross ice without checking stability and the front wheels went through. Or , or, or . . . In other words, you have encountered a situation that requires you to pull your vehicle to the side, or backwards. After some practice you will be able to move your vehicle in the direction of choice in about 7-12 minutes. An added benefit is that you’ll burn off about a thousand calories.
At a minimum your Hi-Lift kit should include the following for use as a hand winch:
- Hi-Lift Jack (we prefer the five-foot units for a longer pull without the need to reset as often)
- Shovel
- Three tree saver straps, eight feet long. Do not substitute kinetic recovery (elastic) straps or ropes.
- One 20- to 30-foot length of adjustable chain (type with a hook that grabs a chain link securely)
- A minimum of four D-Shackles rated at 3.5 tons.
Better yet is to also have the following accessories.
- 30 to 50 feet of synthetic winch extension line, (we use the ones from Viking Offroad).
- ½-inch (about 13 mm) or greater straight and smooth metal pin at least 4 inches long. You can use clevis pins for this (the ones without threads) or a trailer hitch retention pin.
Chock the wheel (with whatever is big and tough enough—put it back if you borrowed it from the trail) that you do not want sliding or rolling and use this as the pivot point for your pull. Using the hi-lift this way is tough enough when moving only half your vehicle, so think ahead.
Check your tire pressure. Think about this: If you have 12 or 14 pounds of pressure in your tires, you have a large area of ground contact. This area equates to better grip as we know, or we would not have aired down in the first place. However, if you’re trying to drag your vehicle sideways the last thing you need is more grip. Additionally, dragging an aired-down tire sideways could result in losing the bead, creating a brand new problem.
Prepare the site. This is especially important if the ground is slippery. Once you start pumping the jack with enough force to move a vehicle, you will need all the grip your feet can get. In the winter I literally have someone grip my belt, so if I slip I will not slide into and under the jack and turned into a tangled mess. This is especially true when taking down the jack tension to reset your pull. I have personally been flicked into the air for a few seconds of free fall.
Clear the semi-circular path the tires will follow. Make sure there are no rocks or other obstructions that will make the job tougher than it needs to be. Be smart and remember all the wheels that will be moving, not just the one near the jack winch rig.
Locate suitable rigging points. One must be on the vehicle, one must be a solid anchor: a tree strap around a large tree, another vehicle, a Pull-Pal (another must have), or similar. Ensure that your recovery point will take the stress you are about to dish out to it. If you are not sure about the recovery point on your vehicle, or if it does not have one, do not use a strap to the drive train or suspension or any other part that can be pulled loose or off entirely. Make a yolk by threading a flat tree saver around the frame, or horns of the rear bumper, so that the two loops of the strap come together in the approximate position of your intended pull.
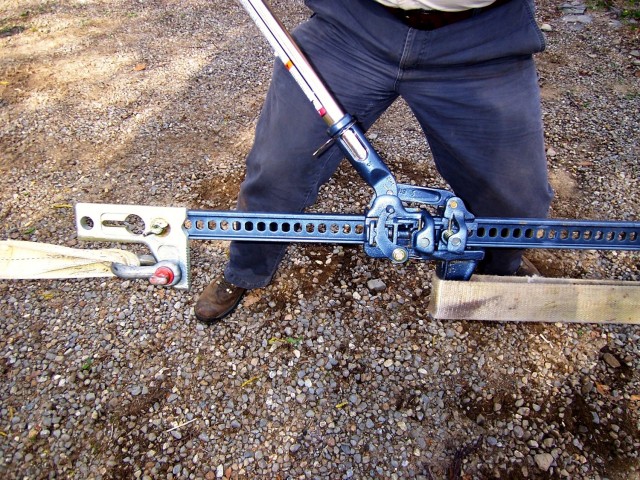
Now it’s time to lay out the links of the winching setup. The jack should start with the nose all the way at the bottom of the shaft, to maximize the length of pull before you need to re-rig. Make sure the jack’s top clamp is bolted parallel to the shaft, rather than at right angles as when used for clamping. The Hi-Lift Extreme has a nice top clamp that works better at keeping the angle of the nose and the top clamp in line as the jacking head approaches the clamp. The Jack Mate also works well for this connection.
This will be dependent on your accessories and situation, but as an example let’s work starting at the rigging point on the rear of the vehicle: D-shackle to a strap, to the Hi-Lift’s nose; then D-shackle through the top clamp of the Hi-Lift, to another D-shackle, to a chain, to a D-shackle, to a strap attached to a recovery point on another vehicle, or wrapped around a tree. You can add or substitute chains, straps, or winch extension line as needed or available.
Loop the strap over the nose of the Hi-Lift and lay the Hi-lift on the ground nose up. (Note: Do not, as has been shown in many videos and articles, put a small D-shackle through the angle support on the bottom face of the nose; this hole is not made for this!).
Attach another D-shackle to the one on the clamp, with the chain run in a loop through it. Run the other end of the chain through another D-shackle, and attach that shackle to the tree strap that runs around your anchor tree, or to the recovery point on the other vehicle.
The hooks on the chain allow you to pre-tension the system. The easiest way to do this is to have someone else hold up the jack in line with the ends of your rigging while you pull as hard as you can on the rigging to hook the chain back to itself, resulting in as little slack as possible. If you get it tight enough the jack will be suspended when your companion releases it, and most of your pumping energy will go toward moving the vehicle rather than taking up slack. (Hi-Lift’s Off Road Kit includes a system that does most of this with less chain, and it has a tension retainer so upon lowering you do not lose slack.)
At times it will be impossible to locate a recovery vehicle or tree in the correct spot for your chain and strap to be adjusted properly. This is when a winch extension line comes in handy. Using a knot called a chain sinnet you can vary almost infinitely the length of the line, to set up a perfectly tensioned rigging system. A chain sinnet is difficult to describe but easy to do once you see it. It involves looping lengths of the line back through itself until you’ve shortened it to the desired length. There are many diagrams of this in knot books, and even a Wikipedia video showing how it’s done. For winching purposes, you need to avoid having the chain sinnet tighten at its final loop; for this reason we use a toggle: a metal pin, a sturdy stick, even a multi-tool, to secure the last loop.
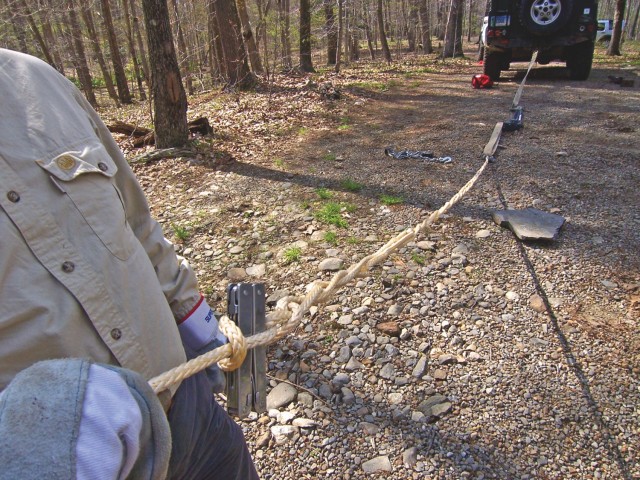
You can vary the winch line/strap/chain rigging to suit your own situation at the time, as the accompanying photos show. If the distance between the stuck vehicle and the anchor is short, only one strap and one chain might be needed.
Now you’re ready to actually winch the vehicle. Once the tension is on, check your full rig for odd twists or other potential sources of trouble. Operate the jack as you would to lift; however, everything is now close to horizontal, and the top of the bar is safely attached to the winch extension line or chain, so you do not have to hold it. Place your feet wide apart and position yourself so you do not have to move your feet at all. The Hi-Lift’s reversing lever is up, because you know that’s the only safe way to have it, and you are not in the No-Go Zone. Pull the handle away from the bar, and you can then twist the entire assembly to a position best suited to your stance. As long as you jack the handle from click to click and no farther the jack itself will not twist out of your hands. If you let the jack’s handle come too close to the bar, the torque on the twist becomes too strong and it will spin in your hand. This means, as with lifting, never stick fingers or other parts of you body in holes or positions that will result in personal injury. You are not a professional on a closed course.
Maintain this pumping action until the jack’s nose nears the top clamp. If you have not moved the vehicle far enough, first chock the tire so you don’t lose the distance for which you have just worked, then engage the reversing handle. Lower the jack until you have slack, then slide the lifting head to the base and take up the slack with either the grab chain or the chain sinnet on the winch line. Repeat as needed.
Remember
- Operate the jack as if you were lifting, minding all safety and body position cautions.
- Use D-shackles and their pins correctly.
- Do not tie tightening knots in your winch line; these create heat and heat will compromise synthetic lines. The toggle works best and never gets stuck (do not use a bolt or metal pin with threads, since the threads will chew into your synthetic winch line—make sure the toggle is smooth).
- Watch your footing, and have someone hold your belt or a strap around you. Laugh if you want, but I weigh 220 pounds and I have been in the air and sliding under jacks and vehicles due to the forces applied here.
- Tree savers can be used full-length or doubled to help adjust the length of your rigging.
- Most techniques used for winching with a power winch can be used here. However, take care in using double or triple pulley blocks to increase power; it will work, but the forces are huge and when something fails you are too close to escape.
When using the HI-Lift as a come-a-long or winch it is very common to encounter too much pressure to actually be able to pump the handle. At this point, define your situation again and ensure you are not hung up on anything. Do not start shoveling and sticking your head anywhere until the jack has been lowered/de-powered. Then shovel a path or make a ramp. If this does not help, raise the angle of the pull by raising your anchor point (this is called cable rigging in the logging industry). This can be higher up a tree trunk. Wrap the tree saver around itself like a clove hitch; the harder you pull the harder it holds, and it will not usually slide down the tree. (Be careful with conifers and soft-barked trees, as the bark can be pulled down with the strap.) This angle will lift and pull at the same time. We often use this with medium and light loads for recovery with power winches.
Clamping
The Hi-Lift can be used as an effective clamp. By turning the top clamp teeth down and perpendicular to the shaft, the nose and the clamp can be drawn together, forming a very strong vise. You might think this is a rarely used feature, but it can come in handy when welding, setting bushings, bending back body panels, temporarily reattaching vehicle parts, etc. Follow all safe-use rules (No-Go Zone, hand position, etc.) and remember this jack can create huge forces, so do not clamp too hard too soon.
One common technique we show our students is to use the clamping mode with a tree saver to tension a tire on its rim enough to reset the bead. Loop a strap around your tire parallel to the tread. Make a chain sinnet with the strap or winch extension, and attach to the nose and top clamp of the jack. Pump the handle until the inner tread face assumes a concave shape, squeezing out the bead to the rim’s edge. With the tension on, supply air to the tire with a tank, compressor, etc. Do not use this technique in conjunction with the lighter fluid/explosion bead-setting trick. (Refer to the Winter 2007 issue of Overland Journal for tips on how to break tire beads with a Hi-Lift.)
These are just a few of the uses to which you can put your Hi-Lift—not to mention some of the uses the components of the Hi-Lift have been put to on their own, which have included everything from repairing broken tie rods to splinting broken legs. Remember: Keep it handy, keep it clean—and keep yourself safe.