
Part 2 – Creature Comforts
“You can go your own way”– Fleetwood Mac
What are the rules of building an expedition vehicle? I say there aren’t any. However, it appears that a lot of people have figured out some really incredible systems and are worth mimicking. Here we have these three things:
- Eezi-Awn 1200 roof tent
- On-board fresh water system and shower
- Rear bumper and tire carrier combo
Each of these items I’ve seen in use on other vehicles, and decided that they’d be a perfect fit on this Nissan Frontier project vehicle.
Shelter from the Wind: Incorporating the Roof Top Tent
Eezi-Awn: Report from the Field On our first night in the tent, Brooke, my wife, told me, “This tent is worth every penny. It’s comfy, it’s easy…I love it. But you’re going to get us a fridge next, right?” We once drove the truck to a dinner party where several friends wanted to know what “that thing” was on our truck. Explaining that it was a tent, many didn’t quite understand. So, to prove how nice the tent was, we flipped it open on the driveway of our friend’s house before a non-camping audience. For good effect, I had Brooke undo the cover and fold it open without my help. Picture it: men in suits and women in classy gowns climbing up the ladder to test it out. The ease and obvious comfort of the tent caused one woman to say, “This is something even I could camp in.” Ratings:
Notes: Expedition use is what the Eezi-Awn is built for; as such you can expect solid craftsmanship and attention to durabilty in the design and build. Since it’s heavy and large, installing the tent can be rather awakward to get it positioned. Otherwise, installing an Eezi-Awn is straightforward thanks to the clever, adjustable mounting tracks. |
So there we were at the first camp during a trip on El Camino del Diablo. I unloaded a few storage boxes from the bed of the truck, found the right one, dug around for a minute and – ah ha! – found it. Under the stove, lantern and a reserve tarp was my nice backpacking tent that weighs a mere five-pounds-eleven-ounces. It’s the kind that you can use just the rain fly and poles as an ultra-lightweight shelter if you wanted. Off I went to find a flat spot on the ground.
Yet 25 yards away there was Pasquale, grinning and using some kind of crank on his roof tent, opening his Maggiolina tent with a simple motion of his wrist.
And so I think, “Okay, so he just parked and used a hand crank to open up a tent. So it has a thick mattress. So it was open in about 45 seconds. So he didn’t swing a hammer to drive a single stake. So he can sit up inside the thing. So it’s not on the ground…”
During my hammering session, I bent two stakes. Then I noticed a couple other roof tents open up in one motion: flip. And I was crawling on the ground, getting dirty, looking for a soft spot that wouldn’t bend my tent stakes.
Maybe you get the idea: the notion of going my own way without a comfy roof tent sunk in as foolish, if not unpopular. Considering that we spend a good number of nights camping, I knew we’d get great use out of a roof top tent. And it was an easy sell for my wife.
After a little research, I decided that the Eezi-Awn 1200 was the best fit for the Nissan Frontier and our needs. Folded up, this tent measures 48” x 48”, and flips open in one motion to 48” x 96” with a safari-print mattress inside. The vinyl rain fly remains attached, making the set-up process even faster.
Since there is no local dealer for the Eezi-Awn, I had to do all the research by web and phone. Conceptualizing the mounting system was difficult; so let me show you how it mounts. The base of the tent is ¾” marine grade plywood. What is that? It’s like most other classic-core plywoods: multiple layers (8-12) of wood veneer laminated together. But the difference with marine-grade is in the adhesive that manufacturers use to laminate the layers together, which is water resistant. Regular plywoods don’t use a water resistant glue. Eezi-Awn also coats the marine plywood with an exterior grade polyurethane finish. So, the base should last many years even in harsh environments; especially if we keep an eye on the polyurethane coating and touch it up when it starts to wear off.
That’s the base. Attached to the base are aluminum tracks, which, in short, allow you to attach the tent on a rack, platform, or cross rails of some kind. See if these photos tell you much:
Eezi-Awn Mounting images Click one to see larger version (opens in new window) | |
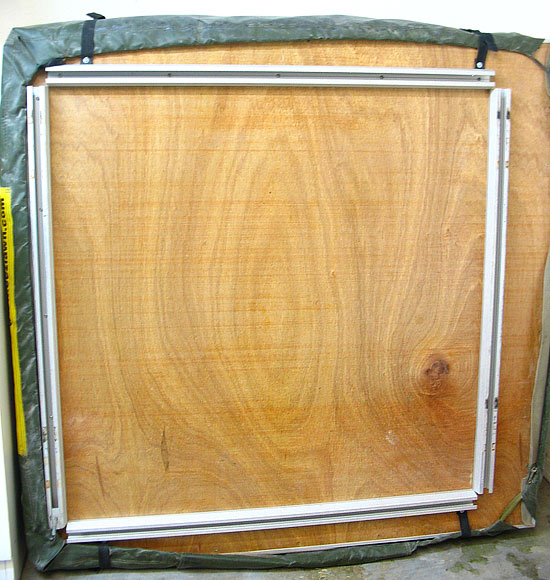 | Bottom of the Eez-Awn 1200 roof tent. The aluminum channels allow a little plate, which holds the bolt, to slide anywhere along that length. This makes it easy to mount the tent to nearly any rack, load bars, or platform. The channels parallel to one another measure 40-1/2″ apart on centers. |
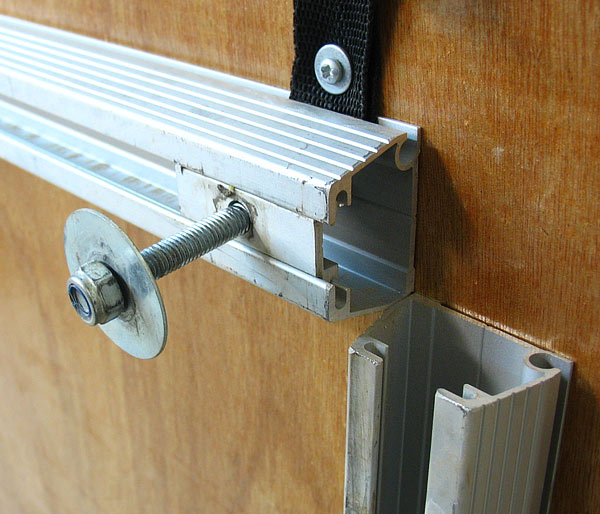 | Close-up of the aluminum track with the sliding plate and bolt. A clever mounting method. Notice that the nuts are nylock. |
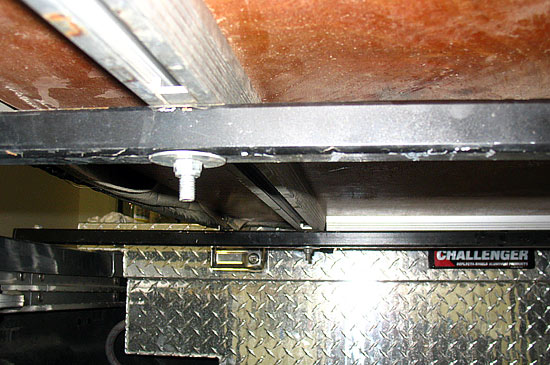 | Shot of the tent mounted on the cross bars. Simple and effective. |
You can see that we have two load bars spanning the bed, which is temporary until a better solution presents itself. The bed of the Frontier Crew Cab is 60”x60”, which is a perfect amount of space. Over-the-bed mounting (instead of on the roof of the cab) is the best choice for these reasons:
- Use of space
- Aerodynamics
- Weight distribution
Since the area directly above the truck bed is “dead space,” we could put the tent there while maintaining the original aerodynamics of the truck, preserving the cargo area, and keeping this additional weight as low as possible. It’s a slick method.
WaterWorld: Installing An Expedition Water System

On-Board water: Report from the field  This thing is f-u-n! Yet, I still have friends who claim that with the roof tent and a shower system I’m no longer camping. They’re right: it’s called expeditioning. After a few months of service, the showers have been nice. At the beach in Mexico, we had a way to wash off the sand before crawling into the tent. Plus, it’s quite amazing how a shower can make you feel after a long, dirty day. Consequences: two of the threaded rods have to poke through the truck bed; added weight; relocation of spare tire necessary; system freezes in extremely low temperatures. Benefits: Happy wife; routinely clean husband; easy to wash dishes; fun to shoot water at people. Ratings:
Notes: The shower head could stand to be more robust. The unit I have is a wall-mount shower for a boat, which is all plastic and rather flimsy. I expected the engineering/installation of the water system to be more involved than it was. Since all the mounting parts had to be designed and created, I couldn’t give this 5 stars. To make the system, I spent almost $300. I consider this money well spent. |
Now what about a way to get clean? During trips into the desert, we inevitably get dusty and sweaty and I’ve seen other people whip out showers of some type to get refreshed; from simple solar-heated, gravity-fed units to 12-volt electric pumps feeding pressurized water into a full shower enclosure. Just because it seemed like a fun project to engineer, I elected to install an electric system with a tank. With our system, we have pressurized water for showering, washing, and cooking. Here are the components:
- 12 gallon poly freshwater tank
- Fill line attached to a fill point on the rear fender
- Shurflo 2.8 gpm 12 volt pump
- High pressure supply hose from the tank to the pump
- Exterior panel-mount boat shower
- Paha Que shower enclosure
Secured under the bed in the spare tire position under the bed (see below for spare tire relocation), the poly tank came from an RV supply company with all the fittings in place: 1-1/4” fill spout, and three threaded fittings for the breather, supply, and drain.
- Installed the tank by “compressing” it against two frame cross members
- Ran high pressure hose for the supply to the tool box
- Installed the Shurflo 12v pump and boat shower in the Deflecta-Shield tool box
- Drilled a hole into the fender for the water fill, used basic clear hose from fill to tank
- Fitted a ¼” hose for the breather and tied the opening high in the fender
Before undertaking the full project, I used a pair of ratchet straps to hold the tank in place with significant pressure. This allowed me to fill the tank, drive around the neighborhood, and evaluate how a full water tank will effect driving and how well the position will work. Since water is 8 lbs per gallon, I was surprised not to feel that additional 96 pounds sloshing around back there on my test drives. Luckily, the tank has a lower profile than our tires, which means a spare tire in the regular position hangs lower than this tank does. So, this arrangement worked perfectly; I removed the straps and bolted the tank in place.
Just to be safe for off-highway use, Scott Brady helped me fabricate a nice skid plate for the tank. Effectively, we cut a 3/16” aluminum plate to size, drilled holes to fit the threaded rods and screwed it on. As luck would have it, the way the tank was fitted under the truck (with steel cross bars under the tank snugging it upward with long threaded rods) the plate was simple to engineer and mount. To refine the plate, Scott hammered a bend into the rear end of it. He also suggested we apply some rubber cushion to where the tank rests against the frame cross members and where the threaded rods might rub against the tank’s sides.
Water System Images Click one to see larger version (opens in new window) | |
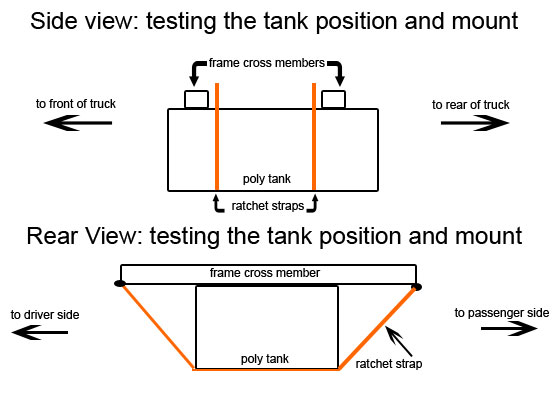 | Image shows how I strapped the tank under the bed of the truck. Very effective method for testing the position of the additional weight. |
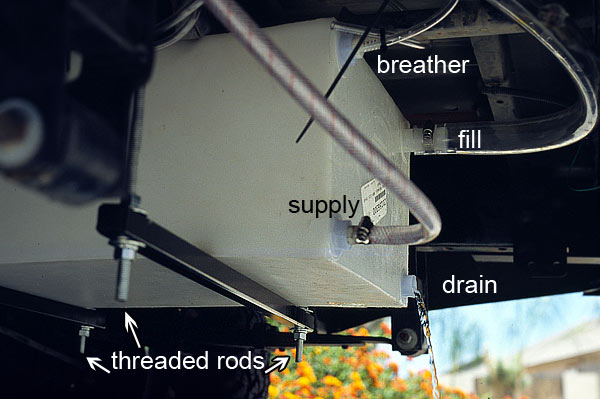 | Here is the tank installed with all the lines labeled. See how the threaded rods extend through the steel cross beams. The skid plate mounts to these. |
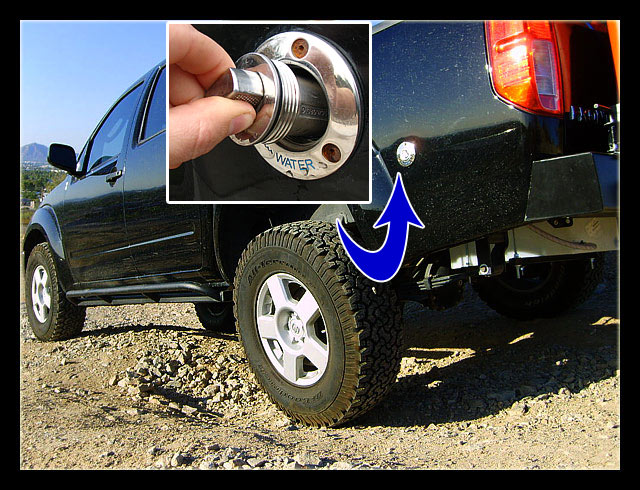 | We used a slick marine water fill, which is all stainless steel. The cap is also leashed to the filler body with a stainless chain. |
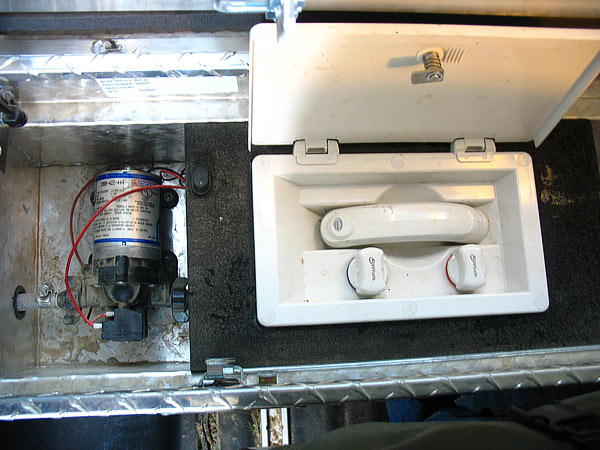 | Looking downward into the tool box, here is the Shurflo pump and the shower. |
More Fun Than Swinging Monkeys: Rear Tire Carrier and Bumper

Multi-Carrier Bumper: Report from the field After all these months and several adventure-expeditions, the bumper remains intact. Unfortunately, I did back into a vehicle while on a trip in Mexico. The massive shackle mount poked right through the headlight of an Oldsmobile. However I didn’t cause any damage to our the bumper. Also, while Jonathan and Roseann Hanson drove behind me during the Expedition Trophy 2006, Jonathan made comment that the tire hardly moved at all. It does remain solid while traveling rough roads. Ratings:
Notes: Though the bumper is heavy and made from stout steel, a few points in the craftsmanship are nearly amateur. It included a gate stop to prevent the tire from contacting the rear quarter panel; however, the stop was welded in the wrong place and it doesn’t do the job. The hi-lift jack mount punches right into the quarter panel and so does the tire. Here’s a photo (click for larger version):
I do like the latch, which is spring loaded. And the shackle mounts are impressively large. Thankfully, the Nissan Frontier has a fully boxed frame which doesn’t need any reinforcement for a bumper like this. |

One of the consequences to adding on the water tank was the need to relocate the spare tire. To a degree, this is also a benefit: if it’s not under the truck, you have quick access to the spare, and it’s easier to maintain and inspect it regularly. However there aren’t too many options here. I set out on a hunt for a bumper/tire carrier combination to kill a couple of birds with one stone. I needed recovery points in the rear of the vehicle in addition to some way to carry the spare tire. It’s rare to find one like this for a pickup truck, but I found one. A small company in Georgia, Kennesaw Mountain Accessories, fabricated my bumper/tire carrier, which they dubbed the Multi-Carrier.
The bumper portion is quite utilitarian. It’s made from a 6”x6” steel tube, and with little design flare other than a cutout for the license plate and slightly angled ends. But it does sport two heavy 1” thick shackle mounts. Way to go boys. The tire carrier is built to swing on a beefy hinge, and to latch closed with a first-rate, spring-loaded handle. In addition to the tire, I can mount a fuel or water can to the gate.
Installing the bumper went smoothly, but was difficult due to the weight of the thing. Here’s the process:
- Unbolt the OEM bumper and rear frame cross member from the frame rails
- Tape a piece of paper to each frame rail where the bolt holes exist so I could make a template. These holes are to be used again for mounting the new bumper, and the new bumper needs to be drilled correspondingly.
- “Dry” test the bumper position. This is to establish where the template ought to go by holding the bumper in place – getting the height right to allow the tailgate to fold down, and getting the extension distance correct so the swing gate can close with a tire attached. At first glance, this looks tough to do without a few helpers. I employed two ratchet straps to hoist and hold the unit into place, which turned out to be very effective and easy. I’m quite proud of this method. It afforded me the flexibility to set the bumper height exactly as I wanted it.
- Drill the holes in the mounting plates. This is not as easy as it could be; the mounting plates are ½” thick, and the holes need to be 5/8” in diameter. Normally, you’d use a drill press to make holes this large and into such thick material, but due to the nature of the bumper they must be drilled by hand. A drill press would be far easier and safer to use, but it’s just not possible without some intensive jigging.
- Hoist and hold the bumper in place again, bolt to the frame rails, and slide the swing gate into place on the hinge.
Multi-Carrier Bumper Images Click one to see larger version (opens in new window) | |
 | Here is the template I made for drilling the holes on the mounting plates. It took a little time to be certain that the holes would be spot-on. |
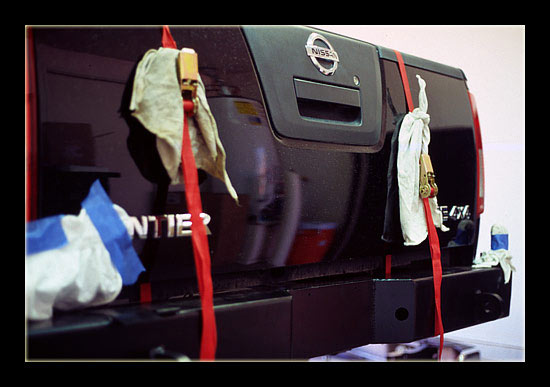 | Ratchet straps proved to be very useful for both the tank install and for lifting/holding the bumper in place. As you can see, I wrapped the metal parts with rags to avoid scratching the paint. |
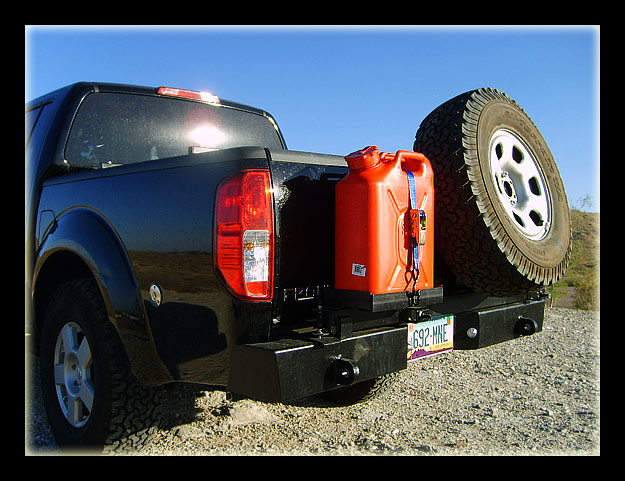 | The bumper in place and loaded. A Scepter can fits perfectly. |
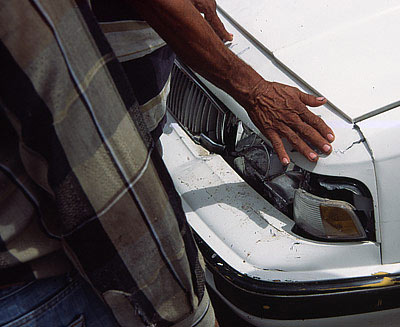 | While visiting El Fuerte, Mexico, I backed into this Oldsmobile. The shackle mount on our bumper went straight into the headlight. Luckily, I was moving slowly and caused minimal damage. |
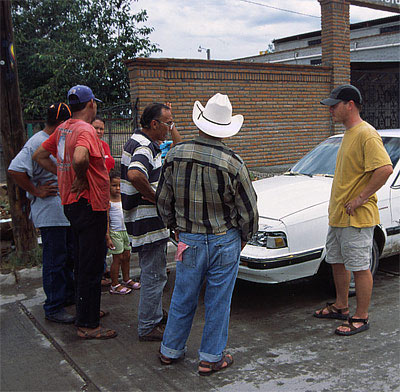 | Discussing the costs to fix the headlight, grill, bumper and hood. $250 U.S. |
Downsides to this bumper:
- Doesn’t utilize the OEM license plate lights; instead, you have to use 1-1/4” trailer plate lights from an auto parts store.
- Comes painted instead of powdercoated. My opinion is that powdercoating is better, but others find that paint is fine. To each his own.
- No quarter panel slider protection with a tie-in to the frame; this would be a nice addition.
With this heavy bumper, we’re well protected from any rear impact, plus it provides a nice way for me to store the spare tire and have some significant recovery points. It’s a nice unit, and it does the job quite well.
What’s next?
Not to get carried away or anything, but you can read about these in Part 3:
More power. We’ve installed a dual battery system for powering the auxiliary loads: the shower pump, GPS, CB radio, 2m/70cm radio, and any future loads (lighting, refrigerator, etc.).
More steel. A gorgeous Shrockworks winch bumper along with a Warn M8000 winch are going to adorn the nose of out Nissan Frontier.
More trips. Learn about our travels so far, and what worked, what didn’t, and what we improved upon.
Expedition Portal 2006-2007 Project Vehicle: Nissan Frontier D40
Part 3: