Herbie
Rendezvous Conspirator
Since a few people saw my kite photography rig flying at Overland Expo, and several more people have expressed interest since I posted one of the resulting photos, I thought I would post a thread to give as much info as possible about the rig and the theory behind it.
First off, credit for inspiring me to undertake this goes to three entities, almost simultaneously: First, DesertBoater mentioned a friend who used a kit towed behind a boat used for overhead photography in a thread on UAV Photography. Second, Randal Munroe of XKCD fame (the best comic on the web, IMHO), as I found his early kite experiments while snooping his site, and MAKE Magazine, as they did a feature on their idea of a simple KAP rig around the same time. In my opinion, the MAKE magazine project was overly complicated and didn't reflect modern reality in terms of cheap and simple possibilities for kite photography, but I'd like to think that mine does.
So, after a little research into "Kite Aerial Photography", or KAP, it turns out the "key" bit of technology needed for good photographs is the "Picavet Cross", or "Picavet Suspension", named for Frenchman Pierre Picavet who in 1912 described a rigging system that keeps the camera (relatively) level to the horizon despite changes in the kite string angle. Here is my simple rig:
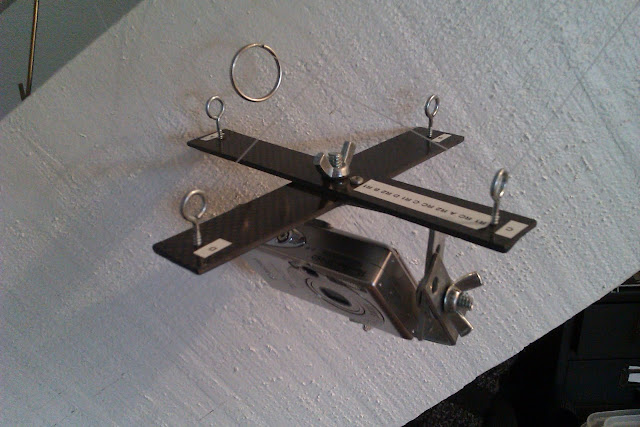
Just about everything I needed to make this rig I learned from KAPER e-zine, with this excellent introductory page. The excellent animation on that page will demonstrate exactly what the Picavet does for you, if it's not clear.
For my use, I wanted to have the option of taking this rig along when I went hiking or backpacking, so I emphasized lightness and simplicity over everything else. I used some scrap carbon fiber strips I had lying around from my Battlebot days, added a couple screw eyes and some fishing line, and voila'.
After you have the suspension, the next thing is the camera cradle. Many KAPers are really serious and have radio-controlled servo driven gimbal rigs that let them pan/tilt the camera while in flight. Mine is much more simple, just a pair of angle brackets from the hardware store with some carriage bolts and wing nuts, using what's referred to as the "LL Design" here. If it isn't obvious from the photo above, my rig is totally static, so to change the aim point I just walk down the kite line, re-aim, and release again. It turns out I don't have to fly very high to get great photos, so this isn't tedious at all.
The last bit of "tech" for the KAP rig, and possibly the only area I have added anything "new", is the shutter release system. This is where I felt the MAKE Magazine build got WAAAAY too complicated, using a mechanical shutter release based on a wound rubber band dampened with silly putty, if I remember correctly.
Instead, I've basically turned a $40 Canon SD450 P&S I got from Craigslist into a time-lapse shooting camera and just let it fly and shoot, then sort out the pictures later. They key is a Canon camera running the Canon Hack Developers Kit (CHDK). This sounds ominous and complicated but basically you just select the correct image for your model of camera, load it onto the SD card, boot the camera, and off you go. In my case, I'm running a user-written script called "Ultra Intervalometer" which is basically a very customizable soft-intervalometer (camera speak for shooting on intervals). I set the initial delay, set the inter-photo delay, and then when I'm ready to fly I just hit the shutter release button once and let her fly. Incidentally, using CHDK also lets me capture images in RAW format, something which this older P&S doesn't normally do.
Now I've got a rig, but I still need something to fly it from. My best KAP kite so far is this basic 14 sq ft sled kite I got from my local tourist kite shop. It's a self-inflating sled with no rigid structure, and it all folds up into the storage bag that acts as the drogue/tail - about 14" by 6", collapsed. This kite is super easy to launch solo, even in mild wind, and is fairly stable even in high wind. More importantly, it has WAY more than enough line pull to lift my rig (about 12oz, w/ camera, if I remember correctly). I could probably get fancy with an RC rig with this kite, but I like the simplicity. If you ever want to make another Dad look bad in front of his kid, show up with this kite at a park on a breezy day when he's trying to launch one of those cheap Disney-branded diamond kites you get at the drug store. While he runs backwards trying to get enough lift under the kite to get it into the breeze, you unpack the sled, clip it to the kite line, give it one good tug and.... UP! (Remember to wear gloves, this kite has some serious pull)
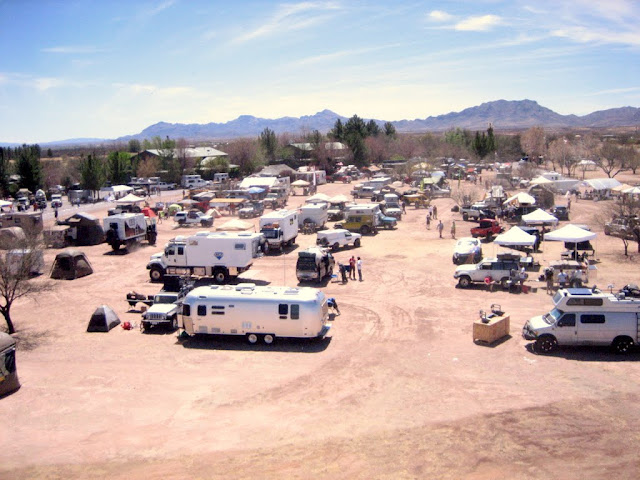
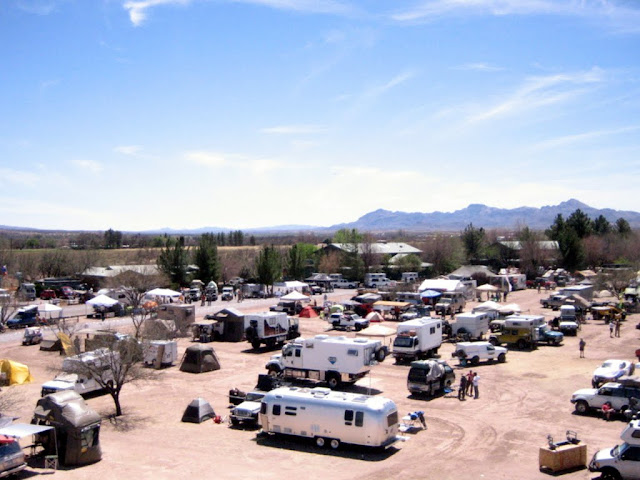
Here's one more example of the results I got with the rig:
As a bonus, due to a happy accident, during my first flight at OvEx11 I accidentally bumped the camera into "video" mode. The intervalometer was still running, so it was shooting a series of short movies as it triggered the release over and over. I stitched these back into a single video so you can sort of get a camera-eye view of me bringing the kite down to make aim adjustments. You can also see the BEST feature of a rig like this - it attracts attention, especially from children, whenever you fly it:
First off, credit for inspiring me to undertake this goes to three entities, almost simultaneously: First, DesertBoater mentioned a friend who used a kit towed behind a boat used for overhead photography in a thread on UAV Photography. Second, Randal Munroe of XKCD fame (the best comic on the web, IMHO), as I found his early kite experiments while snooping his site, and MAKE Magazine, as they did a feature on their idea of a simple KAP rig around the same time. In my opinion, the MAKE magazine project was overly complicated and didn't reflect modern reality in terms of cheap and simple possibilities for kite photography, but I'd like to think that mine does.
So, after a little research into "Kite Aerial Photography", or KAP, it turns out the "key" bit of technology needed for good photographs is the "Picavet Cross", or "Picavet Suspension", named for Frenchman Pierre Picavet who in 1912 described a rigging system that keeps the camera (relatively) level to the horizon despite changes in the kite string angle. Here is my simple rig:
Just about everything I needed to make this rig I learned from KAPER e-zine, with this excellent introductory page. The excellent animation on that page will demonstrate exactly what the Picavet does for you, if it's not clear.
For my use, I wanted to have the option of taking this rig along when I went hiking or backpacking, so I emphasized lightness and simplicity over everything else. I used some scrap carbon fiber strips I had lying around from my Battlebot days, added a couple screw eyes and some fishing line, and voila'.
After you have the suspension, the next thing is the camera cradle. Many KAPers are really serious and have radio-controlled servo driven gimbal rigs that let them pan/tilt the camera while in flight. Mine is much more simple, just a pair of angle brackets from the hardware store with some carriage bolts and wing nuts, using what's referred to as the "LL Design" here. If it isn't obvious from the photo above, my rig is totally static, so to change the aim point I just walk down the kite line, re-aim, and release again. It turns out I don't have to fly very high to get great photos, so this isn't tedious at all.
The last bit of "tech" for the KAP rig, and possibly the only area I have added anything "new", is the shutter release system. This is where I felt the MAKE Magazine build got WAAAAY too complicated, using a mechanical shutter release based on a wound rubber band dampened with silly putty, if I remember correctly.
Instead, I've basically turned a $40 Canon SD450 P&S I got from Craigslist into a time-lapse shooting camera and just let it fly and shoot, then sort out the pictures later. They key is a Canon camera running the Canon Hack Developers Kit (CHDK). This sounds ominous and complicated but basically you just select the correct image for your model of camera, load it onto the SD card, boot the camera, and off you go. In my case, I'm running a user-written script called "Ultra Intervalometer" which is basically a very customizable soft-intervalometer (camera speak for shooting on intervals). I set the initial delay, set the inter-photo delay, and then when I'm ready to fly I just hit the shutter release button once and let her fly. Incidentally, using CHDK also lets me capture images in RAW format, something which this older P&S doesn't normally do.
Now I've got a rig, but I still need something to fly it from. My best KAP kite so far is this basic 14 sq ft sled kite I got from my local tourist kite shop. It's a self-inflating sled with no rigid structure, and it all folds up into the storage bag that acts as the drogue/tail - about 14" by 6", collapsed. This kite is super easy to launch solo, even in mild wind, and is fairly stable even in high wind. More importantly, it has WAY more than enough line pull to lift my rig (about 12oz, w/ camera, if I remember correctly). I could probably get fancy with an RC rig with this kite, but I like the simplicity. If you ever want to make another Dad look bad in front of his kid, show up with this kite at a park on a breezy day when he's trying to launch one of those cheap Disney-branded diamond kites you get at the drug store. While he runs backwards trying to get enough lift under the kite to get it into the breeze, you unpack the sled, clip it to the kite line, give it one good tug and.... UP! (Remember to wear gloves, this kite has some serious pull)
Here's one more example of the results I got with the rig:
As a bonus, due to a happy accident, during my first flight at OvEx11 I accidentally bumped the camera into "video" mode. The intervalometer was still running, so it was shooting a series of short movies as it triggered the release over and over. I stitched these back into a single video so you can sort of get a camera-eye view of me bringing the kite down to make aim adjustments. You can also see the BEST feature of a rig like this - it attracts attention, especially from children, whenever you fly it:
Last edited: