Camelfilter
Explorer
Flippac torsion bar delete modification. My torsion bar is still functional, so this is more of a how-to-in progress...
Many thanks to other users, especially Rhino & Timber, much of this modification is simply copying them.
Here's some nice pictures of Timbers modification, see post #34.
Parts & supplies I used:
6 ball joint quick disconnect sets from Midwest Control, part# SQI312. Note that I only used 4 of the ball joint ends, so I have 2 spares, and only 5 of the quick disconnects, leaving 1 spare.
5 of these EMT connectors: Lowes Gampak 1/2-in NM/SE Connector Item #: 45744 | Model #: 49092
5 5/16 fine thread bolts.
4 5' 3/4" EMT conduit poles.
2 90* 2"x2" brackets.
3M 5200 marine silicone.
1/2" or 3/4" sheet metal screws.
Fender washers.
5/16 fine thread nuts.
1 conduit compression connector similar to this one. <--Edit 4/9/15: I've given up on using the connector to make a long push bar. The latest push bar I've cobbled together is just 2 different sized conduit bars, so that they slide inside each other fir stowage. To keep them "sturdy" for pushing up the top, I just drilled holes thru them which I fit pins into. Shortened for stowage it fits as a 3rd bar up where the original Flippac hammock is.
-----------------------------
I don't weld, a lot of the following would be easier/stronger if I did.
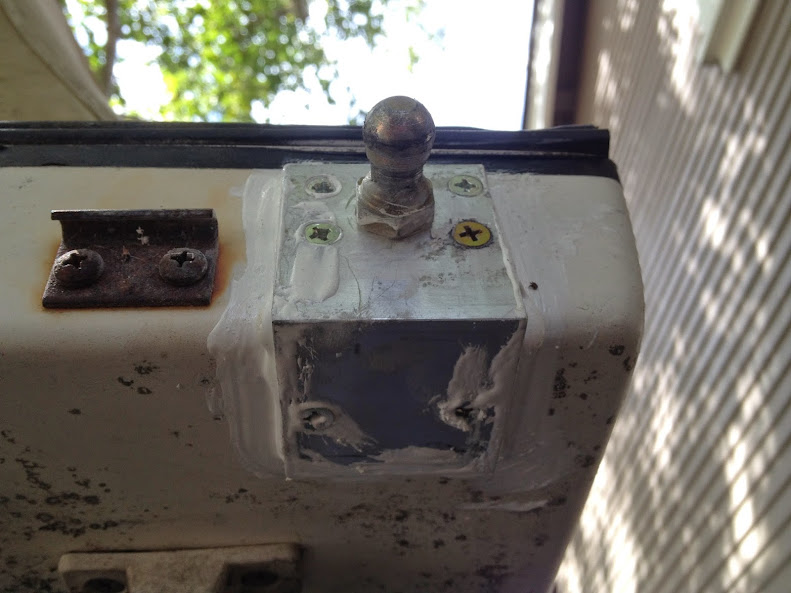
To mount the ball joint ends onto the Flippac, the FP was in the closed position. I used the 2"x2" 90* brackets I pre-drilled for the ball joint end & screwed them into the FP also using liberal 5200 silicone. I had pre-drilled the FP for the ball joint end also. I filled that hole with a bunch of 5200 also, so hopefully this ball joint end will not move/fail.
Better would have been to weld the ball joint end onto the bracket, best would have been to weld a nut onto the bracket.

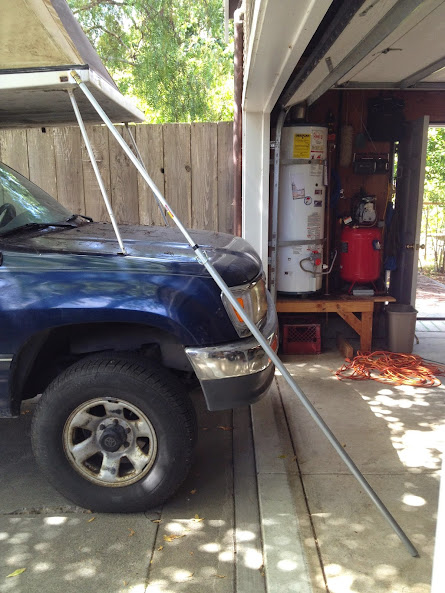
I'm lucky in that my torsion bar is still working. To determine the support pole lengths & bottom ball joint mount locations I deployed my FP as normal and ran a pole out from the already installed ball joint ends.
I'm also lucky that I have an aftermarket front bumper. I was able to mount the bottom ball joints directly to the bumper. I drilled & tapped the hole, so the ball joint ends screw rite in. I did put a nut as a spacer, so my support arms better clear my fenders. Inside the bumper I added a fender washer as well as another nut.
Those lower ball joint ends are not going anywhere, and if something happens where they are pulled out, it's more than likely I have bigger problems! I do have the 2 spares anyways though.

For folks without an aftermarket bumper/stout OEM bumper I imagine there are still some options. One would be to run the support arms straight to the ground, then you wouldn't need the other ball joint ends nor quick connects. Your support poles would be longer though. Another option might be to mount the ball joint end through your fender-you'd have to reinforce it somehow though.
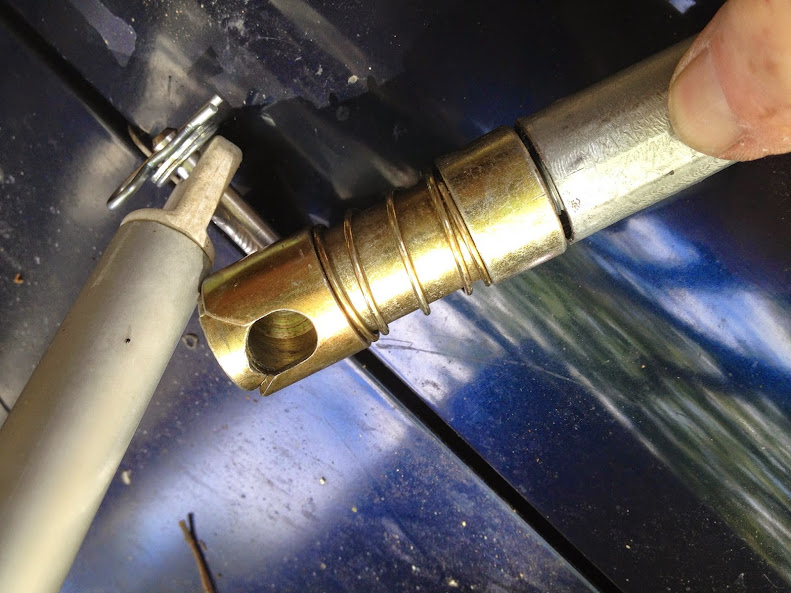
For my support arms I mounted the quick disconnects onto each end using the EMT connectors on each end. To get the quick disconnects onto the EMT connectors I popped out the rubber piece, then put a fine thread bolt thru the back. The quick disconnect then screwed rite onto the bolt. I used various washers on bolt to get it to fit well etc.
The EMT connector/quick disconnect "unit" I mounted to the EMT tubing using 5200 and a machine screw. Repeat on both ends of the support arms, and the end of the push bar.
***Note that the "units" have a little bit of play in them at the end of the bars. I'm likely going to try a different adhesive either an epoxy or perhaps e6000. Here's another point where welding would be super handy, just weld the bolt in or a nut & use a stud.
For my push bar the best that I've come up with so far is to use the compression connector to link a second EMT tube onto the tube with a disconnect "unit" on the other end. <--See edited note above 4/9/15
I tried using a plastic tube which slid over the EMT as an extension, but I found it too wobbly. Ideas are welcome especially in regards to what folks might use for there push bars.

--that's all for now I suppose--
Many thanks to other users, especially Rhino & Timber, much of this modification is simply copying them.
Here's some nice pictures of Timbers modification, see post #34.
Parts & supplies I used:
6 ball joint quick disconnect sets from Midwest Control, part# SQI312. Note that I only used 4 of the ball joint ends, so I have 2 spares, and only 5 of the quick disconnects, leaving 1 spare.
5 of these EMT connectors: Lowes Gampak 1/2-in NM/SE Connector Item #: 45744 | Model #: 49092
5 5/16 fine thread bolts.
4 5' 3/4" EMT conduit poles.
2 90* 2"x2" brackets.
3M 5200 marine silicone.
1/2" or 3/4" sheet metal screws.
Fender washers.
5/16 fine thread nuts.
1 conduit compression connector similar to this one. <--Edit 4/9/15: I've given up on using the connector to make a long push bar. The latest push bar I've cobbled together is just 2 different sized conduit bars, so that they slide inside each other fir stowage. To keep them "sturdy" for pushing up the top, I just drilled holes thru them which I fit pins into. Shortened for stowage it fits as a 3rd bar up where the original Flippac hammock is.
-----------------------------
I don't weld, a lot of the following would be easier/stronger if I did.
To mount the ball joint ends onto the Flippac, the FP was in the closed position. I used the 2"x2" 90* brackets I pre-drilled for the ball joint end & screwed them into the FP also using liberal 5200 silicone. I had pre-drilled the FP for the ball joint end also. I filled that hole with a bunch of 5200 also, so hopefully this ball joint end will not move/fail.
Better would have been to weld the ball joint end onto the bracket, best would have been to weld a nut onto the bracket.
I'm lucky in that my torsion bar is still working. To determine the support pole lengths & bottom ball joint mount locations I deployed my FP as normal and ran a pole out from the already installed ball joint ends.
I'm also lucky that I have an aftermarket front bumper. I was able to mount the bottom ball joints directly to the bumper. I drilled & tapped the hole, so the ball joint ends screw rite in. I did put a nut as a spacer, so my support arms better clear my fenders. Inside the bumper I added a fender washer as well as another nut.
Those lower ball joint ends are not going anywhere, and if something happens where they are pulled out, it's more than likely I have bigger problems! I do have the 2 spares anyways though.
For folks without an aftermarket bumper/stout OEM bumper I imagine there are still some options. One would be to run the support arms straight to the ground, then you wouldn't need the other ball joint ends nor quick connects. Your support poles would be longer though. Another option might be to mount the ball joint end through your fender-you'd have to reinforce it somehow though.
For my support arms I mounted the quick disconnects onto each end using the EMT connectors on each end. To get the quick disconnects onto the EMT connectors I popped out the rubber piece, then put a fine thread bolt thru the back. The quick disconnect then screwed rite onto the bolt. I used various washers on bolt to get it to fit well etc.
The EMT connector/quick disconnect "unit" I mounted to the EMT tubing using 5200 and a machine screw. Repeat on both ends of the support arms, and the end of the push bar.
***Note that the "units" have a little bit of play in them at the end of the bars. I'm likely going to try a different adhesive either an epoxy or perhaps e6000. Here's another point where welding would be super handy, just weld the bolt in or a nut & use a stud.
For my push bar the best that I've come up with so far is to use the compression connector to link a second EMT tube onto the tube with a disconnect "unit" on the other end. <--See edited note above 4/9/15
I tried using a plastic tube which slid over the EMT as an extension, but I found it too wobbly. Ideas are welcome especially in regards to what folks might use for there push bars.
--that's all for now I suppose--
Last edited:

") and then lower it slowly. Still, I think the reliability of this mod makes it worthwhile.
and then lower it slowly. Still, I think the reliability of this mod makes it worthwhile. 
