smokeysevin
Re-redoing things the third time
2001 Toyota Tundra SR5 Access Cab V8 2WD 4WD
This "build" will be tame by most measures but will (hopefully) end up where I always wanted it to. It is also not going to have lots of cool travel pictures, its pretty much a home depot runner and occasional beach truck/jetski tow rig. The only reason its getting worked on at all is because I finally managed to cobble together all the parts I needed to finish the 4wd swap and thought "if I am going to do the work, I may as well do it how I wanted"
The truck as it sits now is a mutant hodgepodge of miss matched parts, 16-28 year old Sean was a real idiot. Lots of loose ends to tie up.


Recent maintenance has been:
2023
2007 Sequoia rear brake conversion and parking brake install
Motor and trans mounts
Rear axle rebuild
Pressure washed underbody and engine bay
Spark plugs
Starter motor
Fan and fan clutch
Heater hoses and valve replacement
Winch ground wire replacement
Reman'd front brake calipers and fluid flush
Front Brake pads
Driver's side outer cv boot
Double cardan center driveshaft joint rebuild
2022
Lower control arms
Lower ball joints
Upper uniballs
Upper control arm bushings
Inner and outer tie rods ends
Lower control arm pivots
Rear leaf spring rebuilt
Transmission service
Transfer case service and shifter lockout removal
Radiator and coolant
Current maintenance required:
Valve cover gasket replacement
Coolant/Heater valve replacement
Heater hose replacement
Charcoal canister/evap system repair
Seatbelt tensioner replacement
Spec overview: 2001 Toyota Tundra SR52WD 4WD
Engine
ASP Underdrive Pulley: (https://www.autospecialties.com)
Ported Upper and Lower Intake Manifold: (DIY)
Throttle Body Coolant Reroute: (DIY)
05-06 Intake manifold swap: (DIY)
SSAutochrome Shorty Headers and Y Pipe: (http://ssautochrome.com/level.itml/icOid/1430)
Magnaflow 2.5” Center In, Side Exit Muffler (Dumped Before Axle):
Magnaflow 2.25” “Spun Cat” Catalytic Converter:
Champion Cooling Aluminum Radiator: (https://shop.championcooling.com/2000-2001-2002-2003-2004-2005-2006-Toyota-Tundra)
HPS Silicone Radiator Hoses: (https://hpsperformanceproducts.com/...a-99-03-tundra-v8?_pos=3&_sid=8d6ce3a24&_ss=r)
URD Maf Calibrator (Untuned) : (https://www.urdusa.com/urd-maf-sensor-calibrator/)
URD Rear O2 Sensor Simulator (high flow cats kept tripping the CEL)
Ebay Air Intake
Volant Donaldson Power Core Air Filter
Drivetrain
Transmission/Transfer Case/Driveline
2004 A340F 4wd Transmission
Radesigns Winters Shifter with electronic control system (http://www.radesignsproducts.com/winters-elec.-control-kits.html)
2000 J Shift Manual Transfer Case
Radesigns Twin Stick Shifter (http://www.radesignsproducts.com/triple---twin-sticks.html)
Hendrix Motorsports Billet Aluminum Carrier Bearing: (https://www.polyperformance.com/hen...um-carrier-bearing-support-for-toyota-cbs-001)
Front End
2000 7.5” Clamshell Front Differential
4.56 Yukon Gears
Toyota Supra Limited Slip
ECGS Solid Bearing Spacer
Locked ADD Actuator
94.5 Tacoma Manual Locking Hub Swap
Aftermarket Spindle Hubs
OEM Wheel Bearings and Seals
OEM Manual Lockout Hubs
DTA Tacoma Outer Axles
OEM Tundra Inner Axles
Rear End
GM 12 Bolt Truck Rear Axle
Yukon Heat Treated Axle Shafts
Mark Williams Enterprises Steel Bearing Cap
Mark Williams Enterprises 1310 Yoke
Low Range Offroad Toyota to 1310 U Joint: (https://www.lowrangeoffroad.com/131...t-u-joint-universal-joint-tdi-1310-toyuj.html)
Detroit Tru-Trac Differential
Yukon Gear 4.56 Gears
Moser Bearing Support Diff Cover
Brakes
Brake Hydraulics
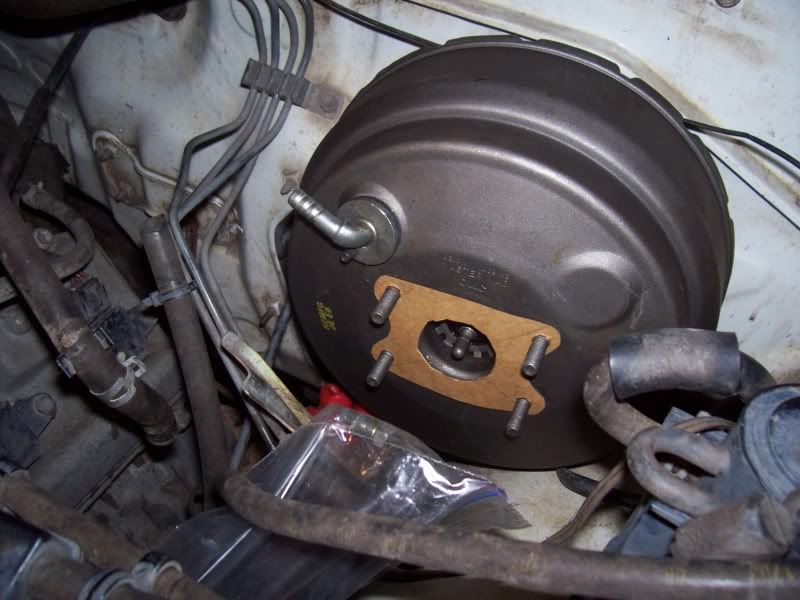
Toyota 4runner Dual Diaphragm Brake Booster
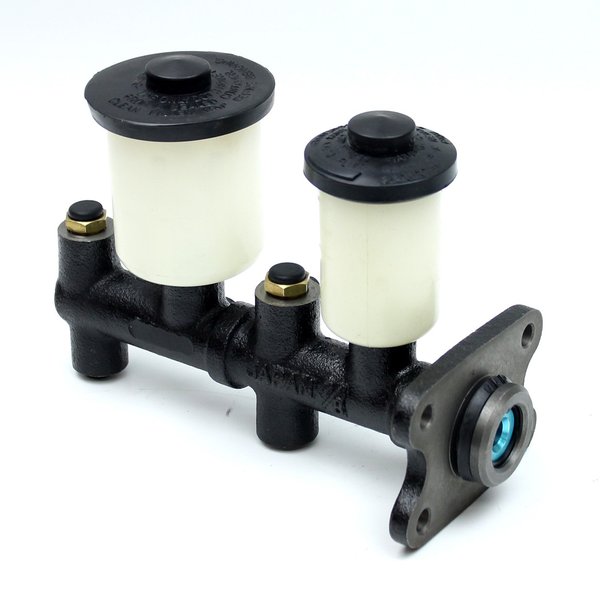
T100 1-Ton Master Cylinder
Wilwood Adjustable Proportioning Valve (https://www.jegs.com/i/Wilwood/950/260-12627/10002/-1)
LSPV Delete
Wheelers Offroad Extended Rear Brake Line (https://wheelersoffroad.com/shopbyv...eight-to-2-lift-tf-bline-05-red-or-black.html) Currently too short
Front Brakes
2006 Tundra Brake Update
Rear Brakes
Custom Brake Caliper Mounts
GMT 1500 Front Brake Rotors
GM LT1 Camaro Rear Brake Calipers
Suspension
Front Suspension
Donahoe Racing (Icon) Extended Travel Coilovers (http://iconvehicledynamics.com/shop...dra-ext-travel-front-coil-over-shock-kit.html)
Camburg Uni-Ball Upper Control Arms (https://camburg.com/shop/suspension...wd-00-06-performance-1-00-uniball-upper-arms/)
Sway Bar Delete
Total Chaos Fab Steering Rack Bushings (https://www.chaosfab.com/accessories/2000-2006-Tundra-Urethane-Rack-Bushings-97701)
Total Chaos Fab Double Shear Plates
Total Chaos Fab Spindle Brace
Total Chaos Fab Uniball Adapters and Misalignment Spacers
Rear Suspension
Deaver G57 Spring Over Leaf Springs (https://deaverspring.com/product/tundra-2wd-4wd-1999-2006-10-leaf-spring-1-inch-lift-rear/)
SOS Custom Rear Cantilever Suspension
FOA 10” Travel Remote Reservoir Shocks (https://f-o-a.com/shop/f-o-a-2-5-inch-id-reservoir-shock-10-inch-travel/)
Airlift Dominator 2600 Airbags (https://www.airliftperformance.com/product/58616/)
Daystar Air Bag Cradles (https://www.4wheelparts.com/p/daystar-air-bag-cradle-ku09140bk/_/R-BKCG-KU09140BK)
G2 1.5” Wheel Spacers


Utility
SOS Custom Bedcage
TT Motorsports “Harbor Freight” Jack Skid (https://www.tt-motorsports.com/prod...floor-jack-skid-plate-and-quick-release-mount)
SOS Quick Release Fire Extinguisher Mount
US Cargo Control "Airline" L-Track (https://www.uscargocontrol.com/Aircraft-style-seat-track-6-ft)
Viair 5 Gallon Air tank (https://www.viaircorp.com/air-tanks/5gallon)
MF1050 Air Compressor (https://masterflowair.com/products/mf-1050)
Jim's Machineworx Battery Terminals
1000W Renogy pure sine wave power inverter
40MM Ammo Cans


Tools
Required for service/repair
Recovery Gear
Straps
Shop Towels
Solar Charger
First Aid
Air Hose
12k Winch
Fluids
Oil
Trans Fluid
Diff Fluid
Brake Fluid
40MM Ammo Can Locks
Lighting
Aftermarket “Black” Headlight Housings (http://www.ajpdistributors.com/0001020304to3.html)
TRS Morimoto BI-LED Projector Retrofit (https://www.theretrofitsource.com/bi-led-morimoto-m-led-headlight-projectors-kit.html?preselect=52976,54340,49863)
Nilight 7” LED Spot Pattern Lights
Clear Laminx
Amber Laminx
Orange Laminx
Nilight 2X3 18W Dust Lights
Nilight 2X3 18W Reverse Lights
KC Hilights Cyclone Amber Rock/Service Lights (https://www.kchilites.com/light-type/led/cyclone.html)
Interior
Alpine Android Auto Head Unit (https://www.alpine-usa.com/product/ilxw650_kta450_power-duo_package)
Firestick Antenna (http://www.firestik.com/CatalogFrame.htm)
Sony Xplod 800w Amp
Kicker S8L5 Subs under rear seat
Infinity Reference Speakers
Raamat Sound Deadner
Switchpros SP9100 (https://store.switchpros.com/sp-9100-switch-panel-power-system/)
On Hold
Raspberry Pi 3B+ with Display
Microsquirt for logging/temp monitoring (may run engine at some point or may just leave passive) (https://www.diyautotune.com/product/microsquirt-engine-management-system-w-30-wiring-harness/)
Trans Temp
Oil Temp
Oil Pressure
Water Temp
AFR
RPM
MAP
TPS
Exterior
Roadrunner Fiberglass Front Fenders
Chopped and Pulled Rear Fenders
Rear Bumper Delete
SOS Custom Rear Hitch
2006 Tundra Grille
Long term goals are for long travel front end while retaining 4wd, rear glass, full paint, new seats (probably prp) 4.88's and 35s all around (which will involve a swap to a 9" FF Rear), a winch and custom front bumper.
Sean
This "build" will be tame by most measures but will (hopefully) end up where I always wanted it to. It is also not going to have lots of cool travel pictures, its pretty much a home depot runner and occasional beach truck/jetski tow rig. The only reason its getting worked on at all is because I finally managed to cobble together all the parts I needed to finish the 4wd swap and thought "if I am going to do the work, I may as well do it how I wanted"
The truck as it sits now is a mutant hodgepodge of miss matched parts, 16-28 year old Sean was a real idiot. Lots of loose ends to tie up.


Recent maintenance has been:
2023
2007 Sequoia rear brake conversion and parking brake install
Motor and trans mounts
Rear axle rebuild
Pressure washed underbody and engine bay
Spark plugs
Starter motor
Fan and fan clutch
Heater hoses and valve replacement
Winch ground wire replacement
Reman'd front brake calipers and fluid flush
Front Brake pads
Driver's side outer cv boot
Double cardan center driveshaft joint rebuild
2022
Lower control arms
Lower ball joints
Upper uniballs
Upper control arm bushings
Inner and outer tie rods ends
Lower control arm pivots
Rear leaf spring rebuilt
Transmission service
Transfer case service and shifter lockout removal
Radiator and coolant
Current maintenance required:
Valve cover gasket replacement
Coolant/Heater valve replacement
Heater hose replacement
Charcoal canister/evap system repair
Seatbelt tensioner replacement
Spec overview: 2001 Toyota Tundra SR5
Engine
ASP Underdrive Pulley: (https://www.autospecialties.com)
Throttle Body Coolant Reroute: (DIY)
05-06 Intake manifold swap: (DIY)
SSAutochrome Shorty Headers and Y Pipe: (http://ssautochrome.com/level.itml/icOid/1430)
Magnaflow 2.5” Center In, Side Exit Muffler (Dumped Before Axle):
Magnaflow 2.25” “Spun Cat” Catalytic Converter:
Champion Cooling Aluminum Radiator: (https://shop.championcooling.com/2000-2001-2002-2003-2004-2005-2006-Toyota-Tundra)
HPS Silicone Radiator Hoses: (https://hpsperformanceproducts.com/...a-99-03-tundra-v8?_pos=3&_sid=8d6ce3a24&_ss=r)
URD Maf Calibrator (Untuned) : (https://www.urdusa.com/urd-maf-sensor-calibrator/)
URD Rear O2 Sensor Simulator (high flow cats kept tripping the CEL)
Ebay Air Intake
Volant Donaldson Power Core Air Filter
Drivetrain
Transmission/Transfer Case/Driveline
2004 A340F 4wd Transmission
Radesigns Winters Shifter with electronic control system (http://www.radesignsproducts.com/winters-elec.-control-kits.html)
2000 J Shift Manual Transfer Case
Hendrix Motorsports Billet Aluminum Carrier Bearing: (https://www.polyperformance.com/hen...um-carrier-bearing-support-for-toyota-cbs-001)
Front End
2000 7.5” Clamshell Front Differential
4.56 Yukon Gears
Toyota Supra Limited Slip
ECGS Solid Bearing Spacer
Locked ADD Actuator
94.5 Tacoma Manual Locking Hub Swap
Aftermarket Spindle Hubs
OEM Wheel Bearings and Seals
OEM Manual Lockout Hubs
DTA Tacoma Outer Axles
OEM Tundra Inner Axles
Rear End
GM 12 Bolt Truck Rear Axle
Yukon Heat Treated Axle Shafts
Mark Williams Enterprises Steel Bearing Cap
Mark Williams Enterprises 1310 Yoke
Low Range Offroad Toyota to 1310 U Joint: (https://www.lowrangeoffroad.com/131...t-u-joint-universal-joint-tdi-1310-toyuj.html)
Detroit Tru-Trac Differential
Yukon Gear 4.56 Gears
Moser Bearing Support Diff Cover
Brakes
Brake Hydraulics
Toyota 4runner Dual Diaphragm Brake Booster
T100 1-Ton Master Cylinder
Wilwood Adjustable Proportioning Valve (https://www.jegs.com/i/Wilwood/950/260-12627/10002/-1)
LSPV Delete
Wheelers Offroad Extended Rear Brake Line (https://wheelersoffroad.com/shopbyv...eight-to-2-lift-tf-bline-05-red-or-black.html) Currently too short
Front Brakes
2006 Tundra Brake Update
Rear Brakes
Custom Brake Caliper Mounts
GMT 1500 Front Brake Rotors
GM LT1 Camaro Rear Brake Calipers
Suspension
Front Suspension
Donahoe Racing (Icon) Extended Travel Coilovers (http://iconvehicledynamics.com/shop...dra-ext-travel-front-coil-over-shock-kit.html)
Camburg Uni-Ball Upper Control Arms (https://camburg.com/shop/suspension...wd-00-06-performance-1-00-uniball-upper-arms/)
Sway Bar Delete
Total Chaos Fab Steering Rack Bushings (https://www.chaosfab.com/accessories/2000-2006-Tundra-Urethane-Rack-Bushings-97701)
Total Chaos Fab Double Shear Plates
Total Chaos Fab Spindle Brace
Total Chaos Fab Uniball Adapters and Misalignment Spacers
Rear Suspension
Deaver G57 Spring Over Leaf Springs (https://deaverspring.com/product/tundra-2wd-4wd-1999-2006-10-leaf-spring-1-inch-lift-rear/)
SOS Custom Rear Cantilever Suspension
FOA 10” Travel Remote Reservoir Shocks (https://f-o-a.com/shop/f-o-a-2-5-inch-id-reservoir-shock-10-inch-travel/)
Airlift Dominator 2600 Airbags (https://www.airliftperformance.com/product/58616/)
Daystar Air Bag Cradles (https://www.4wheelparts.com/p/daystar-air-bag-cradle-ku09140bk/_/R-BKCG-KU09140BK)
G2 1.5” Wheel Spacers
Utility
SOS Custom Bedcage
TT Motorsports “Harbor Freight” Jack Skid (https://www.tt-motorsports.com/prod...floor-jack-skid-plate-and-quick-release-mount)
SOS Quick Release Fire Extinguisher Mount
US Cargo Control "Airline" L-Track (https://www.uscargocontrol.com/Aircraft-style-seat-track-6-ft)
Viair 5 Gallon Air tank (https://www.viaircorp.com/air-tanks/5gallon)
MF1050 Air Compressor (https://masterflowair.com/products/mf-1050)
Jim's Machineworx Battery Terminals
1000W Renogy pure sine wave power inverter
40MM Ammo Cans
Tools
Required for service/repair
Recovery Gear
Straps
Shop Towels
Solar Charger
First Aid
Air Hose
12k Winch
Fluids
Oil
Trans Fluid
Diff Fluid
Brake Fluid
40MM Ammo Can Locks
Lighting
Aftermarket “Black” Headlight Housings (http://www.ajpdistributors.com/0001020304to3.html)
TRS Morimoto BI-LED Projector Retrofit (https://www.theretrofitsource.com/bi-led-morimoto-m-led-headlight-projectors-kit.html?preselect=52976,54340,49863)
Nilight 7” LED Spot Pattern Lights
Clear Laminx
Amber Laminx
Orange Laminx
Nilight 2X3 18W Dust Lights
Nilight 2X3 18W Reverse Lights
KC Hilights Cyclone Amber Rock/Service Lights (https://www.kchilites.com/light-type/led/cyclone.html)
Interior
Alpine Android Auto Head Unit (https://www.alpine-usa.com/product/ilxw650_kta450_power-duo_package)
Firestick Antenna (http://www.firestik.com/CatalogFrame.htm)
Sony Xplod 800w Amp
Kicker S8L5 Subs under rear seat
Infinity Reference Speakers
Raamat Sound Deadner
Switchpros SP9100 (https://store.switchpros.com/sp-9100-switch-panel-power-system/)
On Hold
Raspberry Pi 3B+ with Display
Microsquirt for logging/temp monitoring (may run engine at some point or may just leave passive) (https://www.diyautotune.com/product/microsquirt-engine-management-system-w-30-wiring-harness/)
Trans Temp
Oil Temp
Oil Pressure
Water Temp
AFR
RPM
MAP
TPS
Exterior
Roadrunner Fiberglass Front Fenders
Chopped and Pulled Rear Fenders
Rear Bumper Delete
SOS Custom Rear Hitch
2006 Tundra Grille
Long term goals are for long travel front end while retaining 4wd, rear glass, full paint, new seats (probably prp) 4.88's and 35s all around (which will involve a swap to a 9" FF Rear), a winch and custom front bumper.
Sean
Last edited: