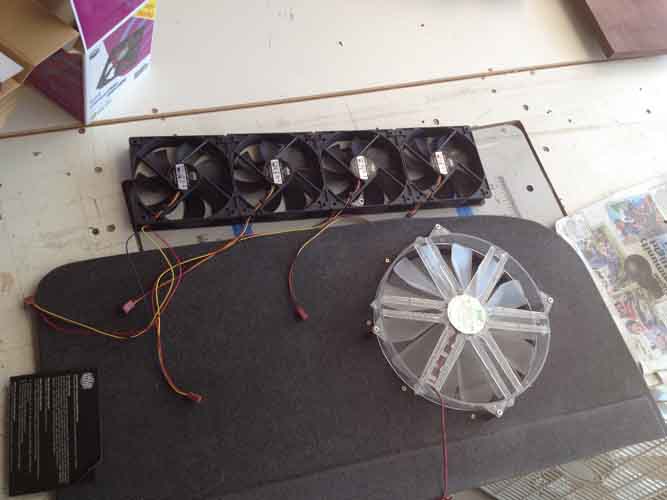
As a general rule of thumb, (for passive intakes) they should be 2x the exhaust. So if using two 120mm fans' you'd want four 4" intakes. Stay away from bends or ducting on any kind. ...more drag/resistance is created n' not worth the hassle. I've been contemplating how to do this setup on my suburban for over a year now....best I can come up with to maximize airflow is two 120mm fans in each rear passenger window exhausting while pulling in from the rear barn doors.
Window insert for 12VDC fan ventilation
- Thread starter rayra
- Start date
rayra
Expedition Leader
That sounds good and/but I'd put the fans in the front windows so you are pulling air thru the whole vehicle. And with the four fans and the barn doors open, you should have no trouble moving air thru - the four fans alone should be moving near the total volume of the vehicle every minute anyway. Putting a mosquito net over the open barn doors?
eta - I've got the quad pack of 120mm fans inbound and have a fresh sheet of 1/8 pressboard sitting in my garage. Only using a small bit of it for my storage drawers in progress right now. When they're done I'll turn right back to a new fan insert build.
eta - I've got the quad pack of 120mm fans inbound and have a fresh sheet of 1/8 pressboard sitting in my garage. Only using a small bit of it for my storage drawers in progress right now. When they're done I'll turn right back to a new fan insert build.
Looking forward to seeing it rayra.
I opted to use the rear windows instead of the front for redundancy. As in i'ma a dunce, and will forget there in the front, go to the console for something and tear the wires out.
Worst case Ontario, I sleep head towards the front. Might make a nice breeze across the face.
Yeah I figured one of them yard sale pup tents would do me fine with the cargo doors open. (I just saw the thread about it yesterday and started grinning like an idiot.
demonslaer
Observer
http://www.campingworld.com/shopping/item/o2-cool-10-rechargeable-fan/81391
Check out the rechargeable , usb port , 12 v fan and 110v-Amazon has it also
Got one and used it for the first time in our van.
Love it !! and it moves air
Choff
thats the one i have but with no usb port the wife and I just love it
I think i am going to have to steal this idea 
I need a solution to keep the windows down at night for my dog when sleeping on the road that will keep bugs out, so i'll probably do something similar and add some bug mesh. I had wanted to take the entire door panel off and make a custom one with fold down table, hangers for leashes, etc and a retractable cage to cover the window opening but i don't have enough time to get it done before my trip. My metal door frame is not perfectly flat, so its going to be a pain to create a new door panel with the limited tools i have for metal work.
How much power do the little PC fans draw? Can i leave a few running over night (and my fridge) and not worry about a dead battery in the morning?
rayra
Expedition Leader
These 120mm fans draw 0.16A each. Call it 0.7A for all four. So an 8hr run is 6AH. The average auto battery is ~~50AH. So it shouldn't be any trouble at all to run them all night. Add a rheostat to the design and you can dial them down and use even less power.
These fans move about 50cfm. So the four together will move more than the entire interior volume of my Suburban (about 140cu') every minute.
I'm making the MkII version out of 1/8" pressboard, two layers, just so it will have a smooth finish on both sides. I'm in the middle of three other projects right now, and was waiting on the fans to arrive, so this got pushed aside for a bit. I'll return to it after the holiday weekend, I've got a lot of electrical-related shopping to do anyway, for my dual battery setup and the power additions for my storage drawer build.
Last edited:
mep1811
Gentleman Adventurer
There are many solar powered window fans to choose from online with prices low to high..
https://www.amazon.com/Kulcar-Solar...qid=1472667736&sr=8-11&keywords=Solar+car+fan
https://www.amazon.com/AUDEW-Solar-...&qid=1472667902&sr=8-1&keywords=Solar+car+fan
https://www.amazon.com/SanSiDo-Powe...qid=1472667949&sr=8-19&keywords=Solar+car+fan
https://www.amazon.com/Kulcar-Solar...qid=1472667736&sr=8-11&keywords=Solar+car+fan
https://www.amazon.com/AUDEW-Solar-...&qid=1472667902&sr=8-1&keywords=Solar+car+fan
https://www.amazon.com/SanSiDo-Powe...qid=1472667949&sr=8-19&keywords=Solar+car+fan
rayra
Expedition Leader
Nope, didn't care too, other windows would be cracked open anyway, as well as the sunroof.
But the answer could be as easy as low-tack painters tape or one of those screen socks, slid over the whole window frame. Neither of which would be very attractive.
The other answer is shape the core panel which the fans are attached to so that it fills that narrow gap. And wind up with a narrow pointy fragile extension that complicates transport when it isn't mounted.
rayra
Expedition Leader
Taken me six months to complete my storage platform and major electrical additions and finally get around to constructing the MkII 12v ventilation fan window insert.
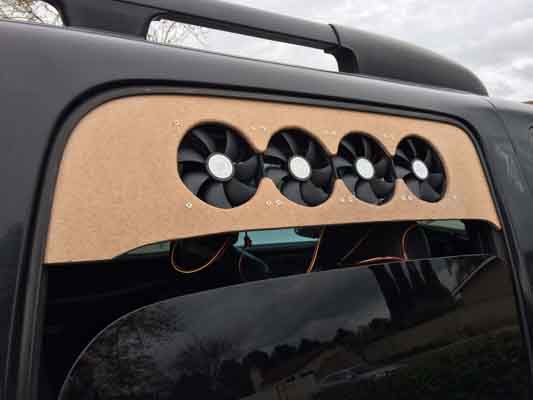
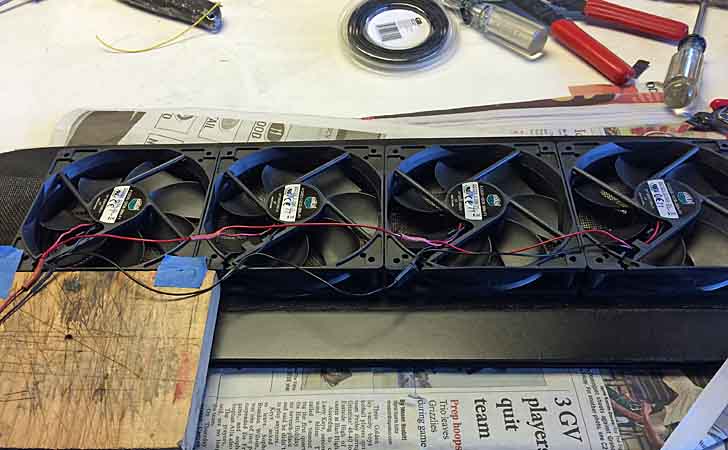
MkII instead uses the previously mentioned (4) 120mm computer fans, mounted in a row to greatly reduce the height of the insert. Each fan moves ~45cfm a small fraction of an amp at 12VDC native. All four together are about 0.6A and 180cfm. The internal volume of the Suburban is about 140cu'. So I can install a rheostat and dial the fans way down and still move a good portion of the vehicle air every minute for very little power.
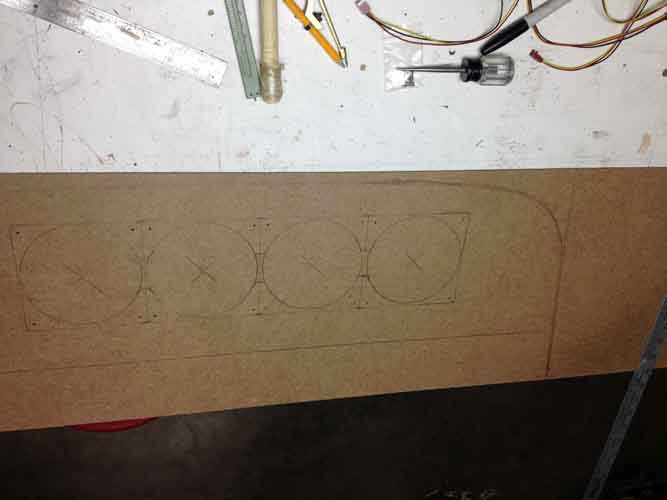
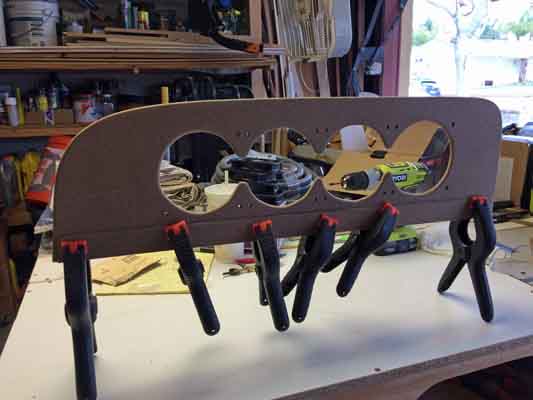
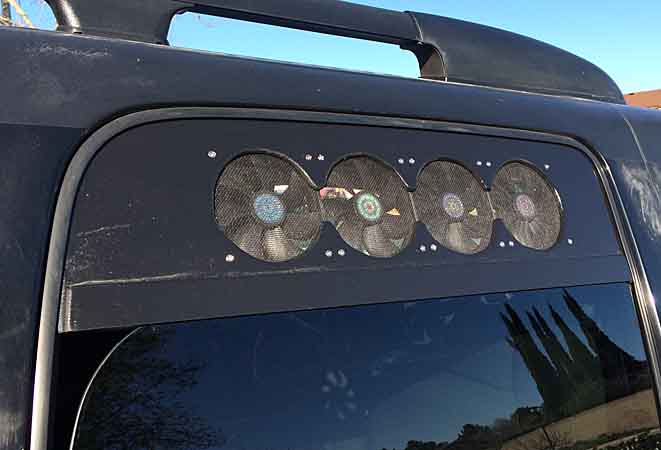
The insert is made from 1/8" pressboard, as that is what I had laying around. 1/4" would be fine / better. You need the thickness anyway. The insert pictured here is a double layer to make it slightly thicker than the window glass. The insert is fitted to wedge into the window track AND socket atop the window glass. With the window raised to trap the insert, it can't be readily removed.
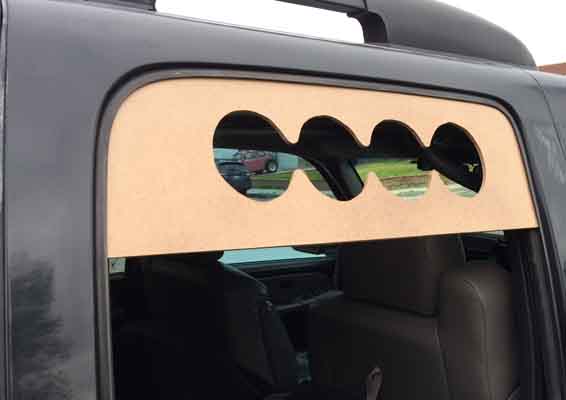
Here it is fit into the window frame
I used a compass to scribe / transfer the outline of the window glass to the insert and cut the insert to match the glass. Not strictly necessary in my design but it lets me make the bottom trapping trim pieces shorter in height.
Here it is with all four 120mm fans temporarily mounted.
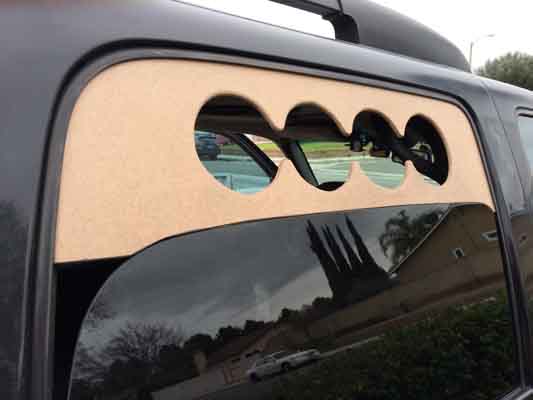
And here I'm gluing on the two bottom pieces to form the socket that will fit down over the window glass. These trim pieces are about 1/2"+ narrower in overall width than the insert itself, as these trim pieces won't / can't fit into the window track. I might reinforce this with a series of thru rivets. Most of the width of the trim pieces only overlaps the insert piece by about 1/2". Rivets would be insurance. Belt and suspenders.
More to come. Work in progress. Should have sunny and warmish temps the rest of the week to complete the painting and assembly.
will be sandwiching from black window screen between the fans and the insert, although there's a wide variety of computer fan mesh grills that could be used.
will be painting it satin black again, mostly due to my vehicle color. Easy enough to paint such a thing to match your vehicle paint.
Will probably use a small 1"x1"x2" electronic hobby enclosure / box as a wiring gang box and mounting location for a rheostat knob.
2950
MkII instead uses the previously mentioned (4) 120mm computer fans, mounted in a row to greatly reduce the height of the insert. Each fan moves ~45cfm a small fraction of an amp at 12VDC native. All four together are about 0.6A and 180cfm. The internal volume of the Suburban is about 140cu'. So I can install a rheostat and dial the fans way down and still move a good portion of the vehicle air every minute for very little power.
The insert is made from 1/8" pressboard, as that is what I had laying around. 1/4" would be fine / better. You need the thickness anyway. The insert pictured here is a double layer to make it slightly thicker than the window glass. The insert is fitted to wedge into the window track AND socket atop the window glass. With the window raised to trap the insert, it can't be readily removed.
Here it is fit into the window frame
I used a compass to scribe / transfer the outline of the window glass to the insert and cut the insert to match the glass. Not strictly necessary in my design but it lets me make the bottom trapping trim pieces shorter in height.
Here it is with all four 120mm fans temporarily mounted.
And here I'm gluing on the two bottom pieces to form the socket that will fit down over the window glass. These trim pieces are about 1/2"+ narrower in overall width than the insert itself, as these trim pieces won't / can't fit into the window track. I might reinforce this with a series of thru rivets. Most of the width of the trim pieces only overlaps the insert piece by about 1/2". Rivets would be insurance. Belt and suspenders.
More to come. Work in progress. Should have sunny and warmish temps the rest of the week to complete the painting and assembly.
will be sandwiching from black window screen between the fans and the insert, although there's a wide variety of computer fan mesh grills that could be used.
will be painting it satin black again, mostly due to my vehicle color. Easy enough to paint such a thing to match your vehicle paint.
Will probably use a small 1"x1"x2" electronic hobby enclosure / box as a wiring gang box and mounting location for a rheostat knob.
2950
Last edited:
rayra
Expedition Leader
Could fit some 45deg louvred fan grills on the inner side, mount them so the rearmost two fans blow towards the rear of the vehicle, the front-most towards the front and the 2nd fan blows in and down.
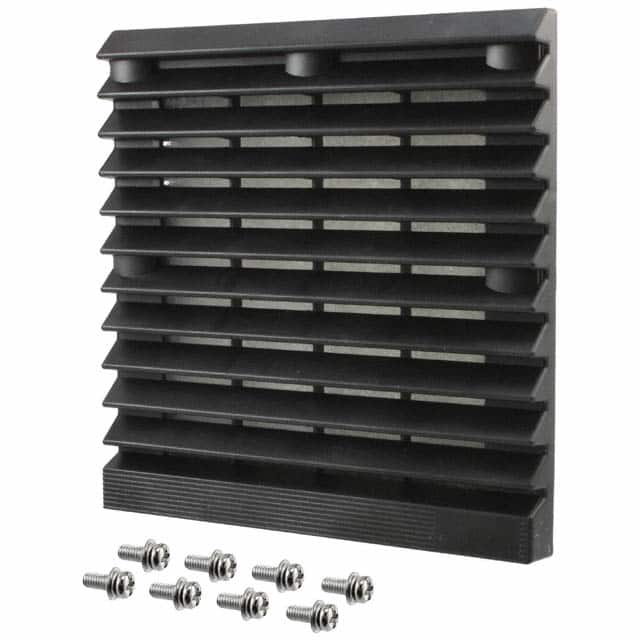
There are also all sorts of mesh grill screens in the computer modding world that could be mounted on the outer side for a more finished clean look.
Painting proceeding in the cool air / full sun. Might have some painted assembly shots tonight or maybe tomorrow. Fiddling with the wiring arrangement now, stripping and trimming wires. Arranging and splicing the built-in leads so they all get the same base voltage. Still don't have my rheostat or job box yet.
rayra
Expedition Leader
Your welcome. Like my other projects, maybe it will stimulate ideas for others. Or motivate folks to build their own stuff. This is the kind of project that's more of a prototyping sort of thing, btu which gets abandoned when it's 'close enough'. If I have the budget or means for 'rapid prototyping' sorts of equipment, like a 3D printer or a CNC cutting table I could make these things a lot cleaner or even entertain the idea of a limited production run. It would even be possible to custom-tailor the design using just a pattern or tracing of the glass edge of a customer's vehicle and use a 'standard' fan array module. Tracing, digitization, automated cutting, easy assembly of standard components, quick turnaround. Even faster if enough orders for a same-model vehicle arrive and the window profiles accrue.
Such a tiny niche market I would think and don't have the capital to explore it. Or exploit it properly.
Anyway, the MkII insert is crappily painted, screen mesh and fans mounted, and I've spliced / soldered the fan wires together. Also poorly. I wanted to keep the wires tucked in close to the fans and cut them down too short. Once spliced and heat shrink applied the wire routing didn't work out well. I'll have to cut and re-splice things to make it prettier. Not sure I care to.
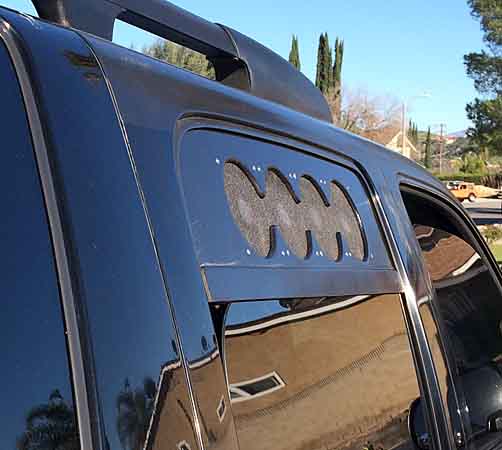
You see the buffer damage to my paint. The tops of the doors and window sills (where your arm would rest) were stripped almost bare when I got it. I did some rattle-can coverage two years ago just to forestall rusting. Now other areas on the doors are breaking down. So I'll be repainting these passenger doors later this year.
Splicing the wires, turning all the cut-down pigtail wiring into an ad-hoc wiring harness so it ends in a single pair of wires. I'll be using a 12v cig lighter plug and ~8' of black lamp cord and they'll connect to each other via a rheostat switch in a small enclosure mounted next to the left (forward) end of the fan array.
3170
Such a tiny niche market I would think and don't have the capital to explore it. Or exploit it properly.
Anyway, the MkII insert is crappily painted, screen mesh and fans mounted, and I've spliced / soldered the fan wires together. Also poorly. I wanted to keep the wires tucked in close to the fans and cut them down too short. Once spliced and heat shrink applied the wire routing didn't work out well. I'll have to cut and re-splice things to make it prettier. Not sure I care to.
You see the buffer damage to my paint. The tops of the doors and window sills (where your arm would rest) were stripped almost bare when I got it. I did some rattle-can coverage two years ago just to forestall rusting. Now other areas on the doors are breaking down. So I'll be repainting these passenger doors later this year.
Splicing the wires, turning all the cut-down pigtail wiring into an ad-hoc wiring harness so it ends in a single pair of wires. I'll be using a 12v cig lighter plug and ~8' of black lamp cord and they'll connect to each other via a rheostat switch in a small enclosure mounted next to the left (forward) end of the fan array.
3170
Last edited: