How would you outfit this custom LJ?
- Thread starter jscherb
- Start date
jscherb
Expedition Leader
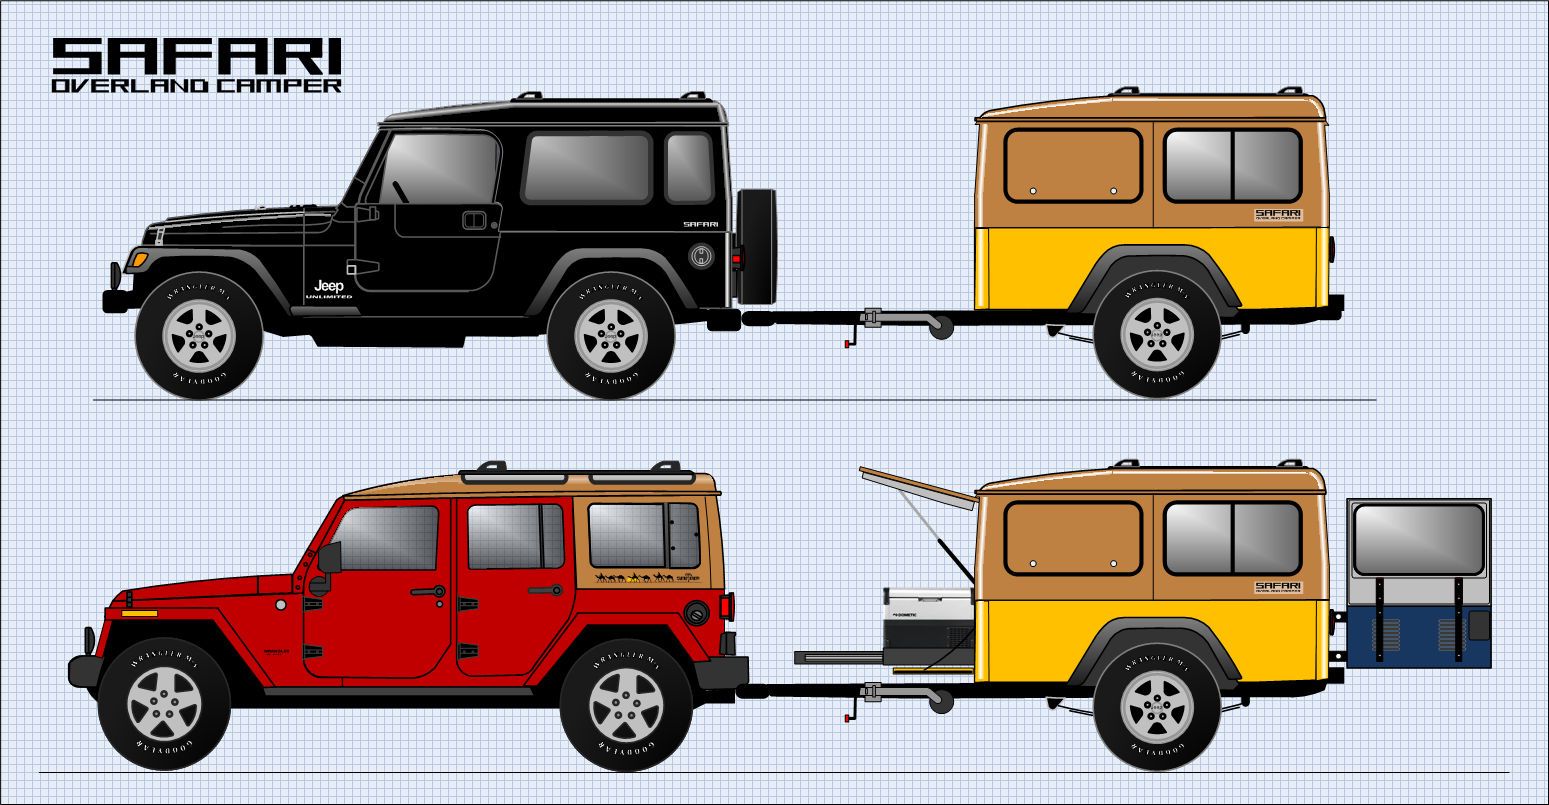
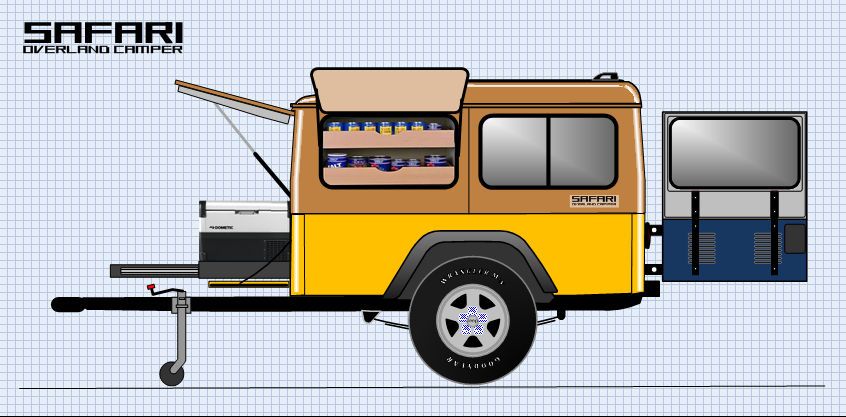
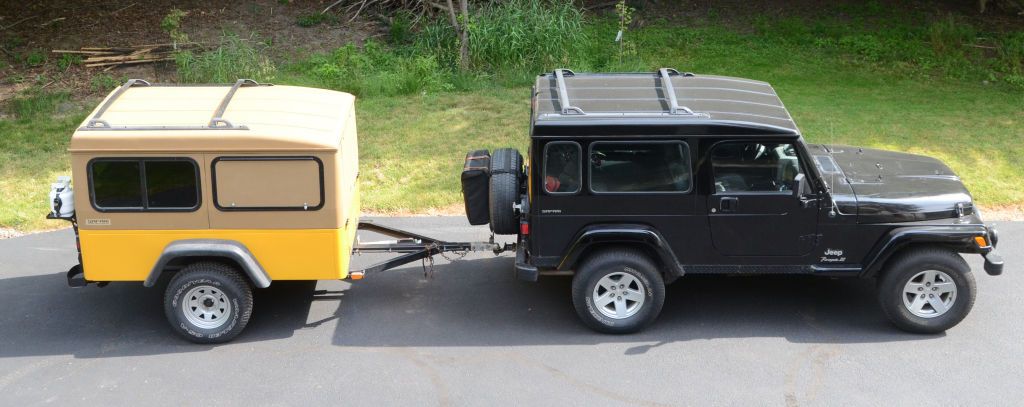
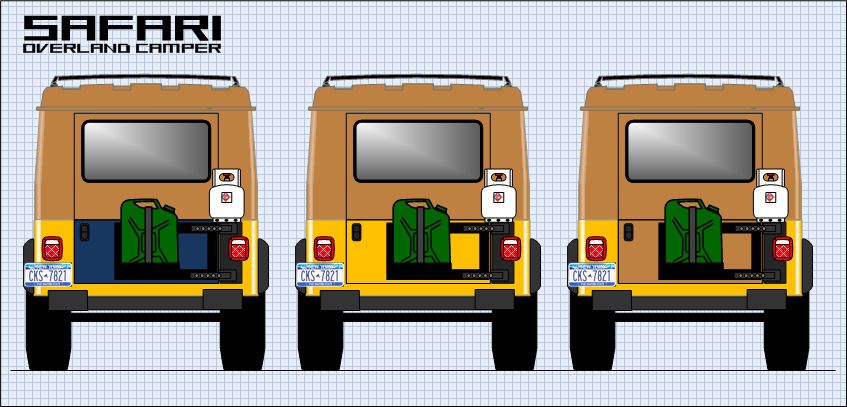
A couple of quick sketches of the current Safari Cab camper project along with two of my Jeeps. The bottom image shows the rear barn door open (the tailgate is still its original blue and the inside of the barn door is currently in primer, so that's how they're pictured) and the front hatch and swing down tailgate open with the Trail Kitchen installed and deployed.
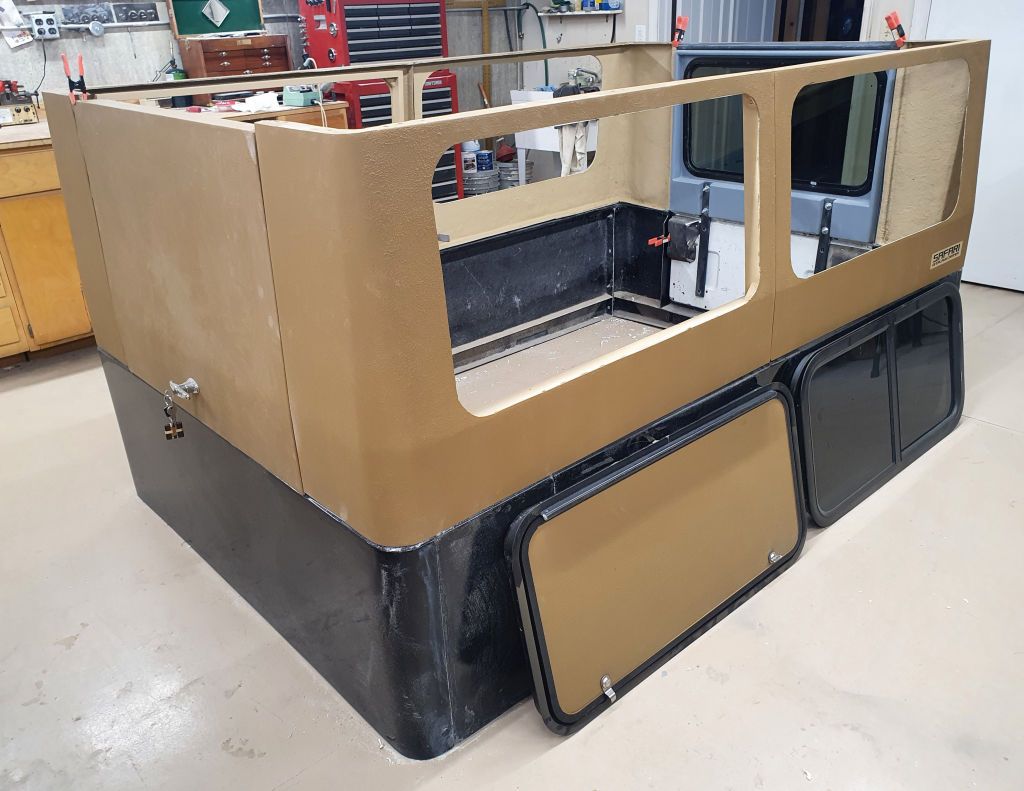
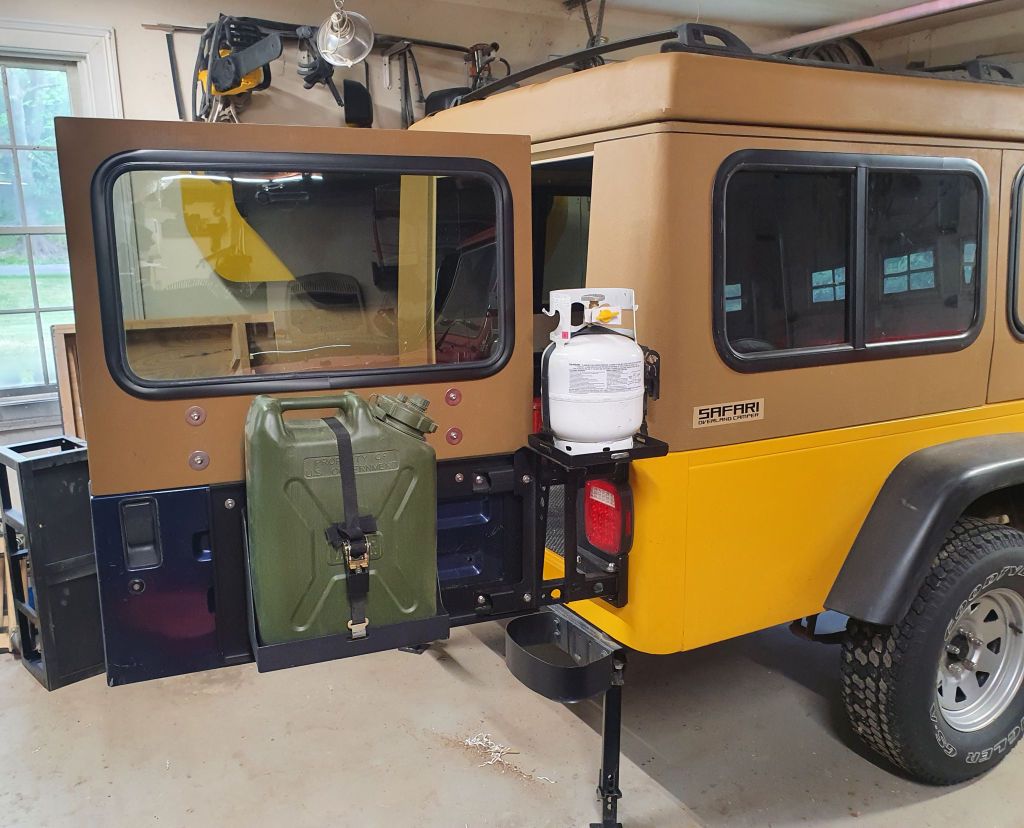
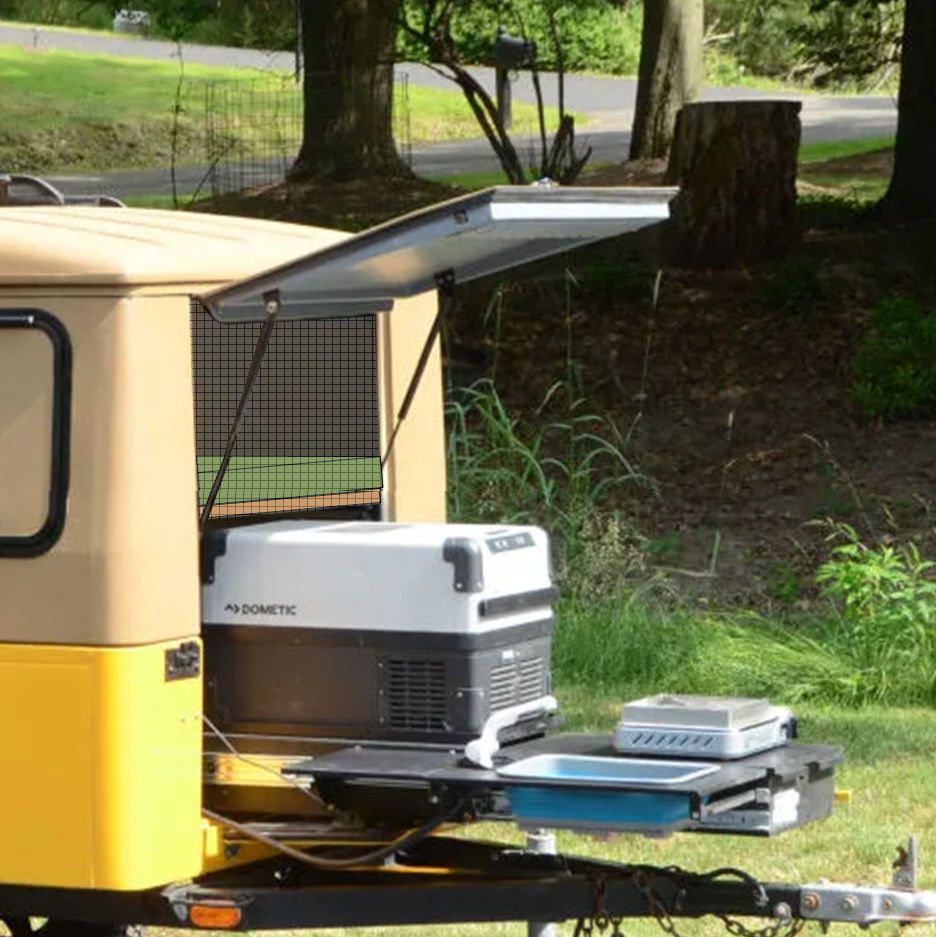
Sides, roof, barn door and front hatch are now installed; I plan to install the windows and side hatches today. Some work in progress photos, as it is this morning:

Sides, roof, barn door and front hatch are now installed; I plan to install the windows and side hatches today. Some work in progress photos, as it is this morning:
jscherb
Expedition Leader
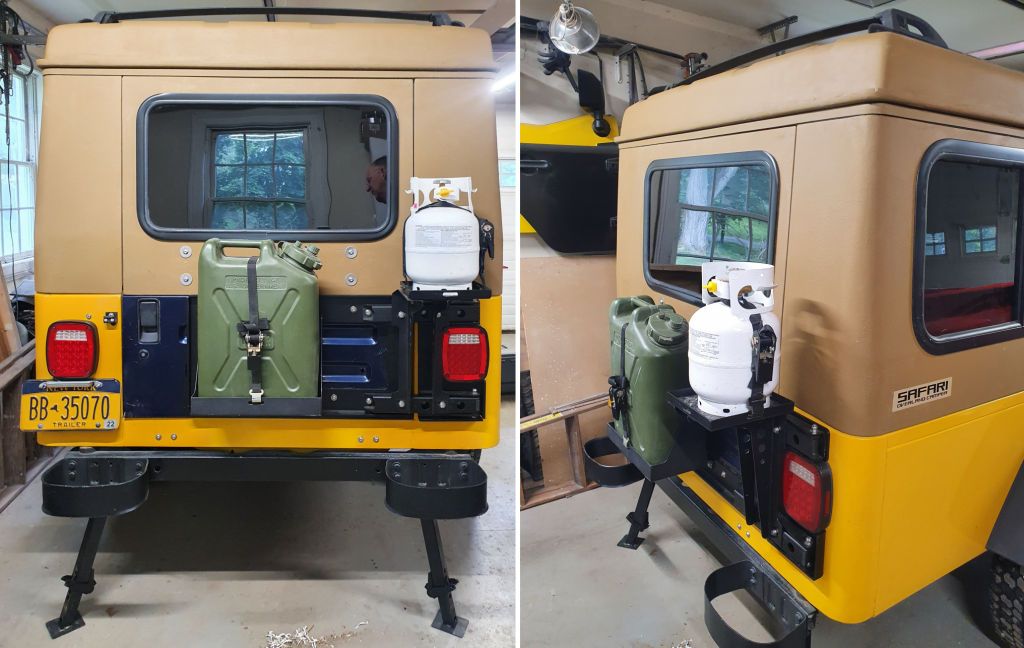
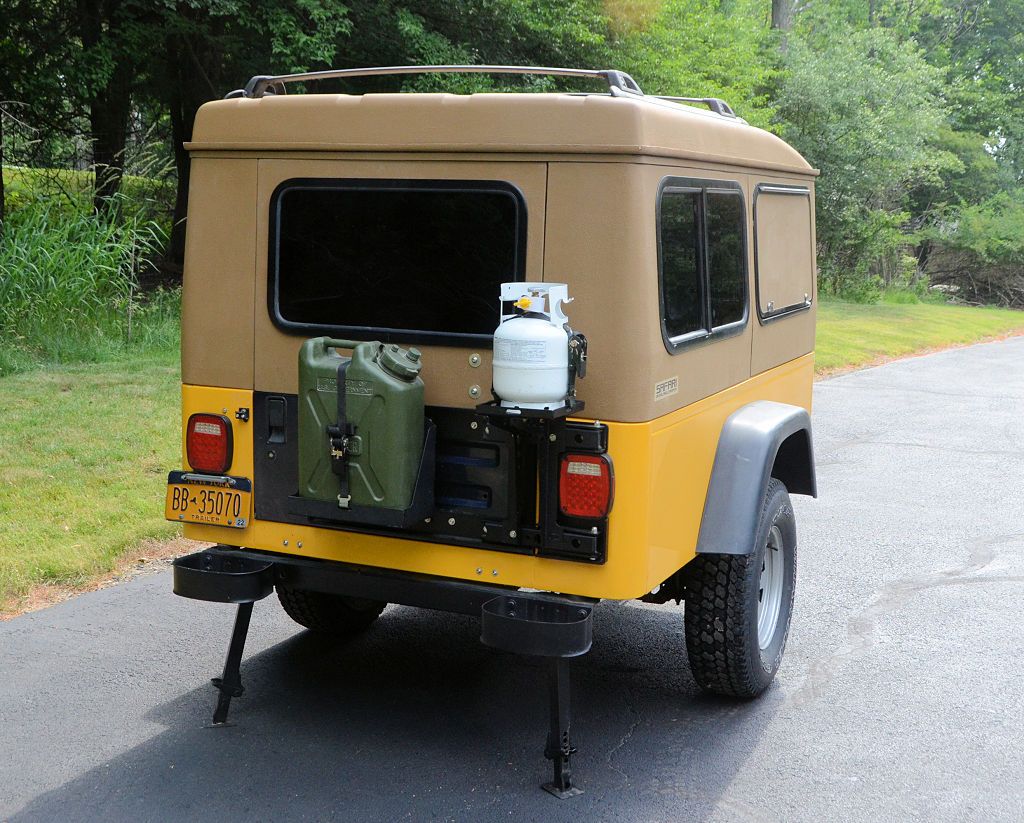
A couple of weeks ago I posted about installing a MORryde reinforcement and HD hinges on the tailgate for this trailer. I don't plan to carry a large spare on the tailgate, but I do plan to carry gear there so I installed the reinforcement so the tailgate could carry anything I decided to mount there.
Since this is a camper, I'm mounting a jerry can for water. It's very simple to mount a MORryde jerry can tray on the reinforcement, all that's necessary is drilling a few holes in the back of the tray and that will give me a place to carry 5 gallons of water. I also plan to carry a small propane tank on the HD hinges - a while back I designed and built a carrier for propane tanks that bolts to either the TJ/LJ HD hinges or the JK HD hinges.
What both will look like when installed:
.jpg)
There's room on the tailgate for two jerry cans and it wouldn't be hard to fabricate a carrier for two cans - I'd probably start by bolting two MORryde jerry can trays together side by side.
Some thoughts about sleeping in the camper... even without a pop-up roof, there's room inside for sleeping. A sleeping platform would go just above the fridge.
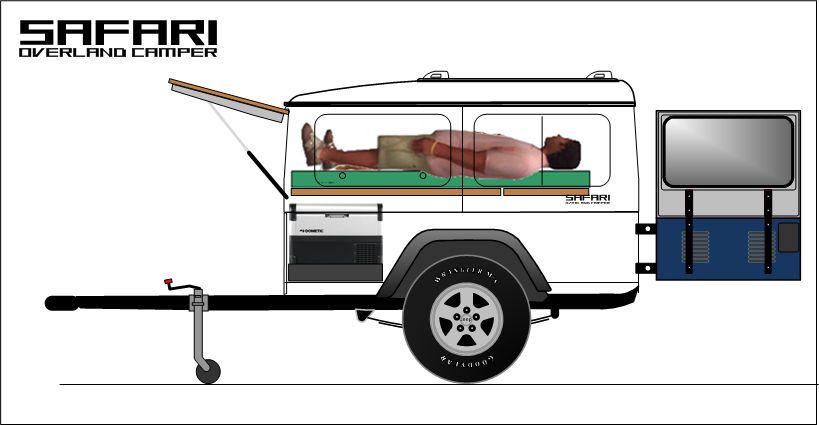
The mattress and bed platform would be in two pieces; a section of both could be repositioned as a seat:
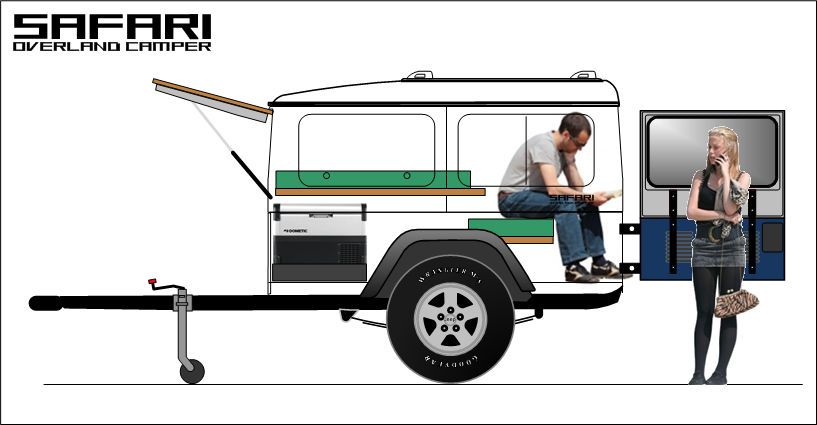
With the pop-top up, there would be enough room to stand in the back.
Storage would be in under the bed; items that get set up at the campsite, like chairs, would go in the back and be removed at the campsite to provide the sleeping/sitting room.
The fridge battery will be mounted behind the Trail Kitchen, and will be charged the same way it is charged when it's in the Jeep - by the Trail Kitchen Charging System when the engine is running (I've already got a 12v outlet for the charging system next to the trailer lighting connector near the hitch on the JKU), and since I've installed an XJ roof rack on the trailer, the same rack with the Solar Trax solar panel that I use on the Jeeps can be installed on the trailer.
Another place some storage could be built would be inside the side hatches.
I don't plan to do the full camper implementation immediately because I've got some cargo-hauling trips coming up very soon and I'll need all available space inside for that.
Since this is a camper, I'm mounting a jerry can for water. It's very simple to mount a MORryde jerry can tray on the reinforcement, all that's necessary is drilling a few holes in the back of the tray and that will give me a place to carry 5 gallons of water. I also plan to carry a small propane tank on the HD hinges - a while back I designed and built a carrier for propane tanks that bolts to either the TJ/LJ HD hinges or the JK HD hinges.
What both will look like when installed:
There's room on the tailgate for two jerry cans and it wouldn't be hard to fabricate a carrier for two cans - I'd probably start by bolting two MORryde jerry can trays together side by side.
Some thoughts about sleeping in the camper... even without a pop-up roof, there's room inside for sleeping. A sleeping platform would go just above the fridge.
The mattress and bed platform would be in two pieces; a section of both could be repositioned as a seat:
With the pop-top up, there would be enough room to stand in the back.
Storage would be in under the bed; items that get set up at the campsite, like chairs, would go in the back and be removed at the campsite to provide the sleeping/sitting room.
The fridge battery will be mounted behind the Trail Kitchen, and will be charged the same way it is charged when it's in the Jeep - by the Trail Kitchen Charging System when the engine is running (I've already got a 12v outlet for the charging system next to the trailer lighting connector near the hitch on the JKU), and since I've installed an XJ roof rack on the trailer, the same rack with the Solar Trax solar panel that I use on the Jeeps can be installed on the trailer.
Another place some storage could be built would be inside the side hatches.
I don't plan to do the full camper implementation immediately because I've got some cargo-hauling trips coming up very soon and I'll need all available space inside for that.
jscherb
Expedition Leader
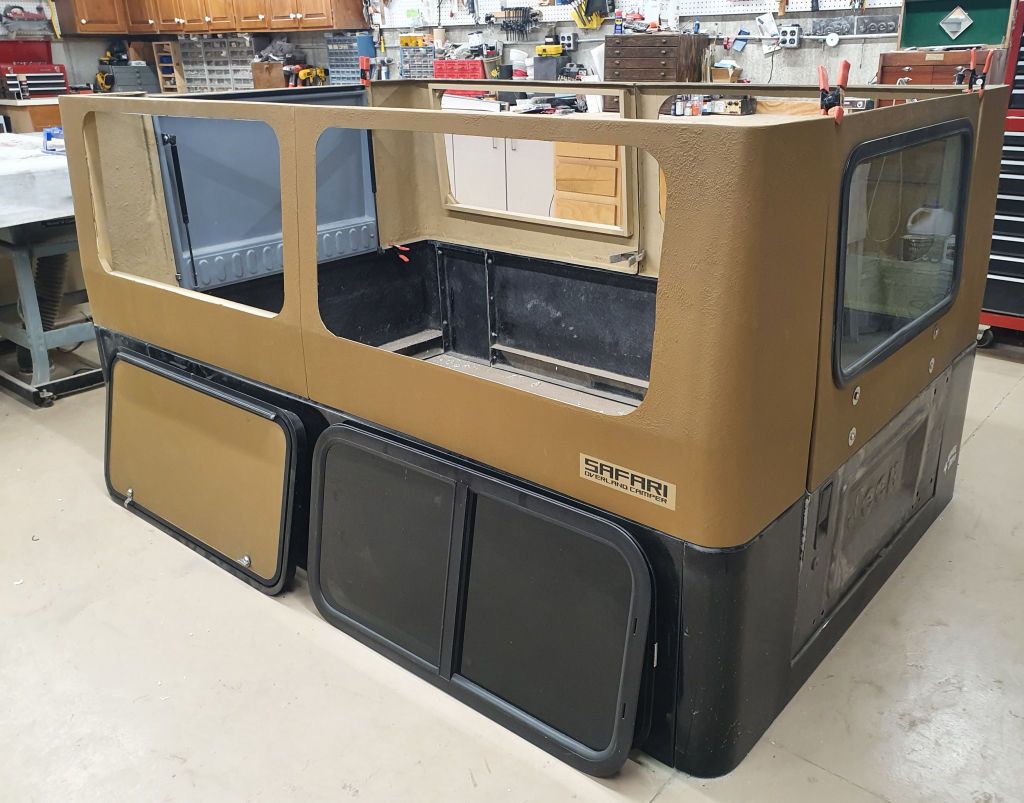
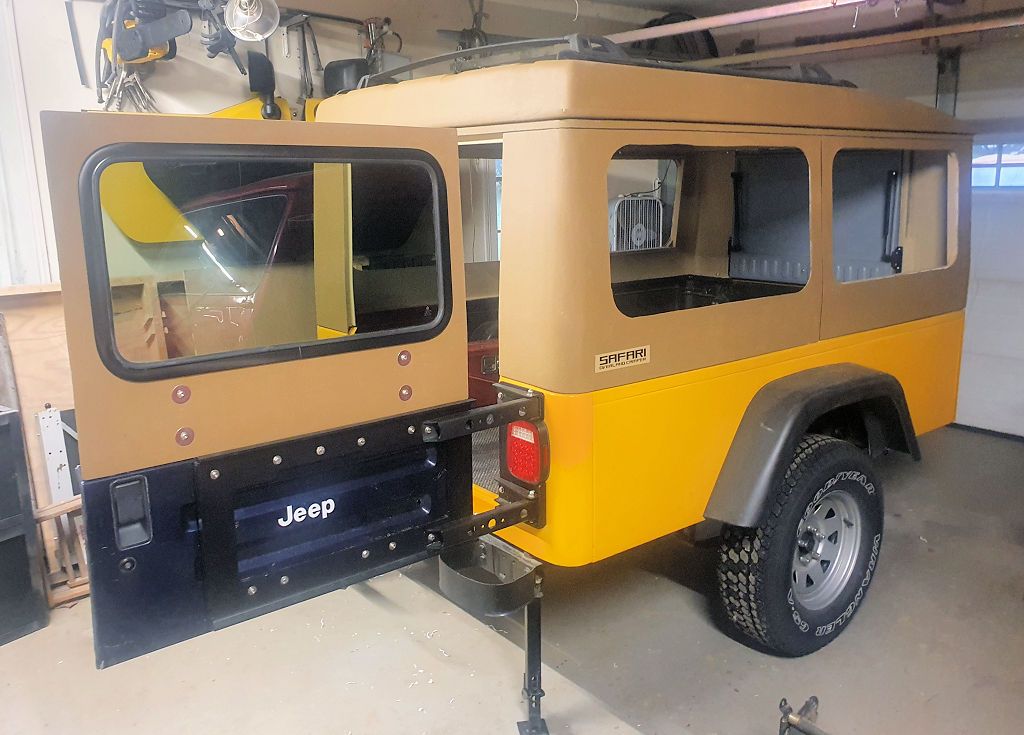
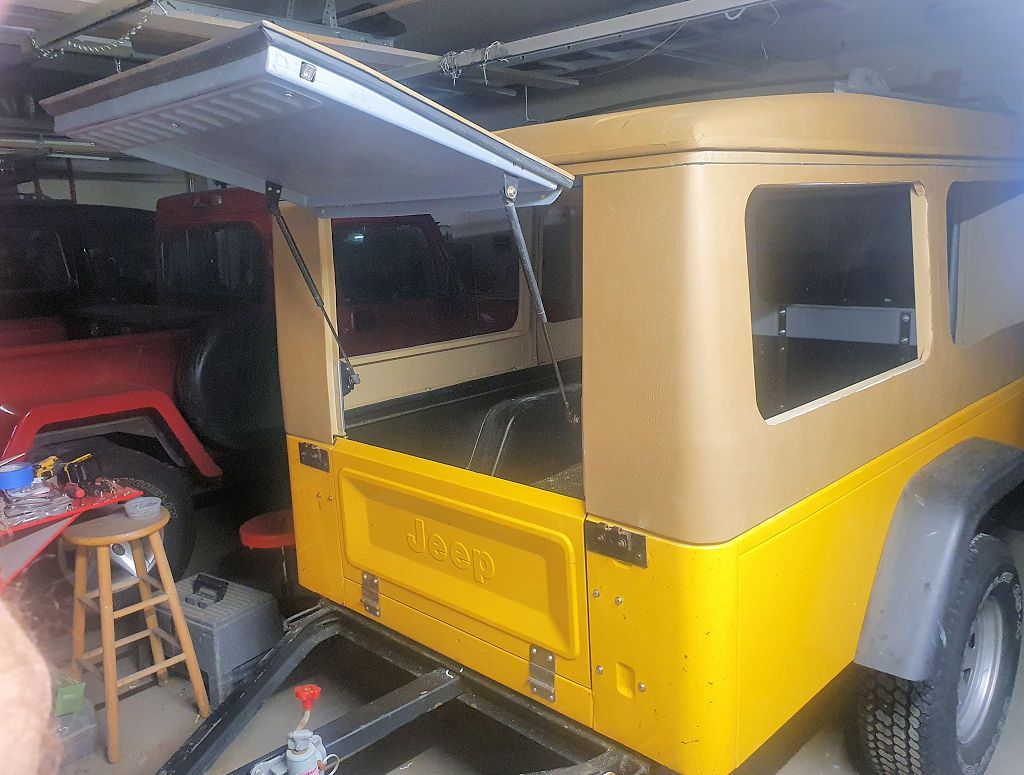
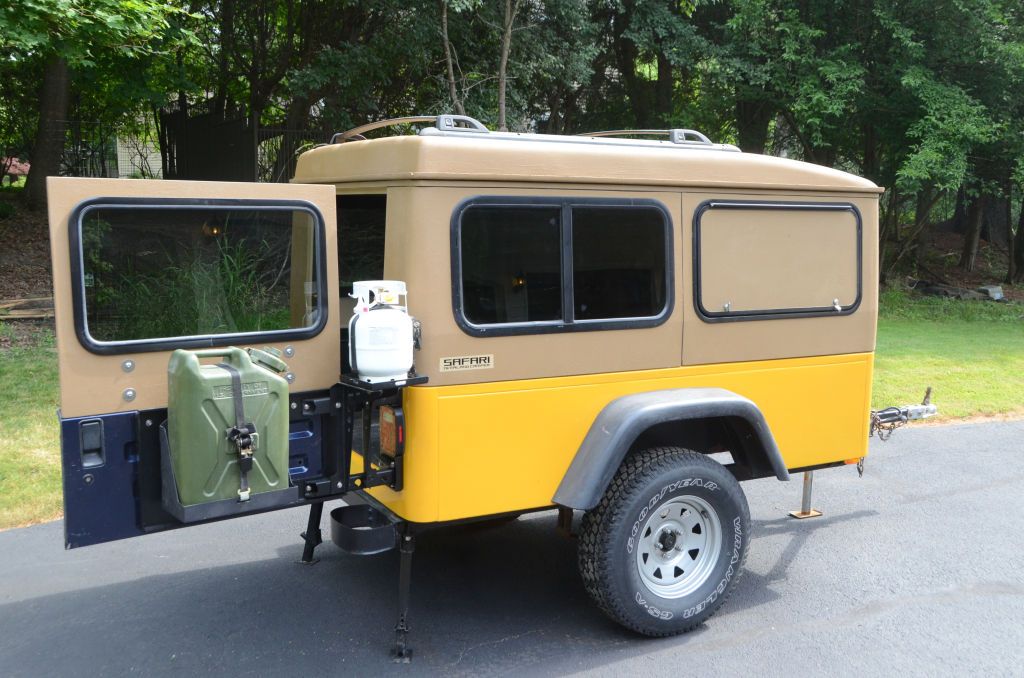
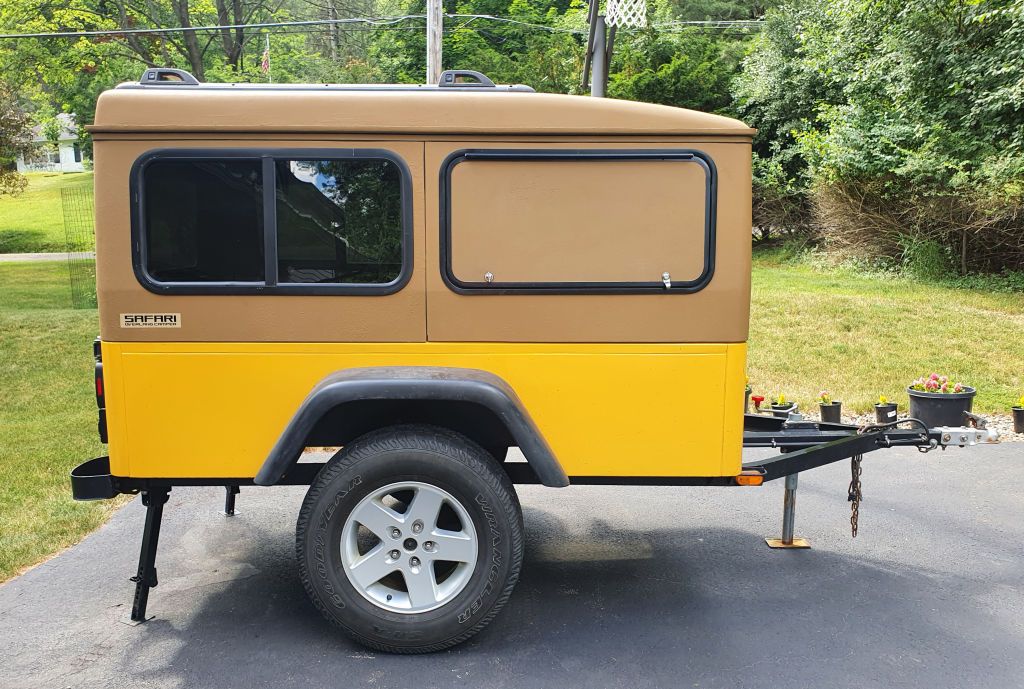
Today I finished the basic assembly of the camper shell. Some photos...
The hatch on the front:
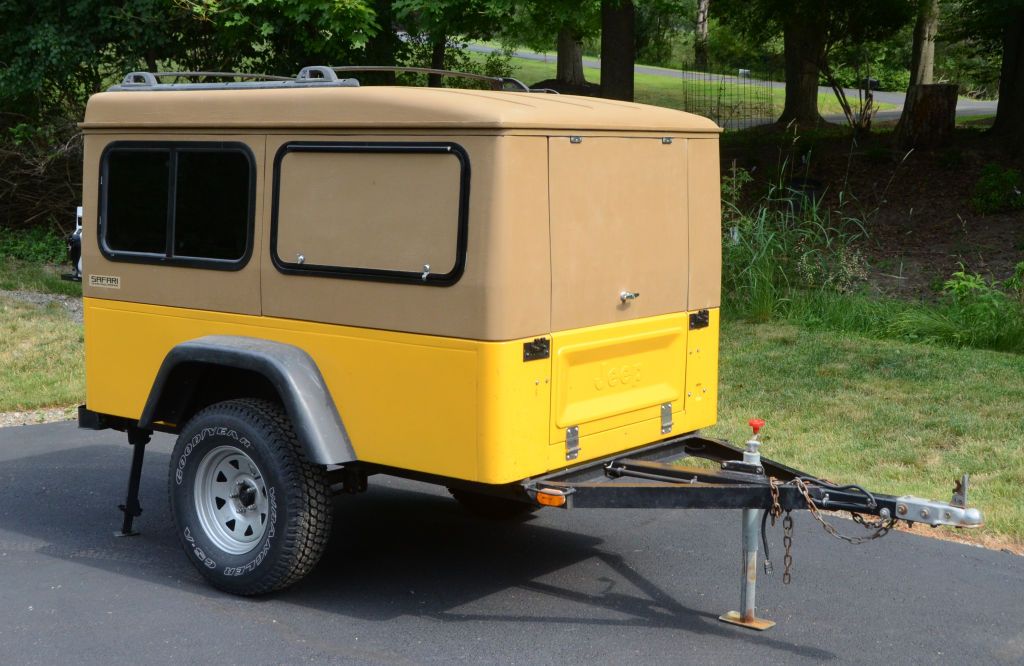

The barn door on the back:
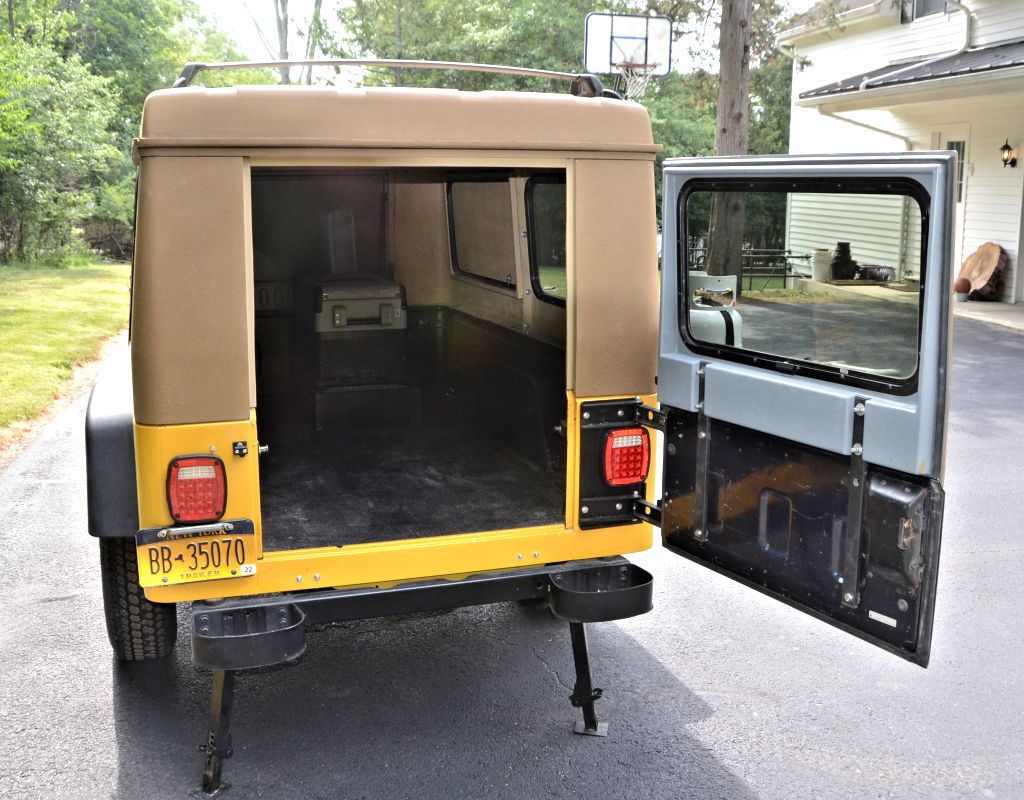
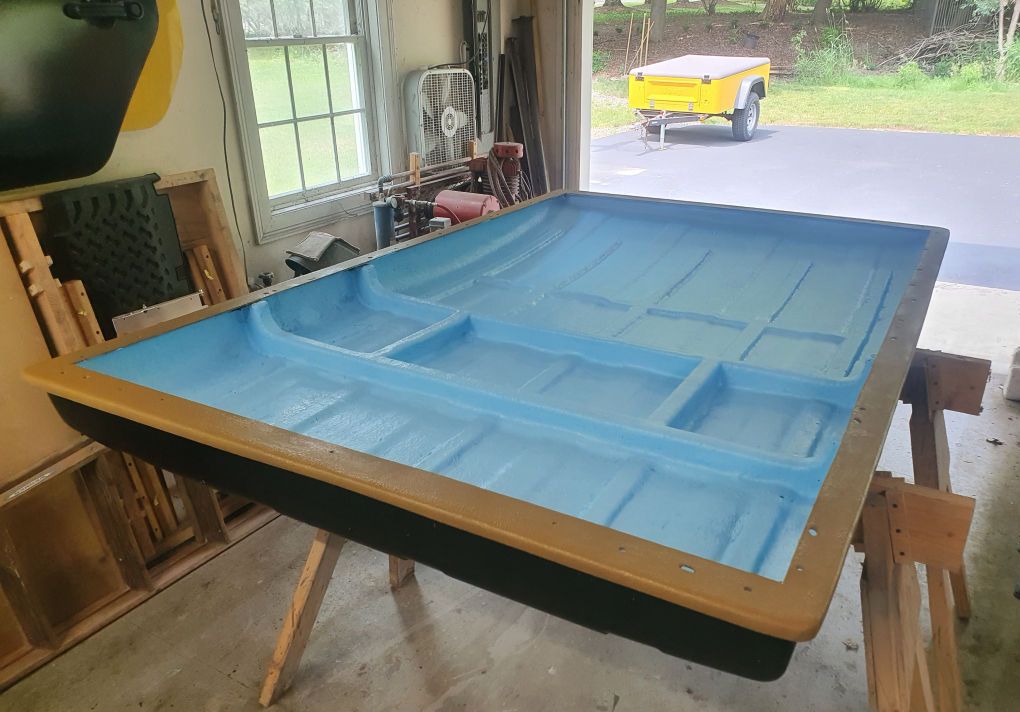
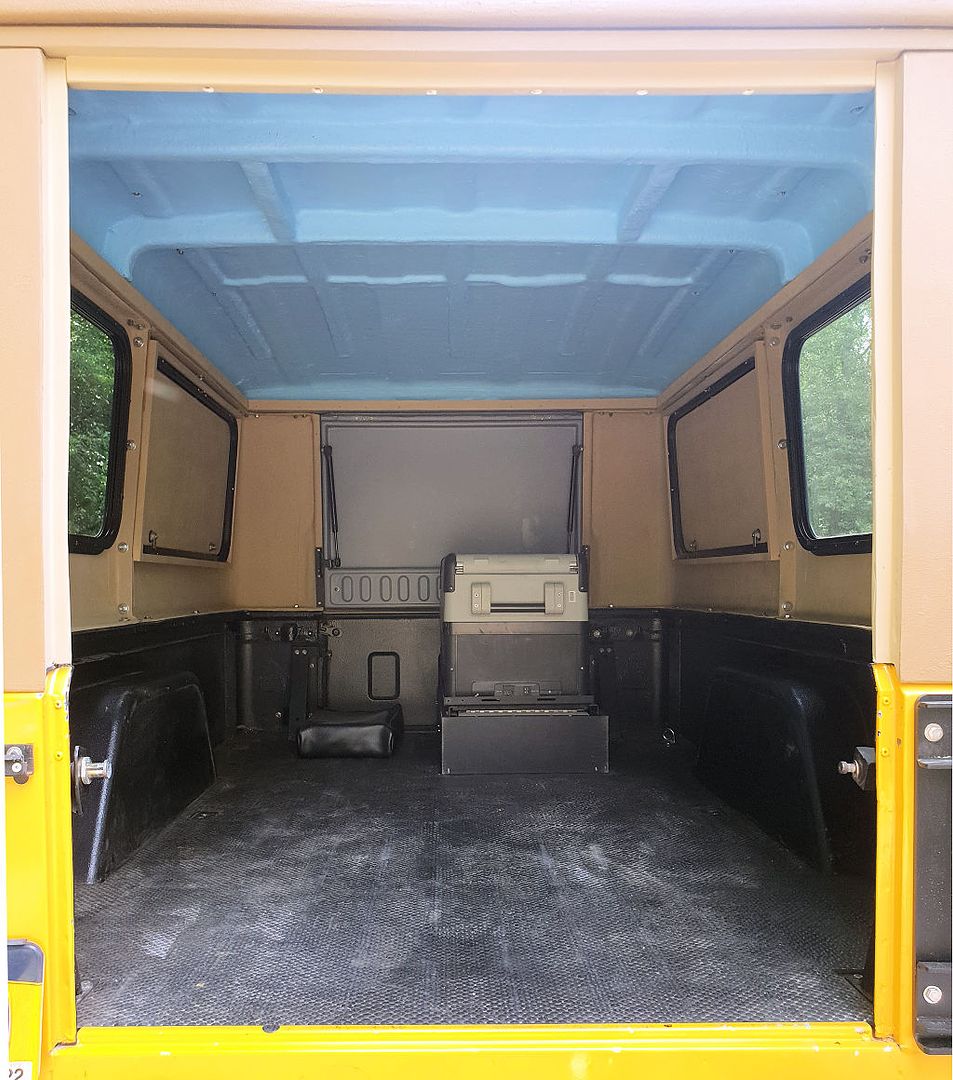
Looking in through the barn door... there's a lot of space inside. I painted the ceiling sky blue because I thought it would be fun.
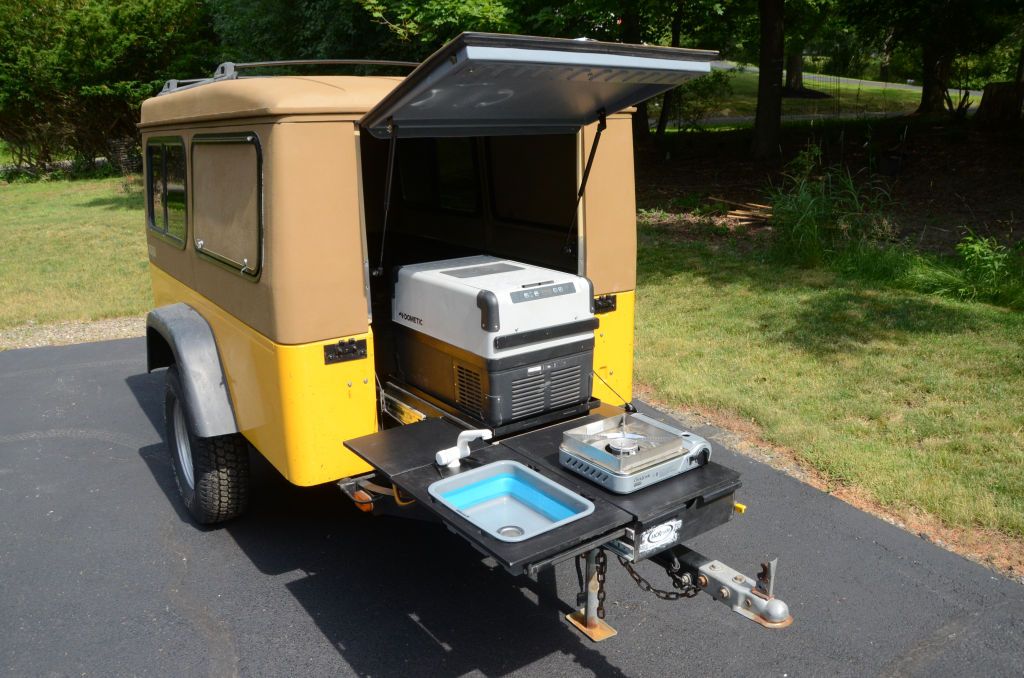
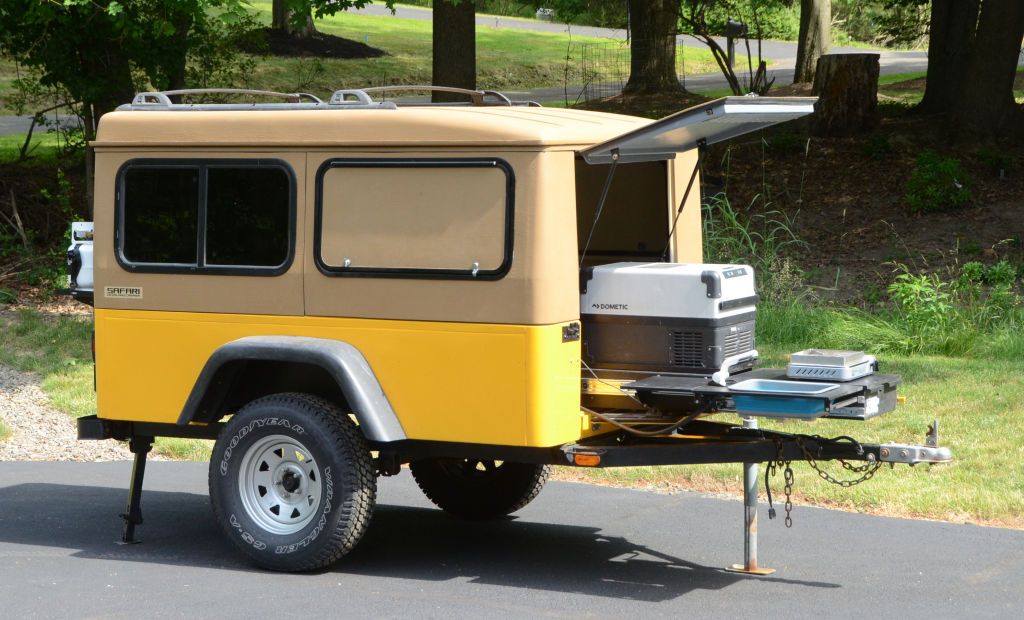
Deploying the Trail Kitchen takes less than a minute:
With the LJ:
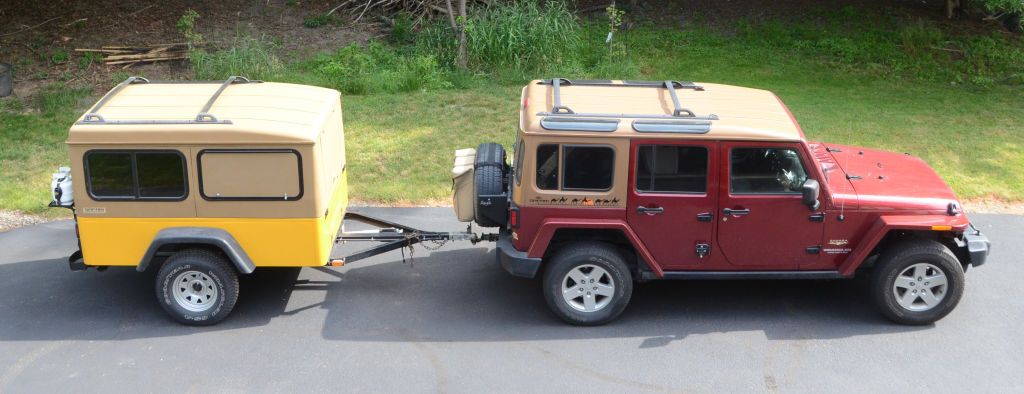
And the JKU:
The hatch on the front:
The barn door on the back:
Looking in through the barn door... there's a lot of space inside. I painted the ceiling sky blue because I thought it would be fun.
Deploying the Trail Kitchen takes less than a minute:
With the LJ:
And the JKU:
jscherb
Expedition Leader
Probably won't do much more on this project for a while, the trailer is needed to haul cargo on a few upcoming trips. But when I get back to it, the main interior build will be a sleeping platform at a height to clear the top of the kitchen. It'll be removable so the trailer can be cleared out for cargo use. BTW the Trail Kitchen installs with only 3 bolts into nutserts in the floor, so that's very quick to install/remove. The sleeping platform will be in two pieces as I showed in the drawings the other day, the end of the platform will be removable so it can be repositioned as a seat when needed. Other than that, some screens on the inside of the side hatches and a few other creature comforts.Very nice!
Looking forward to any interior build out that you have planned
jscherb
Expedition Leader
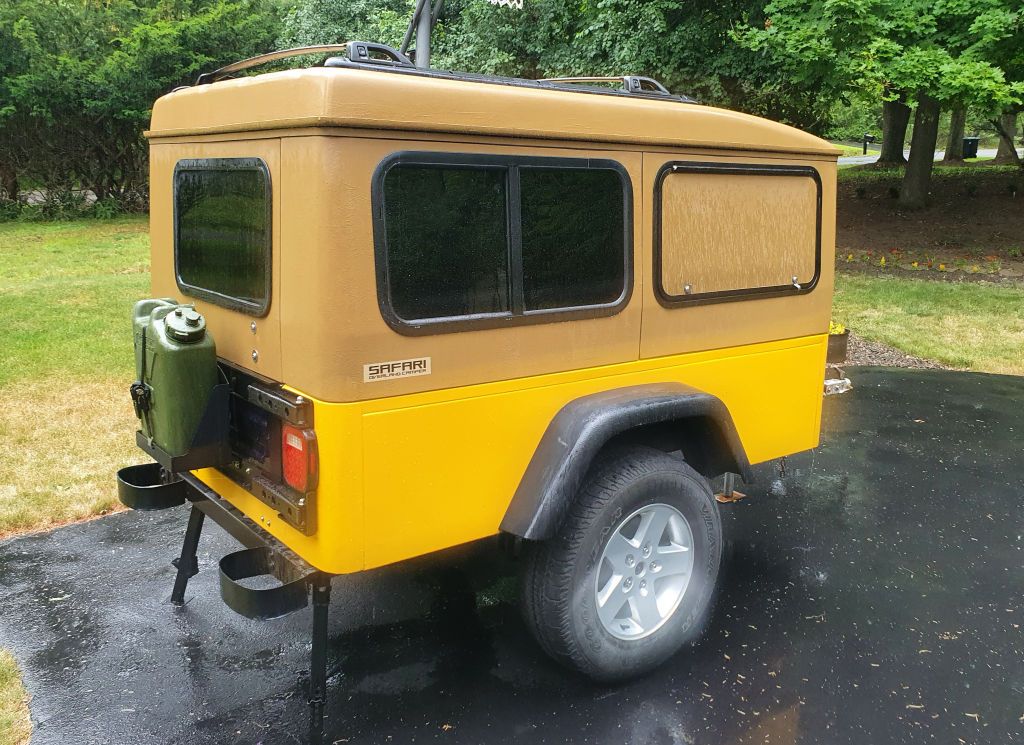
One more change to the camper, mostly for the convenience of a single spare... most of the trips I make with this trailer these days it's towed by the JKU. The trailer has had a TJ bolt circle on the axles since I built it (I only had TJ's when I built it). Changing the bolt circle was easy because spacers are required - the center hole in a Jeep wheel is smaller than a trailer hub; spacers move the wheel out enough so the center hole isn't an issue so I just changed the spacers from TJ bolt circle to JK. But, JK wheels have a much larger backspace than TJ wheels so I had to lengthen the axle so the tires wouldn't rub on the inner fenders of the trailer tub.
These are factory 32 JK wheels and tires; before this I had 30's.
Now the JK spare can serve for both the trailer and the Jeep. If I take the trailer on a trip with one of the other Jeeps, I can swap the spacers and bolt TJ wheels in place.
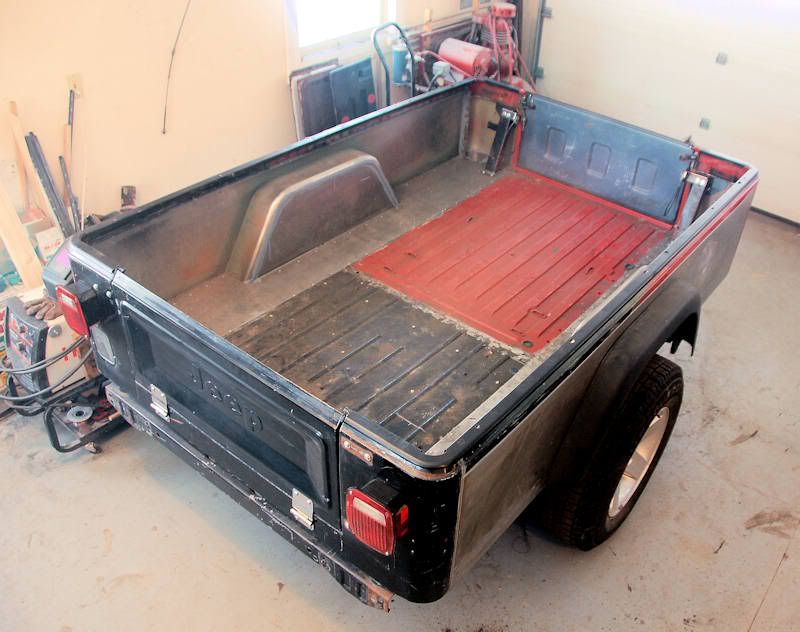
If you're wondering why there wasn't enough clearance to the inner fenders, when I built the trailer I made narrow inner fenders that provided just over 48" between them to maximize interior space and to make it easier to carry a 4x8 in the trailer. This photo was taken when I was building the trailer and shows one of the narrow inner fenders:
These are factory 32 JK wheels and tires; before this I had 30's.
Now the JK spare can serve for both the trailer and the Jeep. If I take the trailer on a trip with one of the other Jeeps, I can swap the spacers and bolt TJ wheels in place.
If you're wondering why there wasn't enough clearance to the inner fenders, when I built the trailer I made narrow inner fenders that provided just over 48" between them to maximize interior space and to make it easier to carry a 4x8 in the trailer. This photo was taken when I was building the trailer and shows one of the narrow inner fenders:
Jurfie
Adventurer
The bottom image shows the rear barn door open (the tailgate is still its original blue and the inside of the barn door is currently in primer, so that's how they're pictured)
Your commitment to accurate renderings cracks me up.

Any thought given to a possible way to have a drop down or retractable insect screen behind the Trail Kitchen to keep insects from entering while you’re cooking? Maybe if the TK pulled out another couple of inches, you could have a screen in the opening held in place with magnets (if metal strips were embedded in the fibreglass) or hook and loop?
It would save you from swatting mosquitos before retiring for the night (or while you try to sleep) after you’ve closed everything up.
jscherb
Expedition Leader
Your commitment to accurate renderings cracks me up.
I believe accurate design drawings are a big part of the success of my projects. With an accurate drawing any flaws in the design can be spotted more easily and corrected in the design phase, rather than during construction. As for the tailgate color, as long as I'm being accurate I might as well show the tailgate in blue. I haven't decided what I'll do with the tailgate yet, here are some options:
The Trail Kitchen is already mounted as close to the front tailgate/hatch as possible, so there will always be a few inches of the kitchen that are still behind the opening. I think a two-part screen would work best. The sleeping platform is pictured in the drawing below, a screen covering the front of that could protect the front of that and a separate screen (or just fabric) could protect the kitchen opening below.Any thought given to a possible way to have a drop down or retractable insect screen behind the Trail Kitchen to keep insects from entering while you’re cooking? Maybe if the TK pulled out another couple of inches, you could have a screen in the opening held in place with magnets (if metal strips were embedded in the fibreglass) or hook and loop?
It would save you from swatting mosquitos before retiring for the night (or while you try to sleep) after you’ve closed everything up.
The design also calls for screens in the side hatches and gas struts to hold them open to prevent rain entry (some details of the rain protection are not shown in these images).
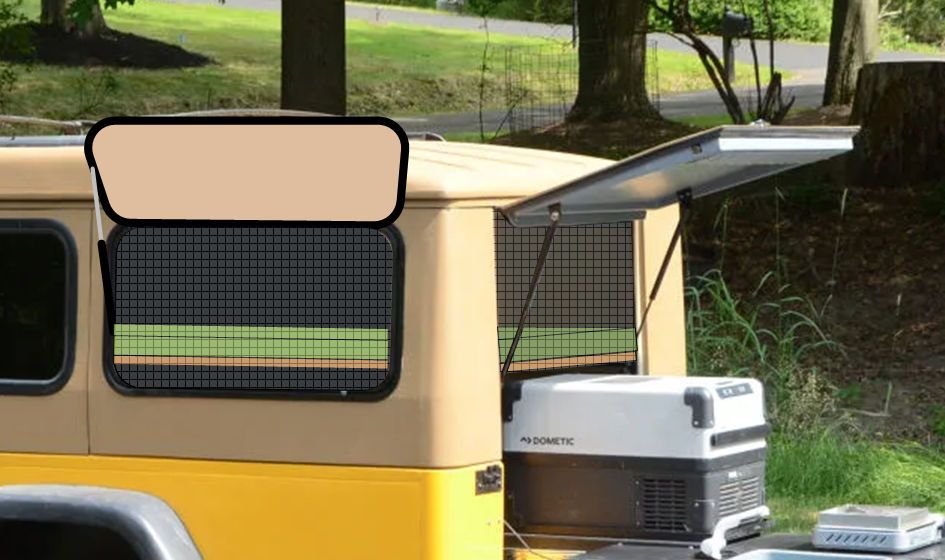
And the design also calls for a side-hinged pop-top (some details are omitted in the image below, such as a rain fly for the windows in the pop top)...

I don't know how far I'll take this project but the images above show the full design that could be implemented.
Jurfie
Adventurer
The Trail Kitchen is already mounted as close to the front tailgate/hatch as possible, so there will always be a few inches of the kitchen that are still behind the opening. I think a two-part screen would work best. The sleeping platform is pictured in the drawing below, a screen covering the front of that could protect the front of that and a separate screen (or just fabric) could protect the kitchen opening below.
That makes a lot of sense. I see now that the sleeping platform is over top of the kitchen, thereby all it to be isolated from the kitchen “cubby” below. In that case, there’s no real need for a screen behind the TK (IMO). The screen above and inside would work great.
I like this project (actually, I like all of your projects!); I hope you keep going!
jscherb
Expedition Leader
Thank you very much.That makes a lot of sense. I see now that the sleeping platform is over top of the kitchen, thereby all it to be isolated from the kitchen “cubby” below. In that case, there’s no real need for a screen behind the TK (IMO). The screen above and inside would work great.
I like this project (actually, I like all of your projects!); I hope you keep going!
Probably there are only two additional things I'll do before the trailer's next cargo trip.
I picked up a bunch of gas struts and brackets at my favorite RV surplus store a while back so I plan to add them to the side hatches. Not sure which ones I'll use, but at $1.00 each I bought several different sizes and brackets to try. Only some of the ones I've got are pictured here:

BTW if anyone is building a camper, trailer or even outfitting their Jeep for overlanding/camping, Bontragers Surplus (https://bontragers.com/) is a great place for almost anything you might find in an RV. They're near Elkhart, Indiana (the Detroit of the RV industry) and carry all kinds of things that are surplus to the RV industry. They list a few of their items are on eBay but you really have to visit their 3 buildings and outside lot to see everything. For example, they have hundreds of RV windows and hatches in many sizes and styles and these rarely get listed on eBay. The windows and hatches on the sides of this trailer came from Bontragers.
The other thing I may do in the near term is install the wiring and a tie-down for the kitchen battery. The battery will be mounted on the floor just behind the Trail Kitchen and will be charged in several ways. When I was designing the Trax Kitchen for Tentrax I planned that the MORryde Kitchen Battery Charging System could be used to charge from the tow vehicle. While I was doing that design I added a power outlet to the rear bumper of the JKU that's connected to the charging system.
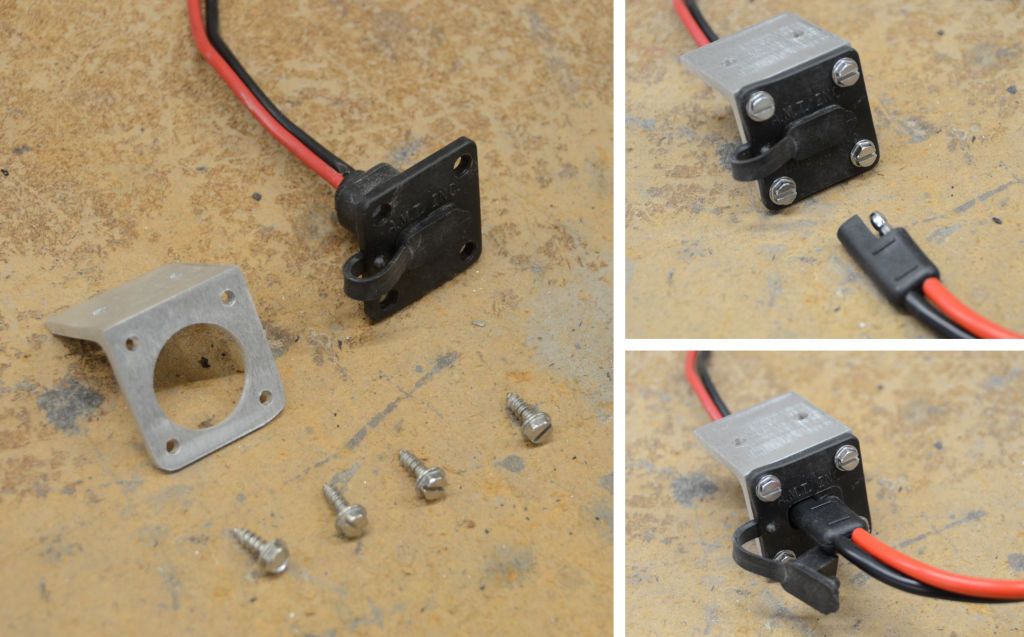
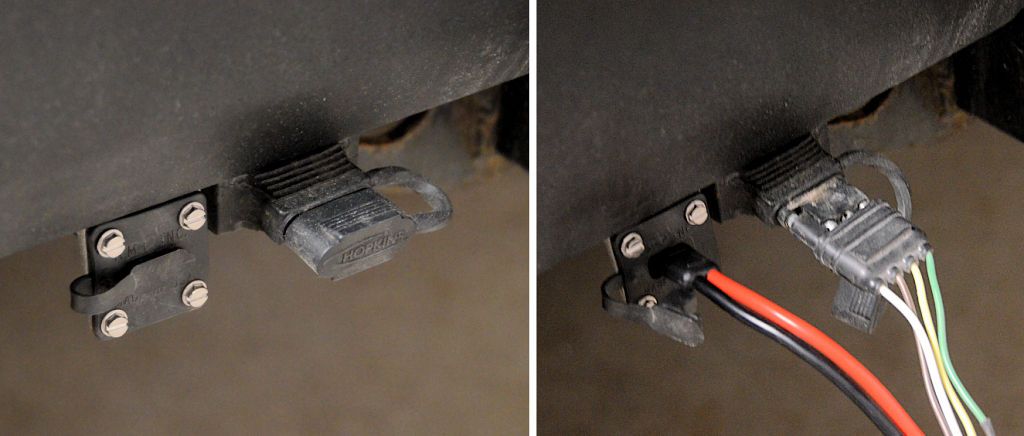
Unfortunately MORryde decided not to release the charging system (electrical items are not their primary expertise), but that allowed me to post full details of the system for anyone interested in building their own: https://expeditionportal.com/forum/...factory-hardtops.127687/page-332#post-2996721
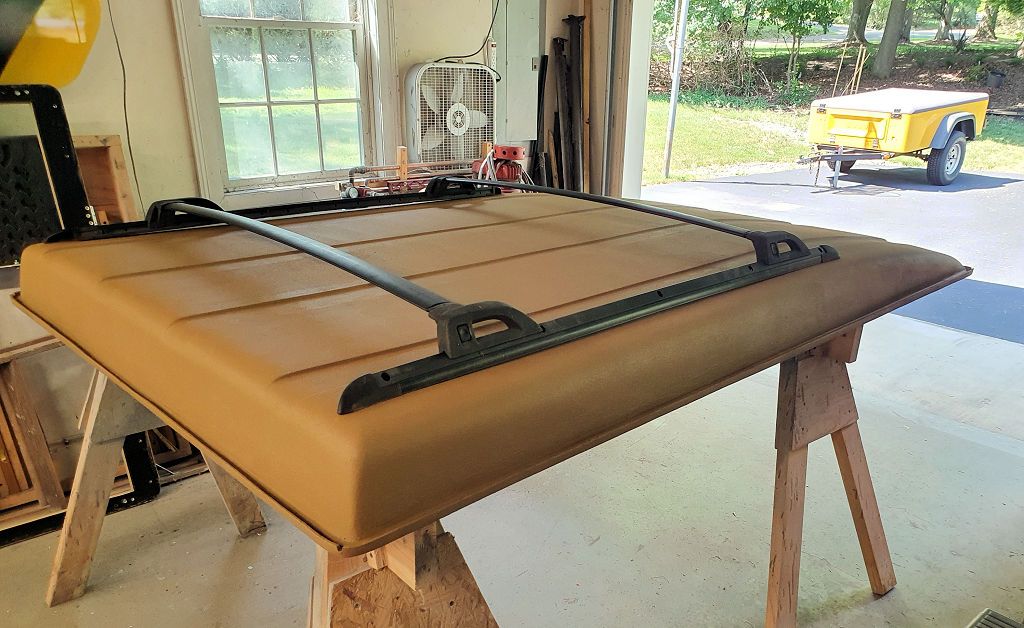
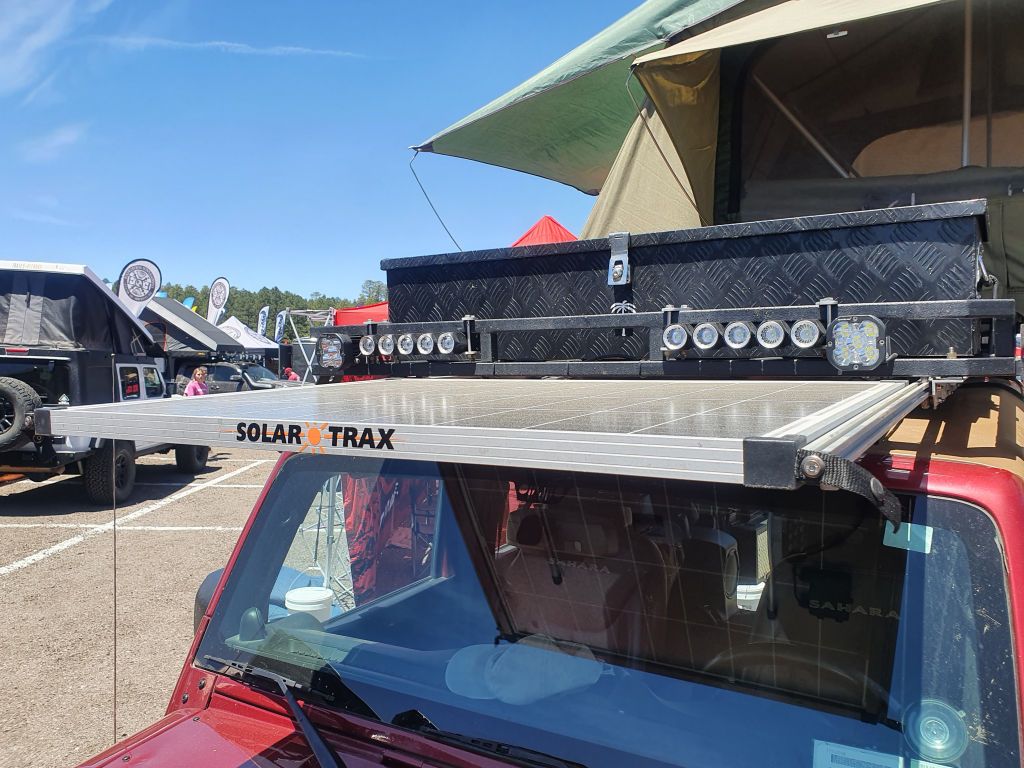
The other way the kitchen battery can be charged is through the solar charging system I did last summer. Since the trailer has an XJ Cherokee rack on top the same roof rack that I use on both my JKU and my LJ can be installed up there and the slide-out solar panel mounts to the rack. Pictured below on the JKU, the rack with the slide-out solar panel can also be used on the trailer.
jscherb
Expedition Leader
I've been waiting for a good heavy rain, and I got one this afternoon. Needed to test for leaks in the new camper top.
In this next photo the drip rail is full; there are drain notches in each corner and they're doing their job.
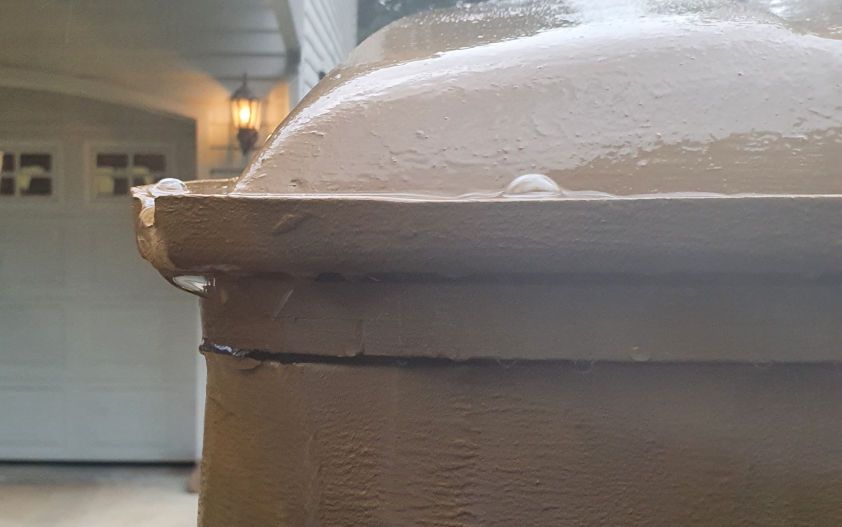
Immediately after the downpour ended I went over every inch of the interior with a flashlight. All dry.
In this next photo the drip rail is full; there are drain notches in each corner and they're doing their job.
Immediately after the downpour ended I went over every inch of the interior with a flashlight. All dry
.jscherb
Expedition Leader
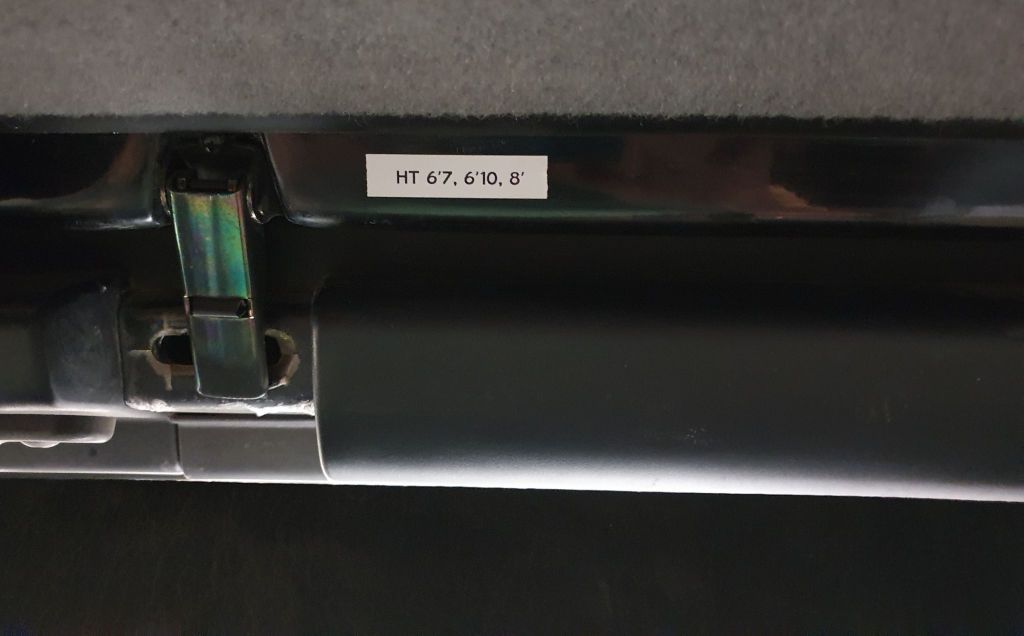
I did this a while back on the JKU, but just go around to it on the LJ yesterday. Sometimes I really need to know how tall the Jeep is, like trying to enter a parking deck. I put this sticker on the hardtop header with three numbers - the height with nothing on the XJ Cherokee rack on top, the height with just the empty Garvin rack basket, and the height with the roof top tent (closed of course). Now when I enter a low clearance situation I can just flip down the visor to remind myself how much clearance I need.