Dodge Ram 3500 Overland Build

Driven To Wander

Adventurer
Lockable Storage part II

5. Line up the metal bar and the bottom frame and drill them both. This is where the lock is going to be attached.
skeleton with lock.jpg


6. Put back the cushion, seat covers, attach the back rest and install the seat back to the truck.

Here is a side view,
side view.jpg


and a close up.
close up.jpg


There is enough room to put the lock on without opening back the doors. Here is another close up with closed doors and locked.
door closed and locked.jpg
 

Driven To Wander

Adventurer
LLumar Security Window Film

A vehicle break-in could take all the fun out of an adventure. After watching the following video on Song of the Road I was set for LLumar.


All the windows, including camper, got LLumar security film installed. Ram's front driver and passenger windows also got tinting that match the rear ones.

LLumar Security Window Film.jpg


LLumar technician did a great job.
LLumar Installer.jpg


Here is the specs of the security film;
LLumar Security Specs.jpg


and the specs of the tinting film;
LLumar tint specs.jpg


Final look.
secured and tinted.jpg
 
Last edited:

cj7ox

New member
That's some pretty amazing stuff! Question though. Will EMS glass breakers still work in the case of an accident that requires breaking the glass to get out of the truck?
 

Mundo4x4Casa

West slope, N. Ser. Nev.
What a worthwhile project! You have thought through all the aspects that will make your proposed trip a success. I too have been an expedition vehicle tinkerer, only for 5 decades, always replacing and upgrading inferior parts and adding the latest gizmos. After 13 4WD remote travel mobiles of all sorts, traveling from Mexico to above the Arctic Circle, I have learned the same savvy lessons that sg1 has learned: namely don't get too far away from stock on a vehicle that will take you to far off lands. I had to learn this over and over again and am still trying to restrain myself. This upgrading stuff is a sickness. Yes, the RAM has certain deficiencies that should be addressed before going away, and there is a list of spare parts to take that will be neigh unto impossible to find in Latvia, but look at it this way: The most fun we ever had on extended expedition type trips were the ones that had us picking 'em up and laying 'em down to find a way to fix our broken down rig. It was the smell of ozone that was the essential challenge: that lovely edge. Just make it work. I can't tell you how many time I used my on board welder to fix......other people vehicles on the Rubicon and Hammers. Ah, there's no fix like a trail fix: welding frames, spring hangers, driveshafts, tie rods, shock mounts, cross members, steering braces, skid plates, axle shafts, receiver hitches, spare tire mounts, snapped off NV4500 shift lever in the middle of the night. 3 a.m. welding. What a thought.
I have but one admonition: Be sure you have a good, long and maybe intermittent trial period using the truck camper plugged in at organized campgrounds, disorganized campgrounds, boon docking, and finally, stealth camping, in weather wet and dry; cold and hot. This will teach you what you really need to know, what to take and how to operate, short of being on the actual road trip. It will surprise you how much of that stuff you will want to leave at home after not using it at all on the shakedown cruise. You don't have that much room anyway. There are some blogs out there with folks doing just what you are planning on doing. Here is our rig with newly installed Renogy 200 watts of solar.


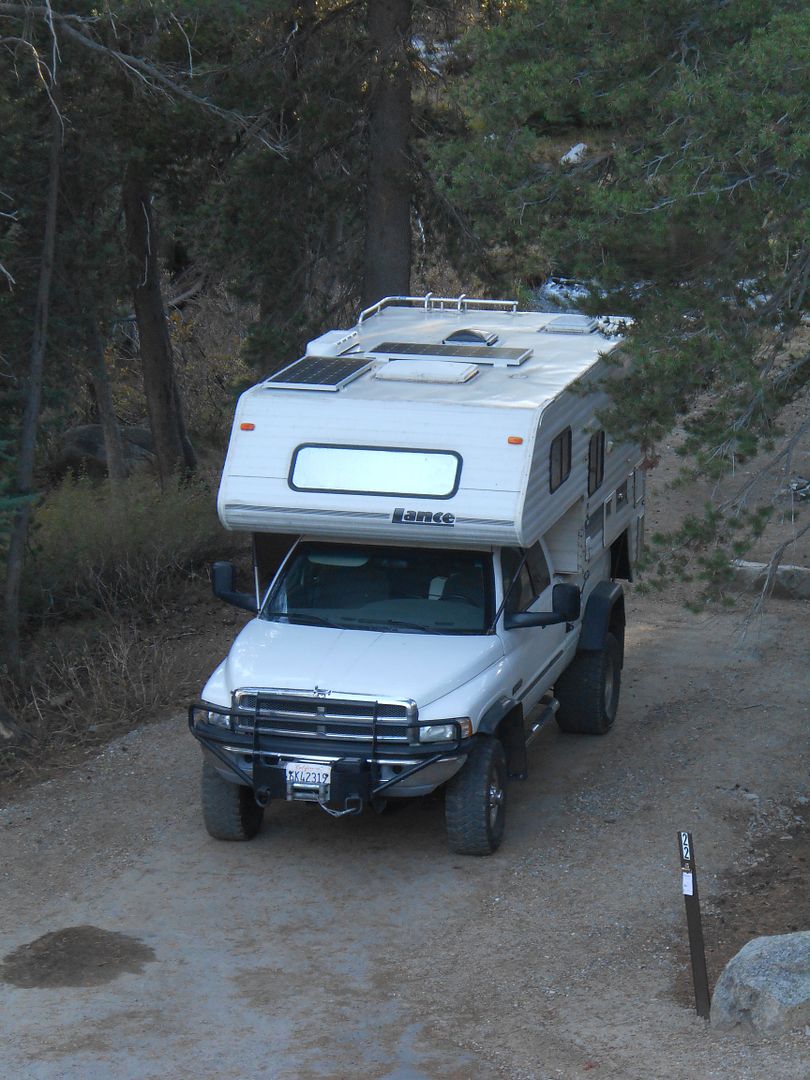
Our 1998 Lance 165-s and built up 2001.5 Dodge 2500 24v CTD has served us well for 165K miles. I changed all the inherent problems with fuel delivery. It seems pretty anemic now compared to the newer RAMS, but has some redeeming features like, no smog device, DEF tank or pee canister. just a muffler. So it can use 3rd world diesel fuel with abandon (keeping the fuel filter changed). NV5600 6 speed manual transmission. It has been bullet proof. Most of the upgrades to our TC have been to the T part, not the C part.
I'll be watching your build.
jeff reynolds
 
Last edited:

Driven To Wander

Adventurer
Hi Cj7ox,
Yeah, I wondered about that also. I hope I will never find out. It is not impossible to break just takes longer.
On that related note, I have read something very interesting recently. Car makers design the head rests removable so in emergency can be used to break the windows from inside.
Thanks for your comment cj7ox.
 

Driven To Wander

Adventurer
Hi Mundo4x4Casa,
I am sure we will have to deal with some unforeseen problems with our rig on the road. I am trying to minimize that. As long as it does not put us in danger, we will be ok. As the saying goes, it's not an adventure if everything goes according to plan! And those are the moments make good memories.
I have chosen 2007 Dodge Ram just because 5.9 cummins can use the 3rd world diesel. There is a great article written by Mike Van Pelt on this topic.
I wish I had NV5600 6 speed manual transmission. I love and miss the feeling of manual shifting besides they are way more reliable then 48RE. Thanks for your comment.
 

Driven To Wander

Adventurer
Bilstein 5100 Series Front Shocks Install

Bisltein 5100 Series.jpg

After struggling to remove one stubborn bolt in rear shocks install I was afraid that front shocks will give me much harder time. Actually both sides went in pretty much without any problem. I was done in 3 hours. One tip, take the plastic wheel housing off to reach the upper stud nuts. I only thought about it half way through and driver side went much faster.

Here is step by step instructions;

1. Spray Liquid Wrench the day before the install.


2. Make sure you are on a level surface. Raise and support the truck. Remove the tire.
Jacked up.jpg


3. Remove the plastic wheel housing. If you choose not to, on passenger side remove the air filter hose to access the upper stud nuts.
upper shock assembly.jpg


4. Remove the nut, retainer (4) and grommet (1) from the upper stud. You need to secure the stud and nut separately otherwise the top part of the shock will spin instead.
old shocks off.jpg


5. Remove three nuts from the upper shock bracket (3). Here is the driver side with wheel housing off. Much easier to reach.
Driver Side.jpg


6. Remove the lower bolt (4) from the axle bracket. Remove the shock absorber from engine compartment.
lower shock bolt.jpg

Bottom bolt.jpg


7. Install the new shock absorber in reverse order. Insert the shock absorber through the spring from engine compartment.


8. Install the lower bolt and tighten to 135 N·m (100 ft. Ibs.).


9. Install the upper shocks bracket and three nuts. This step is little challenging, the shock absorber needs to be compressed while you are trying to line up the bracket. Again it is much easier if the wheel housing is off so you can pull the bracket down. Tighten nuts to 75 N·m '(55 ft. -Ibs.).


10. Here is how the Bilstein 5100 shock bushing assembly should look like. Install upper shock nut and tighten to 54 N·m (40 ft. Ibs).
bilstein top.jpg

Driver Bilstein.jpg


Job well done.
done.jpg
 
Last edited:

topher800

New member
To get the passenger front shock back on, I had to undo the sway bar. Just took the nut off shown on the right side, center of your last photo. It gave me another inch or two of travel.
 

Driven To Wander

Adventurer
Roof Rack for Solar Panels

I ordered our camper with Yakima rails and wiring for solar only. Hallmark sells Solar panels & Blue Sky Charger (hard & soft) 150 watt hard / 200 watt soft for $1,800.00. I thought I could save some money and do it my self.
Yakima towers and landing pads are insanely expensive. After handing the money with forklift for one set of landing pads and towers for Yakima RocketBox, there is no way I was going to pay that much money ever again.

roof with rails.jpg

I needed a rack just to attach 2 Renogy 100 Watt hard solar panels, so it did not have to be really heavy duty. I went to local Metal Supermarket got some metal bars and tubing and got busy.

Here is step by step instructions;

1. First challenge was how to attach something to Yakima rail. Here is the profile,
rail.jpg

My solution was to get carriage bolts big enough so they wont rotate in rail.
bolt on rail.jpg hilman stainless bolts.jpg


2. I had to grind them so the head of the bolt fit and slide in rail.
grinded bolt.jpg bolt test.jpg


3. Second challenge was how to theft proof the rack without making it permanent. I need to remove everything I am putting on the roof so our truck with camper fits in shipping container. I found an American company, Loss Prevention Fasteners who make these tamper proof nuts and they happened to have an office here in Surrey, BC Canada.
tamper proof nuts.jpg


4. I cut the metal bar and tubing to make landing pads and towers.
towers and landing pads unit.jpg


5. Drilled two holes in each bar and welded 1" x 1 1/2" x 1 1/2' tubing.
towers and landing pads weld.jpg

Here I am testing the towers and 2" x 1/2" bar on rails.
testing out.jpg

to be continued....
 

Driven To Wander

Adventurer
Roof Rack for Solar Panels Part II

Here is another look, front view.
front view.jpg


6. After everything is welded, I applied body filler to hide my ugly welding job and sanded it smooth.
]Sanding.jpg


7. Primed and painted, ready for the roof install.
painted install.jpg

on top of the camper.jpg


8. Renogy 100 Watt panels come with pre-drilled holes for it's mounting kit. I wanted to keep the profile low so I used again carriage bolts and tamper proof nuts to mount the panels to the crossbars. I had to enlarge the holes with my rotary too.
Renogy.jpg

renogy under.jpg


9. I got two 100 Watt solar panels in series with these MC4 connectors.
MC4 connectors.jpg

10. Local shop did not have the right size end caps so I have cut the 2" x 1" caps in half and they worked pretty well.
half of one.jpg

end caps.jpg


Here is how it looks after everything is installed.
Final.jpg
 
Last edited:

Driven To Wander

Adventurer
Jimmi-Jammer install

Our departure date has been pushed by couple days to Tuesday. We are getting rid of most of our stuff and putting the rest in storage. It is harder job then I thought. 3 more days. Butterflies...
Before I pack the desktop, I wanted to post couple more installs. This one is quick and easy job. All four doors took less then couple hours. As you can see from my earlier posts security is a concern of mine. I hope I am wrong.


Jimmi-Jammer .jpg

Here is step by step instructions;

1. Take off the screws that hold the door panel.
passenger door.jpg


2. Remove the bolt that holds the interior handle and remove the door panel.
10 mm handle .jpg


3. Remove the 4 screws that hold the speaker in place, and peel off the white plastic cover carefully.
speaker and door handle off.jpg


4. Jimmi-Jammer plates are designed to work with existing bolts and nuts.
front jimmy jammers.jpg

panel off.jpg


5. Install the plate and put back the door panel in reverse order.
done.jpg


I also got Viper 2-way alarm installed. I wish I did the install but company who makes the Viper alarms, Directed has a pretty tight hold on installation manuals. That would be a great write up.
Viper 2 Way Car Alarm.jpg


It has been on the truck more then 6 months and I am pretty impressed with its features.
Viper alarm details.jpg
 
Last edited:

incognito

Adventurer
hy, I

had 2 micron filtration installed along with a water separator and this is the best mod for safety of the injectors. bad fuel can ruin the injectors .noise is lower also after the install. after 30000 kms my front filter was very clean.

http://www.cumminsforum.com/forum/t...-fuel-filtration-baldwin-cat-under-truck.html

or you can buy it here but i'm not sure didn't call them, since I bought 2 baldwin bases and filters separate in Quebec.
http://www.dieselfuelfilterkits.com/

anyway best mod I did for my ram
 

Cyrull

New member
LLumar Security Window Film

A vehicle break-in could take all the fun out of an adventure. After watching the following video on Song of the Road I was set for LLumar.


All the windows, including camper, got LLumar security film installed. Ram's front driver and passenger windows also got tinting that match the rear ones.

View attachment 366417


LLumar technician did a great job.
View attachment 366418


Here is the specs of the security film;
View attachment 366419


and the specs of the tinting film;
View attachment 366420


Final look.
View attachment 366421

Sorry this is a bit late, where did you purchase the film an who installed it?

I'm in Vancouver.
 

Forum statistics

Threads
185,888
Messages
2,879,216
Members
225,450
Latest member
Rinzlerz
Top