Barn Door for JK factory hardtops

jscherb

Expedition Leader
OO tells me they're about to offer limited edition all-black Saddlebags for the JKU, JK and JL 2dr. They sent me a pair and asked me if I would take some photos for them since they don't have a JKU handy right now. Here's one installed just behind the rear seat:

AllBlackLargeSaddlebag2.jpg


I decided to try them in the LJ as well...

AllBlackLargeSaddlebagInLJ1.jpg
 

jscherb

Expedition Leader
I finished the interior wiring today for the rooftop power pods.

In the engine compartment I added a relay powered by a switched circuit in the TIPM and a fuse for the power circuit. Normally the power will be switched, but if for some reason I need unswitched power up on the rack I can move the output to the N/C lug on the relay and pull the relay coil ground wire so it doesn't activate.

Inside, the power runs to an SAE connector on the floor. Plugging the two together puts power to the pod on the roof.

InsidePowerConnectionJK.jpg


If I need to control whatever is on the rack with a switch, I can plug one in between the two SAE connectors. In this next photo, I've plugged the modified Auxbeam lighting harness into the two SAE plugs, which provides a switch to control the power. This is overkill, because the Auxbeam harness includes a fuse and a relay which duplicate those I added in the engine compartment, but no harm done and this was easy. The Auxbeam harness is stuffed in a MOLLE pouch to protect it, and the switch lead can reach anywhere I need it to so I can access it from the driver's seat.

AuxBeamInsideHarness.jpg


I've only run power to the passenger side pod so far; I haven't put it to the driver's side because I'll usually use that one to bring power into the Jeep from the solar panel on the roof. But if I need to send power to the pod, it's easy to connect power to it like I did on the passenger side.

The idea here is that the power pods can be easily and quickly configured for whatever electrical devices I want to mount on the rack (typically temporary use for a particular expedition), allow the rack to be removed when not needed, and allow the same rack and devices to be used on either the JKU or the LJ. This setup accomplishes that.

I still need to shorten the light connection leads of the Auxbeam power harness. They're pretty long - long enough to reach from the passenger side pod all the way to where the front rack extension with the lights is stored hanging from the garage ceiling, so I connected it up for a quick test.

AuxbeamLEDTest1.jpg


To trim the leads to the proper length I'll need to drop the rack onto the Jeep, hopefully I'll have time for that later this week and then I'll give the system a thorough test (using the power pods for powering LEDs and charging the kitchen battery via the solar panel).
 

jscherb

Expedition Leader
Finished the rooftop power pod wiring today. Shortened the Auxbeam light harness to the right length and made up a small extension to connect the solar panel to the power pod on the driver's side. In this photo the solar is charging the kitchen battery through the pod connection on the driver's side and the lights are powered through the pod connection on the passenger side.

PowerPodWiringDone.jpg


The solar connection:

PowerPodSolar.jpg


Since I don't need the rack, the solar or the lights now, I removed everything after taking these photos. The power pods make it very easy to change the configuration.
 
  • Like
Reactions: mhm

jscherb

Expedition Leader
I regularly check the online inventories of the two u-pull junkyards that are a reasonable distance from me. Today I was looking for TJ's, I need to measure something for a design project. Came across this, it's a 2016 2 door:

1643756008247.png

I've never seen a JK in the local u-pulls. I wonder if there's any useful piece undamaged on this one? :)
 

jscherb

Expedition Leader
Back in 2017 I designed and built a charging system for the MORryde Trail Kitchen. I put it in use back then and it's been working very well for over 4 years now. This 2017 photo shows an early photo showing the prototype power panel and the kitchen battery, both of which are part of the overall kitchen electrical system I designed:

PowerPanelInstalled1.jpg


The charging system charges the kitchen/fridge battery when the Jeep is running; when the Jeep is not running there's no drain on the main Jeep battery so powering the kitchen will never be a reason the main battery lets you down in the wild. I've also started the Jeep from the kitchen battery when my main battery failed, so the system has proved its usefulness for more than just the kitchen and fridge.

MORryde produced and released the power panel (the production version: https://www.morryde.com/products/power-panel-2/) and planned to also produce and release the charging system, but once the pandemic started it was harder to keep it on the priority list for engineering and the other day they told me they've decided not to release it as a product.

The charging system is fairly simple to put together and now that MORryde has released their claim on the design, I'll post full details so anyone can assemble their own charging system.

In early 2018 I turned over design drawings and engineering notes to MORryde but what I plan to post now is something a little more "user friendly" so it'll take me some time to create appropriate illustrations and text. Stay tuned.
 

jscherb

Expedition Leader
Back in October I picked up this Rothco "Venturer Survivor Shoulder Bag" (https://www.rothco.com/product/rothco-venturer-survivor-shoulder-bag) for about $21 at the big Kenly 95 Truck Stop in North Carolina. It's not a very high quality or well designed bag, but I liked its size and look. When I got home I sewed a Zip & Go zipper on the back to try it on the seat back:

RothcoTacticalBag.jpg


I bought it not because I thought it would be a great bag to have, I bought it for inspiration - I've been thinking about designing a tactical gear/tool bag and this bag could give me some ideas.

Also part of the inspiration for a new design is a bag I designed and sewed in 2019 and have been using ever since. It's basically a MOLLE/Grab & Go pouch with fold-out tool holders to organize the tools I carry all the time.

6ToolProto_zpscwslkgwx.jpg


That tool bag has been great, I keep it under the back seat of my JKU and it keeps my tools organized, but it's not as convenient to carry as I'd like, so with the Rothco bag and my tool bag as inspiration, I designed a new tool bag. This one is slightly larger that my original tool bag, styled like a small messenger bag and has a shoulder strap and a top carry handle. It also has a Zip & Go zipper so it can hang on the seat back like I did with the Rothco bag. Design sketches...

TacticalToolBagDesign1.jpg


My sketches don't look anything like the Rothco bag or my original tool bag but both were part of the inspiration for the new design. The Rothco bag actually showed me a few things to avoid in the design :).

When I'm designing something I do design drawings like these to finalize all the dimensions and details, and from that I write a script describing which parts get made and sewed in what order so the bag goes together properly. Once the design sketches and the sewing script are done, I can start construction. I finished sewing the other day, a few photos follow...

It's got 2 small pockets on each end and a MOLLE grid on the flap.

TacticalGearBagProto1a.jpg


I wanted to add a provision for a velcro patch like the flag in the photo above, so I added velcro loop behind the MOLLE grid so the patch can be removed to make use of the entire grid. The only thing on the grid in these photos is a small hook for perhaps keys, but standard MOLLE pouches could be added to increase carrying capacity.

TacticalGearBagProto1b.jpg


Opening the main flap reveals two larger pockets and the zipper to open the main compartment.

TacticalGearBagProto1c.jpg


On the back is a Zip & Go zipper so it can hang on the seat back and a zipper pocket across the entire back. I've used rivets in addition to stitching for key parts of the assembly for strength; if you look closely they're shell-casing styled rivets. The snaps on the pockets are also that style. I thought those might add to the tactical appeal of the bag :).

TacticalGearBagProto1d.jpg


Fully open, the inside is lined with velcro loop. The idea is that the interior organization could be customizable, with dividers, tool holders or pockets inside attached to the velcro. My plan is to do fold-out tool holders like the earlier bag I did, and these will attach to the velcro.

TacticalGearBagProto1e.jpg


A quick check on the seat back:

TacticalGearBagProto1f.jpg


Probably won't get to doing the tool holder insert for a few weeks, I've got a bit of travel coming up. I'm also working on a few other ideas for inside organizers that would attach to the velcro lining. The bag is large enough to hold a recovery strap, some shackles and a few tools, so it could have organizers to be a nice recover bag. Or could be a shooting bag, with holders inside for pistols (the 4 end pockets are the same size as typical pistol magazine pouches). The only gun I own (besides nail guns and caulk guns) is a plastic pistol that used to be one of the boy's toys, but it's pretty realistic so I could prototype a design with that :).

If anyone has other ideas for organizers for it let me know, maybe I'll sew your idea.

And coming soon - the details of the kitchen battery charging system. I'm almost done organizing the images, wiring diagram and text.
 

jscherb

Expedition Leader
I'll have to find (or sew) some nice small MOLLE accessories in tan for my new seat back gear/tool bag, these don't quite do it for me...

MOLLEAttachments.jpg
 

jscherb

Expedition Leader
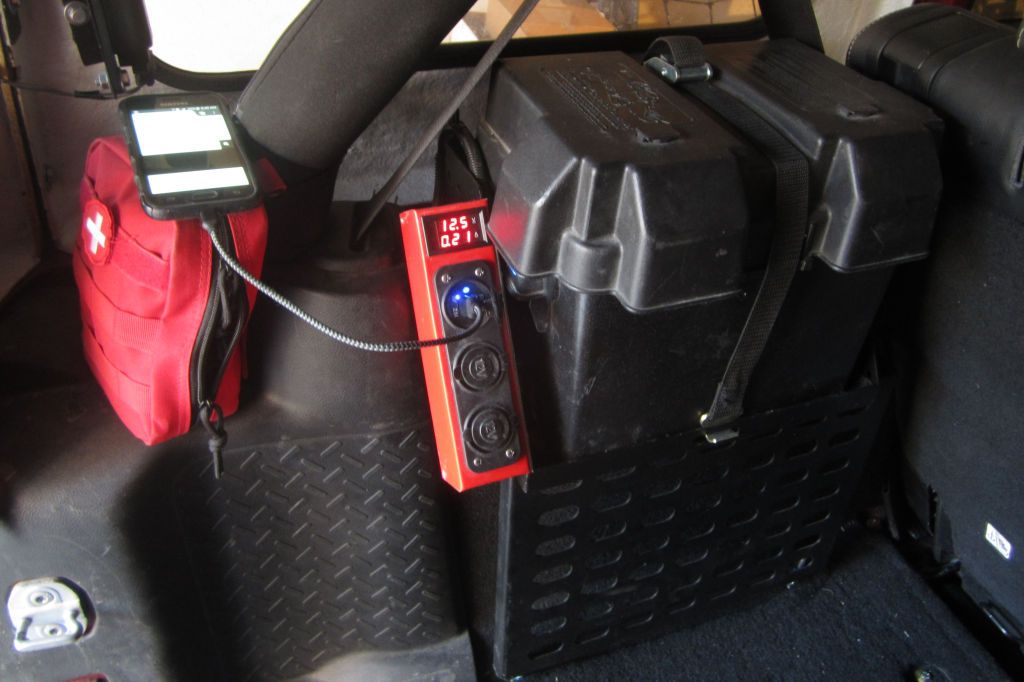
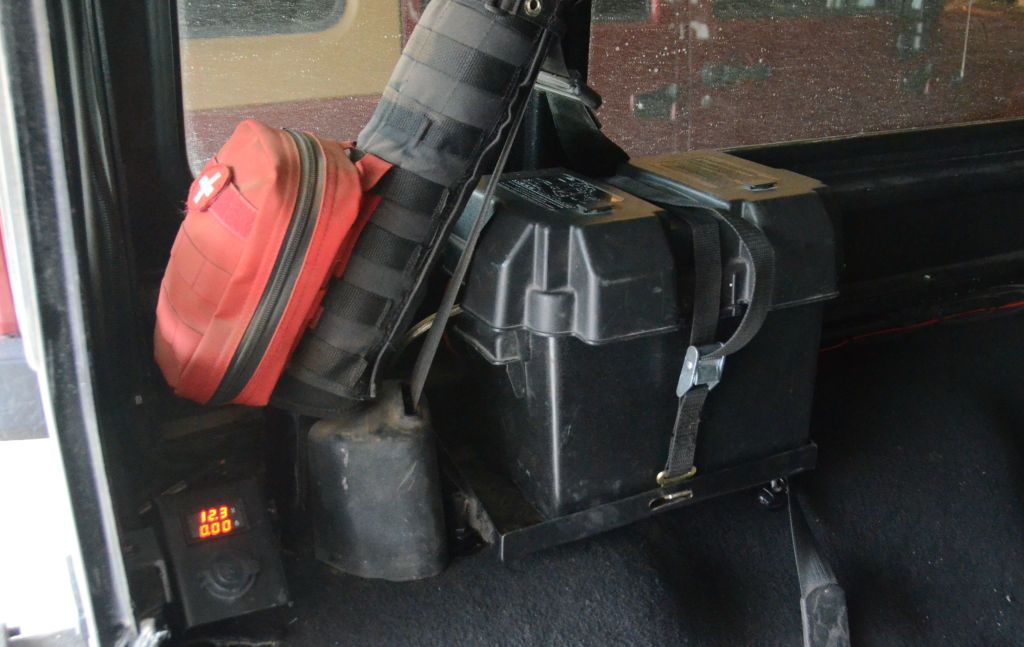
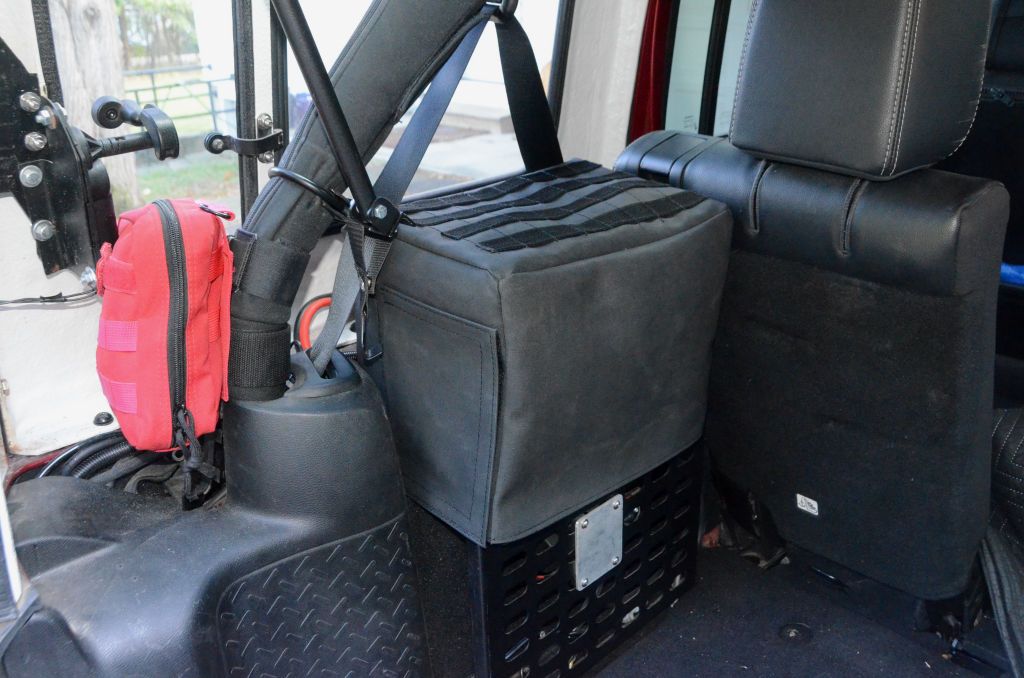
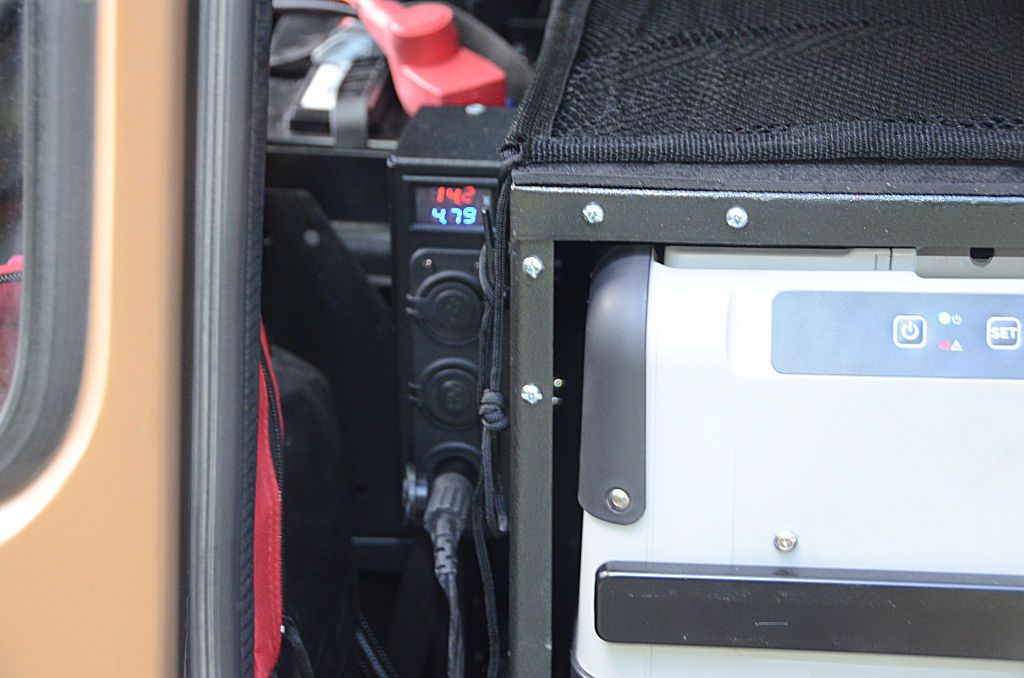
In this next series of posts I'll describe the charging system I've been using for the last 4 years as part of my MORryde Trail Kitchen installation. I'll also cover a bit about how I provide power to the kitchen accessories, what type of kitchen battery I use, and a little bit about adding solar charging to the system.

When I first got a refrigerator, I powered it simply by using the power outlet in the back of the Jeep, but I wanted to have a dedicated battery for the fridge so the fridge could run without worry when the Jeep was parked in the wild. I looked at the dual battery systems on the market but they were expensive, many require engine compartment changes and some require expensive AGM batteries because in those the two batteries have to go in on their side to fit in the engine compartment.

Some of the systems on the market are pretty sophisticated, with electronics to ensure that the main battery gets fully charged before the auxiliary battery, automatic switching of the aux battery into the starting circuit when the main battery is low, automatic use of the main battery to supplement the aux battery when the aux battery is low, automatic cutoff of loads on either battery when a that battery gets low, and more.

Those systems work well, but if the aux battery is primarily used for the kitchen and not needed to be part of a true dual battery system, something simpler and less expensive will do the job, so that's what I decided to design and implement.

These were my initial design requirements:

  1. Keep the kitchen/fridge battery charged (obviously the most important requirement).
  2. Don't ever drain the main battery because of the kitchen.
  3. Simple and cost-effective to implement - I use the kitchen in both my JKU and my LJ, so I need to implement whatever solution I chose in two Jeeps.
  4. Easily adaptable to any Jeep (or other vehicle a fridge might be installed in).
  5. Easily adaptable to solar charging of the kitchen battery.
  6. Simple enough so that if some component fails while on an expedition, replacement components should be easily available at the nearest point of civilization.
  7. Should be possible to use the kitchen battery to start the Jeep in an emergency.

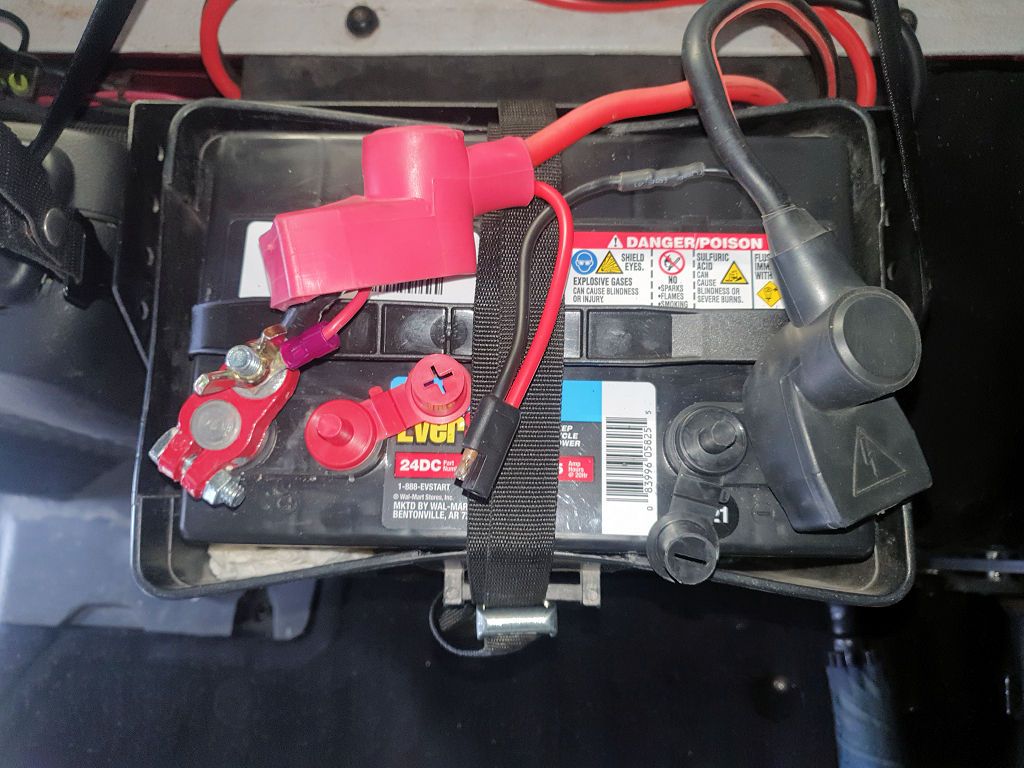
The design I came up with meets all those requirements, is very simple and has been working great for more than 4 years now - it connects the kitchen battery in parallel with main battery so the alternator charges both the main battery and the kitchen battery. To prevent the kitchen from discharging the main battery, the kitchen battery/load is disconnected from the main battery when the Jeep isn't running and connected for charging when the Jeep is running.

A simple relay is all that's needed to make/break the charging connection, and the most important design details are about the current requirements for charging the kitchen battery and minimizing voltage losses and cost.

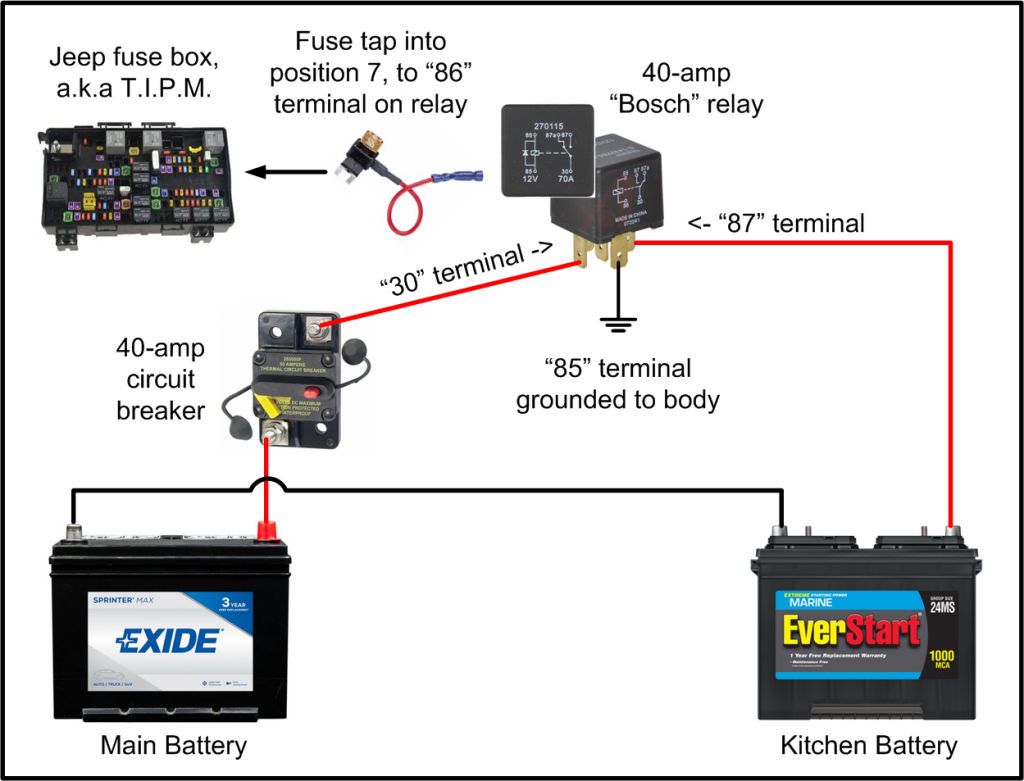
A pictorial schematic (each section and components will be explained in this and following posts):

PictorialSchematic.jpg


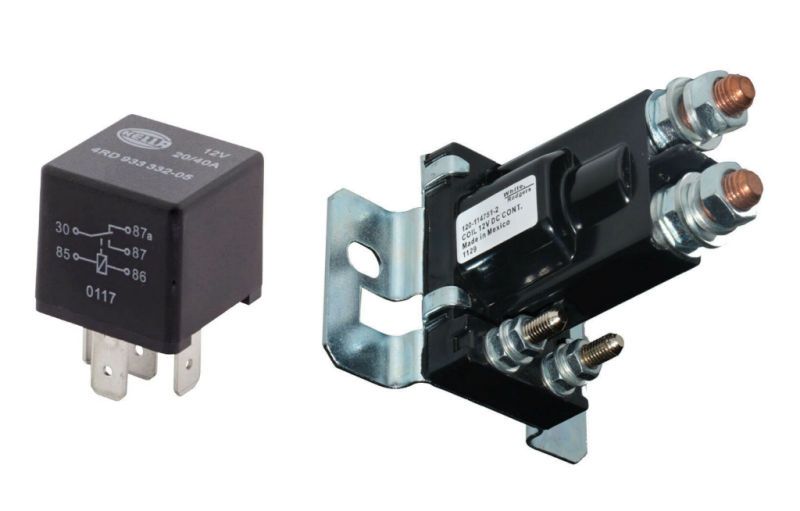
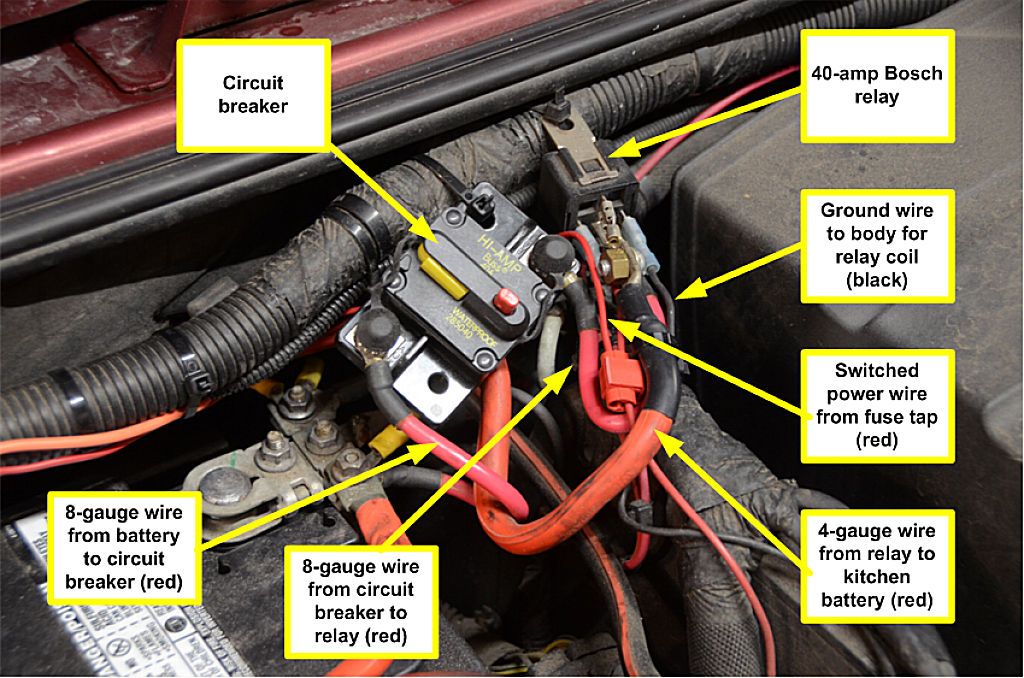
In the engine compartment there's a 40-amp relay to do the switching. I did extensive testing with the fridge battery in all states of charge and even a very discharged battery never drew more than about 34 amps, so a 40-amp relay is sufficient. I used an ordinary Bosch automotive relay because it meets requirements 3 and 6 - Bosch relays are available at every auto parts store and relatively inexpensive. If you're not comfortable using a Bosch relay for whatever reason, higher capacity relays/solenoids are available. Pictured below is a Bosch relay (40 amps, left) and a 500-amp relay.

BoschAndPowerRelay.jpg


One reason to use a much higher capacity relay is for starting the Jeep with the kitchen battery - the starter motor requires more current than a tyical Bosch relay can handle, but more on that later in this discussion - I'll explain why I used a Bosch relay in spite of that.

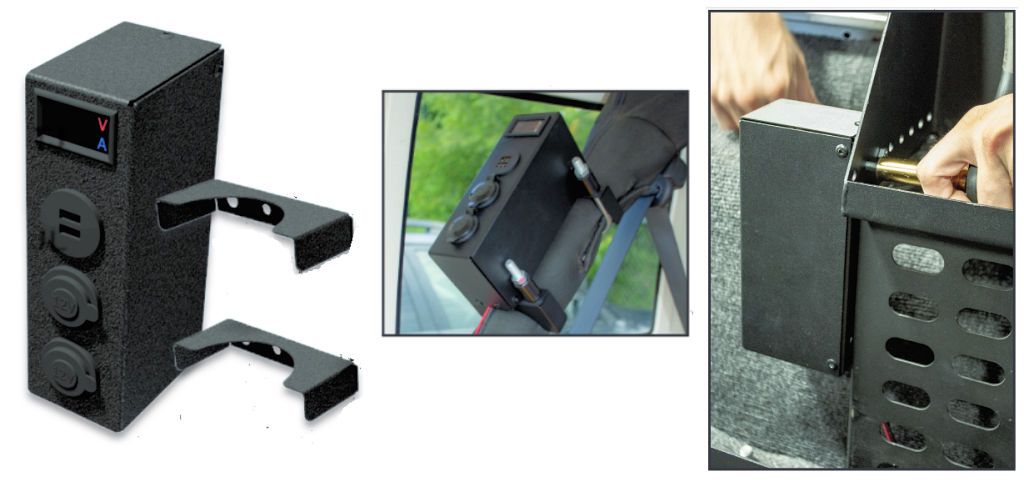
Adequate protection for the circuit is required - the alternator is capable of providing a lot of current so if something goes wrong or a short develops either a fuse or a circuit breaker is required to protect the alternator/main battery. Initially I used a 40-amp ATO/ATC-style fuse because of requirements 3 and 6, but after using the system a while a "nice to have" requirement came up - being able to switch the system off. Since I swap my kitchen and its battery between Jeeps, I need to switch off the power to the kitchen when it's in the other Jeep. I got tired of pulling the fuse so I installed a circuit breaker. But a fuse is all that's needed and it better meets requirement 6 than a circuit breaker does.

FuseHolderAndCircuitBreakers.jpg


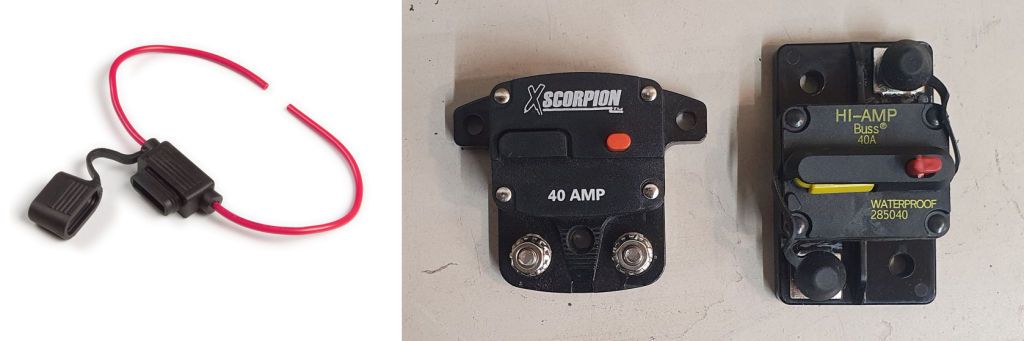
A 40-amp fuse in a fuse holder is more than adequate for the job, but what I like about the circuit breakers pictured above is that they have a switch so power can be turned off. If I remove the battery for some reason, I can turn the circuit off so no power is in the circuit when the battery is removed, eliminating the possibility of a short circuit with the loose battery connectors. But that's a convenience, not a necessity, so a fuse holder will do fine and you can pull the fuse if you need to cut off power.

In both Jeeps I originally used Scorpion brand breakers in the photo above, but two of them failed in the JKU. On one the switch mechanism broke and the other keep popping below its rating in very warm weather. I spent a little more money and switched the JKU to the Buss fuse at right and I plan to replace the Scorpion breaker in the LJ with a Buss breaker as well but haven't gotten around to that yet because I don't use the kitchen in the LJ as often as I do in the JKU.

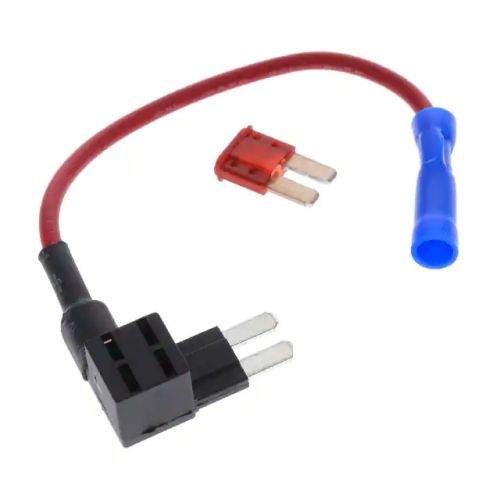
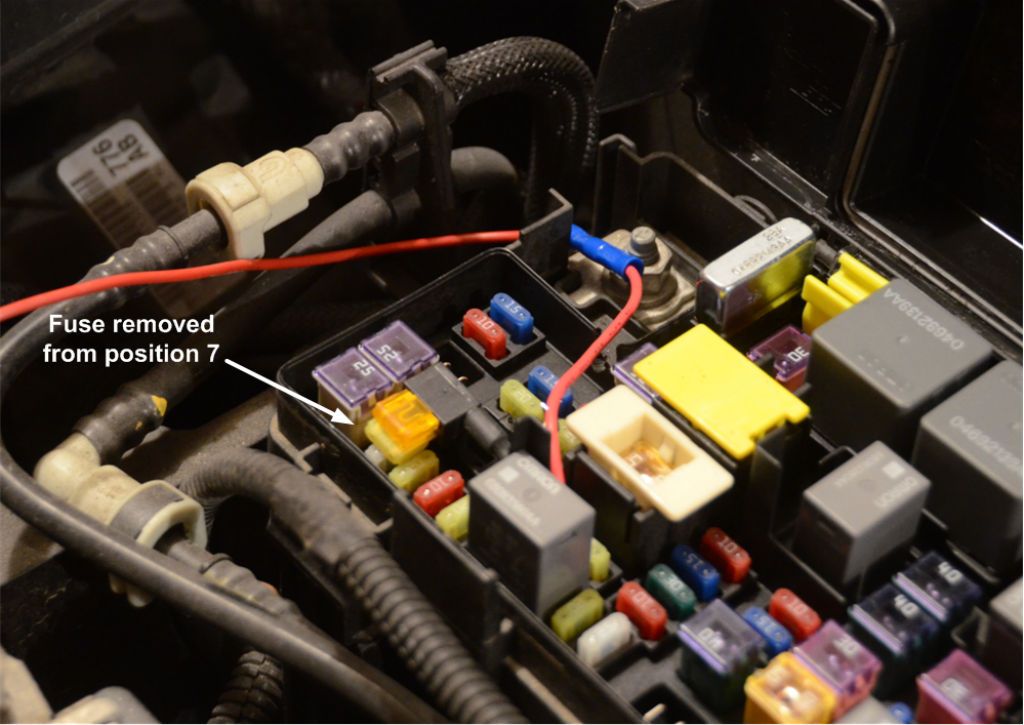
The only other thing in the engine compartment is a connection to switched power to control the relay, which I did with a fuse tap. On the JK, I replaced fuse #7 with the tap. If you're not familiar with fuse taps, they generally have two fuses/two circuits - one fuse replaces the fuse that was removed from the position the fuse tap is installed into and the other fuse is for the additional circuit (in this case, the new relay).

FuseTap.jpg


TIPM.jpg
 

jscherb

Expedition Leader
Wire gauge and component placement in the engine compartment

Key to success of this installation is adequate wire gauge wherever heavy currents are to be carried. The connection between the fuse tap and the relay and between the relay and ground for relay activation doesn't require a lot of current so those can be 16 or 18 gauge but the main power connection between the main battery, the fuse or circuit breaker and the relay does carry a lot of current to charge the kitchen battery so that needs heavier gauge wire. I used 8-gauge copper wire for these short connections. Larger than 8-gauge would be even better but since the relay is mounted fairly close to the battery little power loss will result from these very short lengths of 8-gauge wire. Placement of the relay and circuit breaker isn't critical; since they're very light and don't require solid mounting I used zip-ties to attach them to the main wiring harness on the firewall in the JK. Wiring purists my want to mount and wire the components differently, but what's in the photo below is more than adequate.

EngineCompartmentWiring.jpg


Two quick notes about the photo above - you may notice a "suitcase connector" on the red switched wire to the relay coil - I added that recently to power a second relay which controls switched power to the power pods on my roof. It was just an easy place to tap into. Second, you'll notice a large brass nut at the relay end of the 4-gauge wire that runs from the relay to the kitchen battery. I didn't have any spade connectors (required for the relay) that would accept 4-gauge wire so I used a ring connector on the end of the 4-gauge and a ring+spade connector on the relay. A bolt and brass nut ties the two ring connectors together. A higher capacity relay like the one I pictured in the last post would have bolt terminals but since I was using very large gauge wire with a Bosch relay some improvisation was required.

Since it's a long run from the output of the relay to the battery in the rear of the Jeep, large gauge wire is best to avoid power loss. You could 8-gauge copper wire, which is what I did in the LJ. In the JKU I used 4-gauge CCA wire, which ended up being less expensive than 8-gauge copper. CCA stands for "Copper Clad Aluminum", which means the wires are basically aluminum; the copper cladding mostly provides oxidation protection for good connections. Aluminum doesn't conduct as well as copper so larger gauge is required. I bought a long set of 4-gauge jumper cables at Walmart which provided 16 feet of two-conductor 4-gauge CCA wire.

If you want to see what the effect of different size wire and copper vs. aluminum (CCA) has on voltage loss for a given voltage and current, check out this voltage drop calculator: https://www.calculator.net/voltage-drop-calculator.html. You may be surprised at how much voltage can be lost in even the fairly short distance between the engine compartment and the back of the Jeep at 30 amps. To get accurate results from the calculator, measure the actual voltage at your main battery when the engine is running - it'll be more than 12 volts and you want to use that as the voltage for the calculations. These calculations are important - the current provided to a battery will determine how fast it charges but the voltage will determine if it charges completely or not so if the charging wire is too small and causes a large voltage drop, the battery may never reach full charge. Adequte wire gauge is critical for satisfactory operation.

Routing the heavy-gauge wire to the kitchen battery - Jeep has provided a convenient pass-through hole in the firewall that's perfect for something as large as 4-gauge wire. It's just behind the battery (marked by the dashed rectangle in this next photo). To access it pull the plastic cable straps (arrow) off the studs in the firewall and pull back cable and the firewall insulation. The hole is covered with a piece of soft black self-stick plastic that can be peeled back.

JKUFirewallHole1.jpg


In this next photo a black wire is running through the hole in the firewall - the photo was taken for the installation of the Retrofit Offroad TrailVision camera system but try to imagine that it's red+black jumper cable wire for the purposes of this writeup.

JKUFirewallHole2.jpg


Once inside the firewall the wire will come down behind the glove box. It can be routed to the back either along the passenger side or the driver's side and since my kitchen battery is on the driver's side in the back I ran the wire under the dash to the driver's side using zip ties to hold it in place and then under the door trim to the back. Photos of the routing in the next post.
 

jscherb

Expedition Leader
Routing power to the kitchen battery and wiring connections in the back

Once the main power wire is through the firewall, it needs to be routed to wherever the kitchen battery is - presumably the back of the Jeep. In most Jeeps it's fairly easy to hide the wire behind trim panels and/or under the carpet. As I said in a previous post, I ran the wire down the driver's side of the Jeep because the battery is on the driver's side in the back. After running the wire under the dash to the driver's side, I next hid it under the side trim panels.

The trim panels are easily loosened enough to slip the wire behind them by removing the push pins:

Routing.jpg


Once the wire is behind the panels, replace the push pins and move towards the back. The carpet pulls up easily at the back edge of the passenger door in a JKU:

Routing2a.jpg


Continuing towards the back, the carpet also pulls up easily on top of the inner fender. The wires can exit the carpet just in front of the roll bar.

Routing4a.jpg


Where to put the battery? I use the MORryde ammo can/battery holder (https://www.morryde.com/products/ammo-can-battery-tray-kit-with-molle-holder/):

MORrydeBatteryHolder.jpg


The MORryde ammo can/battery holder is secured by the hardtop bolts and has a MOLLE panel underneath and it positions the battery over the curved/sloped inner fender, which is usually wasted space anyway. The aluminum plate on the MOLLE panel mounts a water pump for the sink behind the panel, it's a convenient and out-of-the-way place for the pump.

I use a different tray in the LJ but it also positions the battery over the inner fender:

LJFridgeBattery.jpg


At the battery I use ring terminals on the ends of the jumper cable wire; they attach to marine-style battery terminals and are protected by slip-on covers. If you use a full battery box with a cover you don't need the slip-on covers but I only use the bottom of a battery box, I made a soft cover out of old soft top fabric.

BatteryConnections.jpg


Also connected to the terminals on the battery is a short SAE two-pin connector, that's where I connect the kitchen power panel.

My battery cover:

KitchenSoftTop1.jpg


I think the soft cover looks nicer in the back of the Jeep than a typical battery box, and I have a good use for the PALS/MOLLE grids I sewed to the outside of the cover, more on that later.

Next post: what battery to use?
 

jscherb

Expedition Leader
Which kitchen battery?

My choice of kitchen battery is a deep cycle marine battery from Walmart. People will argue that there are "better" batteries for this purpose, and some people would never buy a battery from Walmart, but for me this is a great choice. They have a 3 year warranty, and I got about 35 months out of my last one before I swapped it for a new one. They're not expensive, mine was about $80. And you can replace them almost anywhere there is civilization. And do it quickly - the day before my last expedition out west in August, I decided that the kitchen battery wasn't having the life that it did when new. No time to replace it before departing the next morning, I decided to swap it at a Walmart about 3 hours west in Erie, PA. That Walmart was right at an exit on the interstate so it wasn't a detour to get there. From the time I exited until the time I was back on the road with a new battery was less than 20 minutes as I recall.

Getting 3 years out of an $80 battery and swapping it for a new one in about 20 minutes at whatever Walmart is convenient to the route works for me.

As I showed in my last post, I keep the battery inside the cabin, above the rear inner fender. Depending on your choice of battery, you may need to take the extra step of venting your battery to prevent poisonous hydrogen sulfide gas from collecting in the cabin. If you keep your kitchen battery in the cabin, you should use a sealed (non vented) maintenance free battery.

Modern maintenance free batteries have chemistry that recombines the hydrogen and oxygen generated when charging and do not have vent provisions. The Walmart deep cycle marine batteries I use are this type; there is no provision for venting and the battery is sealed. AGM batteries, which are very popular in the overlanding world, also are sealed and generally do not have vent provisions.

If you use an ordinary lead/acid battery with a vent hole should it must be vented to the outside for safety. Dorman sells a kit that's about $10 and some kits can be found cheaper. (https://www.dormanproducts.com/p-47762-924-254.aspx) It's very easy to drill a vent hole in the inner fender under/near the ammo can/battery tray, and it will vent into the outside air and the other end can be connected to the vent hole in the battery.

At the price Walmart charges for a sealed maintenance-free deep cycle battery, there's really no reason to use anything other than something like that, or an AGM battery if that's your preference. If you do decide to use a battery that has vent holes (either a dedicated vent hole or holes in each cell cap), you must arrange for some way to vent the battery to the outside. It should be in a sealed battery box with a vent tube to the outside. But it's best just not to use one of those batteries inside the cabin.

How to jump start with this system

The way the charging system is wired, the kitchen battery is only connected to the main battery when the engine is running, which means it's disconnected with the Jeep is cranking to start. But what if your main battery is dead or doesn't have the power to start the engine? A feature of typical dual battery systems for Jeeps is that both batteries are available for starting, but using this charging system to start the Jeep is pretty quick and simple so I didn't feel the need to design starting capability into this wiring.

On a trip back from Florida a year or so ago my main battery failed. I stayed at a hotel in South Carolina and when I went out to the Jeep in the morning it wouldn't crank. There was enough power to light up the dash but not enough to crank. Probably failed cell in the battery. What to do?

A quick rearrangement of the wires connected to the Bosch relay solved the problem. I pulled the coil connection so the relay wouldn't switch, and then I moved the kitchen battery connection from the 87 "normally open" terminal to the 87a "normally closed" terminal, which connects the kitchen battery directly to the main battery. Turned the key and started the Jeep. I left the relay wired that way until I got home and could get a new battery. I also have a Walmart battery as the main battery for the Jeep, so I could have stopped at any Walmart along the way to replace it, but since the kitchen battery was doing a fine job starting the Jeep, no need to delay the trip to replace the battery. (The Walmart battery that failed was long past it's warranty period BTW).

If your main battery is completely dead, the method above probably won't start the Jeep because the starter will draw more than 40 amps and will trip the charging system circuit breaker. You could temporarily change the charging system wiring to bypass the breaker, but it might be quicker to use jumper cables to jump the main battery from the kitchen battery. In my case that's very easy - my winch lead is always connected to my main battery and it has an Anderson connector on the end to connect to the winch. I also carry a pair of jumper cable clamps also with an Anderson connector, so when I need to jump start, I plug the clamps to the end of the winch lead and I'm ready to jump from the kitchen battery.

Next post: Power outlets for the kitchen.
 

jscherb

Expedition Leader
Power Outlets

You could just connect the fridge to the battery but most people want to power more things in the kitchen - a water pump, for example, perhaps some USB outlets for powering a phone while you're at the kitchen? MORryde makes a power panel that includes two 12v outlets, two USB outlets and a display for monitoring batter condition (https://www.morryde.com/products/power-panel-2/). Their panel comes with mounting provisions for the roll bar and the battery holder. These MORryde photos show a preproduction version of the panel:

MORrydePowerPanel.jpg


I have a different preproduction version of the MORryde power panel and I mounted it on the side of the kitchen enclosure. The production version could be mounted there as well.

PowerPanel1.jpg


I've wired a 2-pin SAE connector to the MORryde panel so it plugs into the SAE connector at the battery that I showed in the previous post.

You could also make your own power panel; when I only have the fridge in the Jeep and not the full kitchen I don't have the MORryde power panel in the Jeep because it's bolted to the kitchen enclosure so for those times I made a power panel that has a belt-style clip on the back so it can clip to the side of the soft battery cover:

MollePowerPanel2.jpg


If you're making your own power panel or just want to improve the reliability of the power to your fridge (the standard cigarette lighter style power plug isn't all that reliable when bouncing around on the trail), consider adding an ARB power socket to your panel or replacing one of the sockets in the MORryde panel with it. The ARB socket secures the fridge plug into the socket with a screw-in connection that will not come loose. It comes with a housing that you won't need if you're swapping it into the MORryde panel but if you're building your own panel maybe you'd find it useful.

ARBPowerSocket.jpg


ARB fridges come with a two-part plug on the end of their power wire, the cigarette style plug can be removed to reveal the screw-in type plug to match the socket above. My Dometic fridge has the same two-part plug, so no changes were necessary to the Dometic power cord to use it with the ARB socket:

DometicPowerPlug.jpg


I replaced the bottom socket in my preproduction MORryde power panel with the ARB socket:

ARBInstalled2.jpg


I also used an ARB socket in my DIY clip-on power panel pictured above.
 

jscherb

Expedition Leader
Adding Solar Charging

Last summer I did extensive testing of the parameters of a solar installation when I was in the process of adding solar charging to this system. I covered it in this thread, starting I think in June. I'll cover just a few of the highlights here as they interface to the charging system.

I used a Harbor Freight solar panel I picked up for $80 with a now-rare 20% off coupon (it's $119.99 now: https://www.harborfreight.com/100-watt-monocrystalline-solar-panel-57325.html) and a Harbor Freight Solar Charge Regulator ($21.99: https://www.harborfreight.com/7-amp-solar-charge-regulator-96728.html). Quick summary of the testing: the Harbor Freight products are very budget-friendly compared to other solar options on the market, they perform very well and are more than adequate to keep a kitchen battery charged in most situations.

The HF Solar Regulator is a very simple device:

HFSolarRegulator.jpg


It has 3 connections: Battery, Solar [Panel], and Load. It comes with 2-conductor SAE connectors for two of those connections.

In a previous post I showed a photo of the kitchen battery with an SAE connector for the power panel. Connecting the Solar Regulator to the system was very simple - I added an SAE connector to the Load output of the regulator so the power panel could be plugged directly to the regulator instead of being plugged into the battery. The SAE connector for the solar panel was used as-is (there's more on extending the wiring from the solar panel to the regulator earlier in this thread). The polarity of the SAE connector for the battery is opposite of the polarity of the SAE connector I've got on they battery, so to connect the battery to the lead on the battery I made up a short extension with SAE connectors on both ends that reversed the polarity.

By using SAE connectors for both the power panel and the solar components, solar can be inserted into the system simply by plugging in the various SAE connectors.

I keep the solar regulator on the MOLLE on top of my battery cover. What's nice about this is that it's easy to move everything between the Jeeps - when I move the battery and its cover from one Jeep to the other, the solar regulator goes with it. I also made a MOLLE storage bag for the extension cable so the solar panel can be moved away from the Jeep if necessary, the bag can be seen on top of the battery cover in this photo:

SolarDeployed5.jpg


The solar regulator goes with the battery cover in whatever Jeep the kitchen battery is in, and stays connected to the battery and the power panel stays connected to it. The regulator is happy to have no connection on its solar panel input if I'm not using solar at the time, and isn't bothered by the battery being charged by the alternator through the charging system.
 

jscherb

Expedition Leader
Charging System: Summary

This concludes my planned posts on the charging system. I've tried to provide enough detail so someone can implement this themselves, but if I've missed something or something is unclear I'm happy to answer any questions anyone might have.

As I said in the first post in this series, I didn't need to have a true and sophisticated dual battery system - all I wanted was a system that meets the requirements I listed:

  1. Keep the kitchen/fridge battery charged (obviously the most important requirement).
  2. Don't ever drain the main battery because of the kitchen.
  3. Simple and cost-effective to implement - I use the kitchen in both my JKU and my LJ, so I need to implement whatever solution I chose in two Jeeps.
  4. Easily adaptable to any Jeep (or other vehicle a fridge might be installed in).
  5. Easily adaptable to solar charging of the kitchen battery.
  6. Simple enough so that if some component fails while on an expedition, replacement components should be easily available at the nearest point of civilization.
  7. Should be possible to use the kitchen battery to start the Jeep in an emergency.

It's been working very well in both Jeeps for over 4 years and the only problem I've had is the failure of the Scorpion brand circuit breakers I mentioned in one of these posts. I've never felt the need for anything more sophisticated than what I've implemented, although I understand some people might have different requirements than I do and may want something more sophisticated.

There are many things one could do to build this differently, but my requirement #3 was to make this simple and cost-efficient to build. You could use more expensive higher-current relays, real copper wire instead of grabbing wire from CCA jumper cables, one could work out a nicer looking way to mount the relay and circuit breaker rather than zip-tying them to the wiring hardness, etc., and anyone who feels the need to do upgrades like that should feel free. But this "minimalist" design really does work very well, so I've never felt the need to upgrade any of it.

Enjoy.
 

Forum statistics

Threads
185,914
Messages
2,879,560
Members
225,497
Latest member
WonaWarrior
Top