Barn Door for JK factory hardtops

jscherb

Expedition Leader
UPS dropped this JLU/JT rear door panel off today. I've been asked to use this as a pattern to design rear door pockets for the JLU/Gladiator. I'll have to stop by the Jeep dealer to measure how far along this panel the front of the rear seat is so I can divide the design into two pockets - if you look at the photos of the JKU rear door pockets at the bottom of this post you'll see that the covered pocket is in front of the rear seat and the open pocket is alongside the seat. I'll do the JLU ones the same way. The pockets sitting on the chair are for the JKU rear, just had to check how far off they are from the JLU/JT.

JLJTRearDoorPanel.jpg


OO tells me they've completed the first production run of the JK rear door pockets and will be announcing them to their email list this weekend.

JKRearDoorPocketsSample1c.jpg


An update on my garage camera test - I've been trying out most of the features of the camera and its app and I continue to be impressed with the capabilities the under $90 camera has. By the weekend I should have done enough testing to post a detailed review.
 

jscherb

Expedition Leader
Lumary Smart Security Floodlight Camera

I've been thinking for a while about adding remote-viewable security cameras to the house - it would be nice to check on things while I'm away. I've done some casual searching to see what's on the market but hadn't gotten too serious about it - until last week when I discovered Lumary Smart Home and their line of products (https://lumarysmart.com/). This is the product that caught my attention:

LumarySecurityCam(1).jpg


It's capable of issuing alerts to a smart phone if it detects motion in its field of view; it has an SD card slot to record video and a live video feed to a smart phone. It has a microphone and speaker so you can communicate on a smartphone with a person in the field of view of the camera, and it works in color and also has an infrared mode for when it's dark. Seems like it's packed with all the important features. The product web page: https://lumarysmart.com/collections...am-color-night-vision-outdoor-ip66-waterproof.

Inside the box is the camera, a "wall wart" power supply with a long cord, a wall mounting bracket, a few bits of hardware and a 25-page instruction manual.

LumarySecurityCamOpenBox(1).jpg


I'm going to install this camera to monitor the garage, but before installing it I decided to configure it and give it a quick test on the desktop.

Initial configuration is pretty simple:

- After downloading the Lumary app to the phone and creating an account, I selected "add device" (a "+" sign on the main screen) and chose "Smart Camera" from the list of the many devices the app supports ("Smart Camera" is under "Security & Sensors").

- I powered up the camera and waited for a tone indicating that is is ready to be configured.

- Told the app that the camera is ready and it asked for the name of the wifi the camera is to connect to and the password for that wifi; once that's entered a QR code will be displayed on the phone's screen.

- Positioned the phone in front of the camera so the camera could read the QR code. The camera then connected to the wifi and then was ready to be used.

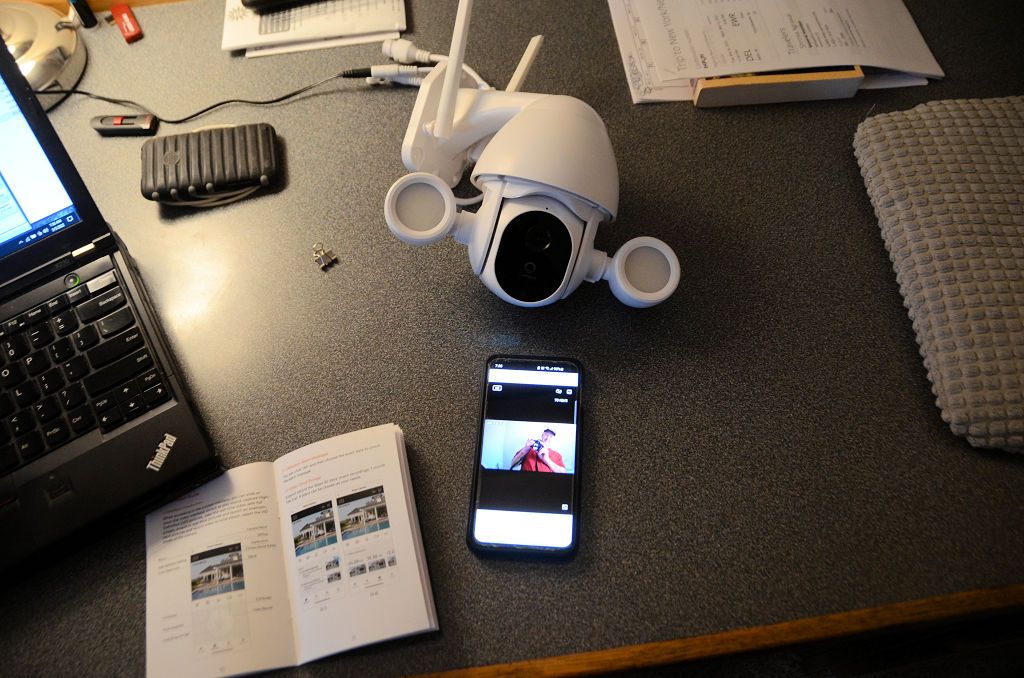
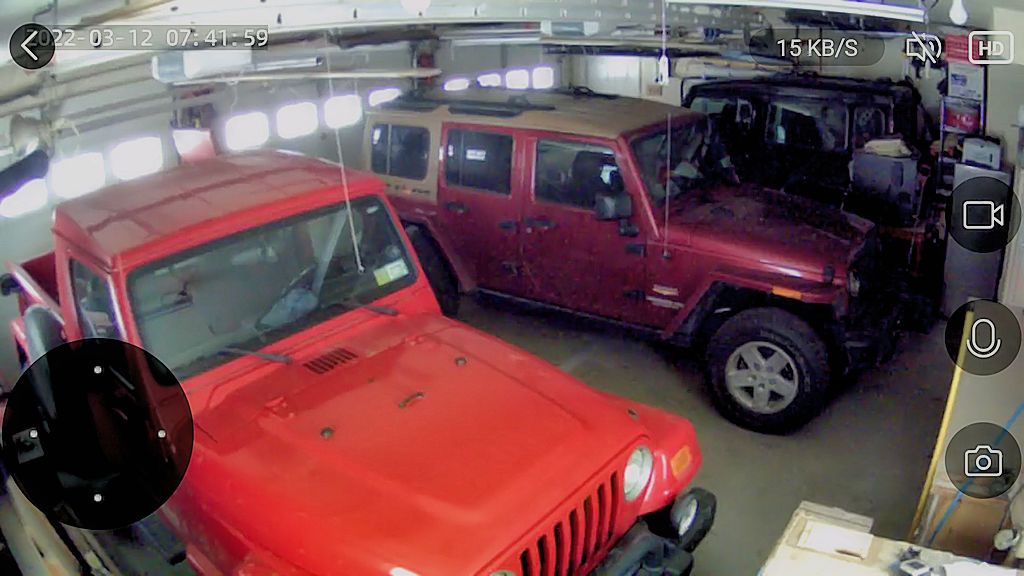
After performing this simple setup procedure at my desk, I opened the camera in the app and took this photo - the image on the phone screen is coming from the camera and in it you can see me taking the photo with another camera. I tested many of the features at the desk to verify that the camera was operating as advertised.

LumaryDeskCheck.jpg


Installing the camera is simple - mounting the included bracket to the wall with the supplied screws (and supplied drywall anchors if needed), slip the camera into the bracket and plug the power supply into an outlet. Since I already configured the camera for my wifi, as soon as I slipped it into the mounting bracket on the wall and plugged in the power, it was working.

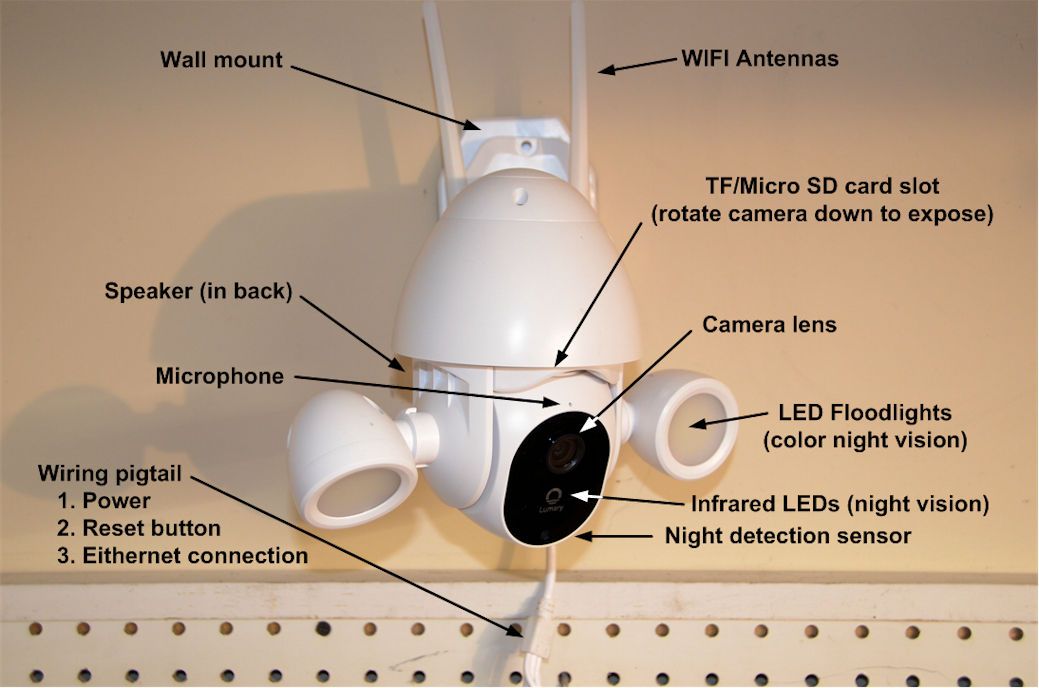
This is a photo of the camera installed to the garage wall; I'll use it to describe some of the components of the camera:

CameraComponents2.jpg


The image above should be mostly self-explanatory. One detail not fully shown in the image is the Micro SD (a.k.a. TF) card slot - it's on top of the "camera ball", so to access it, the camera must be rotated downward. This can be done in the app, but it can also be done simply by rotating the camera ball down gently by hand. The slot supports up to a 128gb card.

Off the bottom of the image are the connections on the wiring pigtail; these include a power connection that the power supply lead plugs into, an ethernet jack in the event the camera is to be connected via ethernet instead of wifi, and a reset button, which is only used if it's necessary to reset the wifi or connect to a different wifi server.

Features, Settings and Capabilities

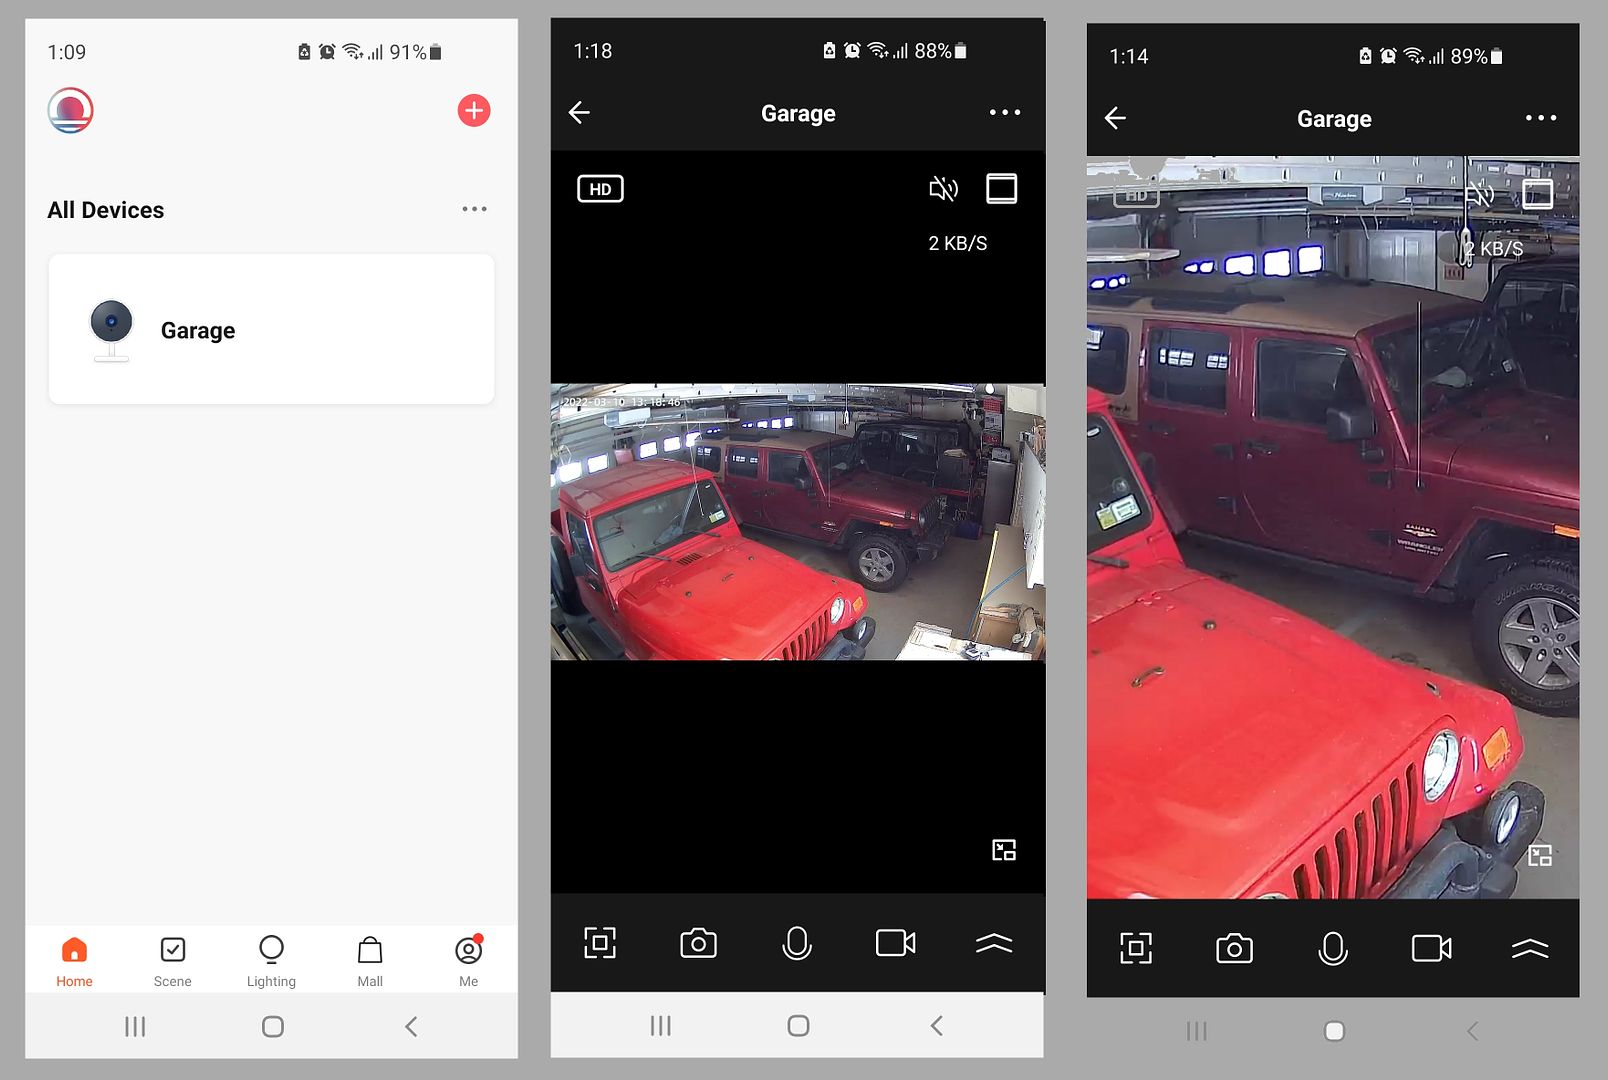
The main screen is displayed when the app is started and this will show a list of all the devices that have been added to the app. I've only added the one camera, and I named it "Garage" because that's where it is (left screenshot below). Tapping on the Garage device goes the the device screen, which shows the current camera image. A nice feature of this screen is that it shows the bandwidth the video stream is using, which in the image below (center screen shot) is 2kb/sec. This will vary due to the image and whatever motion is happening in front of the camera, but the compression seems to be very effective in keeping the bandwidth down.

The icon above and to the right of the bandwidth number zooms the image (right screen shot). Dragging on the zoomed image will pan and/or tilt around the view. Dragging on the image on the prior screen will actually move the camera, so if you want to see more to the left, drag right on the image and the camera will move left. You can move the camera up and down from that screen as well. The camera can rotate 355° and tilt 90° so it's got a very good range of motion/vision.

ScreenShots1.jpg


The speaker icon to the left of the zoom icon turns on the sound so you can hear whatever sounds the camera microphone is picking up.

Icons along the bottom of the screen are (left to right):

- Full screen. The image will rotate and fill the screen in landscape mode.

FullScreen.jpg


- Snapshot. The still camera icon will record a still image to the SD card.

- Microphone. Press this to talk; the sound will come out of the camera speaker so you can talk to whoever is in hearing range of the camera.

- Movie Camera. Records motion video to the SD card; the icon goes red when recording and a second press will stop the recording.

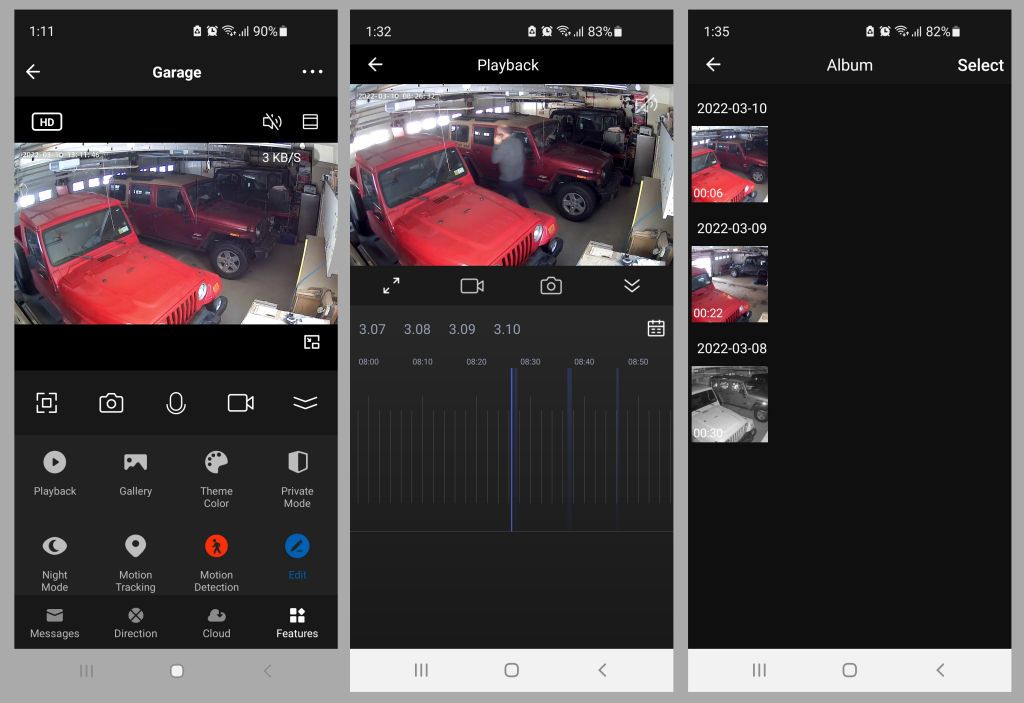
- Chevrons. The chevrons icon (up arrows), will display additional menu options:

ScreenShots2.jpg


The Playback icon will play back video that was recorded due to motion events so you can review what happened to cause the camera to start recording. A scrollable timeline is displayed under the video so you can look at a specific time period (center screen shot). The Gallery icon shows a list of images and video that you explicitly asked the camera to record (right screen shot). Tapping on one of the images displays it (or plays the video if it's a video). Other icons on the menu include turning motion detection and motion tracking on or off, setting the camera mode for daytime (color), nighttime (infrared B&W) or auto. I keep the camera on auto because I haven't found a need to explicitly cause it to go into a particular moce because the auto mode doesn't what it should do and works well - if it's dark the camera is in IR mode, if it's not dark the camera is in color mode automatically.

If motion detection is turned on, the camera can send notifications to the app so the phone will sound a tone whenever motion is detected in front of the camera. Here's an example - it's evening so the camera is automatically in infrared mode so it can see in the dark. I walk into the garage and within seconds the light comes on, switching the camera into color mode, and a notification appears on my phone. Video from the moment of detection until the detection timeout has happened is automatically recorded; I can watch the video on the phone and I can also share the video, which is how I got it to my computer so I could upload it to YouTube (I emailed it to myself).


For this video, I manually turned on recording before I opened the door into the garage so the video would show how long it took for me to be detected. If the video wasn't turned on beforehand, the camera would start recording video as soon as I was detected, which is when the camera lights when on (after I had taken three steps into the garage). In the video I'm carrying my phone and I received a notification on my phone after taking just a few more steps, so the notifications happen very quickly.

On the left below is what the notifications look like; on the right is the event log. If you tap on an event, you'll get a still image of the object that was detected in motion (me), and if you go to the playback function you can see the video for the event.

Motion detection appears to be optimized for person-sized objects moving more or less horizontally. A small animal might not be detected, and in an outdoor use that's what you want - you don't want notifications every time a squirrel runs into the field of view or a breeze moves a branch on a tree.

The camera retails for $89.99 and right now Lumary has a 20% off March sale going on so it can be bought for $72.00 plus shipping.

I've had the camera in use for about a week now and it's worked as expected. I've got notifications turned on all the time, but I'll probably only turn notification on when I go on trips - I don't need to be notified when I walk into the garage or drive a Jeep out. One thing the camera has been useful for is answering the question "Did I remember to close the garage door when I left?".

This camera would be an excellent way to keep an eye on a Jeep parked outside in case someone decides to mess with it.

I rate this camera as an excellent value. It works as advertised, is easy to configure and install, and the app is easy to use. Notification of detected motion are quite fast. And unlike some of the other camera on the market, use of the camera doesn't require a subscription to a paid service - cloud storage for recorded videos is available at an extra cost but a 128gb SD card today costs less than $20 and can hold a lot of video. If you're looking for something to monitor your place when you're away, I recommend you consider this camera.
 

jscherb

Expedition Leader
The weekly Coleman's Military Surplus sale email came in today and in it was this "rubber rucksack":

SwissM90Rucksack.jpg


The description:

...a pack that can resist the worst mother nature has to offer but can carry the most important of essentials when they are needed the most. This Swiss Army model 90 rucksack with straps is made of OD heavy duty vinyl and coated with 100% Polyamide, Polyvinyl Chloride. Which ensures your pack will stay water resistant even in the most inclement weather conditions. The large capacity main pack has plenty of room to fit the most necessary items for short actions or moderate activities while out in the field. Offers two external pouches on opposing sides and additional strap for storage of camping hatchet, would pair perfectly with a Vintage Swiss Military Survival Axe . Comes with many straps with sturdy plastic hardware for securing extra gear and has excellent load bearing shoulder straps.

There's a video on the site that shows a guy wearing it on his back, but it seems pretty wide to wear on your back so it seems like it might be a good fit for here:

SwissM90Rucksack2.jpg


Shouldn't be too hard to adapt the straps to hanging on the spare and the rubberized/weather resistant construction should be good for carrying gear - maybe recovery gear, or camping supplies? I'm tempted to pick one up to try out.


jscherb

Expedition Leader
I'm starting to clean out a lot of the Jeep stuff I've accumulated over the years. Free to anyone who wants to pick them up, a set of painted/paintable JK fenders.

LimeFenders.jpg


Lots more to get rid of as I get to it.
 

jscherb

Expedition Leader
Two years ago I designed and sewed these:

TrashHoppers2.jpg


They're made out of fabric I recycled from soft tops. They've been on my Jeeps all four seasons for the past two years and they've worked out great. I've been asked to update the design to reduce the cost a bit (soft top fabric is very expensive) so they could possibly go into production.

I've been sent a few meters of DWR-treated (Durable Water Resistant) acrylic twill fabric in a tan color that's very nice. Acrylic won't suffer from UV degradation like other bags on the market and the DWR treatment will make it quite weatherproof. The design takes exactly one meter of fabric; I cut out all but a few detail parts the other day. This photo doesn't show the color very well, it's nicer than it looks here:

FabricBlanks.jpg


I plan to make the bag look almost exactly like the bags pictured above, but I did consider adding either MOLLE or outside pockets to the design. When I sewed the first bags two years ago I did a few concept drawings showing possible extra features but I ended up not adding any of these optional features - I've never seen a MOLLE bag on anyone's Trasharoo so maybe those features are nice to fantasize about but not used in practice.

TrashHopperOptionalFeatures.jpg


If anyone has any suggestions about the design or features of the bag please let me know; I'll be starting the sewing over the next few days and if there are good ideas I should consider now is the time.
 

jscherb

Expedition Leader
This week's Harbor Freight email has a coupon for an 18" machete for $5:

MacheteCoupon.jpg


I couldn't resist picking one up, even though I knew it wouldn't be a very high quality tool. And I was right about that, the machete blade is very dull and really won't cut anything without sharpening. The sawtooth side of the blade is actually pretty good, I cut through a 2" limb very quickly. Once I sharpen the blade maybe it will be occasionally useful around a campsite, and the saw edge I know can be useful - several times in the past I've been stopped by a fallen branch or tree across the trail and I've always carried a saw for just such an event, so now maybe I'll carry this.

It came with a sheath with a belt loop:

MacheteAsIs.jpg


I sewed on two straps with cam buckles so it can strap to the roll bar.

MacheteWithStraps.jpg


In the JKU, it fits nicely on top of the rear cross bar - out of the way but still accessible when needed. In these photos, I've swung down the Overhead/Swing-Down MOLLE panel to access the machete. It's also accessible from the back seat.

MacheteInJKU.jpg


In the LJ, I tried it vertically on the main hoop next to the driver's seat.

MacheteInLJ.jpg


Just a couple of minutes of simple sewing made the sheath much more useful.

Just one piece of advice - don't buy this unless you have a way to sharpen it. As it comes it might be ok for bludgeoning its way through brush, but it's not going to do much cutting. With only a few minutes work I was able to put a reasonable edge on it. Whether the steel is good enough quality to hold an edge for long is doubtful but I don't expect to need it too often. And of if I do find myself using it a lot and dulling it often, I'd probably invest in a little better quality machete and implement the same mounting ideas as I did with this one.
 
Last edited:

jscherb

Expedition Leader
All of the Jeeps were outside today so I could sweep the garage floor after all the winter mess. While they were out I took these photos of the roof racks on the JK and LJ to show the roof rack Power Pods. I installed JK pods a few months ago and the LJ pods last month. In these high level photos they're visible but from the ground you can barely notice them.

OverheadJKU.jpg


OverheadLJ.jpg


I had planned to pull the plow off the LJ today but this morning I checked the weather forecast one more time before doing that - there's snow in the forecast for the upcoming week. Nothing more than an inch is forecast but just in case I'll leave the plow on one more week. And as soon as the plow comes off, the LJ will go through the car wash :).

ThreeJeeps.jpg
 

ZONE ZERO

Member
I'm starting to clean out a lot of the Jeep stuff I've accumulated over the years. Free to anyone who wants to pick them up, a set of painted/paintable JK fenders.

LimeFenders.jpg


Lots more to get rid of as I get to it.
any chance you would ship the fenders to New Hampshire I have a project and I need paintable flairs. Obviously I’d pay for your time and the hassle of shipping
 

jscherb

Expedition Leader
Thanks anyway , Im so Impressed with the quality of your work. Keep it up!
Thank you very much. I am keeping it up, here's this morning's work ;)

Had an idea for something that might be handy for camping or picnicking so I sewed this. It's got a Grab & go clip on the back so it can hang on a MOLLE panel; also has grommets for hanging other places.

CutleryRoll1.jpg


Hanging on the MOLLE on a Cool Bag:

CutleryRoll2.jpg


I'll probably keep it in the non-cold compartment in my fridge and hang it on the window when needed.

CutleryRoll3.jpg


The cutlery is a 20-piece set I picked up at Ikea for about ten bucks.
 

jscherb

Expedition Leader
In 2017 I found a Garvin rack listed on Craigslist for $150. It didn't include the tub mounting legs, which was fine because all I wanted was the main rack basket - I planned to mount in on the XJ Cherokee racks I have on the JKU and the LJ. I posted about it when I bought it, this post shows it on the XJ rack: https://expeditionportal.com/forum/...factory-hardtops.127687/page-170#post-2339644

What I didn't post about at the time is this rack that came with it. It was unidentified but I checked it against a TJ spare carrier and the holes matched so apparently it was an "over spare" basket mount for a TJ or possibly a YJ.

TJTailgateRack.jpg


Cleaning up the yard the other day after the winter, I came across that mount again and decided it either needed to go or it needed to turn into something useful. I don't need it in it's original form but I noticed that the verticals are 1 1/4" squatre tubing, which is the size of the receivers that are part of the cargo system I designed for the MORryde tailgate reinforcements, so I cut it apart to result in these:

TJTailgateRackCut1.jpg


They slip right into the receivers on the tailgate:

TJTailgateRackCut2.jpg


They're still parts in search of a use though, I don't have anything I need to mount on these brackets. Someday I'll probably come up with something but until then they take less room to store than they did in their original form :).

I do use the receivers regularly, mostly for the bike rack I designed to slip into them. These photos taken on the Sanibel Causeway in SW Florida; I brought my bicycle down from NY for to ride on Sanibel and Captiva Islands.

BikeRack6_zpse4gu9zat.jpg


BikeRack7_zpsu8fjrca9.jpg
 

jscherb

Expedition Leader
Two weeks ago I posted that I was asked to update the design of the spare bag I designed about two years ago to reduce the cost a bit (soft top fabric is very expensive) so they could possibly go into production.

TrashHoppers2.jpg


To make a prototype, I was sent a few meters of DWR-treated (Durable Water Resistant) acrylic twill fabric in a tan color that's very nice. Acrylic won't suffer from UV degradation like other bags on the market and the DWR treatment will make it quite weatherproof. Over the last few days I sewed a new bag with a slightly updated design. The design updates are mostly in the structure of the bag, so it looks a lot like the original. A few quick shots of it hanging on the back of the chair in the sewing room:

SpareBagProto1.jpg


SpareBagProto1a.jpg


I did make a change to how the bag hangs; on the back I've sewed sleeves into which 2" webbing slides. The webbing will cross around the other side of the spare and secure with large parachute buckles. I made the straps removable so that different mounting methods could be implemented, so instead of strapping it to a spare tire, perhaps it could hang on the inside of a Gladiator bed or on a roll bar. Or hang on the side or back of an overland camping trailer to serve as a trash bag (a kitchen-size plastic trash bags fits in it very nicely).

Also, the leather straps/buckles are functional and are used to adjust the lid closure and can be used to open the lid, but there are parachute buckles hidden under the leather strap to make opening the lid quick and easy.

SpareBagProto1b.jpg


I have a detail or two to finish before I test it on the Jeep (like binding the inside seams to make them waterproof), but I should finish that tomorrow.

I don't know if this will end up in production but I'll turn the design over and the decision is out of my hands.
 

jscherb

Expedition Leader
I'm on Colemans' Military Surplus email list and every week they send an email with specials. This week their email also offered instructions on restoring various surplus items that may be in somewhat used condition, like jerry cans and ammo cans. I'm sure they won't mind if I reproduce part of their email here, maybe someone will find it useful...

ColemansRestore1.jpg


Steel storage containers like the iconic Jerry Can and U.S. G.I. 50 Cal. can may not look like they just rolled off the assembly line. As you know, that is the nature of the surplus industry. However, if you invest a little time and planning, you can clean them up with a wire brush and add fresh coat of spray paint, you have essentially a brand new tailored can at a fraction of the price.

For the interior: First you need dish washing detergent. Hot water and pea gravel or maybe a large amount of copper BB's. Fill the can half full with hot water, add about a tablespoon of Dawn and about 4-6 cups of pea gravel. Put on the lid/cap and wrap it in two heavy towels, one wrapping from side to side the other from end to end and tape with duct tape heavily. Fill half full with clean cool water and shake until there is no more soap and the water runs out clean. Hold can up side down and shake until all of the water comes out. With cap or lid off leave to dry in the sun turning every once in a wile.

For the exterior: First you need a hand sander or a series of coarse to fine grit sandpaper or heavy duty steel wool. Lightly address any areas with light surface rust. Then thoroughly clean the outside with warm water and dish soap. Rise clean and allow to dry completely. Then apply a clear rubber seal coating like Flex Seal or other name brand to the exterior weld areas. Allow to dry completely and apply your favorite exterior olive drab, black, yellow, or red paint to seal in all of the steps up to this point. Once again allow to dry completely. Now your can will look great and be ready for many years of service.

ColemansRestore1b.jpg


FWIW.

The email included instructions for restoring other items, such as surplus tents, packs and other bags, bags with leather and wooden objects. I'll definitely be filing the email for future use.
 

jscherb

Expedition Leader
I finished sewing the last details of the spare bag. In my last post I wrote that the straps slip into sleeves on the back of the bag to allow for different mounting options; here's an example different types of straps. On the left is a full-length set of straps that can attach the bag to tires up to 37". On the right are short straps with clips on the ends, these are designed to attach to the grid in the second set of photos below. I made that grid as part of the original design; it supports MOLLE stuff and also has d-rings for the clips on the short straps.

SpareBagStrapTypes.jpg


SpareBagMOLLEGrid.jpg


In place on both Jeeps:

SpareBagOnJK.jpg


SpareBagOnLJ.jpg


When it's used as a trash bag, a kitchen sized plastic trash bag fits nicely inside. Inside, there are three grommets at the bottom for drainage in case liquid spills in it. BTW I never removed the original bags from the Jeeps when I go through the automatic car wash and nothing's ever gotten wet inside so the bags are pretty weatherproof.

SpareBagInside.jpg


I'll keep the bag on the JKU for daily driving to test it but I don't expect it to perform any differently than the original two bags. And I'll turn over the patterns and details to OO and they can decide if they think it's worth putting into production.
 

Forum statistics

Threads
185,527
Messages
2,875,534
Members
224,922
Latest member
Randy Towles
Top