Barn Door for JK factory hardtops

jscherb

Expedition Leader
That pre-production plastic JL style grille doesn’t need a retirement home? ?
Even though I had it on my Jeep for over a year, it's not 100% perfect and if it ever gets into production I'll probably need it to help whatever company signs up for it to make the few minor changes that would be needed to perfect it for release (a plastics molding company has completed the tooling and the tooling is fine; the minor changes needed are finishing/trimming details after the part is released from the mold). But if I ever decide I won't need it anymore I've already promised it to another Expedition Portal forum member.
 

jscherb

Expedition Leader
-1 amp on overcast day keeps the fridge running but what about the loss when there is no sun? ....FLA batteries take 6-8 hours to charge
- Testing different type of panels (cells/diodes ) may tell you which ones are better in ambient light.
- use more panels
- make the mount so the panel can be portable
The backup when there is no sun is to start the Jeep and run it a bit to charge the kitchen battery. A fully charged kitchen battery lasts 36-72 hours depending on ambient temperature, so running the Jeep occasionally will top off the kitchen battery (each morning and evening is what I typically have done before beginning this solar project) - the Trail Kitchen Charging System charges the kitchen battery from the alternator when the Jeep is running (and when the Jeep isn't running there's no connection between the kitchen battery and the main battery so the kitchen can never drain the main battery).

It may be that there are different types of panels that are better than this HF panel in ambient light/shade, but at $80 for 100 watts (I bought it when it was on sale for $80) this one is a very good value and works just fine for my requirements - I don't see a need to spend a lot more than this on something marginally better.

Same comment about using more panels - this panel works well enough for my requirements so I don't see a need to add to the expense and storage challenges by increasing the number of panels.

Yes I agree the mount should allow the panel to be portable, I've got a few ideas on ways to do that and that's something I will include in the mount design.
 

jscherb

Expedition Leader
Some ideas for mounting the solar panel...

I like the idea of storing it under the rack and enabling it to slide out for use:

UnderRack.jpg


There are times when the tent will be erected and the sun is behind the tent, putting the panel in the shade. A simple option for that would be to have the panel be removable. It could then be placed on the ground; it comes with hinged legs to prop it up at an angle.

GroundOption.jpg


The above seems like the option that requires the least hardware and should work in almost all situations.

Another option would be to use the rack mount as above, but also have a pole mount that clamps the the rack. Something like this:

PoleOption.jpg


It would be designed so it could attach at any point along the rack - for example, at one of the rear corners of the rack in the case where the sun might be behind the Jeep. The pole could also be collapsible so the panel could be positioned high enough so the tent wouldn't shade the panel.

Storing the pole would be fairly easy, it could attach to the side of the rack.

The panel would be attached to the pole with something like this:

PoleMountAdapter.jpg


That mount provides for angling the panel, and because it goes on top of a round pole, it can swivel to aim at the sun. I found that one on eBay for $35.00.

Another way the pole mount could be used is with a ground stake. The pole would be hollow, so a stake could be pounded into the ground and the pole slipped over it.

GroundPoleOption.jpg


I'm inclined to go with the under-rack slide-out and have it be removable to set on the ground when necessary because that requires the least hardware, but I think the pole mount is a viable idea as well.

Thoughts?
 

jgaz

Adventurer
I found your testing to be very interesting.
Im dealing with much warmer temps (Az) but also more sunshine.

I like the idea of a rack mount, but so many times because of the heat out here I’d prefer to park my vehicle in the shade.
I’m torn between the ground stake and a more traditional angled mount. Sometimes there is way more rock at my campsite than I’d like to deal with but the mount you’re proposing would be secure and very ez to aim.
 

zgfiredude

Active member
Less is more.......I'd go with the ground approach until it presented an issue that NEEDED solving if that makes sense. Having to carry the "pole" is just one more thing to worry about that may simply not be useful.
 

jscherb

Expedition Leader
Less is more.......I'd go with the ground approach until it presented an issue that NEEDED solving if that makes sense. Having to carry the "pole" is just one more thing to worry about that may simply not be useful.
That's how I'm leaning. Since the under-rack mount would be used in both cases, I'm going to design that and build it and I'll see how it works out.

It'll need an extension cord; I'm also going to build and test extensions in several wire gauges to see what the minimum gauge with no loss will be.
 

jscherb

Expedition Leader
My front rack extension is on the workbench with the solar panel so I can begin work on the slide-out design.

PanelUnderRackFit.jpg


One option would be to use commercial slides, but that seems like overkill because this isn't a drawer that's going in and out a lot with weight in it, it just needs to slide out with a bit of support so I think something much simpler is a better choice than a commercial slide.

There are many details to work out, but here's a mockup using aluminum angle for the panel to slide on. The panel would be secured in place when stowed with lockable latches. The angle and latches are in this photo:

DesignIdeas1.jpg


The solar panel will be removable from the slide so it could be placed on the ground or on a pole, or it could be slid out from under the rack and left in place if it would be in the sun there.
 

jscherb

Expedition Leader
Post-Covid, Harbor Freight isn't giving away free flashlights anymore, but almost every time I bought anything there before the pandemic I picked one up. I've got dozens and they're very handy:

HFFlashlights(1).jpg


If you want to start sewing accessories for your Jeep, here's a very simple project - a roll-bar holder for these flashlights.

Materials:

- A piece of 1"-wide (or 1.5", which is what I used) Velcro One-Wrap (Velcro with hook on one side and loop on the other), long enough to wrap around your roll bar and overlap an inch or so. I made mine 13" long, which fit well on the roll bars in my LJ and my JKU.

- A short piece of 1"-wide elastic (or 1.5" as I used). I made mine 2 1/4" long, which provides enough length for sewing the ends to the Velcro and for a tight grip on the flashlight.

FlashlightHolderMaterials.jpg


Sew the elastic near the center of the One-Wrap, making a loop with it that's tight enough to stretch to hold the flashlight firmly.

FlashlightHolderSewed.jpg


FlashlightHolderSewed2.jpg


Wrap the One Wrap around the roll bar and secure tightly. Slip the flashlight into the elastic. In the LJ pickup (left) and the JKU (right). The JKU also has Molle belts on the roll bars, and the flashlight holder just wraps around them.

FlashlightHolderInstalled.jpg


Longer flashlights or other items could be hung with two of these.

Sewing projects don't get much simpler than this, and this one is actually useful. It's a perfect starter project for someone who wants to start sewing Jeep accessories.

Tip: You may have noticed in the photo of the materials that the end of the elastic is fraying. There are several ways to prevent that. One is to fold the ends of the elastic under before sewing to the One-Wrap and sew through the folded edge. Anther solution is to melt the end of the elastic - I use a hotknife to cut the elastic, which melts through and seals the edge (see close-up at right below). But most people won't have a hotknife handy, so yet another solution is to apply some superglue to the edge of the elastic.

Hotknife.jpg


If people are interested in simple sewing ideas for their Jeeps, there are more that I can post.
 

jscherb

Expedition Leader
Not long ago Goose Gear released a tailgate table for the JL. It's on the high end of the market like all of their products, and it's very nice:

GooseGearTailgateTable.jpg


Seemed to me like it needed a Cutlery Keeper so I designed one:

GooseCutleryDesign.jpg


I sewed a prototype and not having a Goose Gear tailgate table or a JL I sent it off to be test fitted; it fit well so I sent the design along to Overland Outfitters and a preproduction prototype for my review arrived yesterday.

GooseCutleryPrepro2.jpg


I also received another preproduction pair of JL/Gladiator door pockets yesterday. These are production candidates and as far as I'm concerned only need two minor tweaks before they're ready to go. OO hasn't given me a release date but it should be very soon.

JLDoorPocketPrepro2.jpg


And also in the box were preproduction samples of two designs I did for the new Bronco. I won't post photos of them because this is a Jeep forum.

I'll never get to use any of these because I don't have a JL or a Gladiator, or a Goose Gear tailgate table, or a Bronco. But my fun is in the design process so I enjoyed these anyway.
 

jscherb

Expedition Leader
Another simple sewing project... do you have a bag that you like but wish it could attach to your Molle system? It's easy to do for most bags. Molle straps are available in several lengths; these can be found at multiple online sources and on eBay and in most cases are easy to sew to the back of a bag:

MolleStraps.jpg


Most of us probably have a Jeep-issued document bag in our glove compartment. I've liberated a few of these from Cherokees and Wranglers at u-pull junkyards...

JeepDocBag.jpg


I turned one of them into a Molle pouch. I had two choices for Molle straps on hand - the green ones are the commercial ones in the photo above and the black ones were removed from a cheap Molle pouch with a failed zipper. Neither set is the right color, but since they're on the back it isn't a big deal.

JeepDocBagMolleStrapChoices.jpg


I decided to go with the shorter black ones, the green ones were a bit long. The also needed snaps installed for the bottom of the straps to secure to.

JeepDocBagWithMolle.jpg


Goes nicely on the headrest Molle (or anywhere else you've got Molle):

JeepDocBagOnHeadrest.jpg


Molle straps are usually very easy to sew in place, the only possible complication is if the bag opens enough to sew the strap on. Usually with a little "persuading" I can get the sewing machine to reach into a bag enough to sew straps on.

This was a 10-minute project, which included sewing the straps to the bag and installing the snaps.
 

jscherb

Expedition Leader
And another trivial sewing project...

On my recent Colorado trip I stopped at the Iowa 80 Truck Stop. They had a nice multi tool on sale there with a 2-for deal, so I bought two. They came with a cheap belt pouch:

MultiToolPouch1.jpg


The belt loop wasn't useful but a Molle strap would be so I added a strap. I used a strap I cut off the same cheap Molle pouch with broken zipper that I used on the last project.

MolleStrapRemoved.jpg


A quick bit of stitching attached it to the multi tool pouch, and I added a snap for the strap to snap to.

MultiToolPouch2.jpg


Job done, now I can hang it.
 

jscherb

Expedition Leader
And one last quick sewing project...

I found this bag at a Duluth trading store about two years ago. It was part of their "Firehose" canvas line and advertised as a toiletries bag but it seemed like a good candidate to convert to Molle or perhaps a roll bar mount. I looked for it today on the Duluth site and couldn't find it so maybe it's discontinued, but the concept in the thread can apply to other bags as well.

DuluthFirehoseToiletriesBag.jpg


Because of its shape, it doesn't lend itself too well to Molle straps, so I came up with a different mounting method for it. I sewed a strip of webbing to the back, similar to a Molle strip:

DuluthBackStrap.jpg


Lengths of Velcro One-Wrap can be threaded through the strap to hang in on a roll bar, or on a grab bar:

DuluthOneWrap.jpg


DuluthOnGrabBar.jpg


All of the simple sewing projects I've posted recently are easy enough for a beginner at sewing, they're quick to do and can be useful in a Jeep. And a good start towards more complicated sewing projects ;)

On the roll bar:

DuluthOnRollBar.jpg


In this series of posts I was trying to show some simple things you could do with a sewing machine that could add value to outfitting your Jeep. Even if you don't sew or have a sewing machine, I'm sure you know someone that does, and all of these are very simple projects that you could ask your mother to do for you (she probably has a sewing machine?) I'll stop with the sewing posts now.
 

jscherb

Expedition Leader
I was curious about exactly how the Harbor Freight solar controller works so yesterday I used an oscilloscope to look at the output waveform. I know the HF unit is a PWM (pulse width modulation) controller but I wanted to see exactly what the output voltage is and how the output is modulated.

If you're not familiar with PWM, here's a Wikipedia article about it: 
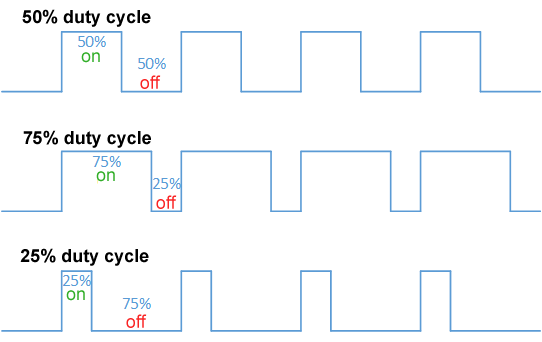
https://en.wikipedia.org/wiki/Pulse-width_modulation. Simply put, PWM varies the power by outputing voltage as a series of pulses. The "duty cycle" (on vs. off time of the pulses) determines how much total power is output over time. This image is from the Wikipedia article and illustrates duty cycle (By Thewrightstuff - Own work, CC BY-SA 4.0, https://commons.wikimedia.org/w/index.php?curid=72876123):

Duty_Cycle_Examples.png


I was interested in seeing several things about the solar controller:

- The maximum amplitude (voltage) of the pulses
- The duty cycle when the battery is charged, discharged, and under load.

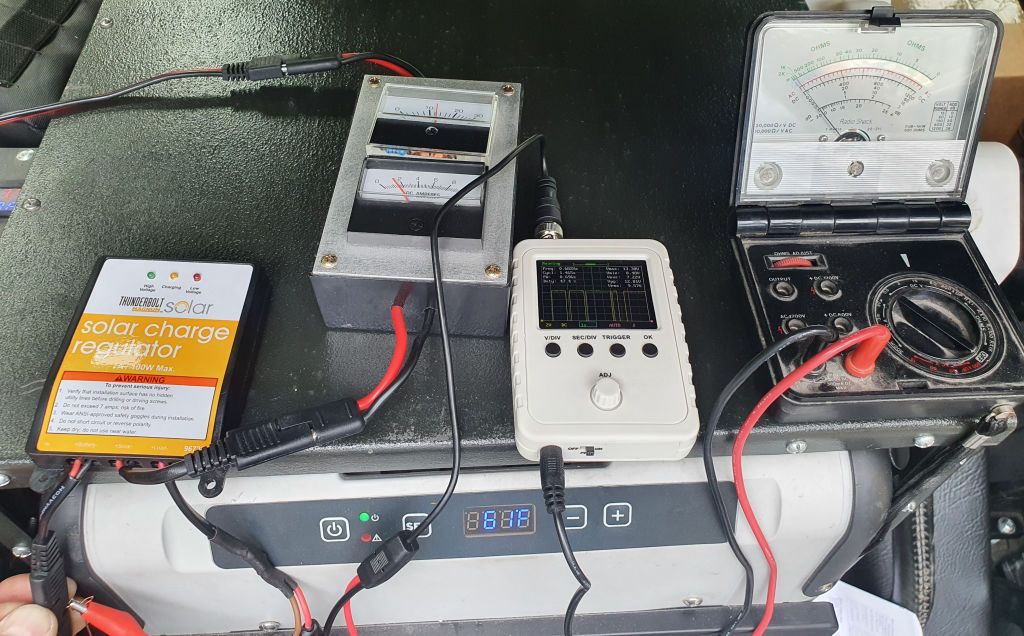
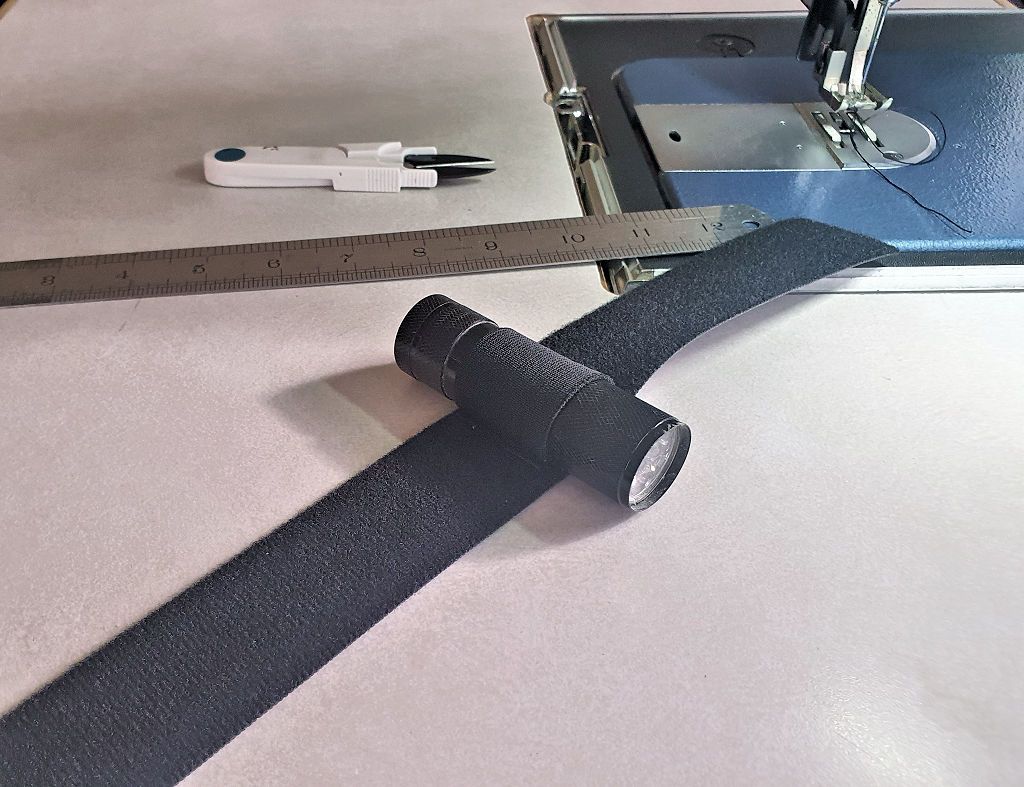
I used a small handheld digital 'scope for these measurements. Here's my setup for this test, left to right: HF Charge Controller, solar panel output volt + amp meters, handheld 'scope, voltmeter (for verifying voltages) and of course the kitchen power panel (offscreen to the left) and the fridge (below).

PWMTestSetup.jpg


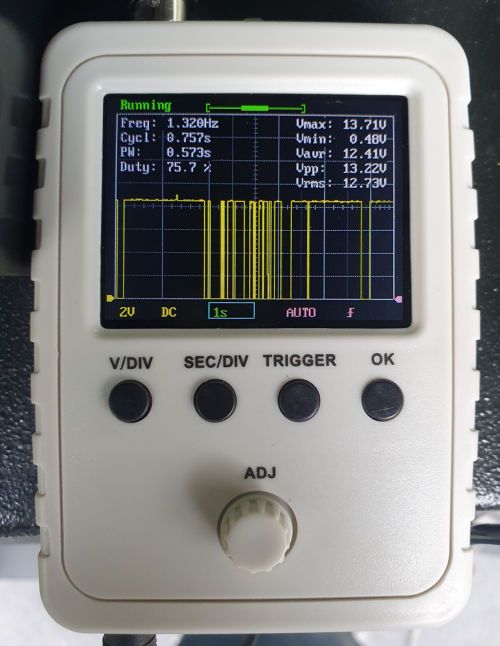
In this next image, the fridge has just been started and the battery is fully charged:

PWMWaveform.jpg


The settings on the 'scope are 2 volts/division vertically so visually it's a bit over 13 volts, and the numeric display at the top of the screen confirms that. Max voltage is indicated at 13.71 volts, which is high enough to charge the battery, given enough duty cycle.

Horizontal divisions are 1 second and the numeric display indicates the frequency is about 1.3 hz, although as you can see from the waveform this varies quite a bit. I was expecting a more regular frequency, so this somewhat random frequency was a bit of a surprise.

Duty cycle is indicated at about 75%, which means 75% of the time the controller is supplying power to the kitchen and 25% of the time it is not.

The ammeter monitoring the solar panel output was indicating slightly less than 2 amps when the waveform photo above was taken, and the kitchen draw as measured by the ammeter on the kitchen power panel was just over 5 amps. With the duty cycle of the power out of the solar controller being 75%, the solar panel is picking up some of the kitchen load.

I'll do more testing but this is just for intellectual curiosity and educational purposes. I like to understand how things work.
 

jscherb

Expedition Leader
Anyone going to the Smokey Mountain Jeep invasion in Tennessee this weekend? I'm writing this at a lunch stop in Virginia on the way south. MORryde and Overland Outfitters are sharing space at the show and they're using my Jeep in the booth an OO is using my trailer to transport merchandise and displays. The Jeep is outfitted with MORryde gear and the trailer is so full of OO stuff that I had to strap their two display tailgates on the roof rack (that's the bundle wrapped in orange ratchet straps). Hope to see some forum friends there, stop by and say hi if you're going to be there.

ToSmokey21.jpg


The trailer is really getting a workout - it'll do about 1700 miles in the next week to and from the show, and the weekend after I have use it to help my son move from Philadelphia to the NYC area, that'll be another 700 miles.
 

jscherb

Expedition Leader
While I have time before the show opens, a few photos from the Smokey Mountain Jeep Invasion...

MORryde recently bought their own Jeep. I'm very happy about that because it means they won't need my Jeep in shows much anymore :).

Smokey21MORryde.jpg


Tentrax is right next door to MORryde:

Smokey21Tentrax1.jpg


I point them out because I designed the trailer-side MOLLE/Gear Carrier for them:

Smokey21Tentrax2.jpg


And Overland Outfitters is sharing the space with MORryde...

Smokey21OO1.jpg


Smokey21OO2.jpg


If you're at the show, stop by and say hi!
 

Forum statistics

Threads
185,528
Messages
2,875,553
Members
224,922
Latest member
Randy Towles
Top