Barn Door for JK factory hardtops

jscherb

Expedition Leader
Well, NOW you've caught my attention. For some reason, I assumed it would only fit in the 4-door.

So glad you've now got access to a 2-door to use as a test mule for new ideas!
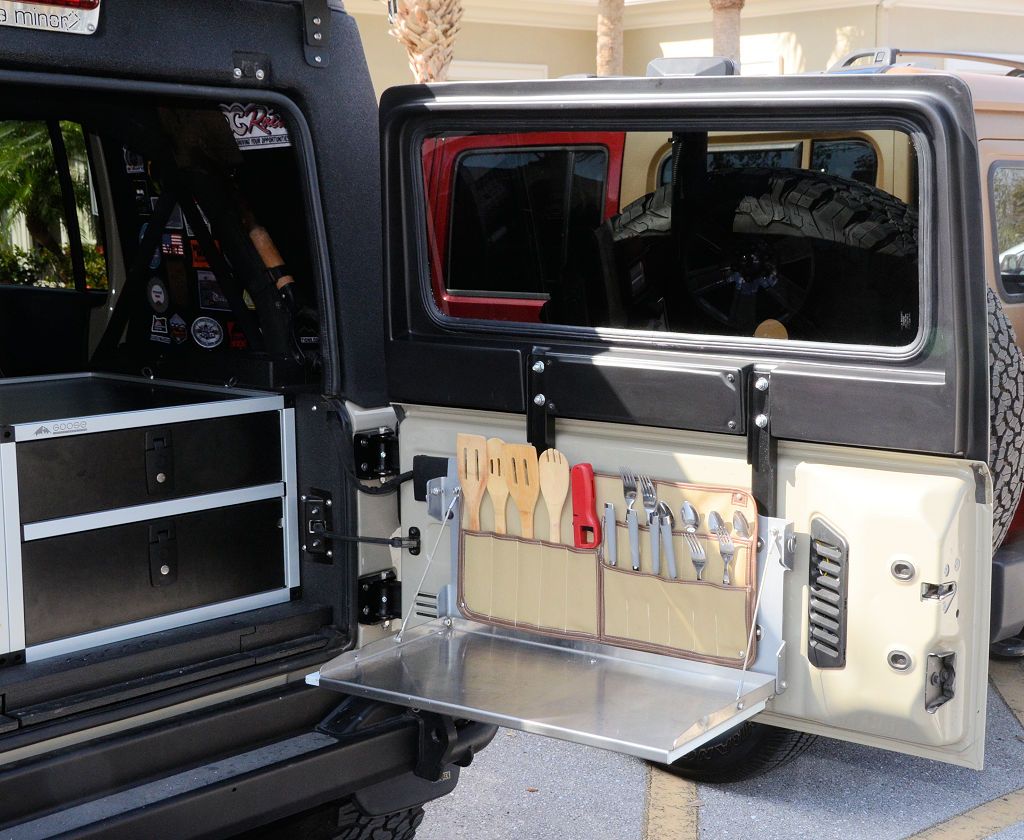
The Trail Kitchen can mount in anything that's got a relatively flat floor and has about 17" x 25" of space on that floor. Mounting it in the 2dr turned out to be pretty easy using the rear seat brackets and one of the factory tie-down points (the same tie down point is used when it's installed in the 4dr).

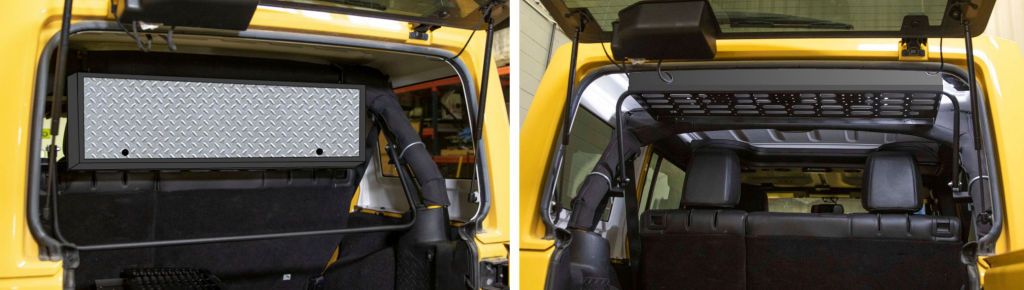
I've been trying out a bunch of new ideas in the 2dr, a week ago I posted about fitting the Overhead/Swing Down Molle panel into it. Because the 2dr roll bar is different from the 4dr roll bar I had to make new upper brackets for it, but they only took a few minutes to build. After installing it I decided to recommend to MORryde that they do not release a 2dr version, and here's why:

2drOverheadMolleHeadroom_zpsbczy3fkv.jpg


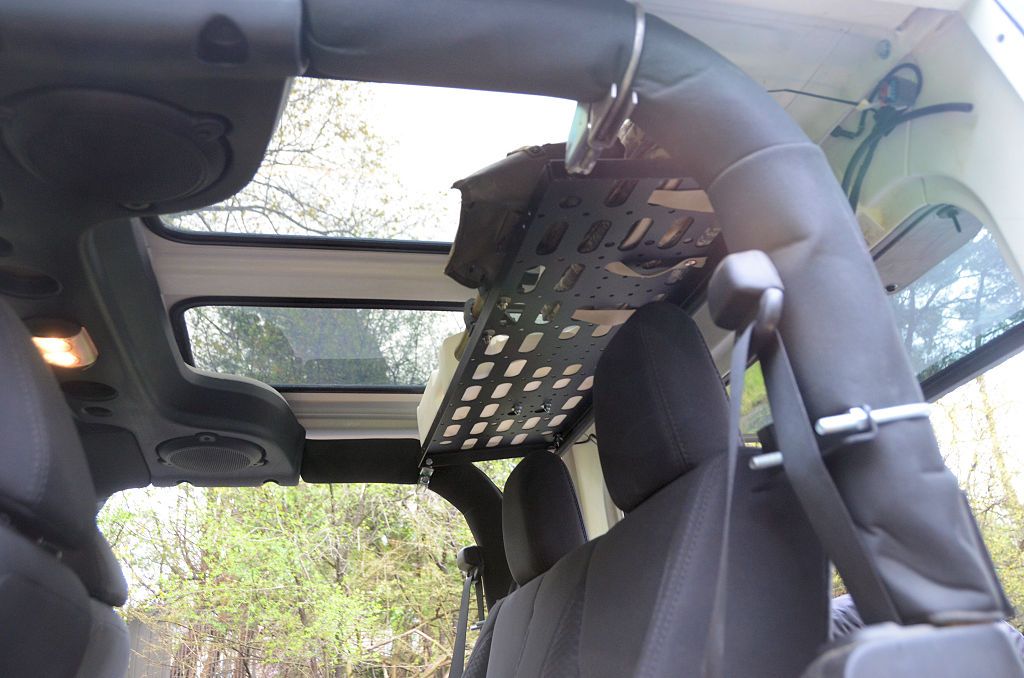
Because the back seat is so close to the rear of the Jeep, part of the panel sits above the head of back seat passengers, which I think is a safety risk. I suppose it could be released as a product with the disclaimer that it's only for use in a 2dr with the back seat removed, or with no passengers in the back seat, but in today's litigious world all it would take is for one child to cut his head on the metal after dad goes too fast over a speed bump and lawsuits would probably ensue, even if a disclaimer was part of the product instructions.

So if any 2dr owners want the panel in their Jeep that they've removed the back seat from, they can make up the necessary brackets themselves, they're not too hard to make.
 

jscherb

Expedition Leader
Another thing for the 2dr - yesterday I molded a JK-style grille for it. These photos were taken just out of the mold, next it needs to be trimmed and the mold release needs to be washed off. I molded this one in black, so it wouldn't need to be painted, but I plan to paint it Dune to match the body.

JLGrilleDemolded1_zpsb1cyzeir.jpg


JLGrilleDemolded2_zpsfd8afcvj.jpg


And if anyone wants to see the grille being wrestled out of the mold...


jscherb

Expedition Leader
Initial test fit, fits very well.

JLGrilleTestFit1_zpsmmkbdcnu.jpg


JLGrilleTestFit2_zpsw76nkwk2.jpg


JLGrilleTestFit4_zpslr16idgy.jpg


JLGrilleTestFit3_zpst0cawzw8.jpg


Next I'll install the lower clips to secure the bottom of the grille to the Jeep and I'll install the mounts for the mesh that will go behind the slots.
 

jscherb

Expedition Leader
That came out Nice.
Thank you very much.

Still more work to do on it...I plan to put a mesh behind the slots and paint the faux "molded in" inserts like I did with the grille on my JKU (photo below). I'll also probably paint the grille Dune to match the body color, although some people have already told me I should leave it black.

BugsOff_zpsuwcsu1aj.jpg
 

Jurfie

Adventurer
Nice! I like the molded-in signal lights better than the surface mounted; it looks more "polished", IMHO.
 

jscherb

Expedition Leader
Installed mesh behind the slots this morning.

Mesh1_zpsaylkidsj.jpg


Probably will go with the factory orange turn signals above, but had to try the dark LEDs in the black grille.

MeshLEDs_zpsprnevcjc.jpg


Two grilles...

TwoGrilles_zpsaozzfeev.jpg
 

borison

Adventurer
I think you could go either way on the lights. Normally, I’d say orange, but the black blends in nicely. More so if you leave the grill black.
 

jscherb

Expedition Leader
I think you could go either way on the lights. Normally, I’d say orange, but the black blends in nicely. More so if you leave the grill black.
The grille will be black, Robert and I have been discussing grille color and he would like the grille to be black rather than Dune. I'll paint the grille to have a matte finish rather than the gloss black gelcoat. I plan to do the entire finish with rattle cans to demonstrate how professional results can be achieved at home.

The base color with be SEM Trim Black (https://www.semproducts.com/product/trim-black/black). I used this a few months ago when I molded a barn door for my friend Donny, here's what the black looks like:

DonnyFinal5_zpsv3da3ye4.jpg


I'll do the "inserts" in both the slots and the headlight buckets in Gunmetal; it'll be a subtle difference from the black and should provide a nice accent for the detail of the inserts. I took these photos to show the Gunmetal color:

GunmetalGray_zpsntzxd1ec.jpg


Once the base color and accent color are applied, I'll seal everything with a 2k matte clear (https://www.spraymax.com/en-us/prod...d-spot-blender/2k-clear-matte-2k-clear-satin/). I also used this on Donny's barn door, and I used it on the C-pillars for the Safari Cab soft sides. The clear protects the base paint well and provides a very consistent matte finish.

CPillarsSpicedDone_zpseday9xed.jpg


And of course the black mesh.
 

jscherb

Expedition Leader
I've designed a new way for the grille to clip to the Jeep along the bottom; here's a video demonstrating grille removal/installation. Since with this new design the grille installs/removes vertically, unlike the factory grille this grille can be removed even is a winch is mounted in front of the grille. In this video after I remove and reinstall the grille, I'm pulling on the front of the grille to show that the grille is securely in place.


Two confessions: for the purposes of making this demonstration quicker, I don't have the turn signal bulbs in the housings, and I'm temporarily using two bolts in the top clip holes instead of the factory clips to secure the top of the grille.
 

jscherb

Expedition Leader
Work in progress: thermoforming the lockbox for the Overhead Molle Panel:

LockboxShell1_zpso5rpgd2s.jpg


The rectangle of 2x2s in the second photo is a die I used to form the recess for the cover; once the plastic was soft enough I pushed the die into the recess in the form.

The sides aren't quite done and they do get trimmed a bit shorter, I'll get to that shortly.

The concept drawings again:

LockboxConcept_zpsvuh31je8.jpg
 

Zeep

Adventurer
Didn't realize you were thermoforming at home. I thought you farmed that out, on the tailgate storage.
 

jscherb

Expedition Leader
Didn't realize you were thermoforming at home. I thought you farmed that out, on the tailgate storage.
The prototype Storegates were thermoformed at a local plastics manufacturer, they did me a favor and formed a bunch for me for free. I've still got a few I haven't used yet.

StoreGateShell2.jpg


I decided to form the prototype lockbox for the Molle panel myself because I'm making the shell for one of my prototype Molle panels, which are a slightly different size than the production panel. I made the form the proper size for the production panel in case MORryde wants to use it for production, but since my prototype panels are slightly different, I need to make some minor changes to the shell as I use the form to make a shell for my prototype panels.
 

jscherb

Expedition Leader
Today I painted the JL-style grille for Robert's 2dr. He wanted it matte black, so here's what I did...

The first step is to sand the entire grille. I use 120 grit followed by 180 grit for this step. If there are any flaws in the surface, they get fixed now with body filler (I found two very minor flaws, both less than 1/8" diameter and about 1/32" deep so I filled them and sanded them.

GrilleSanded1_zpsb4kwpgru.jpg


After sanding, the grille gets wiped down with lacquer thinner to clean off any dust and fingerprints. Then the grille is sprayed with several coats of high-build primer. I'm using black primer because the finish coat will be black. I shot 3 coats, waiting 5-10 minutes between coats for the primer to "flash" - "flash time" is the time it takes for most of the solvent in the coat to evaporate, when it has flashed it will appear mostly dry.

GrillePrimed_zpsn3mysvk2.jpg


Once the high-build primer has dried one hour, I did a light sanding with 320-grit to smooth the surface.

The next step is to shoot the color coat, in this case SEM Trim Black in satin. The final clear coat will be matte, so the grille won't be satin when it's done.

GrilleSatinBlack_zpsxkbkkrol.jpg


I let the satin black dry about 2 hours before the next step, which is to mask everything except the accents so the accents can be painted.

GrilleMasked_zps93e19ltz.jpg


And the accents are sprayed with Duplicolor Gunmetal.

AccentsPainted_zps756l2rxj.jpg


Let the accent color dry for about 20 minutes and carefully pull the masking tape.

AccentsUnmasked_zps466dxsbf.jpg


The final step is the 2k matte clearcoat. This comes in a special rattle can; before spraying you push the red key into the bottom, which opens up the two compartments inside the can so the clear and the catalyst can mix. Catalyzed (2k) clear coats will cure harder than a one-component clear so they're more durable and will protect the paint better.

GrilleMatteClear_zpsm1ejicpv.jpg


All of the above was done with rattle cans.

I'll let the clear cure overnight and tomorrow I'll reinstall the mesh, pop the turn signals in and install the grille. More photos then.
 

Forum statistics

Threads
185,541
Messages
2,875,674
Members
224,922
Latest member
Randy Towles
Top