Barn Door for JK factory hardtops

jscherb

Expedition Leader
Hi Jeff, when you met with MORryde did you discuss the overhead swing-down Molle panel? Also, how well does that work with the kitchen enclosure and cabinets?
Yes we did. I had sent the engineers drawings and hardware details a while back but this was the first time the engineers had seen it in person. I reviewed the design and construction with them yesterday and it is on their list to become a production product.

It works just fine with the full kitchen including the enclosure and drawer cabinet I just completed. I don't have any photos of the panel with the full kitchen in place and won't be able to take any for a while because the kitchen is now out of the Jeep and I'll be traveling a lot over the next two weeks, sorry. The only recent photos I have are these, I took them just after I had the panel powder coated. I had initially installed them in unfinished aluminum in both my JKU and LJ and they proved so useful it took months for me to decide to remove them long enough to get them powder coated :).

OverheadPartsFinished5_zpsxvj97myz.jpg


OverheadPartsFinished4_zpsdb86zscw.jpg
 

jscherb

Expedition Leader
A few weeks ago I posted that a company had send me an a-pillar switch pod to review and test. I posted some photos of it when I got it but hadn't had time to really install it until today. The pod replaces the factory a-pillar inside trim; it goes in the same way the factory piece does. It's got provisions for 4 1.5 x 3/4 switches of the type often called "ARB syle" switches in the Jeep world.

I don't need it for switches but I have been looking for a place to put a pressure gauge for my Air Lift 1000 rear air bag kit. I installed that kit a few months ago to help my factory springs with heavy loads (roof top tent + fridge + kitchen + camping gear + recovery gear, etc.). At the time I installed it I put the gauge in the inside rear fender just inside the tailgate, but it wasn't visible from the driver's seat. It isn't the type of gauge you need to constantly monitor, but checking it once a week is a good idea to make sure the air bags aren't leaking. I mounted the gauge in the switch pod over the bottom two switch positions, here are a few photos:

AirLiftGauge3_zpsls1r5yjg.jpg


AirLiftGauge4_zpsslpg0c2a.jpg


The pod installs very easily, and even though there are no instructions included I think any Jeep person shouldn't have any trouble installing it.

It's from Auxmart, and it's available on Amazon for less than $20, which to me is a bargain considering most people need a place for extra switches and there really aren't any good places in the factory dash. https://www.amazon.com/AUXMART-Pill...=UTF8&qid=1531865864&sr=1-59&keywords=auxmart
 

akpostal

Adventurer
Yes we did. I had sent the engineers drawings and hardware details a while back but this was the first time the engineers had seen it in person. I reviewed the design and construction with them yesterday and it is on their list to become a production product.

It works just fine with the full kitchen including the enclosure and drawer cabinet I just completed. I don't have any photos of the panel with the full kitchen in place and won't be able to take any for a while because the kitchen is now out of the Jeep and I'll be traveling a lot over the next two weeks, sorry. The only recent photos I have are these, I took them just after I had the panel powder coated. I had initially installed them in unfinished aluminum in both my JKU and LJ and they proved so useful it took months for me to decide to remove them long enough to get them powder coated :).

OverheadPartsFinished5_zpsxvj97myz.jpg


OverheadPartsFinished4_zpsdb86zscw.jpg


This is something Ive been watching and wanting. I just realized with my spare inside the back it probably wont work. When this hits production I may have to rework and lay the spare down in the back.
 

jscherb

Expedition Leader
After needing to be strapped over a trail obstacle last year I decided I really should have a winch on board; I've been driving the LJ on trails for years, usually 250-500 miles per year in Utah and Colorado and it wasn't until last year that I needed help in Colorado.

But I probably shouldn't temp fate any longer, so I designed and built a winch mount to meet my requirements. My requirements include easy installation/removal so I could only carry the winch on the Jeep for expeditions and leave it in the garage for daily driving; ability to use the winch on the front and the rear of the Jeep as determined by the situation I find myself in, and ability to use the one winch on all 3 of my Jeeps.

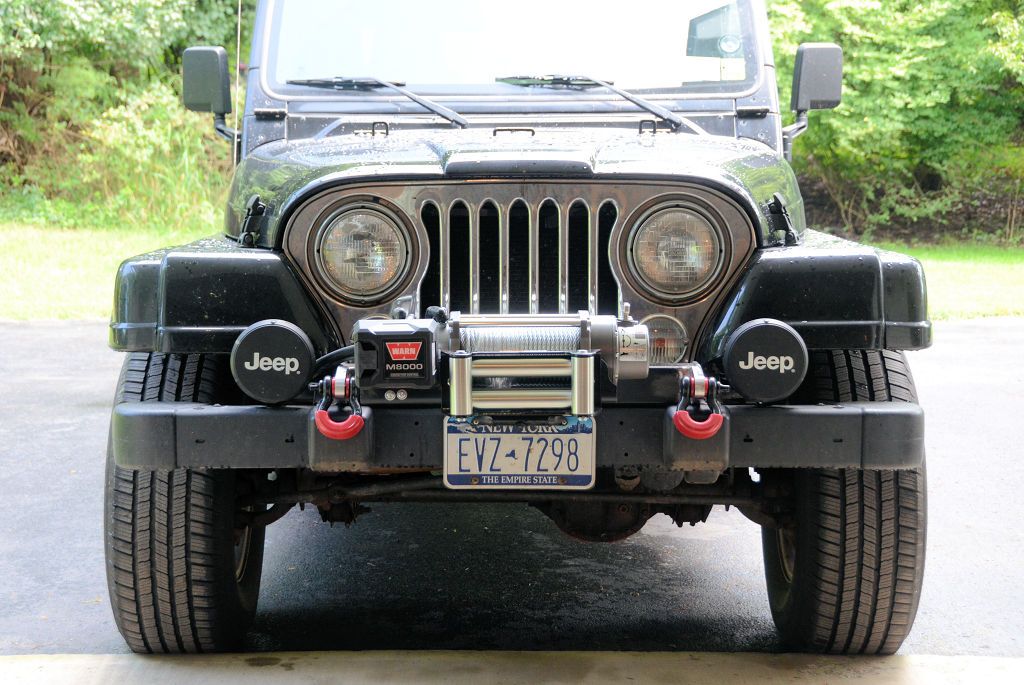
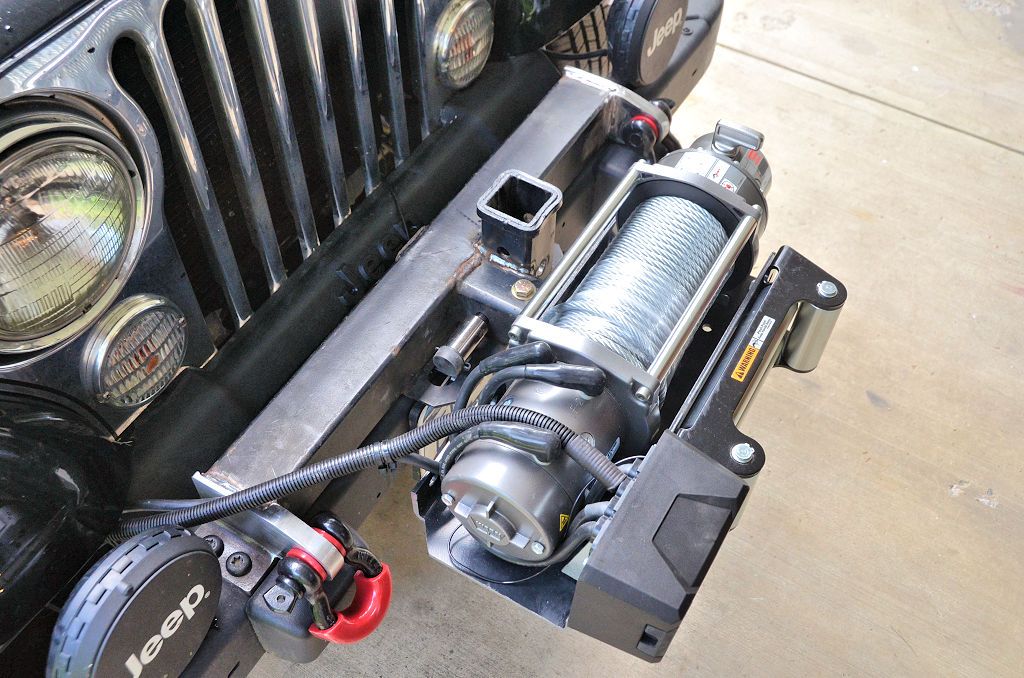
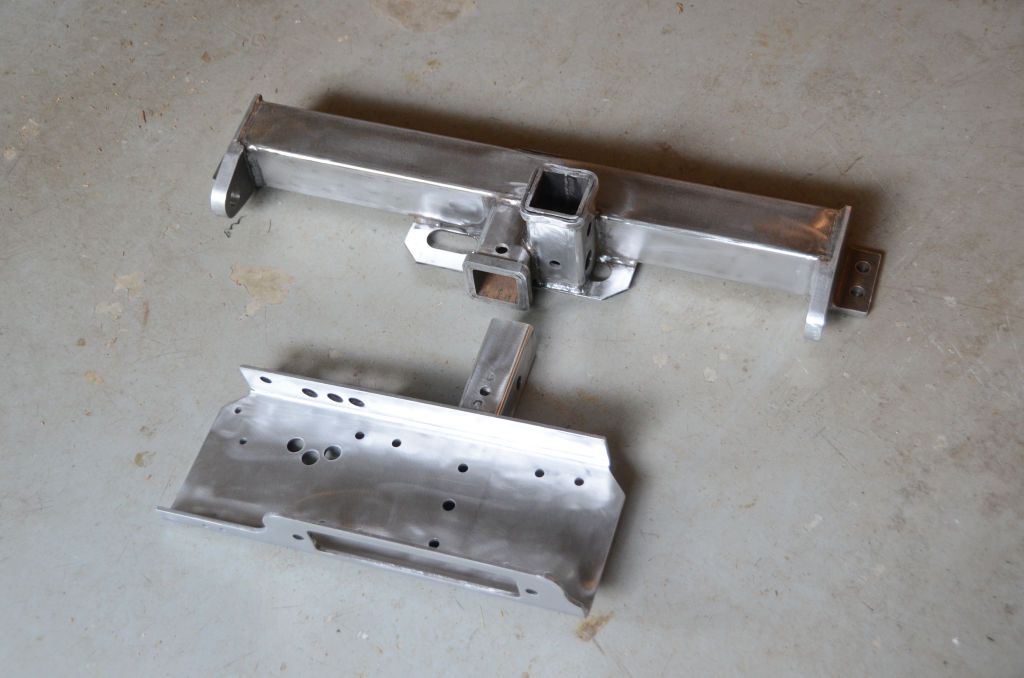
My solution for the LJ is a receiver that bolts to the frame using the factory tow hook bolts; since there are 4 easily accessible bolts on the top of the bumper for the tow hooks it's very quick to remove the factory two hooks and replace them with the receiver. With the winch in place it looks like this:

WinchFabDone1_zpsl2kqisxu.jpg


WinchFabDone2_zps7r6crdvp.jpg


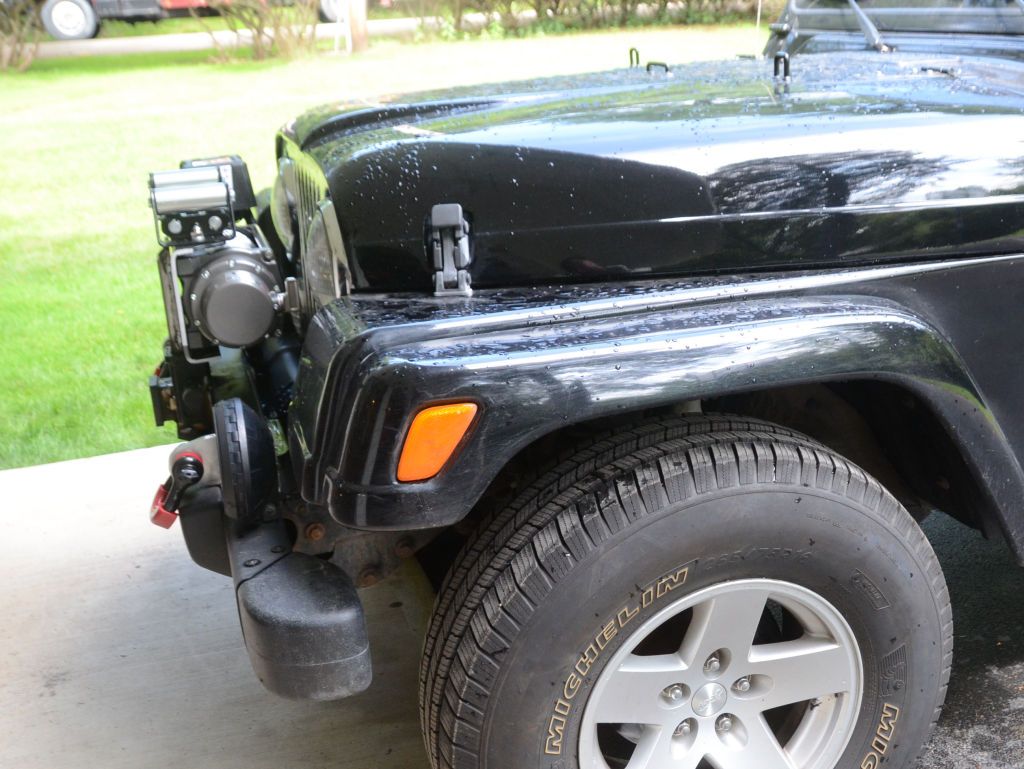
Since this position puts the winch in harms way when it's not needed for recovery, there's a vertical receiver tube that allows stowing the winch vertically so it doesn't stick out past the bumper:

WinchFabDone4_zpsfg61womu.jpg


The winch can also be used in the rear receiver of the Jeep and my wiring design for the winch accomodates both positions. The front receiver can easily be mounted on both my LJ and my LJ-based pickup, and both of them have rear receivers so the winch can be used on either end of both of those Jeeps. The JKU has a rear receiver so it can be used there as well, but currently there is no front receiver on the JKU.

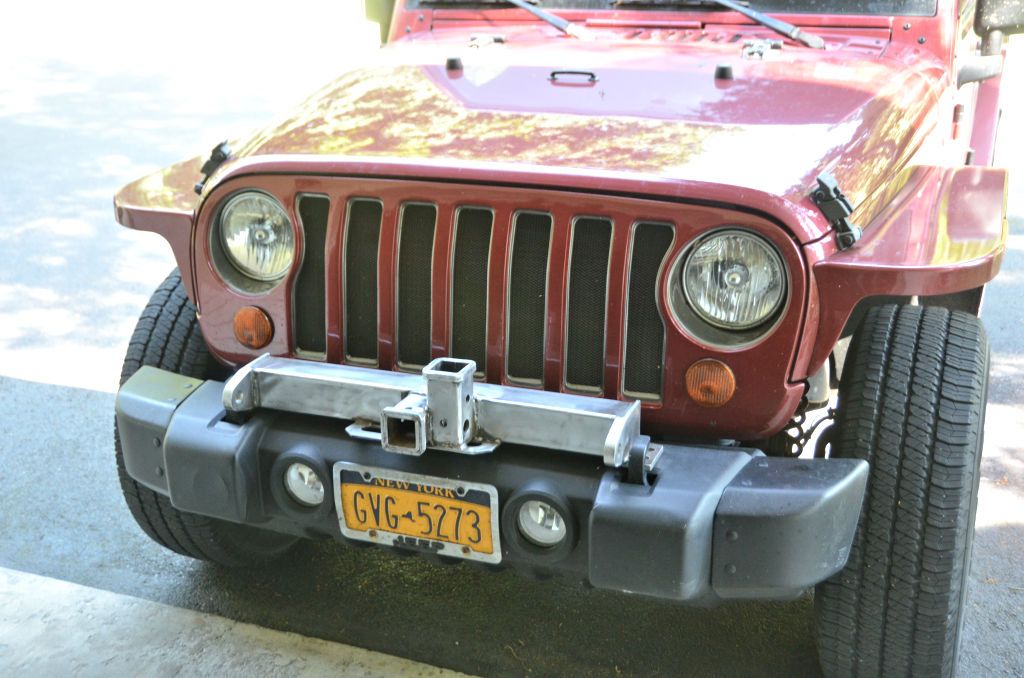
I've done a similar design for a front receiver for the JKU that can work with the factory bumper and be quickly installed only when needed and removed for daily driving. My LJ receiever started with a used hitch I found on Craisglist so I'm now watching CL for a suitable hitch to convert for the front of the JKU.

In this next photo I've posed the LJ receiver on the JKU; it's just sitting on the bumper in this photo. The design for the JK version is a bit different than this one, but this approximates what the JK version will look like. I'm about the send the LJ one off to be powder coated, which is why it's bright metal in this photo.

JKMockup_zpsaixh69wr.jpg


The design also includes a winch cradle, the same cradle will work on both the LJ and the JK. Here's the LJ receiver and the cradle, ready to go off to powder coat.

PreppedForPC_zpsb3ypvnzf.jpg


I covered the construction of the LJ version in my LJ thread; as soon as I find a suitable hitch on Craigslist I'll begin implementation of the JK version and I'll post about it here.
 

jscherb

Expedition Leader
I didn't have time before the trip to MORryde to put a final finish on the enclosure and drawer cabinet so I did it this weekend. All of the unfinished wood on the inside of the drawer cabinet is now painted a tan color, and the exterior is protected with a semi-gloss clear coat.

FiinishDone1_zps6rapnygs.jpg


FinishDone2_zpskalp9t7c.jpg


I won't be putting these back in the Jeep for at least a few weeks, I've got a trip coming up where I need the cargo space instead of the kitchen.
 

jgaz

Adventurer
What product did you use on the exterior of enclosures? I assume you sprayed it? If so, how much did you need to thin the product? Thanks.
Nice job, as always! I love the way you used the space behind the rear seat for the two gallon water container.
 

jscherb

Expedition Leader
What product did you use on the exterior of enclosures? I assume you sprayed it? If so, how much did you need to thin the product? Thanks.
Nice job, as always! I love the way you used the space behind the rear seat for the two gallon water container.

I used Behr Deckover smooth finish in Slate color and I applied it with a smooth foam roller (no nap). (https://www.behr.com/consumer/produ...1jX_-SM1vqZWPS2x_lRdaWEhmQbuj3YRoCsXIQAvD_BwE) I used it straight from the can, no thinning. The roller application of the smooth finish Deckover results in a lightly textured finish. I applied the Deckover directly over the unfinished wood of the cabinet, but to improve the adhesion to the metal enclosure I first coated the metal with black 2k epoxy primer, also applied with a roller. Deckover is only available in gallons, so that's what I had to buy (about $34), I used less than a quart for this project so I've got lots more for future projects. Deckover is an acrylic finish so cleanup is with water, it's very easy to use. Because Deckover dries to a very flat finish, it shows fingerprints and dust very easily, so I applied a finish coat of semi-gloss Varathane clear polyurethane varnish.
 

jscherb

Expedition Leader
I'm working on a cargo net to secure things to the top of the combined kitchen enclosure/drawer cabinet. I've got them set up on my workbench in the garage, in this photo the rubber mat is on top of the enclosure/cabinet and I've draped over it a cargo net I grabbed in a junkyard, I think it's from a minivan and it's sewn folded in half as a pocket - I'll reconfigure it differently as a flat net to fit this application.

CargoNet1_zpsnjmfk8qv.jpg


For the four corners I think I'll use small (2") marine cleats; these accept the loops on the ends of the cargo net but also can be used with rope to tie more random things down if the net isn't best for the particular cargo.

CargoNet2_zpsllw7wqu8.jpg


Haven't made any final decisions on this yet, I welcome any thoughts you might have.
 

OregonJKU

Active member
Hi Jeff, the only concern I see is if the cargo on top of the enclosure/cabinet interferes with getting to things stored in the overhead molle panel. Unloading multiple cargo items could be a pain when you need to get to items in the overhead panel. Just a thought.
 

jscherb

Expedition Leader
Hi Jeff, the only concern I see is if the cargo on top of the enclosure/cabinet interferes with getting to things stored in the overhead molle panel. Unloading multiple cargo items could be a pain when you need to get to items in the overhead panel. Just a thought.
Decisions on what goes where and what you're likely to need when are critical when packing something as small as a Jeep for an expedition :).
 

jscherb

Expedition Leader
I sewed a cargo net this afternoon for the top of the full kitchen. Haven't tested this in the Jeep or on the road yet, the kitchen is still on the workbench. In these photos I've got a suitcase and a gear bag held in place on top. You can see the cleats on the corners of the kitchen for securing the net.

CargoNet3_zpsgfgc6ken.jpg


CargoNet4_zps7flmqqpd.jpg


I think this net will retain cargo just fine, but I may also try a net with ropes in the edges - non-stretchable ropes secured to the cleats may be more secure than having elastic along the edge like this one does.
 

Zeep

Adventurer
I'm guessing you'll need to remove the suitcase and gear bag, to fold down your gear rack. Correct?
 

jscherb

Expedition Leader
I'm guessing you'll need to remove the suitcase and gear bag, to fold down your gear rack. Correct?
With the load I've got mocked up on the top of the kitchen, the overhead Molle panel would swing down about half way, so it may be possible to access something on the panel depending on what it is, how big it is, etc. For unhindered access to the panel anything stored on top of the kitchen would have to be removed.
 

Yuke

Adventurer
Looks very well done. I had s similar setup and recently removed the drawers due to weight and went with a full @goosegear setup.

What does your setup way?
 

jscherb

Expedition Leader
Looks very well done. I had s similar setup and recently removed the drawers due to weight and went with a full @goosegear setup.

What does your setup way?
I'd weigh the drawer cabinet but I'm traveling and won't be home for almost two weeks so can't do that for a while. A rough estimate - it's roughly 1/2 sheet of 1/2" plywood (about 15 lbs), maybe 3 more pounds of 1/8 and 1/4" plywood, and 3 sets of drawer slides (maybe 10 lbs. total?) so I'll estimate the complete drawer unit at 28 lbs. for now.
 

Forum statistics

Threads
185,911
Messages
2,879,535
Members
225,497
Latest member
WonaWarrior
Top