gatorgrizz27
Well-known member
This thing has been a long time coming, and has been designed and revised in my head for a couple of years.
Purpose #1 is to replace my decade old, heavily abused Harbor Freight 4x8 trailer. I own a finish carpentry business and have a 6x12 enclosed trailer and a dump trailer, but there are plenty of things a small open trailer is still useful for.
Purpose #2 is to haul gear and toys for camping trips. My dad had a small trailer built when I was a kid with an extended tongue and waterproof cover to carry our canoe and equipment and it worked really well. He passed away last year and I also inherited a half-finished cedar strip canoe from somebody else, something he’d wanted to do. The combo should be a neat tribute to him as we raise our 2 and 4 year old boys taking camping trips and paddling.
The requirements were fairly extensive, I tend to engineer and analyze things to work as well as possible ahead of time, so hopefully this is a success.
1. Be large enough to be useful in actually hauling things, but small enough to not be a nightmare in the woods. We often carry pallets of plywood, so a minimum of a 4’x8’ deck was required, and the canoe is 16’, so I wanted to fit it without extensions. I also need to be able to transport my zero turn mower which requires 54” between the fenders.
I built the deck at 102” long and extended the 48” wide 14 gauge steel sheet I used for the deck with 1/4” x 2” flat bar strips down the sides, which also allows me to easily mount the tie down rails for requirement #2.
I also built a 26” tall “front wall/headache rack” which stops things from sliding forward, acts as the front portion of a lumber/canoe rack, and has two hitch receivers welded into it which also helps with requirement #2.
2. Allow almost anything to be attached/tied down to it, without any rattling. There a bunch of items that are a pain to secure on most trailers, specifically things like welding gas cylinders, jerry cans, canoe paddles, etc, and fixed tie down rings are almost always in the wrong places.
I ended up choosing to use L-Track to deal with this, and have 96” long strips down each side, along with 48” strips on each side of the front wall. This allows me to secure mountain bikes with front QR brackets, dirt bike wheel chocks, tie down rings for the mower, etc. It will hold 4 of the 7 gallon aqua tainers on the back side of the wall, along with a 20 lb propane tank and 2 Jerry cans on the front side of the wall.
The 2” receivers (I welded one in the rear as well) let me add basically any specialty mount, and allows for future adaptations without cutting/welding/modifying the trailer itself. So far I have a chainsaw bracket, cylinder/tank mount, cargo basket, bike rack, license plate bracket/rear step, and a 2000 lb Warn winch that can be mounted in them.
Each side has 4 stake pockets which are spaced at varying distances, allowing sides, mounts, or racks to be dropped in. They will have 3/8” nuts welded on to secure attachments with hand knobs.
The other part of this is a rear arch that matches the height of the front wall and drops into any of the stake pockets to support long items in the rear, or allow a future roof top tent, etc to be mounted.
3. Have a simple but useful electrical system, I didn’t want to get carried away with this.
I had already built a portable power pack which is just a deep cycle battery in a box with a 12v socket, USB sockets, ARB fridge plug, and 50 amp quick connect. It has a built in fuse and switch also.
I have hard mounted three switches with a fuse panel in the tongue box to control various lights, as well as a pass though port, and the battery box will plug into this via the ARB plug, which allows me to quickly remove it and use it elsewhere.
4. Be able to keep luggage dry when traveling.
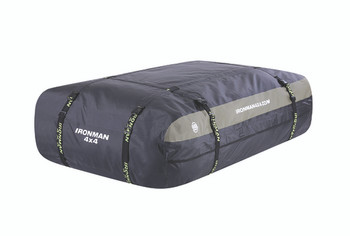
I didn’t want some massive box to remove and store when not in use, so I found a 70” x 43” rooftop dry bag which will quickly tie down to the L-track rails and hold duffel bags, strollers, etc when needed.
 ironman4x4america.com
5. Be smooth riding and off road capable, within reason.
I already had a 3500 lb, 4” drop axle from another project that was very close to the right width for this trailer. I looked at the Timbren trailing arm suspension kits but they seemed overkill for my needs and I didn’t like the cost and potential alignment issues. I then found Timbren’s silent ride suspension kits and ordered the 2000 lb one for $300.
It uses the rubber springs but still has a straight axle. I flipped the drop axle upside down as there was no camber pressed into it, so I have 16” clearance under the tube. The mounts weld onto the axle tube so I’m not worried about it rotating in the U-bolts over time.
I have BFG KO2’s on my tow vehicle and enclosed trailer, so I went with them in the smallest size available for this trailer, 215/75r15. I was trying to keep the frame height from getting too tall with the axle and suspension, with these tires the deck height is 24” which is a good balance between loading and clearance.
I didn’t mess with trying to match the tow vehicle tires and bolt pattern, as it‘s Land Rover so there are no matching trailer hubs available and I didn’t want to use spacers/adapters.
For normal use, I have a regular 2” ball coupler, for off road use I have a lunette ring and will be building a high clearance pintle hitch for my town vehicle.
Here’s the version 2.0 sketch, which I close to what I’ve been building.

Purpose #1 is to replace my decade old, heavily abused Harbor Freight 4x8 trailer. I own a finish carpentry business and have a 6x12 enclosed trailer and a dump trailer, but there are plenty of things a small open trailer is still useful for.
Purpose #2 is to haul gear and toys for camping trips. My dad had a small trailer built when I was a kid with an extended tongue and waterproof cover to carry our canoe and equipment and it worked really well. He passed away last year and I also inherited a half-finished cedar strip canoe from somebody else, something he’d wanted to do. The combo should be a neat tribute to him as we raise our 2 and 4 year old boys taking camping trips and paddling.
The requirements were fairly extensive, I tend to engineer and analyze things to work as well as possible ahead of time, so hopefully this is a success.
1. Be large enough to be useful in actually hauling things, but small enough to not be a nightmare in the woods. We often carry pallets of plywood, so a minimum of a 4’x8’ deck was required, and the canoe is 16’, so I wanted to fit it without extensions. I also need to be able to transport my zero turn mower which requires 54” between the fenders.
I built the deck at 102” long and extended the 48” wide 14 gauge steel sheet I used for the deck with 1/4” x 2” flat bar strips down the sides, which also allows me to easily mount the tie down rails for requirement #2.
I also built a 26” tall “front wall/headache rack” which stops things from sliding forward, acts as the front portion of a lumber/canoe rack, and has two hitch receivers welded into it which also helps with requirement #2.
2. Allow almost anything to be attached/tied down to it, without any rattling. There a bunch of items that are a pain to secure on most trailers, specifically things like welding gas cylinders, jerry cans, canoe paddles, etc, and fixed tie down rings are almost always in the wrong places.
I ended up choosing to use L-Track to deal with this, and have 96” long strips down each side, along with 48” strips on each side of the front wall. This allows me to secure mountain bikes with front QR brackets, dirt bike wheel chocks, tie down rings for the mower, etc. It will hold 4 of the 7 gallon aqua tainers on the back side of the wall, along with a 20 lb propane tank and 2 Jerry cans on the front side of the wall.
The 2” receivers (I welded one in the rear as well) let me add basically any specialty mount, and allows for future adaptations without cutting/welding/modifying the trailer itself. So far I have a chainsaw bracket, cylinder/tank mount, cargo basket, bike rack, license plate bracket/rear step, and a 2000 lb Warn winch that can be mounted in them.
Each side has 4 stake pockets which are spaced at varying distances, allowing sides, mounts, or racks to be dropped in. They will have 3/8” nuts welded on to secure attachments with hand knobs.
The other part of this is a rear arch that matches the height of the front wall and drops into any of the stake pockets to support long items in the rear, or allow a future roof top tent, etc to be mounted.
3. Have a simple but useful electrical system, I didn’t want to get carried away with this.
I had already built a portable power pack which is just a deep cycle battery in a box with a 12v socket, USB sockets, ARB fridge plug, and 50 amp quick connect. It has a built in fuse and switch also.
I have hard mounted three switches with a fuse panel in the tongue box to control various lights, as well as a pass though port, and the battery box will plug into this via the ARB plug, which allows me to quickly remove it and use it elsewhere.
4. Be able to keep luggage dry when traveling.
I didn’t want some massive box to remove and store when not in use, so I found a 70” x 43” rooftop dry bag which will quickly tie down to the L-track rails and hold duffel bags, strollers, etc when needed.
Rooftop Cargo Storage Bag - 600L
Ironman 4x4 America offers off-road parts, accessories, and equipment for the off-roading enthusiast. Check out our website for more information.
ironman4x4america.com
5. Be smooth riding and off road capable, within reason.
I already had a 3500 lb, 4” drop axle from another project that was very close to the right width for this trailer. I looked at the Timbren trailing arm suspension kits but they seemed overkill for my needs and I didn’t like the cost and potential alignment issues. I then found Timbren’s silent ride suspension kits and ordered the 2000 lb one for $300.
It uses the rubber springs but still has a straight axle. I flipped the drop axle upside down as there was no camber pressed into it, so I have 16” clearance under the tube. The mounts weld onto the axle tube so I’m not worried about it rotating in the U-bolts over time.
I have BFG KO2’s on my tow vehicle and enclosed trailer, so I went with them in the smallest size available for this trailer, 215/75r15. I was trying to keep the frame height from getting too tall with the axle and suspension, with these tires the deck height is 24” which is a good balance between loading and clearance.
I didn’t mess with trying to match the tow vehicle tires and bolt pattern, as it‘s Land Rover so there are no matching trailer hubs available and I didn’t want to use spacers/adapters.
For normal use, I have a regular 2” ball coupler, for off road use I have a lunette ring and will be building a high clearance pintle hitch for my town vehicle.
Here’s the version 2.0 sketch, which I close to what I’ve been building.
Last edited:


