You are using an out of date browser. It may not display this or other websites correctly.
You should upgrade or use an alternative browser.
You should upgrade or use an alternative browser.
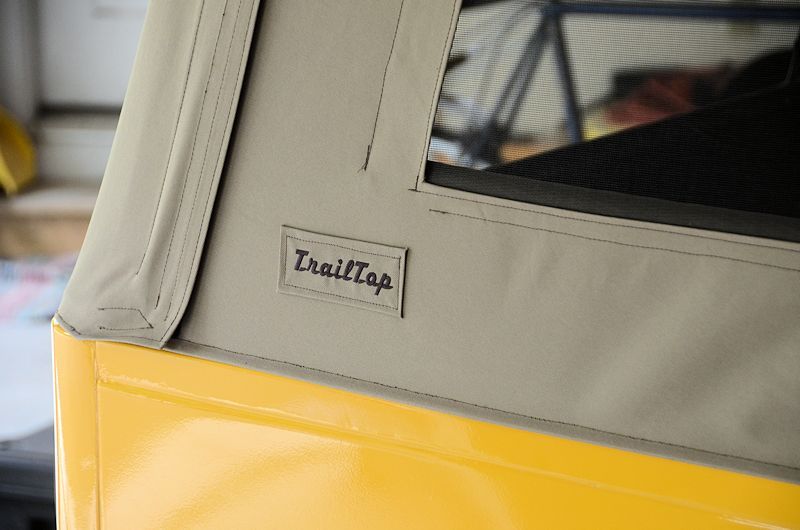
"TrailTop" modular trailer topper building components
- Thread starter jscherb
- Start date
jscherb
Expedition Leader
So many awesome, modular ideas. I'll take one of each.
I need to get past my aversion to fiberglass, hopefully by the time these become available as Dinoot products.
What exactly is the problem with fiberglass? It's lighter than steel, doesn't rust, and in the event of damage, much easier to repair than steel. And in the quantities that things like the TrailTop parts would be made if they get to production, it's much less expensive because the tooling is simple molds made from fiberglass rather than expensive stamping dies that steel would require.
labbe66
Observer
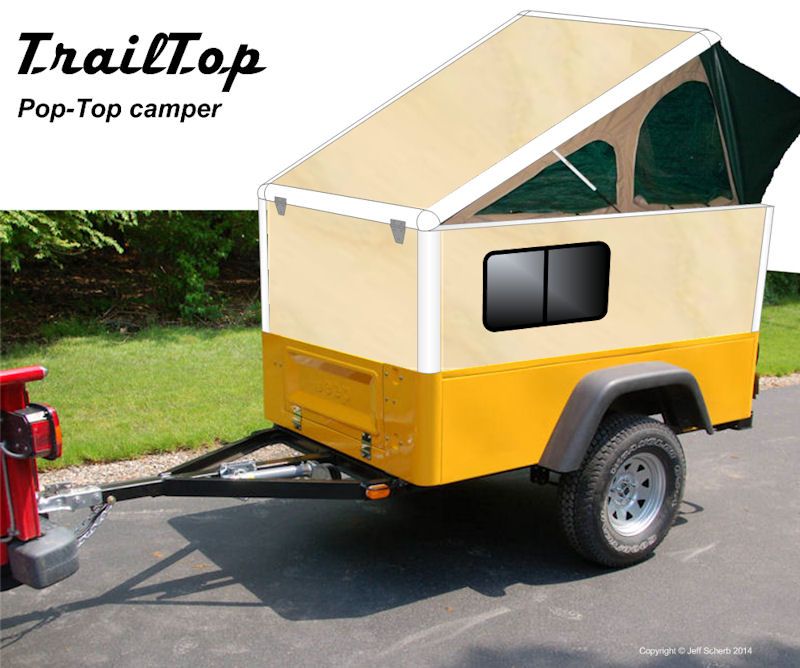
This is very similar to what I'd like to build in the near future but I'd add two fold down platforms on the sides for kid sized beds. My goal is to have something no bigger than my 4 runner slip stream when folded up but still comfortably sleep 4. I also want a small area where I can stand (6'2" min) for changing thus the pop top.
Jeff, you've inspired me to look into fiberglass techniques to use at home. As a design engineer with a lot of hands on experience I have dabbled in a lot of other construction techniques but not fiberglass. I purchased the book you recommended earlier in this thread and I am half way through it. Would you be willing to do a post on some of the tools you use for fiberglass work? I am wondering about the balance between less expensive tools since I'll be only using them occasionally verses tools that don't really do the job as intended, i.e. gel coat guns.
At any rate thanks for the inspiration!
jscherb
Expedition Leader
This is very similar to what I'd like to build in the near future but I'd add two fold down platforms on the sides for kid sized beds. My goal is to have something no bigger than my 4 runner slip stream when folded up but still comfortably sleep 4. I also want a small area where I can stand (6'2" min) for changing thus the pop top.
Jeff, you've inspired me to look into fiberglass techniques to use at home. As a design engineer with a lot of hands on experience I have dabbled in a lot of other construction techniques but not fiberglass. I purchased the book you recommended earlier in this thread and I am half way through it. Would you be willing to do a post on some of the tools you use for fiberglass work? I am wondering about the balance between less expensive tools since I'll be only using them occasionally verses tools that don't really do the job as intended, i.e. gel coat guns.
At any rate thanks for the inspiration!
I'm not exactly sure how to respond to your general question, but I can definitely comment on gel coat guns.
You really can't do a professional-quality job with gel goat without a gel coat spray gun, usually referred to as a "dump gun" because of the crude way the gel coat gets sprayed out. The best thing about a dump gun is that's it's very easy to clean - the paper mixing cup clamps into the gun and gets discarded after spraying, and the only thing that needs to be cleaned is the cup cover and the nozzle. Spraying gel coat in an ordinary spray gun would be almost certain death for the gun because it would be extremely difficult to clean out the gun before the gel coat began to cure. Here's my dump gun, I've also marked the cup with graduations in ounces to make mixing gelcoat and catalyst more accurate:
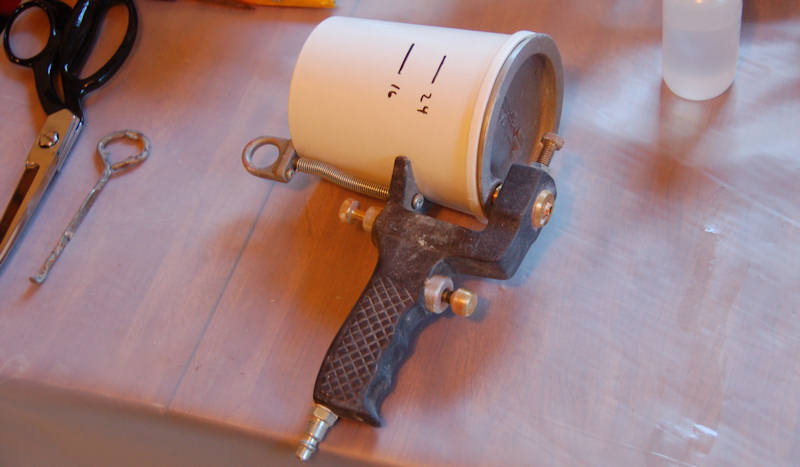
Gel coat guns cost about $125 and the paper cups are very reasonable; I wouldn't do any fiberglass work that matters without one.
You need a compressor to provide air for the gel coat gun, but unless you're doing very large parts, most compressors that are adequate for an ordinary spray gun are fine for this application.
I use Harbor Freight disposable bristle brushes for applying resin and stippling it into the fiberglass.
For cutting/trimming fiberglass, you'll want an abrasive cutter of some sort. Saw blades can cause tiny impact cracks that over time could enlarge over time, so it's always best to use abrasives. Here's what I use:
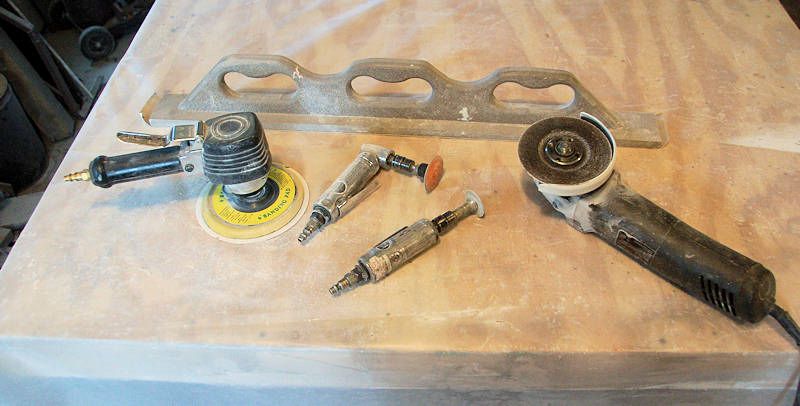
Right to left:
- 4 1/2" angle grinder with a 1/16" thick abrasive cutting disk. For fast cutting of large, straight edges.
- Die grinder with a 1.5" diamond cutting disk. For more intricate cuts, more accuracy.
- Angle die grinder with Rolok attachment for sanding disks. For fine adjusting of the trimmed cuts.
- 6" D/A sander. For quick adjustment of larger cuts.
- In the back: a 30" long board sander. To ensure long straight cuts are really straight.
Other than what's above, and unless I've forgotten something, I can't think of any other special or unusual tools that are required for fiberglass work.
If you've got any other questions about tools, techniques, fiberglass, resin or whatever, please fire away, I'll do my best to answer them.
eternus
Observer
What exactly is the problem with fiberglass? It's lighter than steel, doesn't rust, and in the event of damage, much easier to repair than steel. And in the quantities that things like the TrailTop parts would be made if they get to production, it's much less expensive because the tooling is simple molds made from fiberglass rather than expensive stamping dies that steel would require.
Oh nothing logical, just a sense of fragility. I've read enough of your posts and I've seen the pictures of you standing on them so I know they are tough. That's why I'm saying I just have to get past it. A lightweight camper trailer on a sturdy off-road frame would be ideal for pulling behind a Jeep. I've started plotting in the direction of a Teardrop but really like the the chuck wagon and poptop mocks. You do great work!
jscherb
Expedition Leader
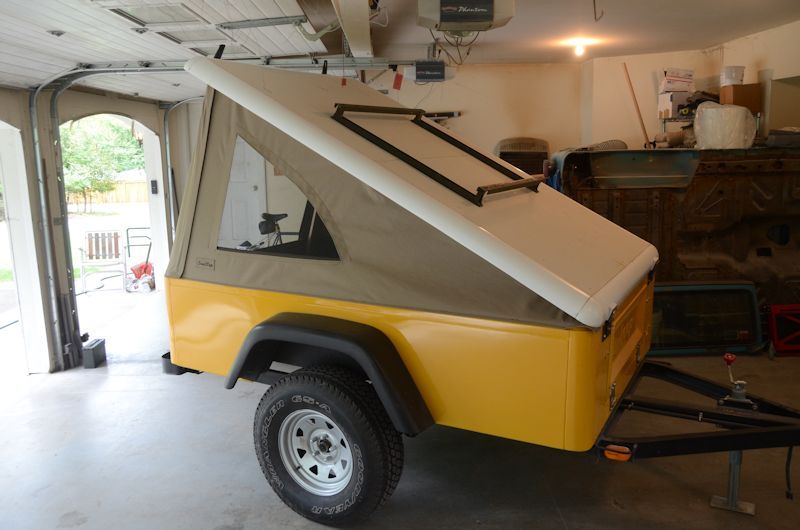
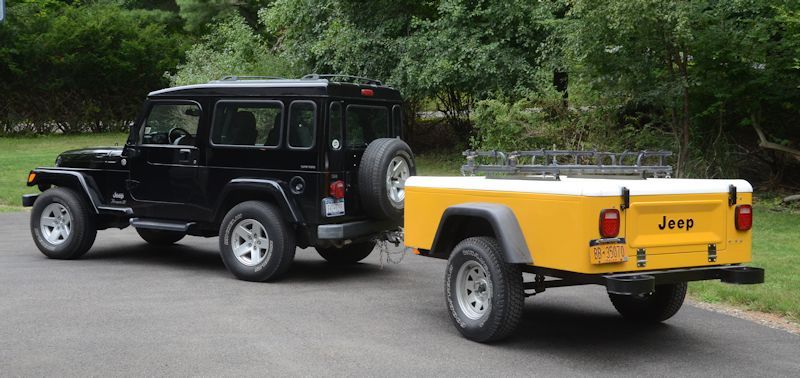
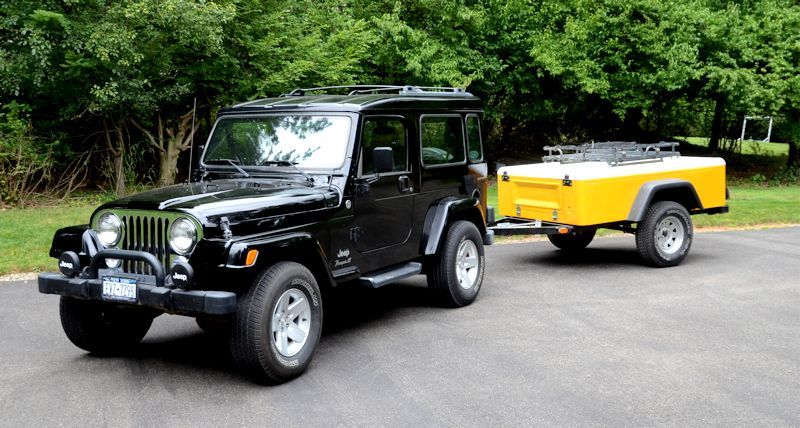
Now that I've finished the basic tilt-up, I'm thinking about whether or not I want to take the tilt-up project any further. I built this as a proof-of-concept and also as a way to improve my new sewing skills, and as it is now, I'd say the tilt-up concept is proven, and I'm happy with my sewing skills, so I could just declare it done.
A while back I drew an awning that might be a good idea for inclement weather, maybe I'll sew that, although I haven't come up with a method for supporting the awning that I really like yet.
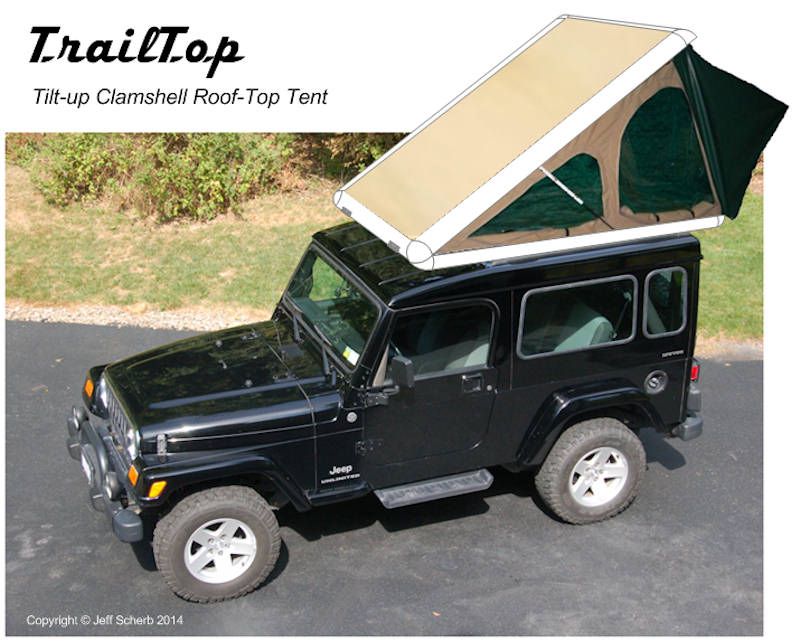
Or I could do is mold some more TrailTop parts to make the bottom of a clamshell to turn what I've sewn into a roof-top tent:
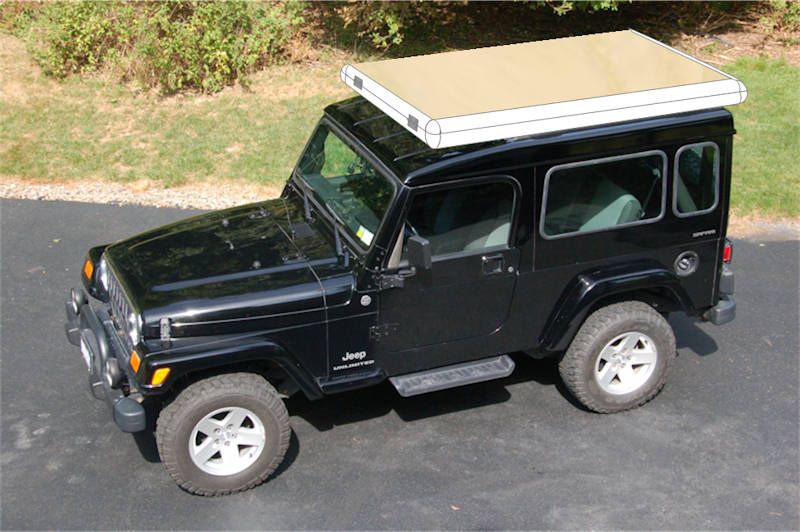
A while back I drew an awning that might be a good idea for inclement weather, maybe I'll sew that, although I haven't come up with a method for supporting the awning that I really like yet.
Or I could do is mold some more TrailTop parts to make the bottom of a clamshell to turn what I've sewn into a roof-top tent:
jscherb
Expedition Leader
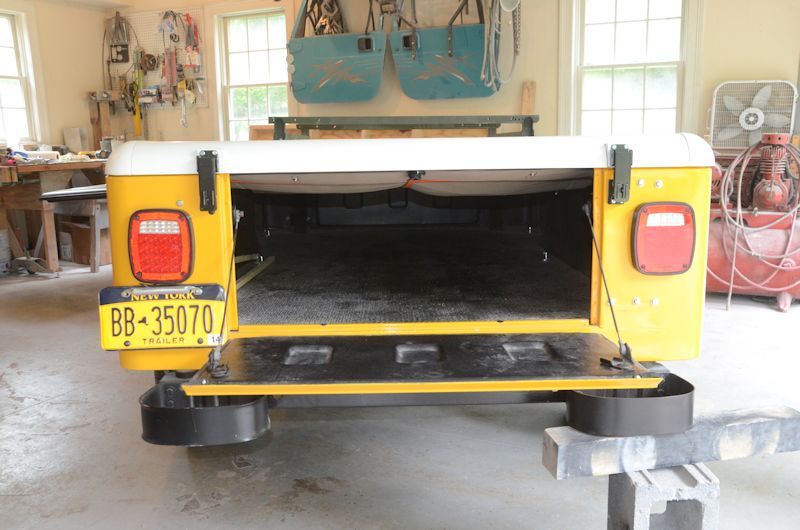
I worked on a couple of details for the tilt-up today. When the top is down, the canvas can remain snapped to the cover and just jumbled down into the tub, but if you've got a lot of gear stowed in the tub it might be better to have a way to stow the canvas that works easily with the tub full.
Using set of bungee cords and some screw eyes, the canvas easily stows up under the cover:
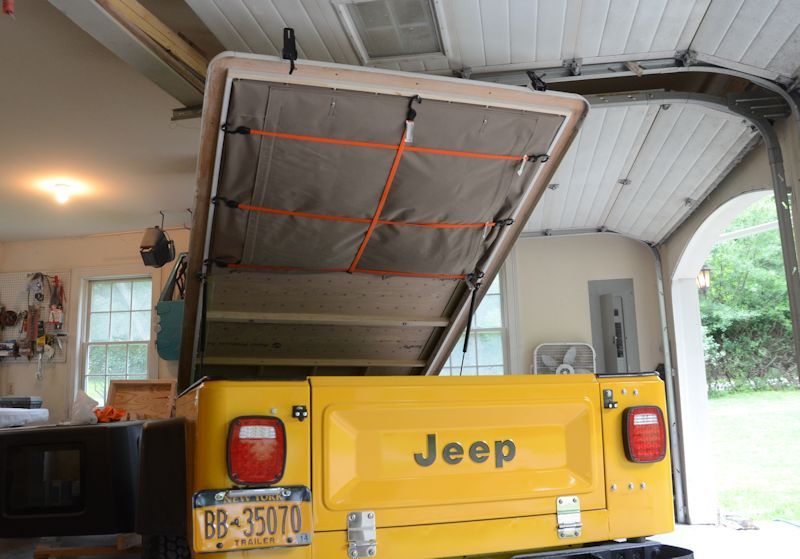
And when the cover is closed, the canvas doesn't take up any space below the cover. It hangs down slightly at first, but it'll compress to be completely within the cover if there's a load inside, so you can load the tub to the rim with gear and the cover with the stowed canvas will close just fine.
Using set of bungee cords and some screw eyes, the canvas easily stows up under the cover:
And when the cover is closed, the canvas doesn't take up any space below the cover. It hangs down slightly at first, but it'll compress to be completely within the cover if there's a load inside, so you can load the tub to the rim with gear and the cover with the stowed canvas will close just fine.
Last edited:
screwball48
Explorer
Show off!
Anarchy Joe
Observer
o.k. really, when and where can we start buying..These pics are killing me.
jscherb
Expedition Leader
o.k. really, when and where can we start buying..These pics are killing me.
Can't talk about that right now, discussions are underway...
")
jscherb
Expedition Leader
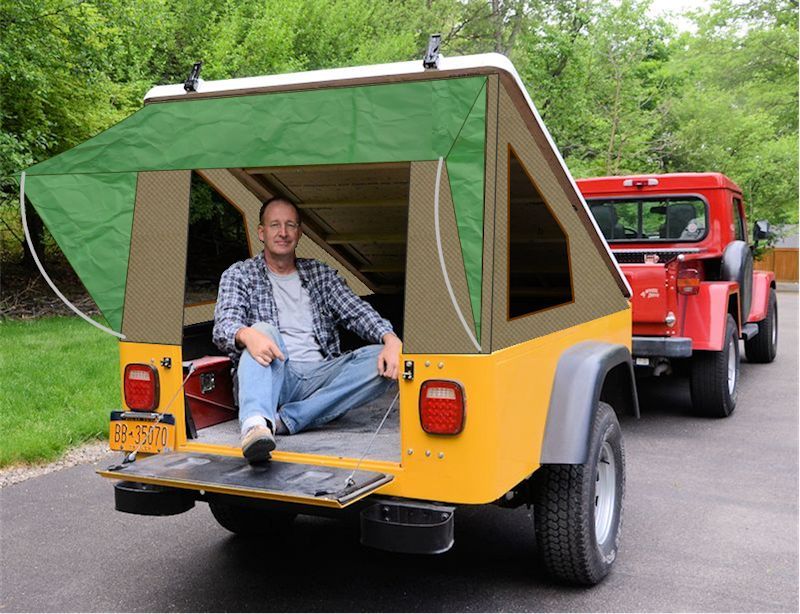
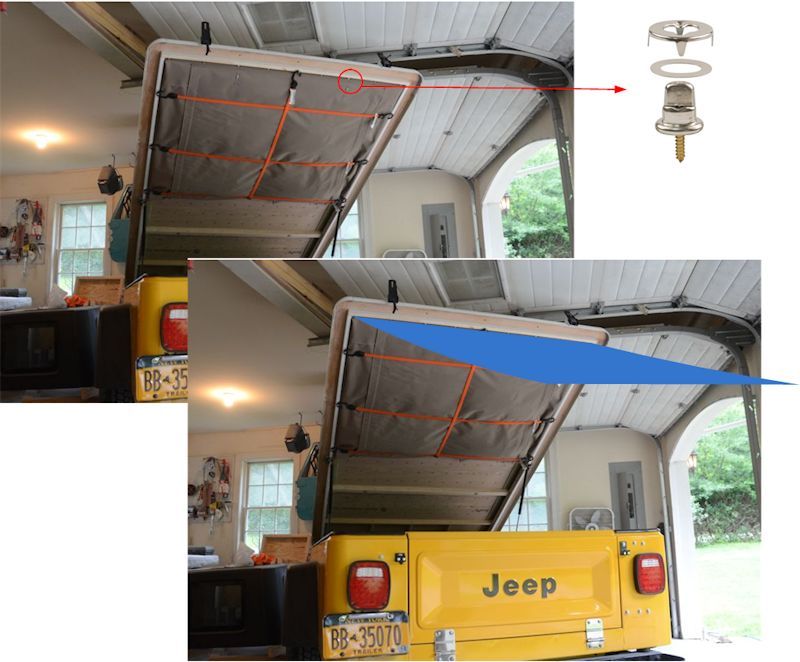
Someone asked me how I would attach a rear awning if I were to sew one, and I never showed that detail so here it is. I attached the top of the end canvas with twist-lock fasteners rather than ordinary snaps, because twist locks can accommodate two pieces of canvas on a single fastener. That means the an awning can attach in front of the main canvas as shown below. And the awning would also fold back for stowing just like the rest of the canvas.
Forum statistics
Members online
- DirtWhiskey
- rsmccull
- TheDeliverator
- Obsessed2findARuggedHybid
- Geared4adventure
- WOODY2
- Long Rifle
- slick621
- HappyWifeHappyLife
- wild1
- RivMan
- Willsfree
- Skinhyfish
- 4runnerteq
- jshensley52
- czechmate83
- Frobisher
- Garrettg1991
- Cancerboyuofa
- Montero_cruz
- JaSAn
- RooRoo
- jchasse
- djr123
- PopSquatch
- Hank Scorpio
- Gilles Disorder
- aka_vladiator
- JoeRidesBikes
- mowgli1313
- Dragonman
- K9LTW
- Runmorun
- WillySwan
- TG2
- mark5280
- rcintx
- CurtStyler
- Felt
- blk4est
- samuraiiamori
- jp510
- mrjakeyoung
- DirtySocks
- Motaka
- Markal
- wparkinson97
- TonyCatmandu
- JayOtheMountains
- sam-aye-am
Total: 858 (members: 59, guests: 799)