soonenough
Explorer
After several years of tinkering on my truck, I've decided to put together a build thread. I've spent countless hours here on ExPo, and not only have I enjoyed it immensely, but I've learned a ton of useful information from everyone, so I hope that my experiences may be of help or enjoyment to others. I will try to keep this first post up to date with the current state of the truck, and will go through the changes and modifications that I've made as I have time.
My truck is over 8 years old now, so I'm going to be digging through old photos and trying to jog my memory for some of the older stuff. In the beginning, I never expected my truck to get to the point it's at now, so I didn't do the best job of documenting some of the earlier modifications I made. I'll try to put links next to each of the mods that link straight to the post(s) that go into detail about that item so it’s easier to find details.
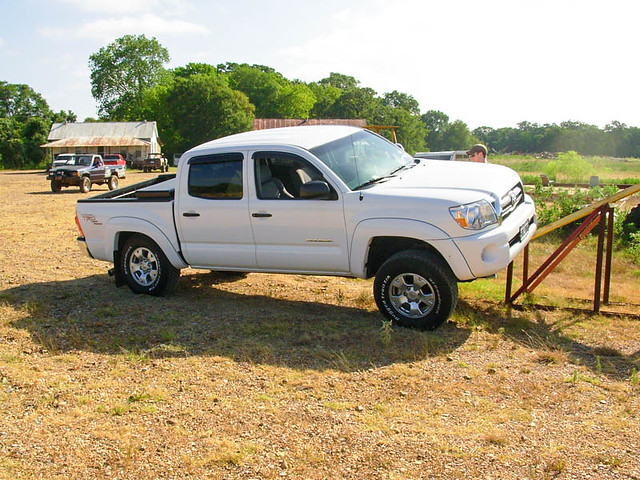
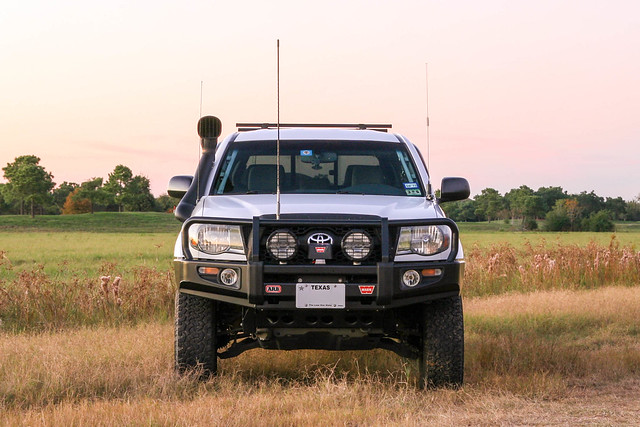
2008 TACOMA DCSB, 4x4, TRD Off-Road package, 040 Super White
FRONT SUSPENSION
OME 886 springs
OME NitroCharger Sport shocks (90000)
Light Racing UCAs
Wheeler's SuperBumps bumpstops
REAR SUSPENSION
OME Dakar HD leaf springs (CS047R) w/ OME AALs (D29XL)
OME Nitrocharger shocks (60091)
Toytec 3° axle shims
Toytec extended-length center pins
OME carrier bearing drop
Toytec U-bolt flip kit
Deaver extended-length U-bolts
BRAKES
Stop Tech Sport front rotors
PowerStop Z36 front pads
WHEELS: OEM FJ Trail Teams edition matte black 16" x 7.5" (4.5" BS)
TIRES: 285/75/16E Cooper S/T Maxx
ARMOR
ARB front bumper (3423130)
CBI Offroad Bushmaster 2.0 high-clearance rear bumper w/ swingout
RECOVERY
Warn M8000-S (contactor controller) w/ Warn 3/8" 100' synthetic line
Warn roller fairlead - powdercoated black frame w/ Warrior AlumiRollers
Factor55 UltraHook
48" Hi-Lift jack
ARB straps, Master Pull SBO30000 snatch block, assorted shackles, tools, spare parts, etc
LIGHTING
OEM 2009 Tacoma TRD headlights
Narva Rangepower+50 high/low beam bulbs
IPF 901XSD 100W driving lights on front bumper
ARB fog light kit in front bumper (6821201)
ARB LED indicator lamp kit in front bumper (6821287)
Rigid SR-M diffused LED lights in rear bumper light buckets [not yet installed; waiting on RFRM installation]
Totron 48W LED flood light on rear bumper camp light pole
OEM DTRL flasher module added [post #22]
LED DTRL / front turn signal bulbs
LED reverse light bulbs
LED interior dome light & map light bulbs
ELECTRICAL
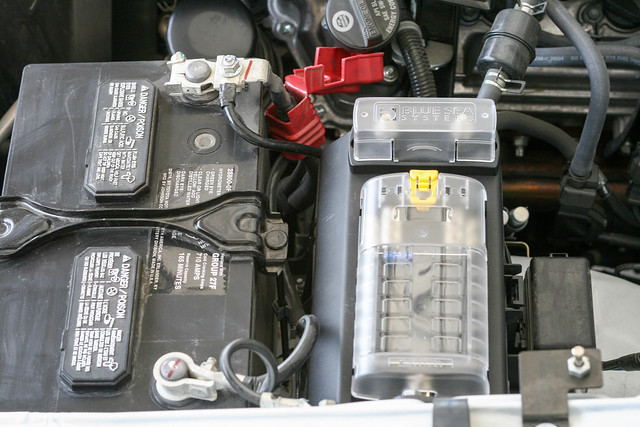
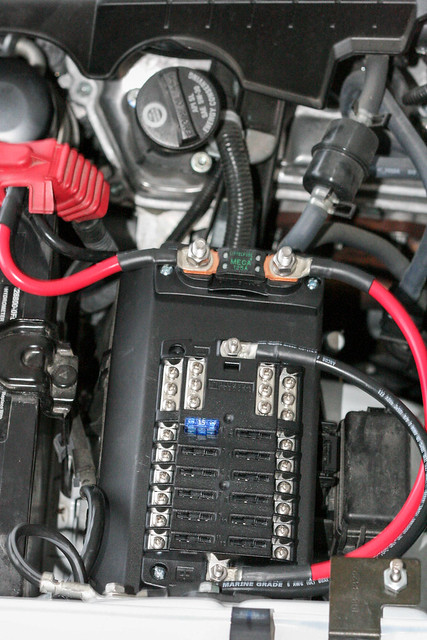
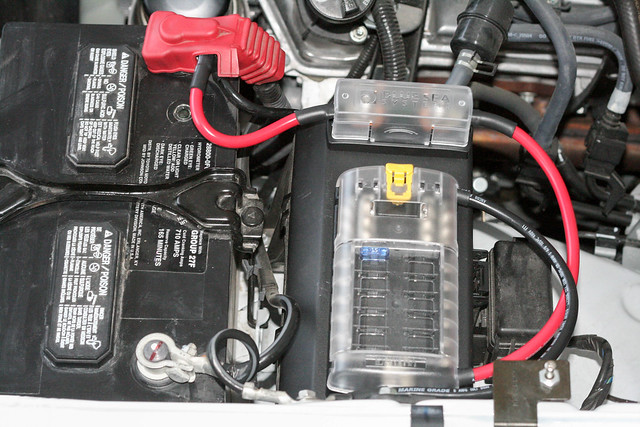
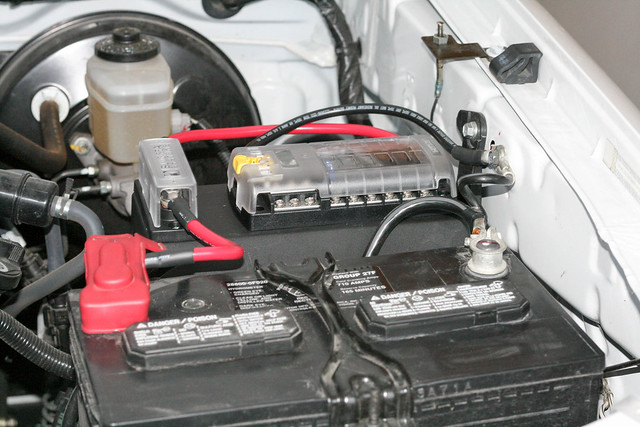
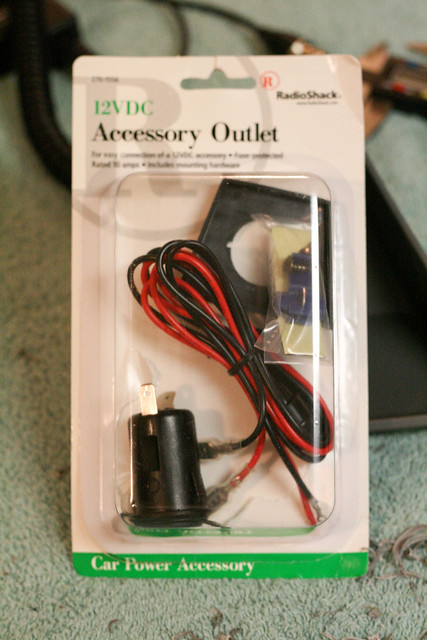
Sears Diehard Platinum Group 65 battery
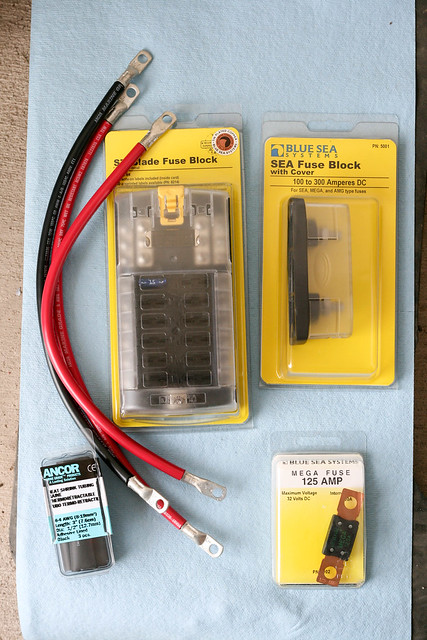
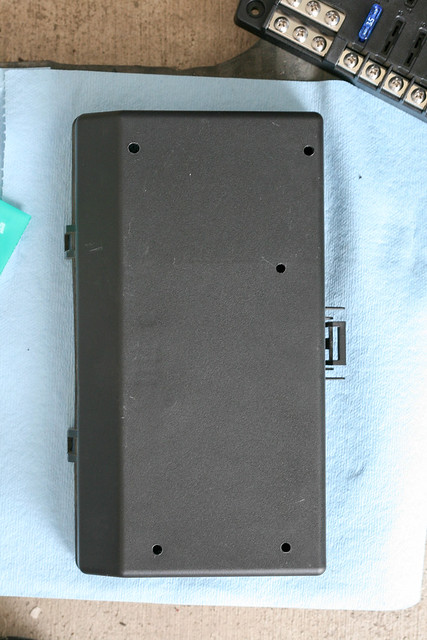
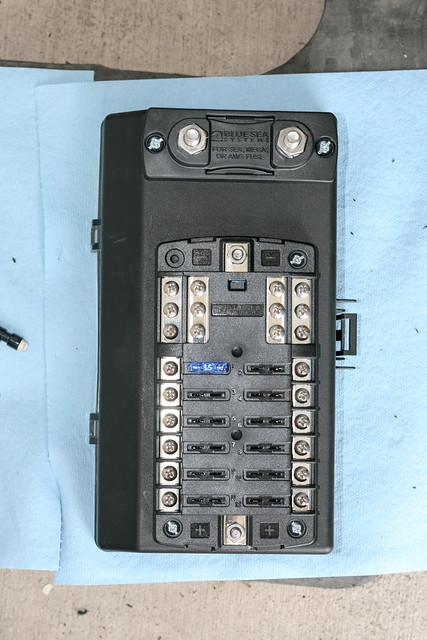
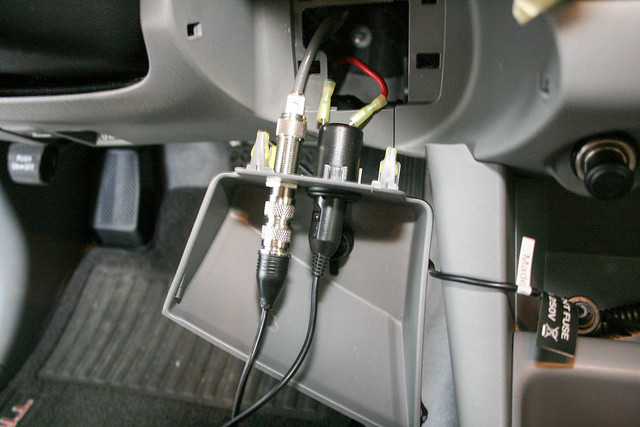
Blue Sea Systems 5026 12-circuit fuse block [post #7] (Bussmann RFRM replacement in process…slowly)
Blue Sea Systems 5005 AMG Mega fuse holder w/ 125A main fuse [post #7]
RemyBattery.com 5505 battery extension cables, 5515 battery terminal adapters, 5702R / 5702B snap-on battery terminal protectors
NAVIGATION
iPad2 3G w/ MotionX GPS HD, MotionX GPS Drive, TopoMaps, and AirDisplay
RAM Mount Tab-Tite iPad cradle mounted to RAM Mount 1.5" ball on dash
MacBook Pro w/ Windows7 (via Parallels software) running DeLorme Topo North America 9.0, displayed on iPad via WiFi using AirDisplay
DeLorme PN-40 w/ RAM Mount PN-40 cradle
Garmin Nuvi 750 [post #27]
COMMUNICATIONS
Ham Radio:
INTERIOR
Marathon Superhides seat covers ("smoke" gray color)
WeatherTech DigitalFit floorliners
2012 OEM Tacoma lower center dash panel
ScanGaugeII on BlendMount
Valentine1 radar detector on RAM Mount Mirror-Mate
Valentine1 concealed display mounted in dash
Grom TOYI2 iPod/iPhone interface w/ CableJive 2' DockXtender cable
Salex center console organizer
Eclipse retractable sun shade
Zulu Nylon Gear visor organizer
CARGO
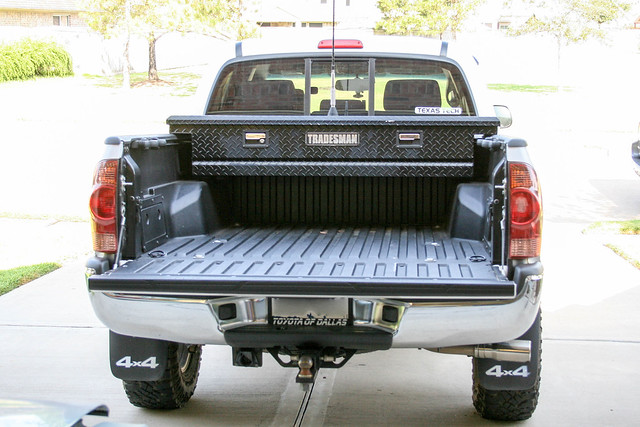
Leer 100R camper shell w/ Yakima tracks/crossbars; driveway paint job
BedRug Mat
Hi-Lift Slide-N-Lock 22" tie-down tracks mounted in bed
MISCELLANEOUS
Airflow snorkel
ECGS front differential bushing
Fumoto F-103N engine oil drain valve
Trail-Gear Creeper Breather on rear diff [post #21]
CoolTechLLC roller fairlead license plate mount
2011 OEM Tacoma grille painted satin black
Vent Visors
Blacked-out emblems
Future Plans:
Past Mods / Equipment that have been removed:
Lastly, gotta give credit where credit's due - RSB, FrozenGround, Box Rocket, Rickashay, freeze, TACODOC, Barlowrs...theirs are just a few of the vehicles that have influenced my build and undoubtedly saved me many headaches.
My truck is over 8 years old now, so I'm going to be digging through old photos and trying to jog my memory for some of the older stuff. In the beginning, I never expected my truck to get to the point it's at now, so I didn't do the best job of documenting some of the earlier modifications I made. I'll try to put links next to each of the mods that link straight to the post(s) that go into detail about that item so it’s easier to find details.
(pictures as of Jan 2015)

2008 TACOMA DCSB, 4x4, TRD Off-Road package, 040 Super White
FRONT SUSPENSION
OME 886 springs
OME NitroCharger Sport shocks (90000)
Light Racing UCAs
Wheeler's SuperBumps bumpstops
REAR SUSPENSION
OME Dakar HD leaf springs (CS047R) w/ OME AALs (D29XL)
OME Nitrocharger shocks (60091)
Toytec 3° axle shims
Toytec extended-length center pins
OME carrier bearing drop
Toytec U-bolt flip kit
Deaver extended-length U-bolts
BRAKES
Stop Tech Sport front rotors
PowerStop Z36 front pads
WHEELS: OEM FJ Trail Teams edition matte black 16" x 7.5" (4.5" BS)
TIRES: 285/75/16E Cooper S/T Maxx
ARMOR
ARB front bumper (3423130)
CBI Offroad Bushmaster 2.0 high-clearance rear bumper w/ swingout
Single jerry can carrier
Fold-down camp table
Camp light mount
Synergy Manufacturing latch
Vulcan Black HP powdercoat
Hopkins 47185 / 20146 trailer wiring connector & cable
Outpost Offroad (Metal Tech 4x4) bolt-on sliders w/ mesh fill platesFold-down camp table
Camp light mount
Synergy Manufacturing latch
Vulcan Black HP powdercoat
Hopkins 47185 / 20146 trailer wiring connector & cable
RECOVERY
Warn M8000-S (contactor controller) w/ Warn 3/8" 100' synthetic line
Warn roller fairlead - powdercoated black frame w/ Warrior AlumiRollers
Factor55 UltraHook
48" Hi-Lift jack
ARB straps, Master Pull SBO30000 snatch block, assorted shackles, tools, spare parts, etc
LIGHTING
OEM 2009 Tacoma TRD headlights
Narva Rangepower+50 high/low beam bulbs
IPF 901XSD 100W driving lights on front bumper
ARB fog light kit in front bumper (6821201)
ARB LED indicator lamp kit in front bumper (6821287)
Rigid SR-M diffused LED lights in rear bumper light buckets [not yet installed; waiting on RFRM installation]
Totron 48W LED flood light on rear bumper camp light pole
OEM DTRL flasher module added [post #22]
LED DTRL / front turn signal bulbs
LED reverse light bulbs
LED interior dome light & map light bulbs
ELECTRICAL
Sears Diehard Platinum Group 65 battery
Blue Sea Systems 5026 12-circuit fuse block [post #7] (Bussmann RFRM replacement in process…slowly)
Blue Sea Systems 5005 AMG Mega fuse holder w/ 125A main fuse [post #7]
RemyBattery.com 5505 battery extension cables, 5515 battery terminal adapters, 5702R / 5702B snap-on battery terminal protectors
NAVIGATION
iPad2 3G w/ MotionX GPS HD, MotionX GPS Drive, TopoMaps, and AirDisplay
RAM Mount Tab-Tite iPad cradle mounted to RAM Mount 1.5" ball on dash
MacBook Pro w/ Windows7 (via Parallels software) running DeLorme Topo North America 9.0, displayed on iPad via WiFi using AirDisplay
DeLorme PN-40 w/ RAM Mount PN-40 cradle
Garmin Nuvi 750 [post #27]
COMMUNICATIONS
Ham Radio:
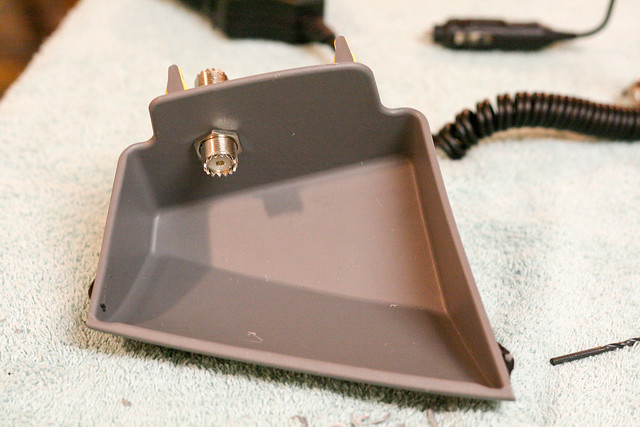
Yaesu FT-7800R 2m/70cm dual-band radio [post #23]
Yaesu YSK-7800 separation kit [post #23]
Relentless Fab hood hinge antenna mount
Diamond C101NMO coax assembly
Larsen NMO 2/70B dual band antenna
MFJ-281 external speaker [post #23]
TE Connectivity panel-mount mic connector on center console (awaiting installation)
CB Radio:Yaesu YSK-7800 separation kit [post #23]
Relentless Fab hood hinge antenna mount
Diamond C101NMO coax assembly
Larsen NMO 2/70B dual band antenna
MFJ-281 external speaker [post #23]
TE Connectivity panel-mount mic connector on center console (awaiting installation)
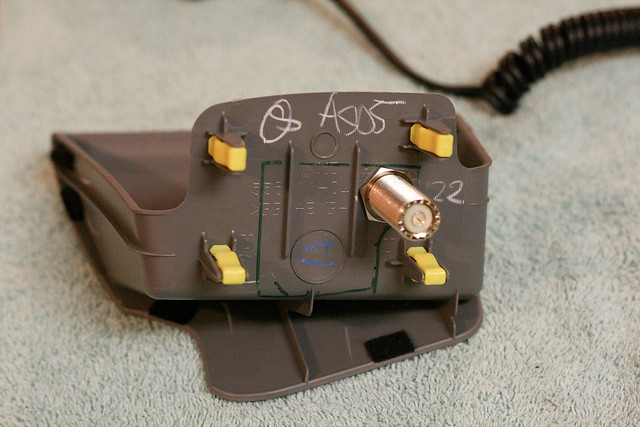
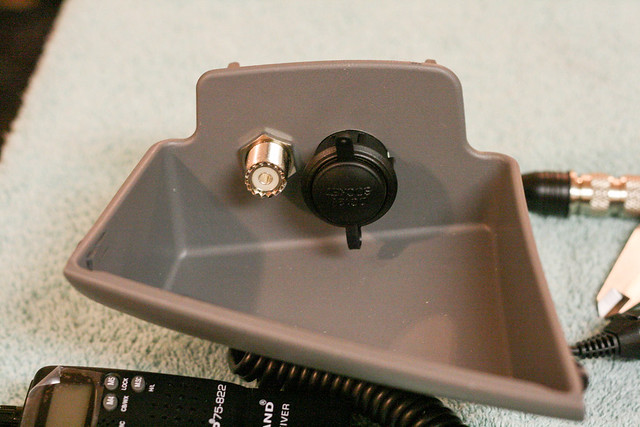
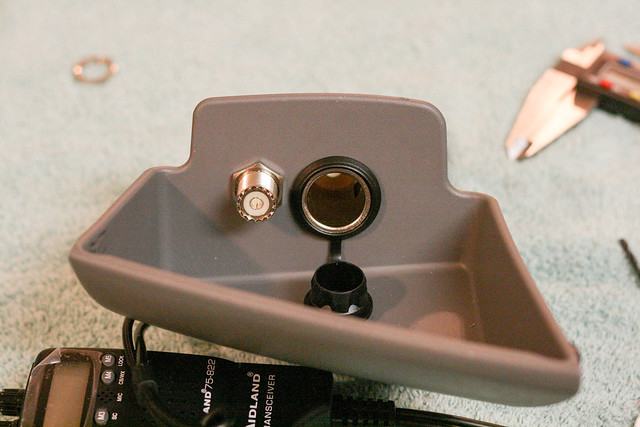
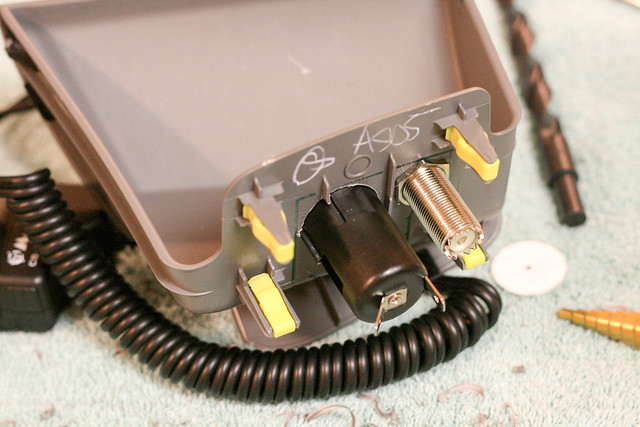
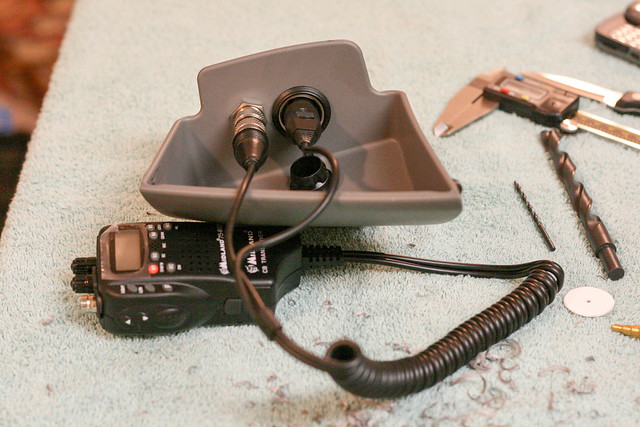
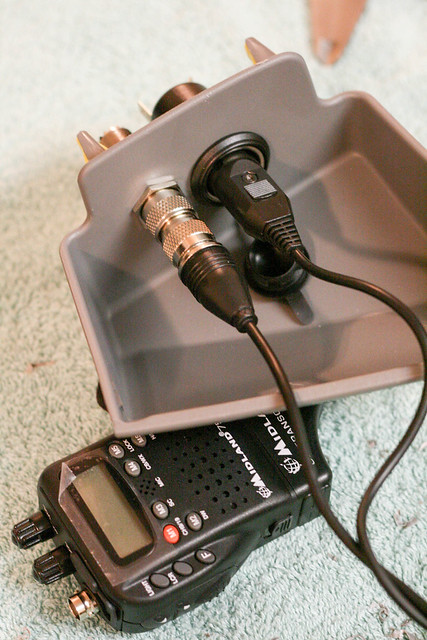
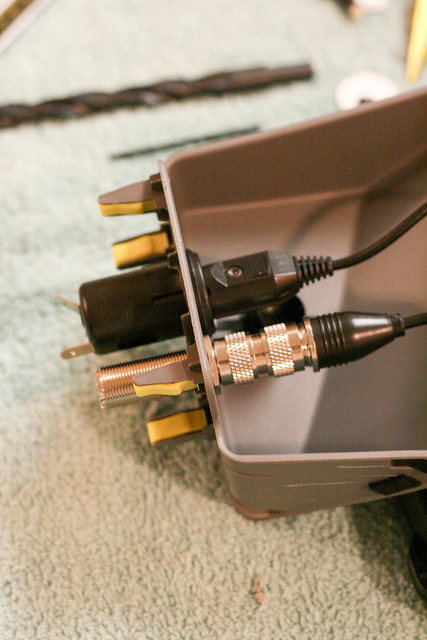
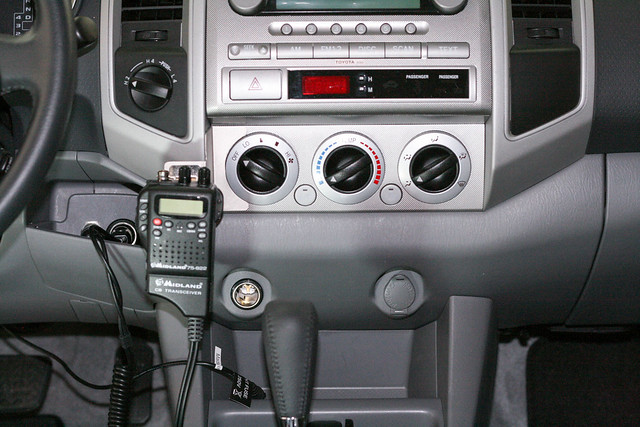
Midland 75-822 handheld CB radio [post #14]
Firestik II 3' antenna
Firestik K4-SS antenna stud mount on front bumper
Firestik SS-3H spring and quick disconnect
Firestik MU8R18 FireRing PL-259 coax
Firestik II 3' antenna
Firestik K4-SS antenna stud mount on front bumper
Firestik SS-3H spring and quick disconnect
Firestik MU8R18 FireRing PL-259 coax
INTERIOR
Marathon Superhides seat covers ("smoke" gray color)
WeatherTech DigitalFit floorliners
2012 OEM Tacoma lower center dash panel
ScanGaugeII on BlendMount
Valentine1 radar detector on RAM Mount Mirror-Mate
Valentine1 concealed display mounted in dash
Grom TOYI2 iPod/iPhone interface w/ CableJive 2' DockXtender cable
Salex center console organizer
Eclipse retractable sun shade
Zulu Nylon Gear visor organizer
CARGO
Leer 100R camper shell w/ Yakima tracks/crossbars; driveway paint job
BedRug Mat
Hi-Lift Slide-N-Lock 22" tie-down tracks mounted in bed
MISCELLANEOUS
Airflow snorkel
ECGS front differential bushing
Fumoto F-103N engine oil drain valve
Trail-Gear Creeper Breather on rear diff [post #21]
CoolTechLLC roller fairlead license plate mount
2011 OEM Tacoma grille painted satin black
Vent Visors
Blacked-out emblems
Future Plans:
- HID retrofitted headlights are on the way, patiently waiting...
- Full-length bed drawer / cargo slide build; already have two pairs of 60" 500-lb drawer slides; drawer / cargo slide design is ongoing in SolidWorks
- OBA system - already purchased the ARB dual compressor; working on the rest of the system
- Extended brake lines front & rear
- Prinsu Cabrac and Toprac w/ additional lighting
- Remove Trail-Gear Creeper Breather and do a proper rear diff breather relocation
- Install lighted 4x4 switch (already have the parts, just gotta install it)
- Install console lock (already have the parts, just gotta install it)
- Lighting inside camper shell (already have the parts, just gotta install them)
- Convert rear turn signals and brake lights to LED
- TechDeck for iPad mount
- 1000W+ inverter w/ 120V outlets and additional 12V / USB outlets
- Repaint grille (my rattle-can job isn't holding up too well over the chrome)
- Replace lower control arm bushings and lower ball joints (already have set of spare used LCAs)
- Skids & exhaust crossover reroute
- Relocate Warn control box to engine bay & add master switch and Warn wireless winch control system
- Underhood LED lighting (Anti-Dark or other kit)
- Get the infamous Tacoma take-off shudder figured out, it seems to be getting worse and is driving me crazy
- Suspension - when it comes time to replace, I will most likely switch to coilovers on the front and All-Pro APEX HD leaf springs in the rear
- Ravelco system
- Paint frame inside and out
Past Mods / Equipment that have been removed:
- Comet SBB5-NMO dual band antenna for ham radio
- Tradesman low profile aluminum toolbox w/ Workman Electronics dome mount for CB antenna [post #8]
- Buyers Products steel toolbox
- 265/70/16 Load Range C BFG Rugged Trails (OEM - 46k)
- 265/75/16 Load Range C Goodyear Duratracs (46k - 102k) [post #28]
- 265/75/16 Load Range E BFG ATs (102k-156k)
- RAM Mount RAM-B-316-1-TAB3 18" arm iPad mount
- Diamond K400CNMO lip mount / coax for ham radio antenna
Lastly, gotta give credit where credit's due - RSB, FrozenGround, Box Rocket, Rickashay, freeze, TACODOC, Barlowrs...theirs are just a few of the vehicles that have influenced my build and undoubtedly saved me many headaches.
Last edited:

 Oh well, better late than never I guess....