Old College Kid (re)builds a Camper/Moto Van-1989 Ford EB SMB Penthouse

Mwilliamshs

Explorer
That was a long post and a lotta work went into it. Here comes another one. As always I welcome your opinions and input. Go ahead, check my math. It's not difficult just time consuming, for a dummy like me.
 

Mwilliamshs

Explorer
Now for the heater (hey I already had all the #'s in front me!)
.
So the propane heaters suitable for heating the van are:
.
Forced-Air furnace like a Suburban or Atwood RV furnance or Propex, Espar, etc.
.
Portable catalytic like a Mr Heater or Buddy Heater, whatever
.
Mounted catatlytic heater like an Olympian Wave, etc
.
I think that's about it.
.
Forced-Air are the safest as they pull outside air for combustion and exhaust their fumes outside. They're the most expensive to operate because they require both propane for heat and electricity for the blower and controls. They're the most difficult to install because you must cut holes in the van, either the floor for a Propex or a wall for the Suburban. and Atwood. Some models require (feature?) ducting for heat distribution which may be great for even heating in large/multi-room RVs but adds to installation complexity. They're the best for moisture introduction into the van because they actually dry the air inside the van by circulating it through a heat exchanger (like a blow dryer for your van). They take up the most room and take it up permanently. They also have thermostats which is nice, because you don’t have to turn them on and off manually.
.
Portable catalytics are not the most dangerous things in the world but they do require ventilation because they use oxygen from within the van for combustion and can deplete it over time and they're prone to being knocked over (they have tipover sensors but they're still hot and can cause damage) or having something accidentally dropped or spilled on them (they're flameless but still capable of ignition). They're efficient to operate because they require only propane, no electric blower. They're easy to install because you just set them down and turn them on, hardly an "installation." The burning of propane creates moisture in the air and thus inside the van. This can lead to condensation on the van walls and glass, basically any cool surface. They take up a good bit of room but can be moved about and removed easily. Most are not connected to external propane tanks and just use 1 lb disposables instead, which is now how’d I prefer it for an extended trip.
.
Mounted catalytics are between portables and furnaces in safety because they're mounted and can't be knocked over and aren't in the floor so can't be spilled onto or inadvertently covered as easily but they do still use oxygen from within the van for combustion and so do require venting. There are supposedly vent-free catalytic heaters (should probably be called self-venting or some such) but I've no experience with them and assume the ducting the vent requires would at least double installation time/energy and be similar to the forced-air furnaces above. They're efficient to operate thanks to needing no electricity and they convert 99.98% of propane used directly to heat as opposed to flame types, with max out at about 76%. Not having a blower also makes them silent. Installation is pretty simple, basically hang it on the wall and connect to gas. Some folks get fancy with cabinet integration. They can cause condensation if not vented sufficiently. They take up the least room of the three (arguable) and depending on installation, can be removed pretty darn easily and used as a portable type by adding optional legs and connecting to other tanks, including 1 lb disposables or left at home during warm months.
.
I've decided on a mounted catalytic Wave as my most likely choice. I do have a portable and will use it if needed before a Wave comes along.
.
EDIT: Not no more! Keep reading!
.
The Olympian Waves come in at least 3 models, a Wave 3, Wave 6, and Wave 8. There may be more but these are the most common and only ones I've found I'd trust. The 3 vary in BTU output and external dimensions but all function the same. CAMCO, manufacturer of the heaters, rates them in both BTU rating and Square Footage they can each heat. I have not found what height of a room is assumed in these square footage calculations but I assume they're all the same so for the sake of comparison, any figure works and I'll use 8' as it's most common for interior walls in homes. The Wave 3 is rated at 130 sq. ft. The Wave 6 is 230 and the Wave 8 for 290. I assume these ratings are for an interior room with no outside walls because this is the way to make the numbers as high as possible, and manufacturers are biased like that. Who ain't?
.
So let's down-rate the figures due to my van having nothing but external walls and some of them single-wall canvas and the others only containing as much insulation as can fit (definitely less than 2/4" walls filled with fiberglass bats with sheetrock on one side and sheathing/siding on the other. I'll say that my van, with its 70" interior height (top popped) and approximate (rounded up and assumed square) external dimensions of 237" long and 80" wide, contains about 349.235 cubic feet of air, minus furnishings and cargo. Why that number? With the 8' ceiling assumption, the Wave models are rated at 1,040 cu ft, 1,840 cu ft and 2,320 cubic feet, respectively. These ratings are of course with heaters set on high and are fairly abritrary given the assumptions and misgivings of the math to get them. Based on these findings however I think the Wave 3 should sufficiently heat a van since it's rated for over double the volume.
.
So that Wave 3 model, let's see how much propane it uses. This is all super tricky and frankly, only quasi-reasonable at best given all the variables of wind, temperature, sunlight, elevation, etc etc etc that a van will see vs a stationary home. Basically, if you want a structure that can be heated efficiently, don't pick a van, especially one with canvas walls. That being said, here are the minimum and maximum amounts of propane and butane and 70/30 mix the heater can use under any normal circumstances:
.
Olympian Wave 3 Heater's lowest setting is 1,600 BTU and its highest is 3,000. Did some math and found that for about $425 I can insulate the van to an average R value of 6.28 and this makes the heat loss 1,946.37 BTU/hr when the van’s 65 inside and 30* outside, which is about as cold as I expect to use the thing more than once. Let's say I want to heat the van for sleeping in only, so 10 hours should let you get ready for bed, into bed, and out the next morning. Whether or not I'd feel safe sleeping (and expect to wake up the next day unasphyxiated) whilst the heater ran remains to be seen but if it's cold enough to want heat all night (would be really really extreme since folks camp in tents with no heat all the time) I'll vent aplenty and hope for the best. Normally I'd expect to heat the van to maybe 70ish before bed, kill the heater, and burrow into my 20*F sleeping bag with my sweetie but let’s see what 10 hours of staying 65* takes: 91,500 BTUs in 1 gallon of propane, divided by 1,950 to keep the can warm = a tenth of a gallon an hour. Do that for 10 hours and you’ve used a gallon. The tank I hope to lasts me 90 summer days 30 winter days is going to last me less than a week doing it that way! Now if the heater could be turned off for half that time and then run 25% higher for the other half, you’d save 25% of the fuel. Turn it off 75% of the time and run it 25% of the time at a 40% higher output and you’d save 65% of the fuel yet theoretically have the same average temperature. If you don’t see what I’m getting at, it’s called Duty Cycle, or the percent of the time something’s being worked vs the percent of time it isn’t. Now that’s great but I really don’t want to drive to South America to sit in my van turning the heater on and off every few minutes to conserve fuel.
.
ENTER THE FORCED-AIR FURNACE!
.
Suburban makes a pretty nice little unit, the NT16SE I think, but it’s 16,000 BTUs and quite large. Too large. It also requires a big (think shoe box) hole cut into the van’s exterior and it requires ducting its output throughout the van, which takes time and energy to do and takes up even more space than just the big furnace itself. Well...poop. As my brother Dave says, “Rejoice, Dear Hearts!” The Atwood Everest Star furnace is available in output ratings of 9,120, 9,160, 12,160, and 13,680 BTU/hr. It’s small, only 11 3/8"H x 8 3/8"W x 20 1/2"D, 23 lbs. Vent cutout size: 2-1/2" H x 4-7/8" W. They can be ducted but don’t have to be. They do require electricity, but it’s under 2 amps on the lowest power model. They also waste heat by blowing their (hot but noxious) exhaust outside, but are still 76% efficient on propane. The lowest power model @ 9,120 BTU output can maintain 65 in an uninsulated van @ about 30% duty cycle, heat it from 30 to 65 in an hour with over 1,000 BTU spare and maintain an insulated van @ 14.6% duty cycle. Best of all, thermostat controlled and fully automatic and totally safe. Like Ron Popeil says, “Set it and forget it.”
.
Now, with regard to consumption, the 8012-II Everest Star furnace @ 9,120 BTU output can maintain an insulated van at 65* in 30* weather @ about 14.6% duty cycle. That means about 9 minutes of an hour (8.88) it's running to hold 65 *in 30 *degree weather. 8.88 minutes x 1.8amps = 15.84 amp minutes, or 0.264AH, which is under 6.5AH per day (6.33) if it stays 30* and you just let ‘er rip, tater chip. Under those same conditions the furnace will burn 12,000 x .148 = 1,776 BTU of propane per hour, or ~2% of a gallon per hour (1.94%) and ~½ a gallon (46.5%) per day, keeping toasty round the clock. Compare that to the catalytic turned down low burning a gallon in 10 hours, or 2.4 gallons a day. 2.4 > .46 in my world.
.
So if you only heated, no cooking, and had 8.25 gallons of propane, that’s over 430 hours of heat, almost 18 days (17.95), during which time it'll use ~113 AH of battery power (but under 7AH a day so very easily replaced daily).
.
In more real-world conditions, like camping in winter where nightly lows are 30-ish and the furnace is run maybe half the day (but having to heat the van up from 30* before bed then keep it 65* through the night), you're looking at about 33% of a gallon burned for heat per day with the top up (30,240 BTUs) and 23% with it down (21,024 BTUs), which extends run time to over 25 and 35 days, respectively, and again, the electrical demand can very easily be overcome with solar, driving, etc.
.
Figured earlier that I can cook plenty of food on 8,400 BTUs per day. Now we know I can heat the van up nicely on 21,024 so a single cold day with home-cooked meals is 29,424 BTUs. That’s 25.7 days without conservation or a warm spell.
.
I remind you these are all worst-case-scenario numbers and that they've now been up-estimated twice. Boiling a lot of water, burning the least efficient fuel available (which you might have to do at elevations over 10,000 ft and/or temps below 32°F), and assuming huge heat losses (as in, no gain from all that cooking inside). There's still a bed for 2 with the top down and since I'll travel with a pretty hot female, that's plenty. "Yeah babe I'm cold too...REAL cold"
.
At current $/gal prices as of Monday, October 27, 2014 that 8 gallons would cost $6.96 USD in Argentina according to the US Energy Information Administration. The annual peak in $/gal prices for propane was $1.10 in April 2014, when a 8 gallon fillup would cost $8.80. You're talking ~$9/month, at the very worst of times. I didn't hand-pick a country with low propane prices; I thought of the montains there and how long I'd probably spend in them and decided that's a likely spot for a fillup. Last month in Mexico propane was .56 per gallon. That means my 21 (COLD) day supply for cooking and heating would run me ~$4.62, or about $6.60 per month of 30* days, and yes it's USD, not pesos. I can handle that. At their 2014 peak, last February, propane prices in Mexico hit $1.44 USD per gallon, so still under $17 per month of 30 degree weather.
 
Last edited:

Mwilliamshs

Explorer
How long will a tank last? (part uhm...B?)

Now let's combine cooking with heating and see how many days we squeeze from a ~8 gallon tank.

I previously generously (fuel-conservative) figured a boiled egg, bacon, coffee breakfast for two was 2,770 BTU then tripled that for 8,310 BTUs per day for meals. This works because lunch will most often be purchased from a cafe or street vendor, so 0 BTUs, and dinner will vary too much to guess but likely will be either purchased prepared or cooked on the campfire, etc.

Rounding that 8,310 up to 8,400 (further underestimating to the tune of 8,100 BTU over the life of a tankful, nearly a day's worth in one fell swoop) and mulitplying by 90 days (my goal) it was decided I wanted to get 756,000 BTUs into my tank, which on the least energy-dense (BTU/gal) fuel, 100% propane, is 8.25 gallons.


For the VAST majority of the trip I'm sure this will prove at least sufficient, and more likely, very very conservative (filling up far less often). Due in large part to rampant underestimation of the tank's longevity / overestimating my needs.

However, if cold weather finds us suddenly, sooner, or more often than planned, that 90 day supply will demand either a larger tank (not feasible after purchase/installation/departure) or more frequent fillups but how much more frequent? From heater calculations posted previously the two most likely scenarios I see are A) a cool rainy day spent indoors resting road-weary bodies in front of a heater watching movies or playing cards and B) a very cold night spent soaking up radiant heat and cuddle-points.

A) I'll call this one 10 hours on low power heat. Not cold, just cool, but long.

B) I'll call this one 4 hours at 75%. Much colder, but cold, tired bodies will sleep earlier in the night and the heater will be extinguished before they do.

Let's say in a 90 period (that's 1/4 of the year-long trip!) each of these happens 5 times. That's 80 days and nights of no heater and 10 days of, "boy I'm glad I brought that!" So for the those 80 great days we know to use 8,400 BTU/day as before which requires 672,000 BTU from our tank of 756,000 BTU or 8.25 gallons (again, 100% propane)...672,000/91,500 (BTU/gal) = 7.34 gallons burned, leaving behind (8.25 - 7.34 =) .91 gallons. That .91 gallons is 83,265 BTU to cover 10 days of heater use, will it last?

Day A (low heat @ 1,600 BTU, 10 hrs/day) is 16,000 BTU and 5 of them is 80,000 BTU, leaving 3,265 BTU (less than even 1 "normal" day) so no, the tank won't go even 86 days at that pace...but it might make one more breakfast (to soften the blow of bad news)!

Day B (75% heat @ 2,300 BTU, 4 hrs/day) is 9,200 BTU and 5 of them is 46,000 BTU, leaving 37,265 BTU (4.43 more normal days) so no, the tank won't quite go 90 days, but 89.43 ain't bad!

So what good are these numbers? They illustrate that 90 good weather days worth of propane fit in a ~8 gallon tank, kinda, keep reading. They also illustrate that it's foolish to drive past an otherwise good propane station if you're 40-50 days from your last fill-up. They also illustrate that how long the heater runs makes a bigger difference in its consumption than how high it's set. That last one is probably the most valuable lesson. Also the 90 day goal with an 8.25 gallon tank is busted because banking on 85 days of no-heat weather might work on beaches but mountains kill that dream fast.

Another way to look at this heat fuel estimating is if each and every day of a year (spent south of Texas mind you) required 1 hour of heating at max output an additional 12 gallons of fuel would needed.

Of great importance, and I apologize to any readers for not saying this earlier (this has just been me thinking through the keyboard, not trying to teach anybody anything just putting my brains on paper) is that propane tanks can only be safely filled to a maximum of 80% of their capacity due to expansion, temperature changes, elevation changes, etc. I don't care. I'll be on vacation for a year so if I have to fill up every 45 or 50 days instead of every 65 or 70 I really really really don't mind. I got all the time in the world, well in a year. To get 90 perfect days (no heat, just cooking) out of a tank of 100% propane would actually require a tank of 10.3 gallons capacity, of which 8.25 = 80%It sucks to buy (and find room for) 2 gallons of tank you can't cook or heat with (cuz it's just air, not gas), but that's the price you pay for a widely available, cheap, safe fuel that flows uphill, doesn't use any power, doesn't go bad or stink or spill or smoke. Hank Hill would be proud.

That means we get to cook for an entire year while only refilling a tank only 4 times, which is much less hassle than offered by any other fuel. I don't want to think about how much gasoline I'd spill just in refilling a Coleman stove enough times to cook 1,080 meals, the number I've budgeted for with just 4 fillups of propane. The first one will even be in my hometown, pre-departure, by the guy selling me hose and fittings, so that should be painless.

If all 4 anticipated tankfuls were purchased in Argentina on the most expensive day of the year, all 1,080 meals could be cooked on (8.25 gal/tank @ $1.10/gal x 4 tankfuls) $36.30 of fuel. Not bad.
 
Last edited:

Mwilliamshs

Explorer
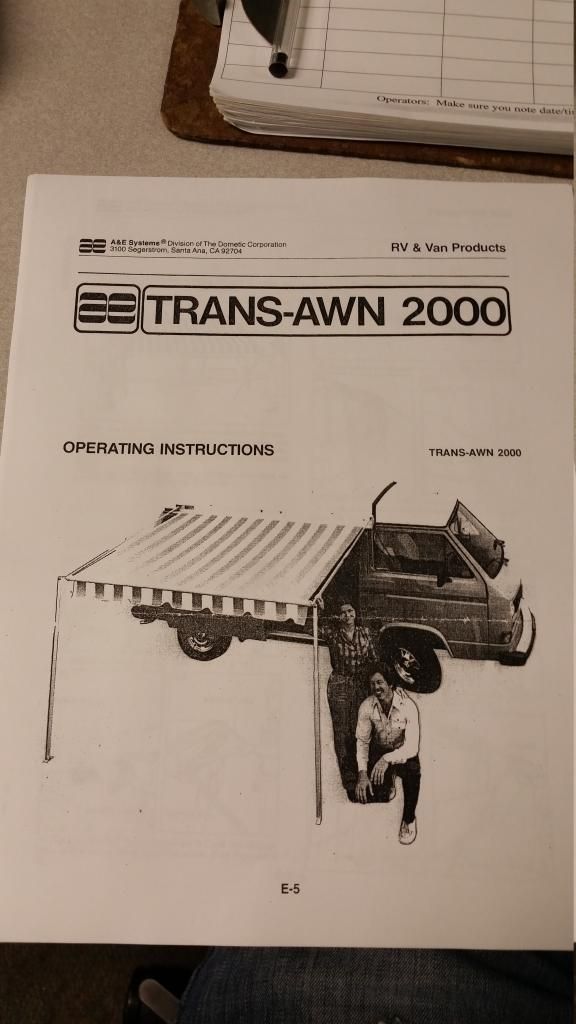
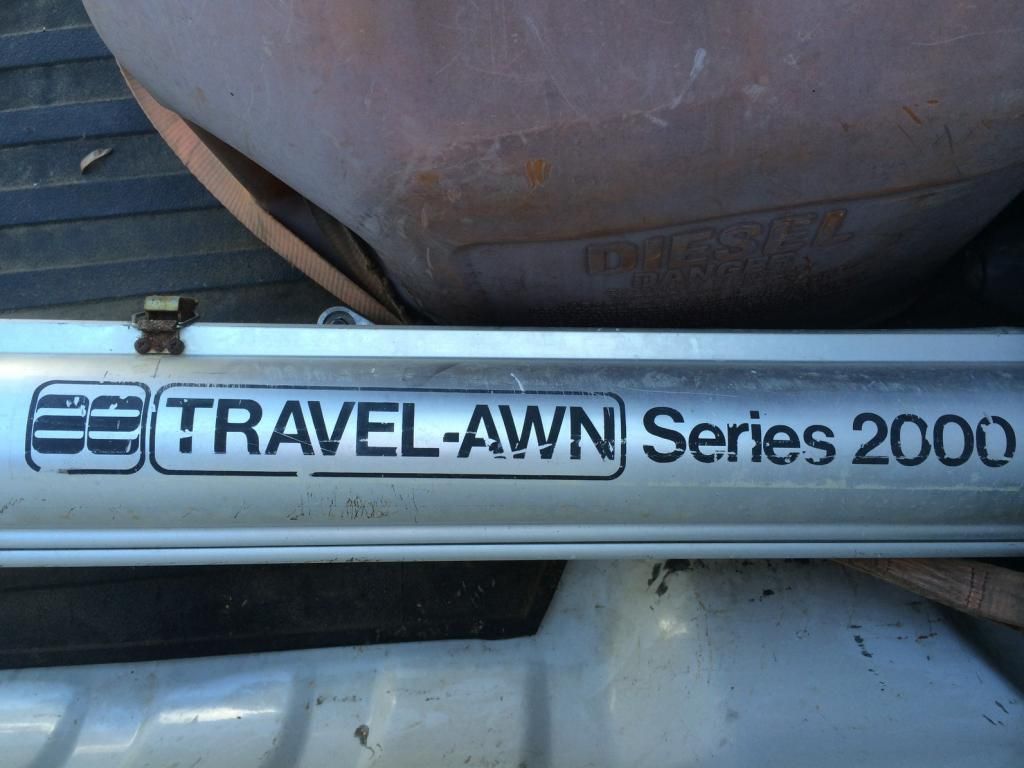
Got an awning! A&E, a division of the Dometic Corporation, made the Trans-Awn 2000 (Travel Awn is apparently the Canadian model?) for years, starting back in the 70s or 80s. They were very popular for small campers, Volkswagen Westfalias, etc. The same awnings are now sold as the Eezi Awn 2000 and are sold state-side by Equipt. This is great news because nearly all parts are available (from multiple sources), some have even been upgraded over the years, like stainless steel case latches! (note the rust on mine in the pic :() I got a heck of a deal on a 10' model. Gotta buy gutter brackets but I think I'll have this thing mounted and ready to go for under $250! Got the owner's and installation manuals downloaded from The Samba.

Link to Samba thread about these awnings.

Link to YouTube video of Eezi Awn 2000.

Link to the brackets for mounting on the gutters.

Eezi-Awn Brochures List (Includes Series 2000 User Guide and Parts list

Eezi-Awn Series 2000 Parts and Accessories


Last edited:

rockbender

Adventurer
Thanks for the LP usage tutorial! Right, wrong or otherwise it was fun to follow along. You thread gets kind of hidden over here on the SMB subforum (in lieu of the 4wd van forum). I need to remember to pop over here and see what you're up to!

I just finished installing a 5.9 gallon tank on my van and what I'm picking up is that I will have a lot of weekends of stove and propex furnace use before I will need to be filling up!
 

Mwilliamshs

Explorer
Thanks!

One thing to think of is efficiency. The better your appliances are at turning gas into heat the longer your gas will last. The catalytic heater I discussed is like 98% or so efficient so I just ignored that 2% of loss but a number under 95% or so I'd suggest calculating for if long trips between fillups are in your plans.
 

Mwilliamshs

Explorer
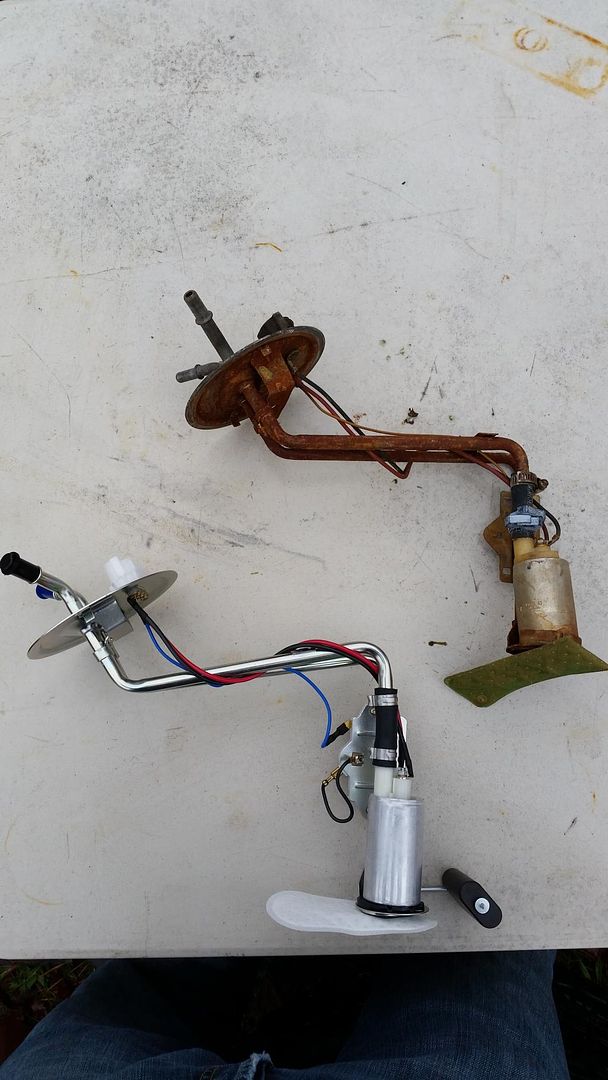
Did some van work today. Got new positive battery cable installed, 16" long from post to solenoid. The whole cable assembly is cheaper than buying cable, a battery terminal, a ring terminal, and crimping it yourself-go figure. The negative cable is next but it runs from battery post to the lower starter mounting bolt and has to be about 6 feet long! It's not as bad as the positive was and I needed to get to the tank so it'll have to wait. The cables had their old (25 years I guess) insulation cracked and peeling from corrosion and since I'm replacing the battery, it just made sense to get all the connections in order too. The van has sat for some months without running and the battery is too small for the tray, old, and was flat when I got it so it's got to go. That work was prompted by a no-start a while back that I suspected was fuel pump related. Couldn't hear either pump run at key-on so I jumpered the fuel-pump relay to make the frame-rail mounted pump run continuously (could hear it) and it still wouldn't start and barely built any pressure at all at the fuel-rail schrader valve. I know the tank had fuel in it because I added 3 gallons today to be sure. With the pedal matted and some ether sprayed in the intake it'd try to run but without the ether it wouldn't do a thing so I deduced a) no-start caused by lack of fuel, b) the frame-rail mounted pump is at least spinning if not pumping, c) can't hear the in-tank pump with cap removed and ear held to filler so d) probably the in-tank pump has failed, making the frame-rail mounted pump work too hard, burning relay. Dropped the tank (not bad, 2 nuts, 2 hose clamps, and 2 quick-disconnects) and sure enough the pump is REAL crusty as is the hanger assembly, gauge float, etc. The tank itself looks great which supports the idea the hanger assembly came from a different van. Didn't test it. I've seen them run fine on a bench when powered up but then fail when installed and asked to pump fuel against the restriction of filters, etc. The story goes this pump came from the junkyard to get the van running to sell it so I'm sure it's due for a new one. The frame mounted pump might be next. One step at a time. You can either replace the pump itself or the entire hanger assembly with fuel gauge sending unit, strainer, etc. I'll replace the whole assembly. Not a drastic money difference and doing all this work to then find the gas gauge inop would really suck. Just moved into a new condo, wrecked my truck, paid my last tuition bill of the semester, xmas is coming, etc so money is short at the moment. I'll use the cheapest hanger assembly available and if the pump later dies I'll replace JUST the pump with a top-shelf part. No pics today, nothing interesting to see just old battery cables and a fuel pump lol
 
Last edited:

Mwilliamshs

Explorer
Waiting on another day off to go play van man and kiling time at work (when I should be prepping for finals....) has me thinking about suspension. The van has the 1/2 ton stuff under it now and since I'm projecting a 7-8k finished weight (stock gvwr of 6200 I think) something must be done. I do plan to swap the front end and rear axle for those from a 250 or 350 class van and while the front should all be plug and play, the rear isn't. 3/4 and 1 ton vans have 3" wide rear springs. 1/2 ton vans have 2.5" wide rear springs. The axle-to-spring mounting isn't a problem there but spring to frame certainly is. The shackle bushings (both upper and lower) interchange for all weight classes of vans so either the shackles are all the same or the 350 shackles should fit the 150 frame. That leaves just the front end of the springs as the problem child of the swap. So to swap spring mounts (riveted on, 5 per bracket I think) or to swap springs becomes the question. I've been reluctant to go after spring hangers because of the rivets which I'd have to replace with grade 8 bolts and the labor involved. I don't mind hard work but tool time is hard to find. Not wanting to change the spring hangers meant finding a 2.5" wide leaf spring with a capacity of 2850-3300 pounds and lengths matching or very close to the E-150's stock springs. I don't have the funds for custom springs and considering how many stock applications there are I'd expected a suitable replacement to be reasonably easy to find given my resourcefulness. I was wrong. Dexter, SD, Deaver, Rancho and about half a dozen more spring sources have returned nada. The issues are that the center pin is offset in the stock springs, springs rated for greater weights are wider (1,900 lbs seems to be the limit of OE available 2.5" wide springs and the 8.8"'s highest GAWR I can find is 3800 in F150s), and since the van is SOA from the factory, arch heights greater than about 4.5" are ridiculous looking on 30" tires (stock 150 is 3.625" and stock 350 is 4.25") but are very common in springs with greater weight capacities (naturally). All those things working against me in the search of stock style springs with ~3k capacity means I'm looking more and more at swapping the front spring hangers. Suggestions for leaf spring sources other than custom?
 
Last edited:

Mwilliamshs

Explorer
If I do swap the front spring hangers to accomodate 3" wide springs I'll either use the springs that come from whatever van I find the axle under or likely the SD Truck Springs #43-623HD or the SD Truck Springs #43-623.


The HD spring (linked) is rated for 4k lbs, has 10 leaves, and a very low arch (2.25") vs (3.625" originally on my van).


The non-HD spring is rated for 3,235 lbs, has 10 leaves, and a very low arch (2.25") vs (3.625" originally on my van).


The difference here is between the individual leaves as evidenced by the two E-350 pack's respective differences in overall thicknesses. The HD pack is 4” thick while the non-HD pack is 3-⅝”.


Being SOA, arch + pack thickness = unloaded frame to axle distance. Unloaded frame to axle distances are, E-150: 3.625 + 2.0625 = 5.6875" and E-350 HD: 2.25 + 4 = 6.25" and E-350 non-HD: 2.25 + 3.625 = 5.875”.


Since I don't anticipate a rear axle weight of 8,000 lbs but rather more like 5,000 I think I could pull a couple leaves from the 10 leaf HD pack and get a pleasant ride, stock looking ride height, and plenty of spring pack weight capacity. On the other hand, the non-HD 10 leaf pack would likely ride better as-is with its thinner leaves, is already very close to OE height, and is cheaper....hmm decisions, decisions.


The OE E-150 spring pack is 6 leaves, 2.0625" thick overall, and that's 11/32" per leaf.

The E-350 HD pack is 10 leaves, 4" thick overall, and that's 12.8/32" per leaf.

The E-350 non-HD pack is 10 leaves, 3.625” thick, and that's 11.6/32” per leaf.


More, thinner leaf springs rides better than fewer, thicker ones.


A leaf spring's strength comes from each leaf supporting the ones above it. Removing leaves softens the pack and reduces its weight-carrying capacity. Each leaf in my stock packs is rated for ~292 lbs each. The HD pack is 400 lbs each and the non-HD pack is ~324 lbs each. If I use the HD pack and it's too harsh (due to being grossly overrated for my application) I could remove a leaf or two. 4k - 400 = 3,600 lbs, just about 1 HD leaf stronger than the non-HD pack but still stiffer and .025” thinner overall. Remove another leaf and the weight-carrying capacity of the two E-350 packs is nearly identical (35lbs more on the non-HD pack) but the HD pack will still likely deliver a harsher ride and it'll also now be lower (unloaded) than the OE E-150 pack. Reduced to 8 leafs the HD pack is still stiffer (nearly double) than OE pack and thus will sag less loaded.


Taking all of that into consideration, I think the best $ bet is to use whatever springs come attached to the axle and the best bet for performance and ride comfort given the anticipated payload is the non-HD E-350 10 leaf pack.


There are other packs available, including a 7 leaf/2850lb pack. Briefly, it's even stiffer than the HD pack (weight capacity/leaves = 407 lbs), even taller (6.5625” frame to axle, unloaded), and has leaves which are 10.57/32” thick. The thickness of the leaves vs their weight capacity is puzzling to me. They're rated for more weight than the HD pack but are thinner by over 1/16” each. Those must be some seriously stiff leaves! No thank you. There are also some 5/1 packs where it's 5 normal leaves and 1 overload. These are rated at 2,900 lbs and while I think they'd be great in a van that was often unloaded, I think I'd be so close to their rated capacity most of the time that I'd be punished by that very very stiff overload. If you assume it's just twice as stiff as the others, those 5 normal leaves are still responsible for 414 lbs each. I think realistically (having never seen these springs of course) the overload is probably more like 3x as stiff as the others, which drops the capacity of the 5 normal leaves to ~360 lbs, which is right in the middle of the HD 10 leaf pack and its non-HD counterpart.

That all leads to the non-HD 10 leaf pack as the best riding, most-economical replacement for my van with a basically permanent GVW of ~7,000 lbs and rear axle weight of ~5,000. I have the 300ci 6 cylinder, which weighs ~410 lbs vs the 5.0 at ~460, the 5.8 at ~525 and the 460 at ~720 or the 6.9/7.3 at ~1,100 lbs so compared to most vans out there, my front end should be pretty light. I'll be mounting the deep-cycle house batteries as far forward as possible, the water tank up there too (or more likely about midship), but the sole 22 gallon gas tank (140 lbs full) is behind the axle, as is the 20” body extension of the EB so the most of the space and thus weight is gonna be on the rear-end. Not a bad thing in my opinion, just a thing. This does mean I'll be careful not to put too much spring up-front though. The design of the Ford twin beam front end is such that a light front load (vs spring) causes excessive positive camber (outside tire lean) and thus accelerates outer tread wear on the front tires. Same thing with a heavy rear-end, if it goes down the front comes up and tires wear faster. Although it may seem counter-intuitive, I'll likely leave the E-150's stock front coils in place even after the rest of the suspension has been ‘upgraded'. The only reasons for all the upgrades on the front is to match the lug pattern of the E-350 rear (which is needed for weight capacity) and to get larger brakes and kingpins. I'm likely not significantly changing the front axle weight of the van (and HIGHLY doubt I'll be over even the E-150's front GAWR of 2,400 lbs much less the E-350's 3,900 lbs) so stock springs will likely remain. If I find uneven tread wear or poor handling, etc result I can always change the springs there too but I doubt it'll be necessary.
 
Last edited:

SilverSlug

Visitor
So . . . a very interesting thread here and I wish you all the luck in the world on your build-up and subsequent travels. If you are interested I have two vans that are currently rusting away in my yard: A 1977 E250 Quadravan (Regular length) with a Dana 44 front end and a 1986 E350 Extended Cargo Van (but has a sliding door). Both have the 460 V8 and C6 transmission. Neither one has run for several years and are looking pretty dumpy. I was originally planning to cannibalize the 77 and make the 86 into a 4x4 van. I never got the time or money until somewhat recently and decided to buy a used Sportsmobile instead. Do you have any interest in either/both of the vans to help you? Since you are about 6 hours away you could drive over and check them out some day for only the cost of gas. Or I could take a bunch of pictures and send them to you. PM me and let me know please.

Bruce
 

Mwilliamshs

Explorer
Smog Junk and Engine Decluttering

I don't know if anybody else will find any of this useful or interesting (or if anybody is even reading this thread LOL) but it helps me to write it out and I'm sure I'll reread it in the future as a reference so better for it to be here than on a notepad I'll lose anyway.
.
My goals here are:
1. Simplify things under the hood and increase or at least maintain present MPG.
2. Create no new maintenance issues and keep the Check Engine Light off/working normally
3. Create no new noises or smells.
4. Try to keep things environmentally friendly
.
*Tree Hugger Stuff* My state does no emission testing whatsoever. My van is registered as an antique and is not a daily driver. I am not a rampant poluter nor a rabid environmentalist but in fact am certain I'll be improving the overall environmental impact of this vehicle. Vehicles have come a long way in the last 25 years and this one is getting dragged, kicking and screaming toward present day. For simplicity and to eliminate as much old junk as possible (solenoids, valves, pipes, hoses, vacuum lines, etc) and since the air pump will likely be removed to create space for a 2nd alternator, I've started "de-smogging" the van. I'll explain here both how the emissions system works and what I've done to it.
.
I had a rough understanding of vehicle emissions controls before starting this project. I'd learned about them in school (years ago) and desmogged a few vehicles in the past but those were all "don't need anything but what makes it run" operations and for this van I need it to be reliable, quiet, clean, and as simple to maintain and modify as possible. I spent lots and lots of time studying the systems and how they operate before modifying anything. I'm still not an expert but I haven't done anything I can't explain with real mechanical and scientific answers, not just "cuz I don't need it". That being said, here goes nothing...
.
The goal of a vehicle's emissions control system is to minimize the bad stuff coming out of it. Simple. It does this by trying to burn up everything that goes in the motor so nothing comes out. Not so simple. The motor takes in fuel (gasoline + ethanol + additives + accidental impurities like water, etc) and air (not just oxygen, air, made up of lots of gases like nitrogen, hydrogen, etc and dust). It combines these two ingredients, fuel and air, then compresses them, ignites them so they explode, and extracts mechanical energy from their chemistry. The left over fuel and air and the byproducts of their combustion get sent out the exhaust system. It's there that the emissions system does the bulk of its work. Because the heat of combustion within the engine and the duration of that combustion are both insufficient to completely burn all the fuel and oxygen plus their byproducts, a secondary combustion takes place in an attempt to burn everything in the exhaust gases of the engine. This is done with a catalyst.
.
A catalyst is a substance that increases the rate of a chemical reaction without itself undergoing any permanent chemical change. That last bit is a stretch because eventually the catalyst will be used up, burned out, etc. The catalyst is contained in the catalytic converter (CAT) which is in the exhaust pipe close to the engine so it gets nice and hot as fast as possible, so it's active as much of the time as it can be. This catalyst can only handle so much gas and air at once and it needs them in the correct proportions to work most effectively. That proportion just happens to be about 14 parts air to 1 part fuel. It's known as the stoichiometric ratio for gasoline and air where, when in that proportion, they are most able to completely react chemically, aka burn. This is not necessarily the most efficient ratio of air to fuel with regard to fuel mileage, just the ratio where they burn the "cleanest". To keep things as close to that "ideal" ratio as possible, math is required. To do the math, a computer and that computer is the Engine Control Module (ECM). So what inputs are used for this math?
.
The ECM sniffs the exaust with a sensor and calculates how much fuel to inject on the next cycle based on how much oxygen was left over from the last cycle. This sensor is an Oxygen Sensor, commonly known as an O2 Sensor. Because these sensors need to be hot to do their job, they either have to be heated by the exhaust system or by an electric heating element. The electric heating element kind are known as Heated Exhaust Gas Oxygen sensors (HEGO). Measuring exhaust oxygen and injecting the right amount of fuel based on that is known as running in "Closed Loop" as opposed to running based on a set of pre-programmed guesses as to how much fuel the engine needs based on temperature and load, aka "Open Loop". Most engines run in Open Loop when first started and until the engine reaches a normal operating temperature (measure with an Engine Coolant Temperature sensor, ECT) then go to Closed Loop until they cool off or need to make maximum power (throttle wide open aka WOT as measure with a Throttle Position Sensor (TPS) and/or low manifold vacuum indicating high load, meaured with a Manifold Absolute Pressure sensor (MAP)), then they use Open Loop when cold or Power Enrichment tables (those guesses based on load) to make sure there's plenty of fuel to get the job done.
.
Even running in closed loop and calculating fuel injection amounts and constantly adjusting them isn't going to get us a perfect fuel mix though. Why not? Old rigs like this van can't reliably burn all the fuel it takes to make them run. How can that be? Their ignition sytems, combustion chambers, etc are just not super efficient so they can only burn a percentage of that they take in. Here's a simplified explanation: If it requires a gallon of fuel injected to keep the engine running but it can only burn 80% of what's injected, you have to inject 1.25 gallons so that 80% you can actually burn = 1 gallon. Maybe confusing for you and definitely frustrating for me, the guy buying the extra quarter-gallon of gas. So we're injecting more gas than we can burn, and trying to keep the ratio of air-in:fuel-in at about 14:1 so we need more air. That "more air" can't be put inside the combustion chamber because that would require more fuel and we're already putting in more than we need and to balance the extra fuel would take even more air which would need even more fuel...vicious to say the least. So, how to get "more air" in without needing more gas? (than the .25 gallon we're already wasting)
.
Enter the Air Pump. It's a belt driven pump that takes clean air from the air filter housing, pressurizes it, and injects it into the head (after the combustion chamber) and into the exaust (before the catalyst) so there's plenty of air to burn up the extra gas and if there's a little too much air, that's okay, environmetally speaking. More air coming out the tailpipe is better than any gas but putting extra air through all the time might cool things off too much so we need a way to turn that air supply on and off.
.
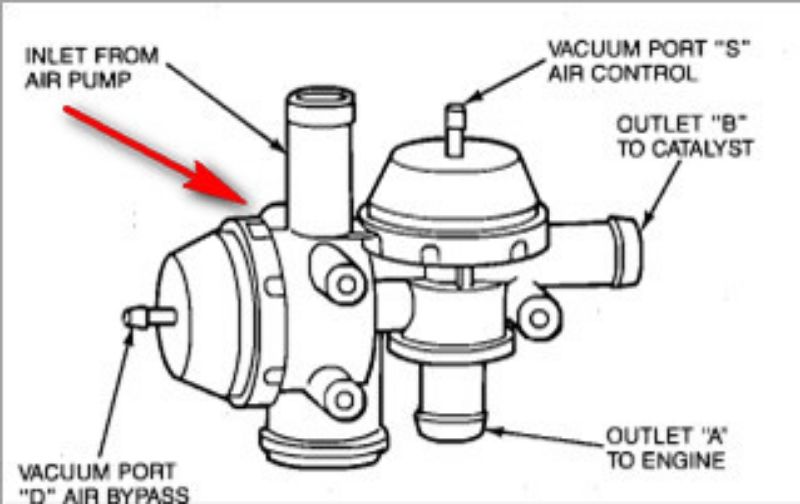
Enter the Air Control Valve (ACV). This valve, actually two valves working in tandem and mounted to one another, controls where the air from the Air Pump goes, to the head/exhaust or to a silencer. The ACV is mounted directly to the alternator bracket (called Generator Bracket in the picture). The ACV takes air from the pump (connection in diagram below labeled AIR PUMP) and sends it to either the AIR pipe in the head (labeled ENG) and the exhaust (labeled CAT) via two 3/4" output hoses or to a silencer (labeled SILENCER). Since we know we need this air sometimes but not others, and the ECM decides when and the ACV controls when...how does the ECM communicate with the ACV?
.
The ACV is operated by a pair of vacuum solenoids, the Thermactor Air Bypass Solenoid (TAB) and Thermactor Air Diverter Solenoid (TAD). The ACV (again, above the alternator, at the very top and front of the engine) is plumbed to the TAB and TAD on the driver's rear side of the cylinder head via vacuum hose and plastic pipe. The TAB and TAD are opened and closed (switched electrically) by the ECM. The TAB and TAD are fed vacuum from the Vacuum Resevoir on the passenger inner front fenderwell (VRESSER on diagrams) via vacuum hose and plastic pipe. So the ECM switches on the TAB and/or TAD which then open and send vacuum to the ACV. The ACV then sends the pumped air to the head and exhaust instead of the silencer. This happens because of the excess unburned gas on cold starts (rich mixture) and light load cruising (low load= less exhaust heat so less after-burning), etc.
.
So we have a catalytic converter burning up extra gas and dirty air, and a pump supplying extra clean air to do that, and an ECM that's reading a HEGO, MAP, TPS, ECT and controlling an ACV, what more could we need? Lots, according to the EPA anyway. They're also worried about the fumes coming from within the engine's crankcase. These fumes are water vapor and oil mist and dirty air leaking past the rings (blowby) all mixed together, looking for a way out. In the olden days they were just dumped to the atmosphere through a road draft tube or simple breathers in the valve covers. Nowadays the engine's natural vacuum is used to counteract its natural internal pressure through the Positive Crankcase Ventilation system (PCV). Fresh air is pulled from the air cleaner, through the engine crankcase, then those nasty fumes from the crankcase are sucked through a one-way valve (PCV valve) and into the engine's intake to get burned either in the combustion chamber or the exhaust catalyst. The EPA was so pleased with this use of the engine's vacuum to suck in bad stuff (whether it's good for the engine or not...) that they decided to use it to give exhaust gases a second chance at getting burned up too, through the Exhaust Gas recirculation system (EGR). It works similarly to PCV except EGR isn't active all the time, just when the computer opens an electric solenoid (EGR solenoid aka EVR) that sends vacuum through a tiny hose to a valve (EGR valve) that opens a big hole so lots of exhaust gas can get sucked into the engine. The EPA is also worried about the big gas tank we have and fumes that might come out of it when the gas inside evaporates. So they put a vacuum hose on the tank (all the way at the back of the van) and run it forward along the frame to just under the passenger seat, then hook it to a charcoal filter canister (labeled CAN on diagrams) and hook that to the engine so it suck the fumes up like PCV and EGR. This is called Evaporative Emissions control.
.
So that's the emissions system. What did I keep? What did I toss? Why and why? Next post.
 
Last edited:

Mwilliamshs

Explorer
So we know what parts make up the emissions control system and how they work together but based on that, why would anyone want to remove any of them? Let's see.
.
The ECM, TPS, MAP, ECT, HEGO, and a handful of other sensors (knock, CAT, etc) are staying. They kinda have to if I want to keep the engine fuel-injected vs carbureted and I do want to do that. Faster starts, better driveability, better economy (arguably), all good reasons to me.
.
The CAT is going away. It's old (rusty, untrusted), it doesn't flow air as well as new ones which hurts power and mileage (designs have improved in 25 years), it doesn't work as efficiently at cleaning the air as new ones (designs have improved in 25 years), it requires the AIR PUMP so if the pump fails - the converter fails or the pump must be replaced. A new converter will allow removal of the pump (simplification and less failure-prone), better air flow, better efficiency, and is better than no cat at all because it'll keep the exhaust clean both environmentally and it won't stink.
.
The AIR PUMP is going away. It's old (untrusted), it robs power (very little I think but >none), it adds weight (not a lot I think but >none), it takes up space under the hood, it hinders access for maintenance, and it's in the way of my planned 2nd alternator.
.
The ACV is going away. It's unnecessary if the CAT and AIR PUMP are gone. It's old (untrusted), it adds weight (not a lot I think but >none), it takes up space under the hood, it hinders access for maintenance, and it's in the way of my planned 2nd alternator.
.
The plumbing (vacuum hoses, plastic pipes, metal pipes and 3/4" hoses) for the ACV, CAT and ENG are going away. It's unnecessary if the CAT and AIR PUMP are gone. It's old (untrusted), it adds weight (not a lot I think but >none), it takes up space under the hood, it hinders access for maintenance, and it's in the way of my planned 2nd alternator.
.
The TAB and TAD are staying. They're unnecessary but I think removing them might trigger the Check Engine Light (CEL) and with their plumbing removed they take up very very little space, weight next to nothing, and even if removed would leave behind wiring connectors and a bracket. The bracket also holds the EGR solenoid.
.
The EGR is staying. It improves fuel economy. There is some debate about this online but my mind is made up. I can explain this at length (I'm sure you believe that part about length by now LOL) if you'd like. Just ask. I also think removing it might trigger the CEL. It may get modified with a manual control at some point (to allow more "on" time). Still researching.
.
The PCV is staying. It makes the engine, frame, and body cleaner. Not only are the oily crankcase fumes not being blown under the van but the slight vacuum inside the crankcase keeps seals from leaking as much as they might. Fabricating a replacement would also be quite a hassle unless a road draft tube from an older 300 or 240 Ford I6 could be found and fitted.
.
The evaporate emissions canister and lines are going away. It's unnecessary IMO. It's old (untrusted), it adds weight (not a lot I think but >none), it takes up space under the hood and along the frame where I might mount batteries, tanks, etc and it hinders access for maintenance.
.
So were these things removed willy-nilly? How can you do it too? Next post.
 
Last edited:

Mwilliamshs

Explorer
Starting at the back of van and moving forward:
.
Fuel tank:

.
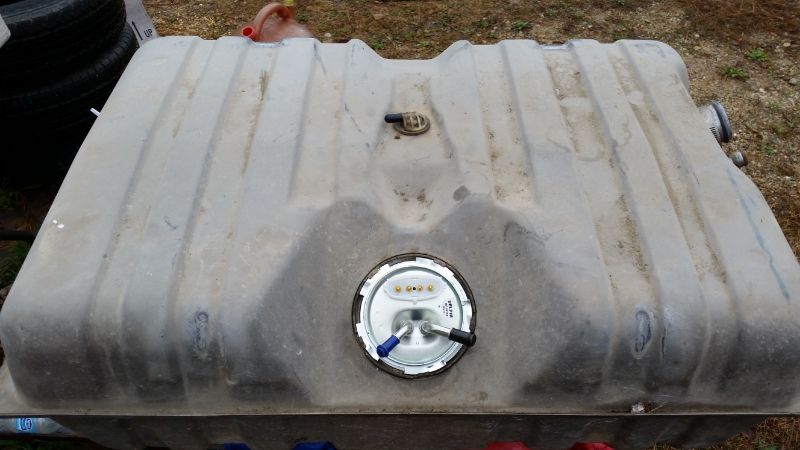
You can see the emission fitting on top (centered) with its new black rubber cap (pointed left). My 22 gallon tank was dropped to install that shiny new Delphi fuel pump and the emission fitting was capped at the same time.
.
IMAGE 1

.
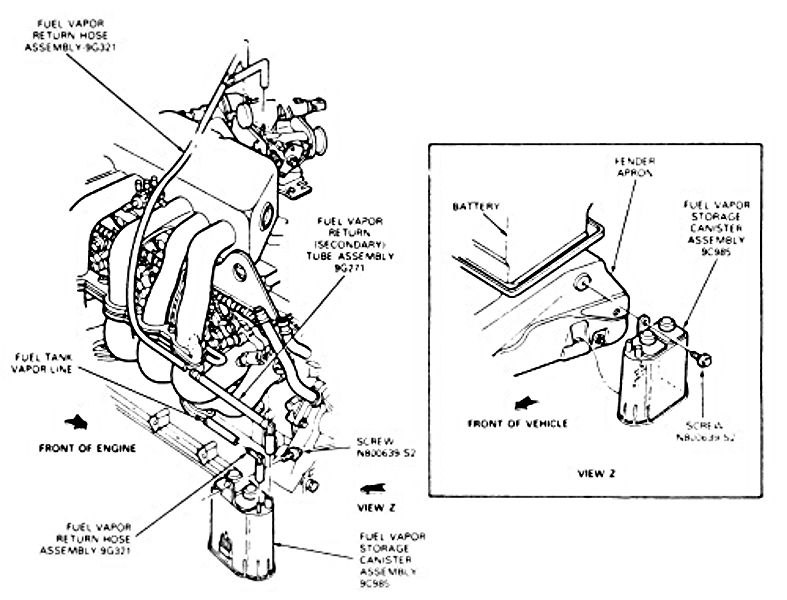
The picture above gives a look at the canister (FUEL VAPOR STORAGE CANISTER ASSEMBLY) and lines (FUEL TANK VAPOR LINE, FUEL VAPOR RETURN HOSE ASSEMBLY, FUEL VAPOR RETURN (SECONDARY) TUBE ASSEMBLY, and FUEL VAPOR RETURN HOSE ASSEMBLY) connections. All removed now.
.
IMAGE 2

.
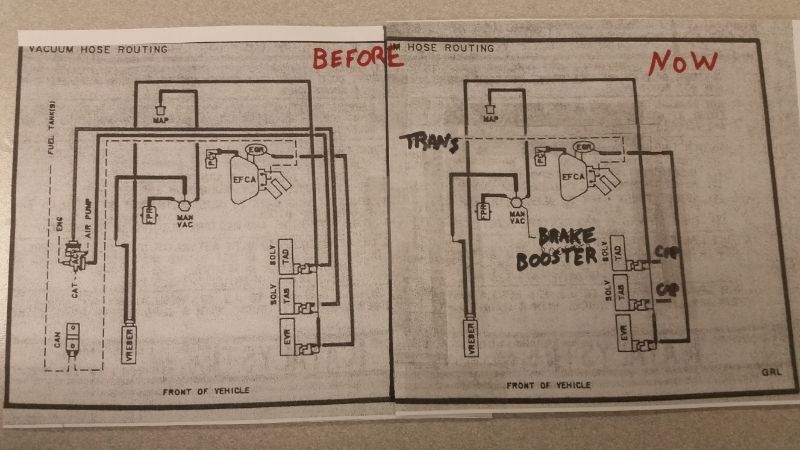
The diagram on left, labeled BEFORE shows the stock vacuum hose routing. On the left side of the diagram you can see (starting at top) FUEL TANK(S) then CAN then EFCA all connected by a dashed line. That line and the CAN are gone, as seen in the diagram at right labeled NOW.
.
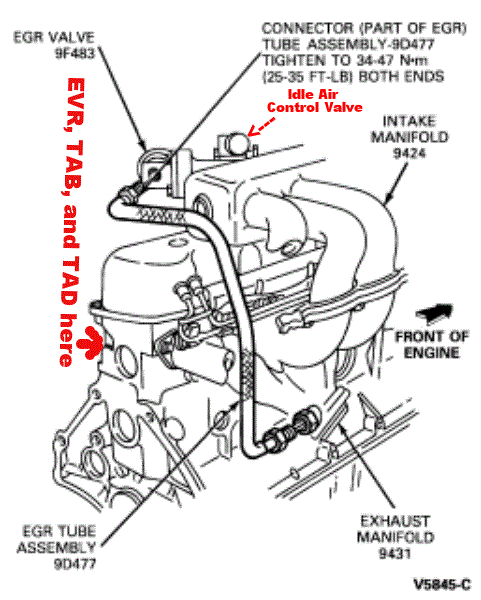
The EGR is, as stated, staying. Here it is:
IMAGE 3

.
The EVR, TAD and TAB solenoids are also staying and are located (as indicated) out of sight on the far side of the block in the picture above.
.
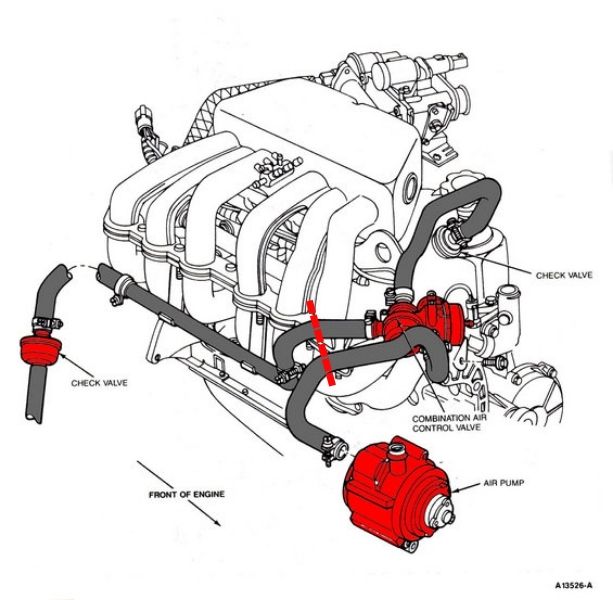
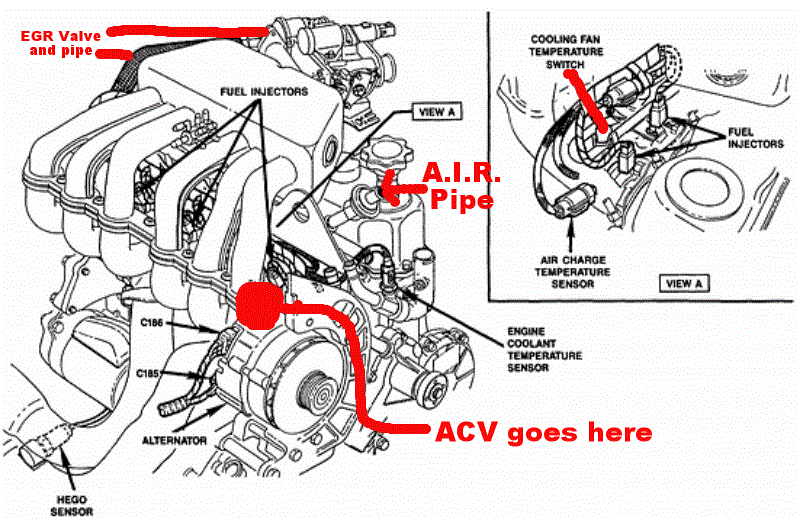
The AIR PUMP is going away eventually, but staying for now to keep the CAT alive until it's replacement arrives. Since the cylinder head A.I.R. pipe (replaced by pipe plugs) is gone and the catalytic coverter pipe is staying for now, I removed the ACV (bolted to the alternator bracket, or Generator Bracket as it's called in the picture below) and capped the TAB and TAD's vacuum outputs with little vacuum caps from the parts store (cuz I think removing them entirely might cause a CEL and would leave behind wiring, plus they take up very little space, weigh nil, and IDGAF). I connected the "AIR PUMP" output directly to the "CAT" catalytic converter input with a 3/4" nylon hose splice from Lowe's (the pump doesn't push hot air so nylon should be fine here). The splice replaced the catalytic coverter's side of the ACV and the other side (for the head) was eliminated entirely with no need for a substitute. When its output was open for testing the pump was LOUD. Like as soon as you start the engine you think it's blowing up till you find the noise is coming from a 3/4" rubber hose. LOUD. Must be what that silencer is for, huh? So now the pump sucks in filtered air like it always did and pumps it out into the catalytic converter constantly (no more solenoid turning it on and off). Might be more air than the catalytic converter needs but it sure shouldn't clog up anytime soon and it should all come out real easy when the time comes and the exhaust is no louder at all, maybe quieter, IDK. The extra air is, as has always been the case, pumped in downstream of the O2 sensor so no worries of the engine's air:fuel mix being thrown off or the open-loop idle or warm-up cycles being extended. The PUMP's output hose was shortened a bit and the hoses were connected as indicated by the red dashed line across the hoses below. .
IMAGE 4

.
Below is the ACV.
.
IMAGE 5

.
The picture below shows the location of the ACV and the AIR pipe for the ENG connection.
IMAGE 6

.
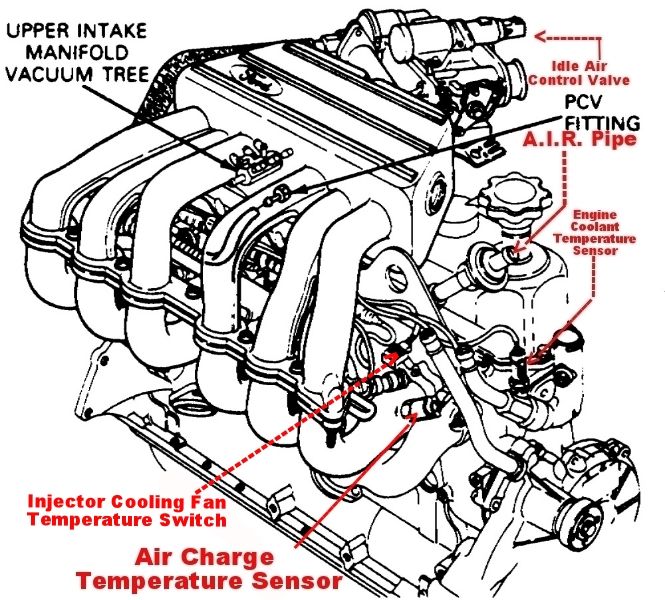
The other job of the PUMP was originally to send air to the exhaust ports of the head through the AIR pipe. Seen below just to the left of the oil filler cap. This pipe has been removed. The remaining holes in the head have been plugged by steel pipe plugs, locked and sealed in place with Red Loctite.
.
IMAGE 7

.
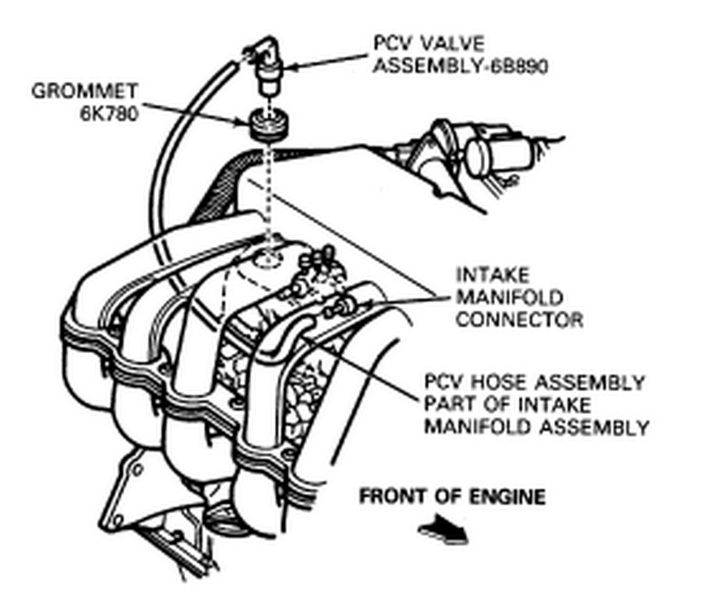
The picture above also shows the PCV inlet on the intake manifold and the hose connecting it to the valve cover at the rear. Unlabeled, but visible, is the round breather cap of the valve cover just to the left of the oil filler cap and above the AIR pipe. This gets connected to the air filter housing with a rubber hose to let fresh air into the crankcase as the PCV sucks out the bad. The breather cap can also be see in the picture labeled 4.9L Secondary Air. (IMAGE 4) Below is another look at the PCV system, showing the grommet that goes in the valve cover, the PCV valve that gets insterted into it, and the rubber hose that runs under the upper half of the intake manifold, connecting the valve to the INTAKE MANIFOLD CONNECTOR.
.
IMAGE 8

.
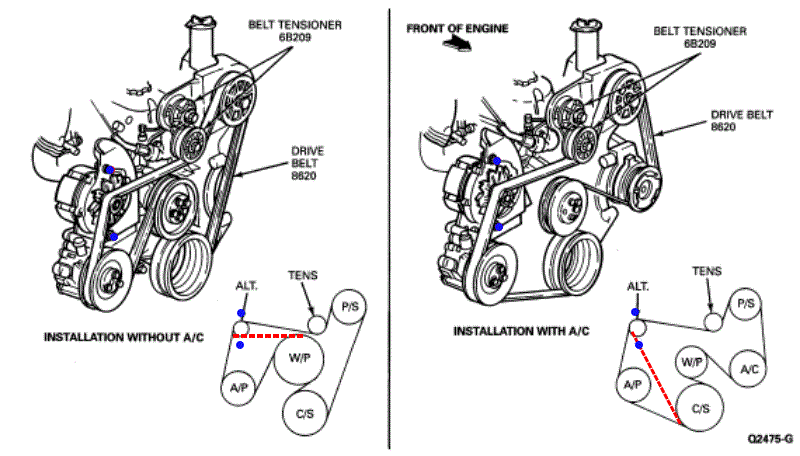
The eventual removal of the AIR PUMP isn't entirely without a concern: the routing of the serpentine belt.
As seen below in the right-hand diagram, vehicles with A/C but no A/P (AIR PUMP) adopt a belt path (red dashed line) that aligns with the lower mounting bolt of the alternator. I haven't examined this closely but I've read several accounts of belt-bolt interference following pump removal. (Bolt heads in blue)
IMAGE 9

.
The belt path concerns aren't major. Either a different bolt arrangement should suffice or, and this is my hope, an auxiliary alternator will take the pump's place thus significantly altering the belt path to assimilate the original.
 
Last edited:

Mwilliamshs

Explorer
Not really emissions related, but definitely pertinent to goal #1 "Simplify things under the hood...", I've also removed another pile of stuff from the van. The Ford 4.9L is rather unique among modern (relatively speaking) engines in that does not have a cross-flow head, meaning both its intake and exhaust manifolds are on the same side (air doesn't flow across the head, get it?). This is known as a u-flow head by some because air makes a u-turn in the head. Anyway...
.
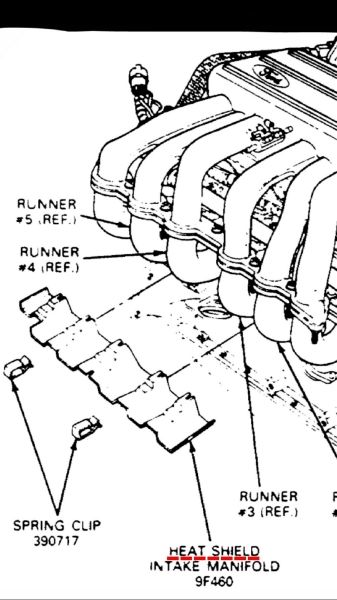
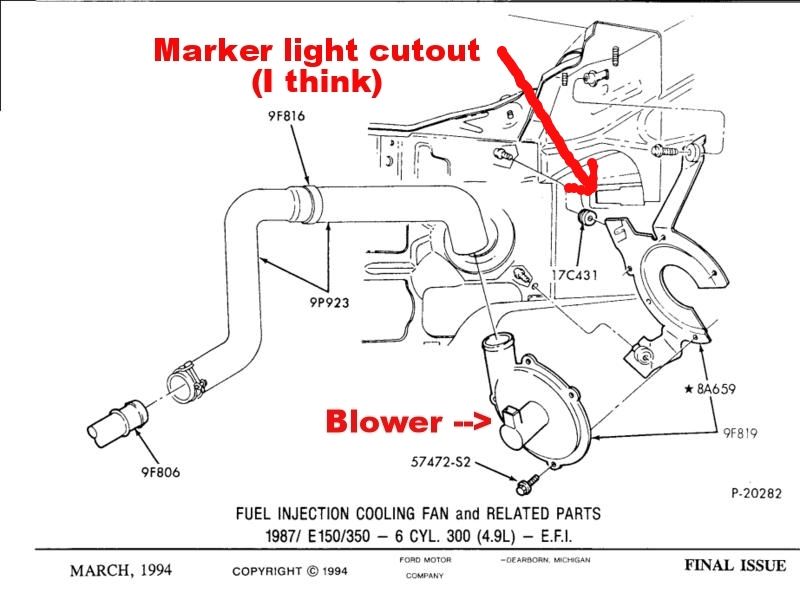
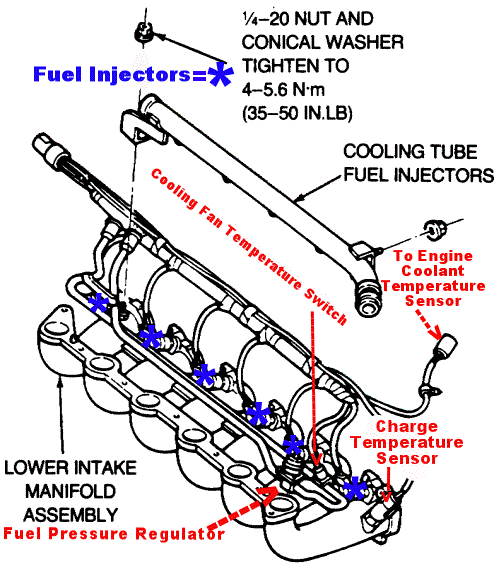
Putting the exhaust manifold just below the intake made things easy to package, especially back when heat from the exhaust was used to improve fuel atomization inside the intake manifold. With the advent of fuel injection that heat was no longer a benefit and is in fact, now a detriment. The fuel rail and injectors get hot, like real hot, and can cause vapor lock. If you don't know what vapor lock is, Google it. Just kidding. It's when the gas in the lines boils and the engine doesn't start. Most of the problems with vapor locking of the 4.9L (and other cars too) occured after the vehicle was parked hot and turned off. The fuel stops flowing, the air flowing over the engine (from moving down the road and the radiator cooling fan) stops, but the heat from the exhaust manifolds keeps radiating, soaking the engine compartment in heat and causing vapor lock. Ford did a few things to combat this, starting in 1987, same year they put on EFI. First, they raised the fuel rail pressure on the 4.9L to 55-60 psi vs 30-45 for practically all their other engines. The higher pressure raised the boiling point of the fuel but didn't completely solve the vapor lock issue. Next they added a pipe with downward facing nozzles above the injectors. This pipe is closed on the back-end and its front-end is connected to an electric blower via rubber hose. This blower is turned on by a temperature switch when the engine is turned off and runs until things cool down. This didn't completely solve the issue and sometime around 1989 a heat shield was added between the intake and exhaust manifolds. I can't say for certain what the results of all this were as I've yet to drive my van in hot weather or experience any vapor lock issues. I can say that after 1992 4.9Ls didn't have injector cooling fans anymore but the heat shields continued. There are some internet rumors and local anecdotes that report the injector cooling fans A) don't do much to improve the problem, some people say they've had problems anyway and B) aren't needed, some people say they've had the blower and never had problems and C) are prone to failure and even fire. Considering it's not widely held as a viable solution, not widely held as necessary, and fairly likely to fail (25 years old now anyway), I've removed the blower, pipe, and hoses but kept the heat shield, just as newer vehicles did. They're shown in the pictures below along with the switch that activates the fan, clipped to the fuel rail.
.

.

.

.

.
I can always reinstall the blower, pipe and hoses if need be but what I'd more likely do would be to use the existing switch and wiring to power a different, more modern and reliable blower. Time will tell.
 
Last edited:

Mwilliamshs

Explorer
Fuel pump replacement

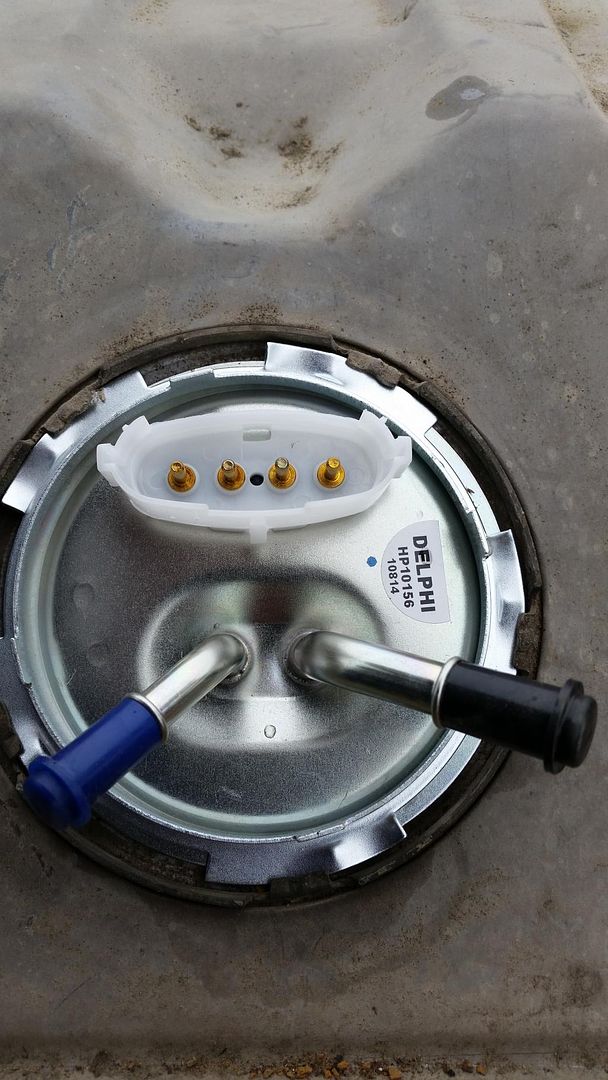
Replaced the in-tank fuel pump on the van. It had failed to start and had very very little fuel pressure at the schrader valve on the rail buty the pump on the frame rail could be heard running. Listening closely to the filler neck with the gas cap removed while the key was turned from off to on, I didn't hear a thing. There's your troubleshooting/diagnosis. This Delphi replacement was ~$60 @ RockAuto. Replacing just the pump motor itself is possible but I went with a whole new hanger assembly due to how crusty the old one looks. Surprisingly, the tank itself is spotless inside. I've been lead to believe the old hanger assembly was installed as a used part by the PO. The new hanger assembly includes everything: strainer, pump, fuel guage sending unit, lock ring, lock ring gasket, and quick-disconnect tabs. Tank's a 22 gallon model that fits behind the rear axle. Filler is 2" and vent is 3/4". Fired right up on reassembly. Happy.
.

.

.
 
Last edited:

Forum statistics

Threads
185,891
Messages
2,879,262
Members
225,450
Latest member
Rinzlerz
Top