Mstudt's 01 Toyota 4runner SR5

MStudt

Adventurer
We've been lurking around for awhile, but never had a reason to start a thread until now. Our hopes are to build our new (used) 01 4runner into something that is more camper and forest road friendly then our old vehicle.

As it sits now.


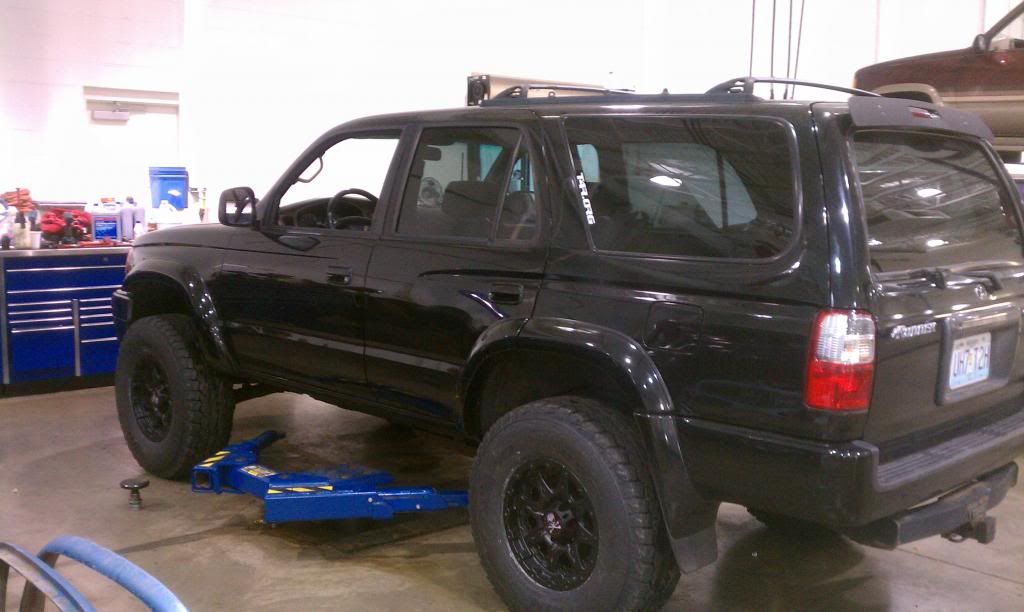
The 4runner needs some work from the get go. For starters it needs new exhaust since the tail pipe rusted off at the muffler. The brakes are pretty well toast, along with the stock suspension. The radio does not work since the antenna seems to have been ripped off, cd portion cuts out, and we don't own any cassettes. It through a couple codes on the way as well, P0440 & P0442. The 4runner is an 01 with close to 115k on it; we're the second owner.

Here are some of the ideas we have and parts we're after.

Exhaust- MagnaFlow 11255
Fix codes (P0440 & P0442)
Radio (Pioneer DEH-X3500UI)
Speakers (Rockford Fosgate Punch P165-S for the front and P152-S for the rear)
Antenna
Brakes/rotors
Bug guard
Window guards
Suspension (leaning towards TRD Tundra)
Front/rear bumpers
Rocker guards
Winch
Air compressor
Rotopax
Wheels

There is a lot more to the list then that, but it's a starting point. First things first, exhaust and codes. Any help will be greatly appreciated.
 
Last edited:

AxleIke

Adventurer
Nice looking Jeep and 4Runner.

Looks like a good list of things to do. Looking forward to the progress pictures!
 

MStudt

Adventurer
First things first, band clamps absolutely suck! Now I know, save time and weld it the first time. All in all things went pretty smooth with the install. I still have some tweaking that I'd like to do. I was thinking about ditching the tail pipe and just dumping it. Any of you have experience with this, is it something you're glad you did?

On to the install:
I started by cutting the inlet fitting off the muffler since the outlet had already fallen off.


Cleaned up


Welded up


Had some extra day light left, so I decided to go ahead and remove the running boards. Looks a lot better without them!


MStudt

Adventurer
The muffler sounds great at idle, but only sounds good while driving. Granted, I only drove it around my road for about 3 minutes. It's a little louder then I'd like when getting up to speed. Once I'm at speed just cruising along it does sound pretty good. I has a nice deep tone it, and even when getting up to speed it doesn't sound bad. Another thing, I was driving with all the windows down and the radio was not on either.

Lets move onto the next issue, and I need some help with this. I'm getting codes P0440 and P0442, along with the VSC OFF and VSC TRAC lights on the dash. My code reader is saying the both are Auxiliary Emission Control problems. The only thing I've done so far is replace the gas cap. Any help would be great.
Thanks
 

fireball

Explorer
Pretty sure one of those is emission or o2 sensor fault codes. Might want to do some research over at Toyota-4runner.org
 

MStudt

Adventurer
Pretty sure one of those is emission or o2 sensor fault codes. Might want to do some research over at Toyota-4runner.org

I'm already on there looking as well. I've replaced the gas and erased the codes, now we'll wait to see if they come back on. If they come back on then I'll plan on replacing the O2 sensor near the converter and see if that take care of it. I've been reading up on this and there seems to be about 4 things it can be. I'll go one by one and see which one it is, and hopefully it's the cheapest one, the gas cap.
 

MStudt

Adventurer
I recently installed a new CD player. Let me know if you'd like to see some picture and a write-up about it. I'm not doing one at this point since there seems to be some already floating around out there. Instead I've decided to do a write-up about installing a new antenna since the factory one was non-working.

The broken antenna, I removed the nut with a pair of snap ring pliers


Once the nut was off I'll pulled this out


Then remove the tire


Next, pull the inner fender away and look for the nut holding the antenna on, it's a 10mm nut
RL]

Next I pulled the antenna assembly out, disconnected it, and cut the wire going in to the head unit


From there I positioned the inner fender portion of of the antenna, and connected the adjustable to bracket


Then this


This is the opening where the stock antenna wire came out, I pulled the cut into the cab


After pulling into the cab I removed the grommet to slide over the new wire


I had to remove a couple trim panels in order to access the opening for wire


Then I pulled the antenna wire in the cab,and tucked it under the carpet, the orange is the old wire


After all of this, you just need to connect the new wire to your head unit. I removed the old antenna wire, just so I had no unused wires in the cab. Hopefully this help someone out. Also, I got this antenna from O'Reilly's for $13.99 (CK-US07R). Really no need to do the Tacoma whip when any universal antenna will work.
 
Last edited:

MStudt

Adventurer
Some more progress. We plan on buying our suspension within the next week, so the sleeping platform is keeping me busy until then.

Started by removing the backing on the seats.


Seat backs are out, and so are the cushions (just no picture).


We took the rear seat completely out since this is going to be a dedicated camping car. We also doubt there will ever be a passenger riding along with us, and if by chance there we'll figure that part out.

Two pieces of wood the same size, one for each side.


We started by using the cargo mat as a template for the wheel well opens.


Four side were cut to the same length and pocket drilled with a Kreg Jig.


Both bottoms cut and fitting the sides to them, as well as the back.


Both compartment in place. I plan on building a small box in between the two halves.


The overall height of the platform is going to be roughly 5-3/4" with 4-1/4" drawers. With the drawer roughly being 16" wide and 40" deep. The trick is going to find drawer slide long enough to support drawers that long. Hopefully I get some more done this week.
 

MStudt

Adventurer
I have no pictures of this, but I added an extra 1/2" of sheathing to the bottom of my drawers. With as long as they are, they sat on the lip just behind where the back seats were. Without the extra 1/2" there was a nice gap under the drawers and the carpet. After adding the extra sheathing, it pretty much leveled out the back end.

Fitting the drawer slides, both sides were the same so I'll just show one of them.


First drawer is done, both are the same as well.


First drawer in place.


First drawer opened.


Drivers side in place.


Both in place, and open they open just about the right distance.


Tomorrow I'm hoping to install two PVC tubes between the drawers and work on the section where the back seats were. At this point I have spend $0 on the entire platform. Hoping to complete the entire at no cost to me, with the exception of carpeting for the top.
 

MStudt

Adventurer
Been at it for a couple hours now, and here is the progress so far. Still a lot more to come today though.

Got the PVC for my storage tubes cut. Spacer blocks cut and drilled to hold the tube. Used 2" sch40, and drilled out holes at 2-3/8".


All framed in.


In the the 4runner.
L]

This tube is going to hold the awning and frame that we're going to make for the back of the 4runner. Should be just about the right size to hold the material and old tent poles we're using I could have been about 10" longer, but I would have needed to spend money on that.
 

MStudt

Adventurer
The next section is finished and in place. Now I'm ready to start the last section behind the front seats. The section I just did is cut to fit snugly against the drawer boxes in the rear. This box is most likely going to store our trekking poles or some other longer items.

The finished box.


Test fit.


Test fit, with the next bottom section in place.
 

MStudt

Adventurer
The final section is almost done. I decided to go with driver and passenger side boxes on this one. Both of these will most likely be hinged, but still not 100% sure. I'll skid the box building part since this is starting to get picture heavy.

The finished box. Two boxes, but only one platform.


Section in place.


I was really hoping to get 72" out of the platform but oh well. I'll have to make a removable piece to cover the last few inches.


I want to make a support section that goes under the lip on the box. It'll add support between the box and the floor behind the front seats. If anyone needs measurements or more information on what I've done feel free to ask.
 

MStudt

Adventurer
So I made the main support going across the front of the box, and two small pieces for the sides. I need to do some leveling and shimming on the front. Everything seems to be pretty close from front to back, but I'm going to give it a once over to double check.

Made a template from some old cardboard I had.


Copied the template, started cutting, and ended up with this.


Did the same thing for the sides.


Of course I still need to make lids and tops for everything. Once that is done I'll be carpeting everything to match the original carpeting that inside.
 

Forum statistics

Threads
185,841
Messages
2,878,757
Members
225,393
Latest member
jgrillz94
Top