Los Angeles -Class Attack Sub(urban), Build / Collected Werks topic - '02 k1500 Z71

Overlandtowater

Well-known member
A suburban 2500 already has a tank over the spare tire area in addition to the regular tank. Why not copy/source that?
It's only 8 gallons. But I do plan on the 2500 aux tank, but for some people 8 gallons is not worth the time. I'm really liking the idea of a mid 90s f150 rear tank.
 

rayra

Expedition Leader
Thunderbirds are GO!

Got my winch-re-spooled under load with the help of my neighbor. Got a lot of inquisitive looks and a couple questions from the general public as we did this in the parking lot of a large local park. Which was busy with people not wearing masks :winking:

The 100' fits a lot better when taut, although the spring loaded tensioner lost a loop at the very ends of the drum. Another wrap's clearance before the drum is full. In practice it means a pull under a heavy load may pile up and bump the control box loose on top of the tensioner setup, but the control box mounting brackets are designed to accommodate that.

So overall a success. Four years in the planning and doing. Have been on this path since I first ran the heavy power cabling to the rear of the vehicle, over 3 years ago.

For bonus points I did the winching from the rear hitch. For an instant I thought I'd botched something in the control/power re-cabling. No workee. But then I remembered I had to turn the rotary cutoff switch in the vehicle to make the bumper plug hot.

I still need to have the front hitch modified. The receiver tube needs to be extended 4". Can't seem to find a drop-in extension shorter than 7-8". I might buy a 7" and cut and prep everything to be welded back together. Bevels, paint stripping, another pair of large holes top and bottom for additional welding access. Get it solidly welded.


pics before re-spooling.

winch198 ready.jpg
winch199 front hitch mod.jpg
 
Last edited:

rayra

Expedition Leader
I'm thinking I still have an AC system leak. And either way, I probably have to evacuate the whole thing and re-fill it.
Bought the fancy manifold gauge set, took some good working measurements. And was on the lower range of the desirable low-pressure reading at ~28psi. High side was 148psi. Prior big charge on the opened system was brought up to ~40 on the low side on the can's gauge.
I bought another 12oz can of just 134a and will be pushing it back up to ~40+ on the good gauges. Take a good measurement and drive / use it a few times and re-gauge.

And in the meantime I'll be pulling the cabin air filters in the passenger footwell and try to get some UV light on the evaporator / mini-radiator up in the dash, looking for dye.

Meantime I'm looking for tips and tricks to shortcut the proper factory replacement procedure, which is essentially remove the entire dash and split open the vent/AC system to get to the evaporator.

This guy has the hack / heart surgeon method, just cut right thru everything in the way. I'm willing to do this and with things like my oscillating cutting tool, etc


Ain't no damned way I want to move to Vegas in peak summer in a black SUV without a fully operational air conditioner.


eta about 16mins into that vid he has the box partially opened, you can see the base of the evaporator and he was using a dremel with a cutoff wheel and switches off to an oscillating tool. I'm thinking a neater cut, closer to the formed edges / corner bends of the box and getting the ductwork plastic off in once piece. Afterward I can put it back and slather the joint in RTV/silicone and overlap the joint with metal HVAC ductwork tape, that stuff sticks to anything and doesn't rot / fall apart.

eta2 watching a couple others, the above way works fine, I see a couple ways to improve on his process mostly in cutting a wider access hole. Will put in some closed-cell foam to line the four sides of the evaporator to help position and cushion it as the factory interior bracket is getting severed to do the above method.

$46. https://www.rockauto.com/en/moreinfo.php?pk=9798060&cc=1380327&jsn=2302&jsn=2302&jsn=2302
 
Last edited:

rayra

Expedition Leader
That hack though....☹
Yeah it was extra hacky. I'd hope to do a cleaner job of it. And properly re-brace the bottom of the glove compartment. The glove box hinge does cover everything, but still. And I drive too many dirt and washboarded roads to have stuff loose / cut that evaporator bracket with no consequence.
But I've got no qualms about cutting the whole side of that box off to get the evap out. And I have all the cutting tools and experience to make it easy.
But first I'm pulling my cabin filter open and sticking my UV flashlight in there to look around. And topping my AC to to some fancy-gauge-measured values and see if it leaks down.


Just went ahead and ordered my Powerstop Z23 rear rotors and ceramic pads. Still have rear bearings and gear oil change and hood and door paint to fix, as well as the AC, before our August deadline.
 

Overlandtowater

Well-known member
Yeah it would be nice if it was just a bad O-ring somewhere out side the cabin. The UV dye makes quick work of finding any leaks though.
 

rayra

Expedition Leader
Couple days of screwing around with the AC and it seems to be working great right now. But we shall see.
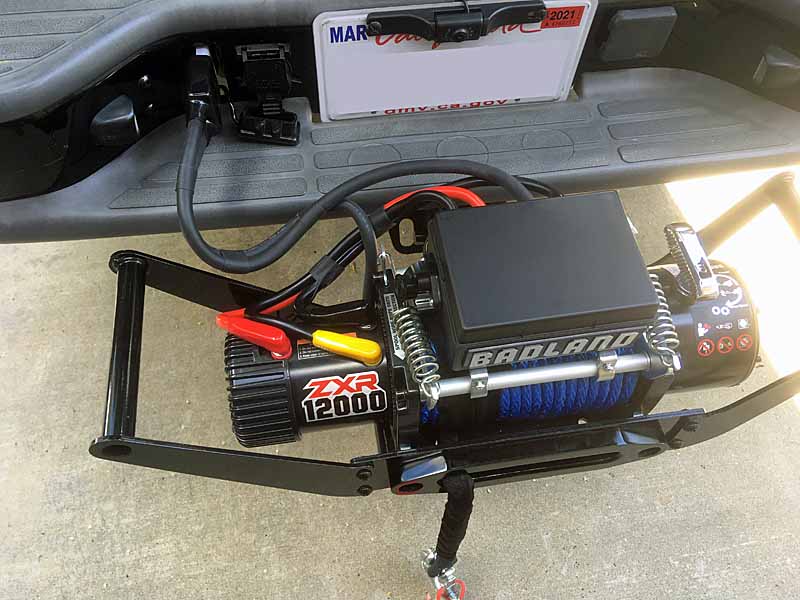
Looked everywhere I could spy and found no more leak sign in the exposed plumbing. Found some refs that a Sub with rear AC takes 3# of R134a, that's 48oz.
System was very low pressure and barely working before I put in the 12oz can of esters, dye and 10.5oz of R134. Obviously some of that leaked out. found sign on the low pressure hose connecting the receiver/drier to the compressor and some spatter on the undercarriage and some that was my fumbling the charging of the dye. Hose -

And this is where I failed to take proper advantage. I breached the system to replace the hose. I didn't vac it down, leak check it before charging, nor seize the opportunity to put a new drier, orifice tube on - cheap but essential parts and no better time to swap them out than while the system is breached.
After re-assembly I put a 22oz can of r134a+ester/seal conditioner in the system. Blew cool. Worried about the 'air' in the loop. Then found the 'takes 48oz'. Drove it for a few trips and some driveway time at elevated idle and performance (or lack of it) stayed the same.
So today I put another 12oz can in today and drove it around some. Much better.
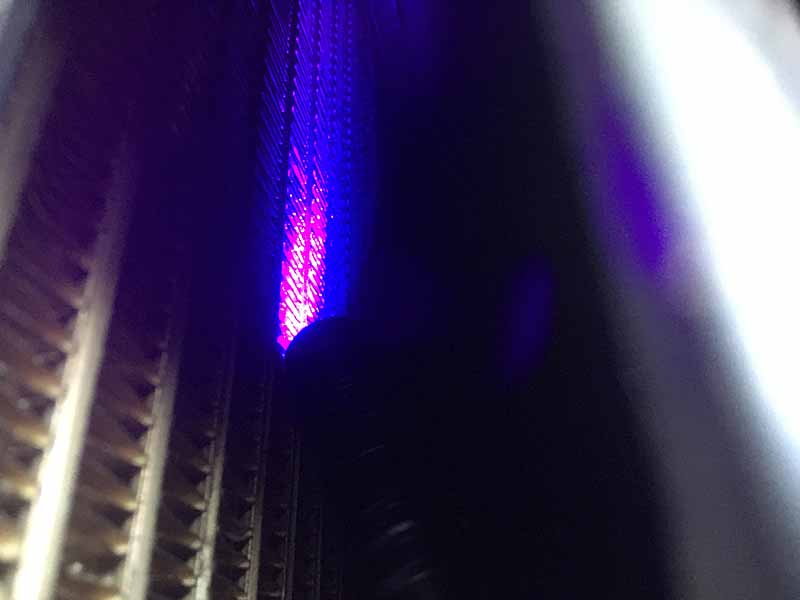
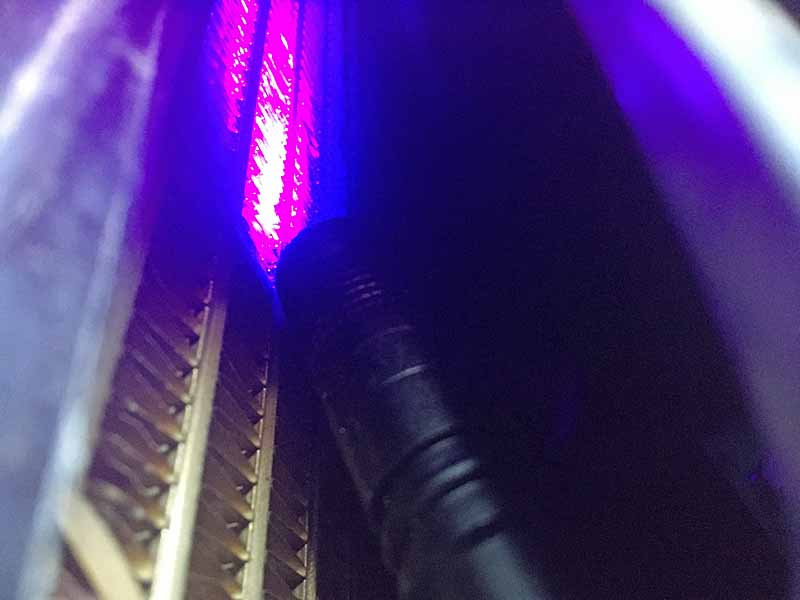
Pulled the dash ductwork cover off and opened the cabin air filter access cover off - another missed opportunity, filter set is $6-13 on rockauto, $27 at Autozone. I changed them last when I first bought the vehicle, 5yrs+ ago. They were pretty dirty. I shop-vacced what I could.
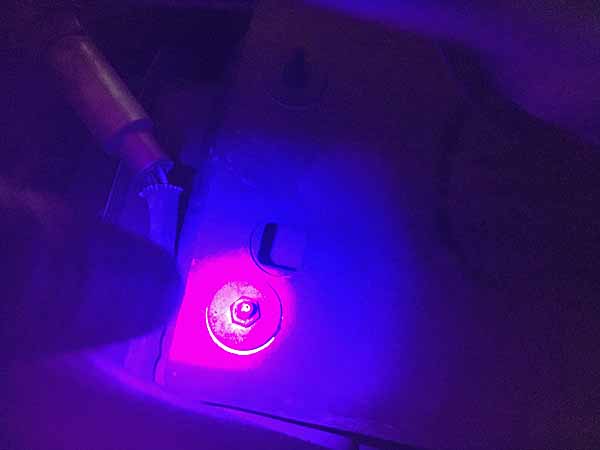
With the filters out I could jam my UV penlight up in the slot and view the upwind face of the evaporator (heat exchanger) and I found a little dye. The stuff is persistent. Might be my shot, might be an earlier one, vehicle was 13yrs old with 116k mi when I bought it.

ACLeak10 evap.jpg
ACLeak11 evap.jpg


And judging from the shape of the surrounding duct and its downslope to the firewall I think I figured out where the condensate drain penetration was. but it's obscured by a heatshield / plastic cover. But I found dye sign there, too. But not much and none has hit my driveway. So a small seep. Optimistically, the leak sealer might have done its job before much passed.

ACLeak12 condensate.jpg


So I'm right about $200 into this (so far). $100 for the shipped AC Delco hose. $50 for R134a etc. About $50 for a nice manifold gauge set that is a very good diagnostic tool. My system functions, all the electrical, solenoid, compressor clutch etc are good. I MIGHT still have an evaporator leak.
If the system loses its cool again, I presume the evaporator is leaking and I hack a hole in the duckwork to replace it. While doing so I replace the drier and orifice too. And upon reassembly I properly vac it down and verify no leaks before a re-fill. And I'll STILL be $250-1500 ahead of what my local AC shops want.
 

rayra

Expedition Leader
Still some leakage somewhere. What was cold two days ago is cool today. Will take some system pressure readings in the morning, after it's all at rest and equalized. Probed some more with the UV light this evening and the rear evap drain is fine, no sign of dye. Still no dye spillage on the ground or worsening of the front evap drain area. The drain on the firewall right under and behind the receiver / accumulator can. Can't get an eyeball directly on it. Some light dye spray on the water pump hoses, some luminescence on the radiator fan that might be the plastic rather than dye. Some speckling on the rear face of the engine radiator. Some trace on the AC condenser from the front but very little. So late tomorrow or Monday I'll open up the nose of the vehicle and unbolt the condenser so I can really shine some light in there looking for dye sign.

The good news is the parts are inexpensive. New condenser is $60-70. new front evap is $43. Orifice tube $3. Accumulators $14-30. New insulator blanket for Accum, $12. Even a full-blown compressor replacement is just $160.
So I find more dye sign on the condenser - or don't, there's enough on the evap to warrant pulling it - I'll try to get an AC shop to properly evacuate the system, as long as their price isn't rapey. Then I'll get some parts and do the surgery on the dash. The accumulator and orifice are so cheap they should be replaced while the system is breached.
Bought a cheap vacuum pump that will work with 134a fittings, too. So once I replace parts I can draw a proper system vacuum and validate there's no more leak, before putting 3# / 4 cans of r134a back in it.
 

rayra

Expedition Leader
The new rear brakes are here! The new rear brakes are here!

Powerstop Z23, drilled and grooved / slotted with ceramic pads. They'll now match the Z23 GMT900 front disk set I put on a couple years ago. My rears just got new pads when I first bought the vehicle, the rear rotors are pretty worn. Kept putting it off. But with some trailering in the offing later in the year, finishing the rest of the drivetrain and brake work got put to the top of the list.

Did some masking and put some 1200F bbq paint satin black on the hubs. Will install things some time in the next few days. Last 10 days of school semester / graduation, will find the time after my Finals are done.

rearbrakes001.jpg


Last work I need to do very soon is rear wheel bearings and seals, rear diff oil. And I have to get the hood and doors repainted. Runnign out of time to do that, has to be done by Aug1.
 

rayra

Expedition Leader
Rear brakes are in and basic break-in done. Definitely need new rear seals (and bearings), with the rear disk/drum rotor off, lot of fuzzy grease built up around the axle shaft

rearbrakes002.jpg


Next up is UV light test on the back side of the AC Condenser tomorrow evening.
 

rayra

Expedition Leader
Nothing major or sechsy to report. Work continues to perform drivetrain improvements and maintenance ahead of our move out of CA. will be making several trailer runs, and possible some camper trailering, in the last third of the year. Have my new rear axle bearings, seals, in the mail, will be doing that and rear diff oil change next week. Today I bought a fresh Grp78 for the Starter / vehicle batt in the Sub, bumped the former to my Aux, and my former Aux to my old pickup. Averaging about 18mos between battery purchases, keeping things 'fresh' as we head into the hot months.
Couple days getting a pair of 'E' rated Geolandars for the rear axle, need new tires there anyway and upping the rating with the trailering in mind.

AC repairs are holding and just bumped up the R134a about half a can. Blowing real cold all the time now. Gonna need that in Vegas.

next 'project' project is getting a 4'x8' sheet of 3/8" or 1/2" HDPE in black as the final version of my roof rack deck. Hopefully by July 4 weekend. My MkIII one-piece plywood design is doing what I want in terms of fit and function. So time to execute it once more in a better, more weather-resistant product.
 

Forum statistics

Threads
185,798
Messages
2,878,286
Members
225,352
Latest member
ritabooke
Top