Kitchen Kit/Chuck Box

Every Miles A Memory

Expedition Leader
Pretty awesome idea really and no need to design or spend gobs of money on exotic pieces. I love when you can make use of a product already on the market but not really thought about in a different way
 

Herbie

Rendezvous Conspirator
Herbie's Kitchen Kit v2.2

So I really LOVE to cook when camping. Probably 75% of my gear load for every trip is either cooking gear or actual food. I just finished the latest revision of my kitchen kit/chuck box and I thought I'd share.

I'm calling this version 2.2, the most recent changes were small, but I've gone through a couple of major iterations of different gear and how it was stored. I started with a lot of pieces packed into a half-height Rubbermaid tub, and have progressed to this. I've taken some advantage of nesting gear of various types, but I have also tried to keep the nesting to no more than "3 orders". In other words, I don't want to have to move more than 2 things to get to any one piece of gear. (Being able to just grab what I need would be "first order retrievability", a concept I learned from Adam Savage).

So first, here's all the gear I'm currently keeping in my kit for the family of three (myself, wife, daughter):
IMG_20130915_153808.jpg
This kit includes (starting loosely from top, working down):
  • Large HDPE Cutting board
  • 3 Stanley nesting mugs & handled bowls
  • 2 GSI stemless wine goblets (nest into stanley mugs)
  • Collapsing snack bowl
  • Steel Cocoa mix tin, used for ground coffee storage
  • Collapsing camp sink
  • Scrub brush
  • Silicon plate/bowl scraper
  • Bottle of dish soap
  • 4 sham-wow towels of various sizes
  • 3 enameled steel plates
  • Folding handle anodized skillet
  • Plastic tub of condiment packets
  • Salt shaker, pepper grinder
  • Squeeze bottle of vegetable oil
  • GSI Bugaboo Base Camper (medium) (2 pots w/ lids, one fry pan, one small plate/cutting board, one handle)
  • GSI Haulite Ketalist (Kettle & nested bowl kit)
  • GSI Collapsing Drip-coffee system
  • 4 place, 4-piece flatware set

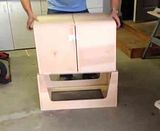
These items all nest and store in the case pictured on the left. It's a mid-sized cable equipment case I picked up surplus for $20.
IMG_20130915_154752.jpg
On version 2.0, I moved to this case and crudely removed some of the interior foam dividers to fit the various pieces I was using. This has worked so well that only minor changes have been needed since.
IMG_20130915_153901.jpg

The GSI nesting cookware was a love/hate thing for me in my earlier kits. Everything nested in a very compact way, but if I needed say one of the small bowls from the ketalist set, I had to dig down through the layers of nested lids and pans to get to the kettle, then dig again to get the bowl out. Moving to this case (with the height limits enforced by the two halves), actually SOLVED this problem, by forcing me to store the lids/pans separately from the pots, etc.

The top-left section of the case gets the pots, kettle (and small bowls nested within), and small plate/cutting board. I don't really need the small cutting board/plate very often, but it's useful to separate the two pots to keep the inner one from damaging the non-stick of the outer one. The kettle kit originally included a storage bag but it didn't do much of a job of protecting the inner pot from the kettle (and required removing before using the kettle) so now I store two of my sham-wow towels here to pad everything.
IMG_20130915_154321.jpg

The top-right section of the case holds consumables like soap, seasonings, tub of condiment packs, cooking oil, and then the flatware set, in a bag made from the sewn-up leg of one of my daughter's jeans. I originally had a set of lexan flatware, but having knives that can't cut steak and spoons that might melt was a bit of a downer, so I switched to inexpensive stainless flatware from Marshalls. The larger spoons usually get used as mixing/serving spoons unless soup or stew is on the menu.

The bottom-left compartment gets the collapsing sink, the lids and fry-pans, and the plates. This stacking order isn't the most efficient for space, the lids and small fry pan will actually nest inside the plates, etc., but stacking this way means the stuff I use most often (plates, large pan) are on top, so I don't have to remove the seldom-used lids for every meal.
IMG_20130915_154622.jpg

More sham-wow towels keep down the rattles and protect the pans. The bottom-right area gets the cocoa-tin filled with ground coffee and the stanley/eddie bauer mug/bowl combos. Two of these also hold our GSI stemless wine glasses. I'll add a third soon as the kiddo is moving away from needing a sippy-cup.

My most recent change was to remove the flimsy ABS divider for the top compartment and replaced it with the large cutting board. (Ripped down and sanded to size.) This is retained by an aluminum bracket on one side and a pivoting hook on the other:
IMG_20130915_154705.jpg

Not shown (and not stored here) are the following items I pack separately:
  • Messermeister Knife Roll w/ knives and cooking instruments (whisk, graters, spatulas, slotted spoon, wine opener, ladle, etc.)
  • CampChef 2-burner propane stove w/5lb tank (to be replaced by something with better simmer control)
  • 10" Camp Oven (optional, where fires allowed)
  • "Dry Goods" box - a full size Rubbermaid bin loaded with all the non-refrigerated foodstuffs

Depending on where I'm camping, this all sits on either a Coleman Pack-Away Camp Kitchen or available picnic table. Here's version 2.1 of the kit, my knife roll, and the terrible views I had to suffer during my summer outing:
IMG_20130911_180426.jpg

Detail shots and a bit more info available via the web album here.
 
Last edited:

JKJenn

Adventurer
Pretty awesome idea really and no need to design or spend gobs of money on exotic pieces. I love when you can make use of a product already on the market but not really thought about in a different way

Someone will take the idea and make a desert sand version and call it an Expedition Kitchen and charge $399 for it. ;)

I picked up a Timberline Camp Kitchen cabinet this year and sadly, am just now getting around to trying it out. I was packing it for my trip and thought I would snap a couple of pics.

WP_20130918_12_47_23_Pro.jpgWP_20130918_12_47_32_Pro.jpgWP_20130918_12_47_44_Pro.jpg

The construction seems solid. It comes with a built in cutting board, a utensil tray and paper plate dispenser. I removed the part that holds the paper plates to allow for more room this trip. The construction seems to be quality. There are magnetic catches on the doors and the door handles are nice. The only thing missing are handles on the sides.
 

pray4surf

Explorer
<Snip> and the terrible views I had to suffer during my summer outing:
View attachment 186409

Nice writeup Herbie! The kitchen/chuckbox HAS to be next on my list. Being in a little Tacoma PU, space is at a premium. You managed to pack a lot into a nice compact size.

And I agree, nothing nicer than a complete, organized chuckbox to accompany those terrible views...

SanElijoAugust13 016.jpg
 

doug720

Expedition Leader
Here is my set up.

I used a surplus steel ammo type box with two top latches and permanent attached hinges. I lined the interior with self stick cork and added 1/8" plywood dividers.

It holds all the cooking supplies we need for many days and includes:

2 - Peak liquid stoves
1 - Single mantle Coleman liquid fuel lantern
2 - Spare liquid fuel bottles - 1 20oz and 1 16 oz.
spare mantels, lantern tree hook, matches, pump OH kit, dish soap, foil, hot pads, large and small baggies, trash bags, plastic cups, a couple of "Tupper Ware" containers, etc.
2 - Plastic cutting boards
2 = plastic boxes of cutlery and cooking utensils
3 - SS insulated coffee type cups
1 - Collapsible wash basin
Pile of Paper plates
1 - MSR Cook set = fry pan X 2, pots X 3, handles, etc
I'm sure a few other things I'm forgetting

The box is 30" X 13" X 7" and loaded, weighs about 25 pounds. It is very stout and has HD ring handles on both ends. It is sealed well, maybe not water proof, but has kept rain and dust out for many trips on the roof rack.

I have a HD plastic box, a little smaller, we keep our food in. This works well for us and our travels

Doug
 

Attachments

  • P1080323.JPG
    P1080323.JPG
    166.1 KB · Views: 220
  • P1080322.JPG
    P1080322.JPG
    157.5 KB · Views: 206
  • P1080321.JPG
    P1080321.JPG
    156.9 KB · Views: 195

Dazrin

Adventurer
I love the idea of using a rolling tool chest. I am in the middle of building up my camping gear and have been looking at how to efficiently load my LC at a minimum of cost. So far, I have been using plastic totes for carrying gear which has worked, but not great.

Here are some links for reference. The prices listed are Amazon's, but I know that at least some of them can be found cheaper elsewhere. Check Home Depot/Lowe's/Ace/Walmart/etc. for local options or places like Zoro Tools online.
The Stanley Fat Max Mobile Work Station is about $115 (new) at Amazon but not from Amazon. This is the style Every Miles a Minute found.
The Dewalt Mobile Work Center is about $90 from Amazon and is (nearly?) identical to the Fat Max work station above.
The Stanley Rolling Workshop is about $40 from Amazon. This is the style Splash posted and is three separate pieces instead of a single cantilevered unit.

Someone had had the same idea I had. Top part is cooking items, middle for utensils, condiments etc to put on table and bottom holds dishes.

Saw this on Pinterest and Thought it might give some folks some ideas. Seems like a great idea and available in any Home Depot or Lowe's
 

Splash

New member
I actually went to Lowes with the intentions of buying wood to build a chuckbox. My little boy is 3 now and I was really wanting to wait till he could help me build it. I still needed something in the meantime. When I strolled through the tool department and saw this, a light bulb went off in my head. Building a chuckbox was then officially put on hold until he can help build it.
 

chevyz71

4x4 Z71
the own right door hold the counter up, I loaded the counter top with heavy weight to see if will hold it and yes it does...
 

chevyz71

4x4 Z71
What are the legs made from?

I made the legs with electric pipe from home depot that I found on the electric seccion. 1/2 inch the pipes and 1/2 inches electric bracket. It hold the kitchen with out any problem. I can lift the kitchen without the legs fall apart, I drilled from inside and I added 1/4 in. Zinc-Plated Tee Nut and from outside I use a wing nut through a drilled hole on the leg pipe and screw it into the Tee nut.
 
Finally got around to making my camp kitchen. I was sick of my milk crate full of stuff bouncing around in the back of my truck. Not gonna lie, I took much inspiration from Lupinsea, who no longer appears to be active. Built the whole structure out of 1/2" birch ply. It's a bit on the heavy side, but it's built to take a beating! Just need to lacquer it and fill it with stuff!

Click the photo below for a video of it in action!


Dazrin

Adventurer
Finally got around to making my camp kitchen. I was sick of my milk crate full of stuff bouncing around in the back of my truck. Not gonna lie, I took much inspiration from Lupinsea, who no longer appears to be active. Built the whole structure out of 1/2" birch ply. It's a bit on the heavy side, but it's built to take a beating! Just need to lacquer it and fill it with stuff!

Click the photo below for a video of it in action!

...snipped your pic...

Wow,that is very well done. Great job!
 

Forum statistics

Threads
185,910
Messages
2,879,494
Members
225,497
Latest member
WonaWarrior
Top