turbodb
Well-known member
How-to: Planning a Trip/Route Part 1 (with Google Earth, GPX, KML, and more)
Route planning for an offroad adventure can be daunting to say the least. Just finding a geographical area to explore is often time consuming, and that doesn't even take into account the time spent figuring out the cool things to visit in that area and how exactly to get to those things (i.e. the actual route). Oh, and then there's navigating that route when you're out in the wild - often without any type of internet connectivity.
Because of this, two of the most common questions I see on the interwebs are:
Usually when these questions are asked, there are no meaningful answers in the rest of the thread - for good reasons:
Hopefully it's helpful. If it's not, well - I definitely encourage you to figure out a route planning process that works for you!
What are we going to cover?
There's a ton to cover in route planning, so I'm going to break the topic into two posts (each of which will be too long themselves)! In them, I'll cover:
Planning and building a route
Before we get started actually planning and building a route, let me state right up front that planning is tedious and time consuming. If you've ever painted a house, then you know that prepping for paint takes 75% of the time. That's the same with an adventure - the route planning can take longer than the trip itself (at least for me). The nice thing is that it happens in the comfort of your own home, allowing you to take breaks, get distracted, etc.!
Where to go and an initial list of what to see (points of interest)
The first step in planning a route is deciding on the general area you want to visit, and the type of trip you want to have - i.e. are you looking for something that's on mostly paved roads, gravel, or unmaintained dirt? Do you want to camp in campgrounds with bathrooms, or are you looking for a secluded spot with a private view? These things are often but not always intertwined - if you're looking for something "more civilized" then you want to look at state or national parks, and you're generally looking at "more mainstream attractions" in those types of places. On the other hand, if you want dirt roads and solitude, that can inform the fact that you should be looking away from national parks, or at least away from their main attractions.
As I mentioned previously, to make this more real I'm going to plan part of an actual route throughout this post. I think a great general area to plan that route would be Death Valley National Park. It's a great option because it's a relatively well known place (so I'm not giving away any secrets) while still having many points of interest (with varying remoteness) to explore.
So now we have our general area: Death Valley.
The next step in route planning is to find some points of interest for your trip (places to go, things to see). There are two main resources that I take advantage of at this point:
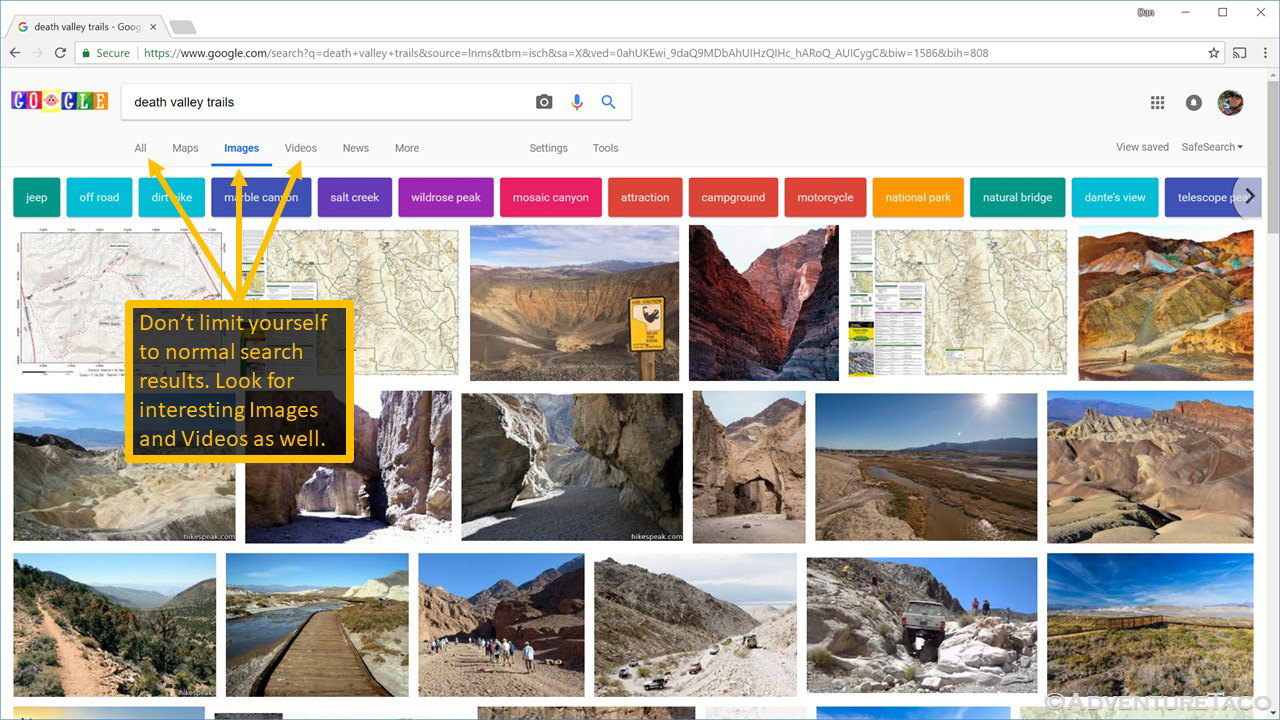
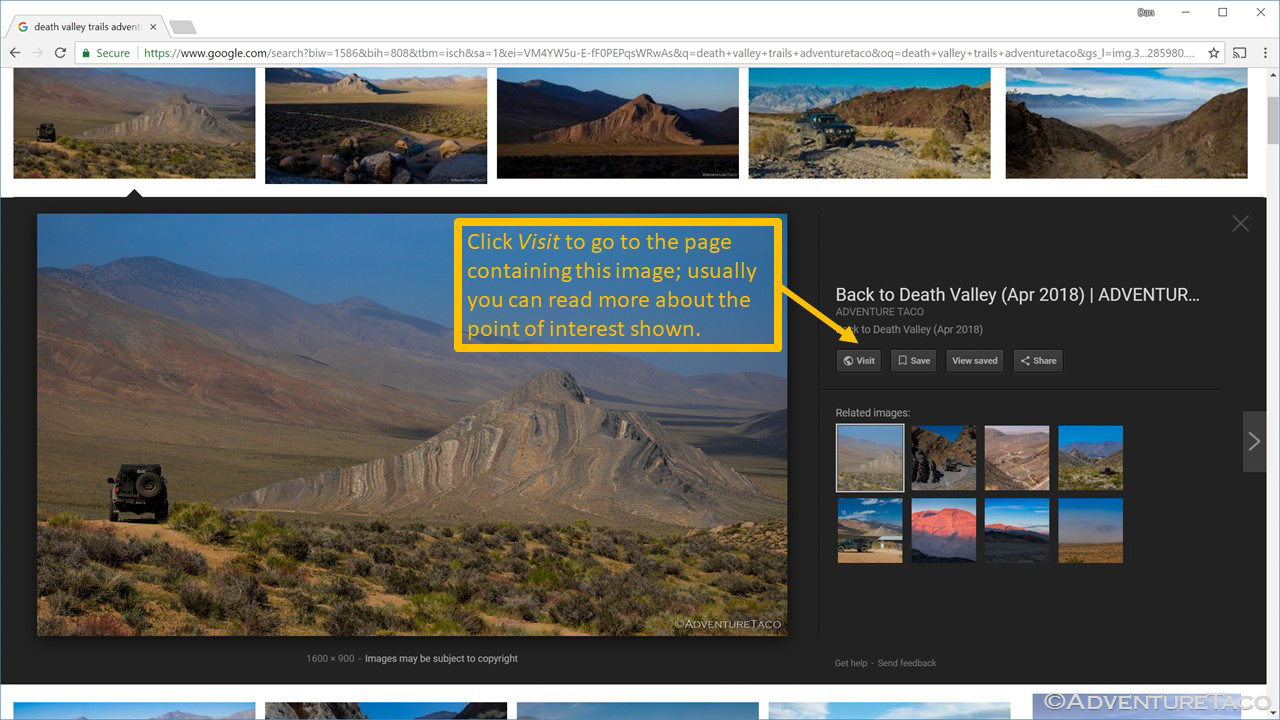
For #1, start by searching for generic terms about the place you want to visit - "Death Valley" and maybe "Death Valley trails" in this case. From there, click on links that peak your interest. Perform additional searches for those interesting items, and don't just limit yourself to "normal" search results. Look at "image" and "video" search results as well - if you click on an image, Google will show you more info about the image, including the page that contains that image. Clicking through to that page can get you more information about a place you may want to go.
There are several types of results you are looking for when you're searching. In the order of most-to-least valuable (usually):
For Death Valley, with a bit of searching, let's say that we came up with the following list of bookmarks for places we wanted to see:
Building a route using Google Earth to create tracks
So, the next step is to create a set of routes that will get us to the places we've gathered, so we can see how they relate to each other spatially (on a map), and which ones we can visit over the course of a trip. There are many ways to do this, but the tool I use is Google Earth - mostly because it's got a good set of maps (being Google), and because I figure it will be around for a while (again, Google).
I should note that Google Earth can be a bit daunting the first several times you use it, but if you master a few of the basics, it's not that bad (and you can learn more over time). For the purpose of this post, I'll walk through creation of just one route; obviously you could create the others in exactly the same way.
Since it's so beautiful and since it's "on the way into Death Valley," the route I'll cover here is Titus Canyon.
So let's get started.
Next time, we'll pick up with part 2 - how to move the route to a tablet and actually using it on your adventure! If you've got questions, feel free to add them below the post and I'll try to address them as quickly as possible.
.
Route planning for an offroad adventure can be daunting to say the least. Just finding a geographical area to explore is often time consuming, and that doesn't even take into account the time spent figuring out the cool things to visit in that area and how exactly to get to those things (i.e. the actual route). Oh, and then there's navigating that route when you're out in the wild - often without any type of internet connectivity.
Because of this, two of the most common questions I see on the interwebs are:
How do you plan your routes? Where to go and how far you'll make it each day. Where you'll camp, etc.
I'm headed to {some place}. Anyone have any suggestions of trails I should run, or totally awesome camp sites in the area?
Usually when these questions are asked, there are no meaningful answers in the rest of the thread - for good reasons:
- Most have no idea how to answer, because they are in the same boat.
- People who do know how to route plan, and who have discovered amazing routes don't necessarily want to share those routes with others. Well, not "others" so much as "everyone," which is what answering a question like that on the internet would be. If the route were shared with the internet, it would quickly get overrun, and no longer be the majestically beautiful place previously was.
- Route planning is complicated and time consuming. Explaining it is also complicated and time consuming. And frankly, it would just be too much work to constantly write up every time the question was asked.
Hopefully it's helpful. If it's not, well - I definitely encourage you to figure out a route planning process that works for you!
What are we going to cover?
There's a ton to cover in route planning, so I'm going to break the topic into two posts (each of which will be too long themselves)! In them, I'll cover:
- Planning and building a route
- Where to go and an initial list of what to see (points of interest)
- Building a route using Google Earth to create tracks
- Adding route detail, iterating on the route and points of interest
- Planning distances and camp site
- Using the route on your adventure
- Setting up a tablet for navigation
- Exporting a route to the tablet for in-vehicle use
- Prepping the tablet for offline use when you're on the trail
Planning and building a route
Before we get started actually planning and building a route, let me state right up front that planning is tedious and time consuming. If you've ever painted a house, then you know that prepping for paint takes 75% of the time. That's the same with an adventure - the route planning can take longer than the trip itself (at least for me). The nice thing is that it happens in the comfort of your own home, allowing you to take breaks, get distracted, etc.!
Where to go and an initial list of what to see (points of interest)
The first step in planning a route is deciding on the general area you want to visit, and the type of trip you want to have - i.e. are you looking for something that's on mostly paved roads, gravel, or unmaintained dirt? Do you want to camp in campgrounds with bathrooms, or are you looking for a secluded spot with a private view? These things are often but not always intertwined - if you're looking for something "more civilized" then you want to look at state or national parks, and you're generally looking at "more mainstream attractions" in those types of places. On the other hand, if you want dirt roads and solitude, that can inform the fact that you should be looking away from national parks, or at least away from their main attractions.
As I mentioned previously, to make this more real I'm going to plan part of an actual route throughout this post. I think a great general area to plan that route would be Death Valley National Park. It's a great option because it's a relatively well known place (so I'm not giving away any secrets) while still having many points of interest (with varying remoteness) to explore.
So now we have our general area: Death Valley.
The next step in route planning is to find some points of interest for your trip (places to go, things to see). There are two main resources that I take advantage of at this point:
- The internet via search engines
- People I know who have gone to the general area
For #1, start by searching for generic terms about the place you want to visit - "Death Valley" and maybe "Death Valley trails" in this case. From there, click on links that peak your interest. Perform additional searches for those interesting items, and don't just limit yourself to "normal" search results. Look at "image" and "video" search results as well - if you click on an image, Google will show you more info about the image, including the page that contains that image. Clicking through to that page can get you more information about a place you may want to go.
There are several types of results you are looking for when you're searching. In the order of most-to-least valuable (usually):
- GPS tracks for a route you're interested in - sometimes you'll "get lucky" and find an actual track, or a web site with a bunch/set of tracks.
- A trip report - a blog, photo journal, etc. from someone who's to the same place before, and written about it, ideally with landmarks you can follow on a map.
- Names of places - just a name or photo that you can us to search for more information, or look for on a map.
For Death Valley, with a bit of searching, let's say that we came up with the following list of bookmarks for places we wanted to see:
- Teakettle Junction
- Ubehebe Crater
- The Racetrack
- Titus Canyon
- Goler Wash
- Eureka Dunes
- Saline Valley
- Badwater Basin
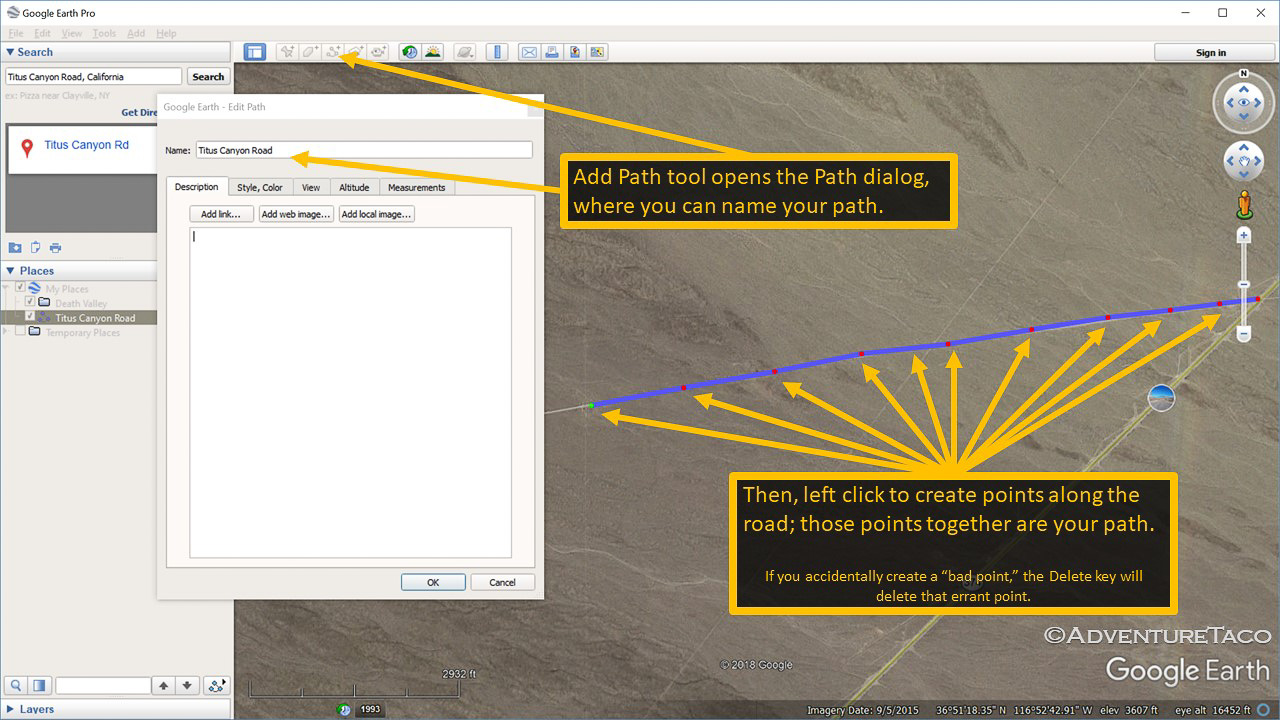
Building a route using Google Earth to create tracks
So, the next step is to create a set of routes that will get us to the places we've gathered, so we can see how they relate to each other spatially (on a map), and which ones we can visit over the course of a trip. There are many ways to do this, but the tool I use is Google Earth - mostly because it's got a good set of maps (being Google), and because I figure it will be around for a while (again, Google).
I should note that Google Earth can be a bit daunting the first several times you use it, but if you master a few of the basics, it's not that bad (and you can learn more over time). For the purpose of this post, I'll walk through creation of just one route; obviously you could create the others in exactly the same way.
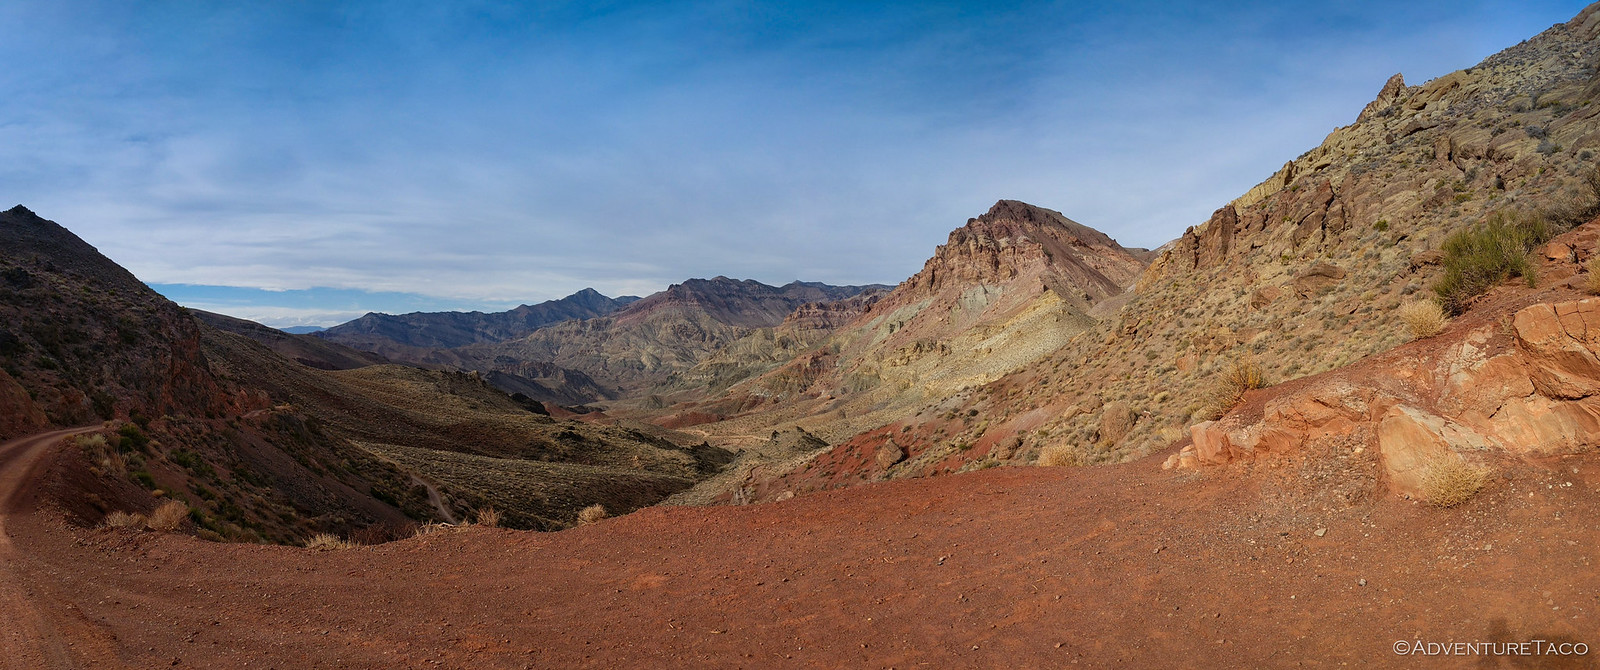
Since it's so beautiful and since it's "on the way into Death Valley," the route I'll cover here is Titus Canyon.
So let's get started.
Unfortunately, that's as long a post as ExPo allows - I've hit my 10K character limit. Not to worry, you can pick up the instructions here:
Planning a Trip/Route Part 1 (Google Earth, GPX, KML, and more)
- - - - -
Planning a Trip/Route Part 1 (Google Earth, GPX, KML, and more)
- - - - -
Next time, we'll pick up with part 2 - how to move the route to a tablet and actually using it on your adventure! If you've got questions, feel free to add them below the post and I'll try to address them as quickly as possible.
.
") ) it's time for part 2:
) it's time for part 2: