You are using an out of date browser. It may not display this or other websites correctly.
You should upgrade or use an alternative browser.
You should upgrade or use an alternative browser.
Boden Build - 2015 Tacoma DCLB 4wd
- Thread starter tacozord
- Start date


tacozord
Adventurer
When I purchased my FlipPac camper shell, which was used, it already had a dome light installed. I temporarily connected it to a spare fuse on my 1st Bussmann RMTR that I built a couple years ago knowing that I'd ultimately be installing an aux battery and another RTMR. For this temporary setup, I didn't connect it to a relay or anything. I simply used it to provide power from the RTMR back to the dome light in the bed of the truck and used the integrated switch on the dome light.
Now that I've installed a second battery and built another Bussmann RTMR dedicated to bed/shell accessories, it was time to connect the dome light permanently. But I also wanted to modify the circuit to accommodate two switches to control it. I never liked the fact that when I wanted to turn the light on, I either had to crawl into the shell or open the driver-side win-door. This was really inconvenient. So I wanted two switches, one at the rear of the truck and another at the light itself. The following circuit diagram outlines the wiring.

This is called a three-way circuit and many people might be familiar with it when two switches control a hall light in your home. There's typically a light switch at either end of the hallway and these switches are called double-pole-single-throw switches or DPST for short. I purchased my switches from OTRATTW, part number #V4D2UXXB-00000-000. The specific switch I purchased didn't come with rocker covers, so I purchased two of those separately, VVPZC51-5BA1.
This is the switch wiring diagram that OTRATTW provides.

In the following image, which shows my Bussmann RTMR wiring and connections, the white plug on the right connects to the switches at the rear of the vehicle.
Two of the wires are used for the dome light switch, and a third wire to supplies power. The white plug at the top left goes to a new switch at the dome light. Notice that there are three wires. The brown and white wires connect to the terminal block and continue to the switch at the rear of the vehicle. The blue wire connects to pin 86 on one of the relays in the RTMR. And finally, the black plug at the top left connects to the dome light with two wires, black to ground and red to pin 87 of the relay.

Here's the switch panel at the rear of the vehicle.

Here's the dome light and secondary switch. In order for this system to work, the original switch that is integrated in the dome light remains on at all times. This was the easiest thing to do instead of replacing the light or re-wiring the dome light.

I used a Hammond 1591DSBK ABS project box that I purchased from Amazon for the switch at the dome light.

With it installed and working, I love it. I can turn on the light from the rear without crawling in, but when I go to sleep in the FlipPac, I can easily reach down and control the light from the secondary switch. I'm chalking this mod up as another favorite. It's rather easy to do, and the payoff is better than expected!
Now that I've installed a second battery and built another Bussmann RTMR dedicated to bed/shell accessories, it was time to connect the dome light permanently. But I also wanted to modify the circuit to accommodate two switches to control it. I never liked the fact that when I wanted to turn the light on, I either had to crawl into the shell or open the driver-side win-door. This was really inconvenient. So I wanted two switches, one at the rear of the truck and another at the light itself. The following circuit diagram outlines the wiring.
This is called a three-way circuit and many people might be familiar with it when two switches control a hall light in your home. There's typically a light switch at either end of the hallway and these switches are called double-pole-single-throw switches or DPST for short. I purchased my switches from OTRATTW, part number #V4D2UXXB-00000-000. The specific switch I purchased didn't come with rocker covers, so I purchased two of those separately, VVPZC51-5BA1.
This is the switch wiring diagram that OTRATTW provides.
In the following image, which shows my Bussmann RTMR wiring and connections, the white plug on the right connects to the switches at the rear of the vehicle.
Two of the wires are used for the dome light switch, and a third wire to supplies power. The white plug at the top left goes to a new switch at the dome light. Notice that there are three wires. The brown and white wires connect to the terminal block and continue to the switch at the rear of the vehicle. The blue wire connects to pin 86 on one of the relays in the RTMR. And finally, the black plug at the top left connects to the dome light with two wires, black to ground and red to pin 87 of the relay.
Here's the switch panel at the rear of the vehicle.
Here's the dome light and secondary switch. In order for this system to work, the original switch that is integrated in the dome light remains on at all times. This was the easiest thing to do instead of replacing the light or re-wiring the dome light.
I used a Hammond 1591DSBK ABS project box that I purchased from Amazon for the switch at the dome light.
With it installed and working, I love it. I can turn on the light from the rear without crawling in, but when I go to sleep in the FlipPac, I can easily reach down and control the light from the secondary switch. I'm chalking this mod up as another favorite. It's rather easy to do, and the payoff is better than expected!
Last edited:

tacozord
Adventurer
About 3 years ago, I purchased and installed a 250A alternator from CAE in Van Nuys, CA. Well, today I removed it and re-installed my OEM 140A alternator, because I was having problems with the 250A this past weekend. Basically, the battery light turned on and then fluctuated while I was out in the desert. I also observed via my ScanGuage that the voltage level of the primary battery was jumping around from as high as 13.7v to as low as 11.2v. This was looking like a voltage regulator failure. Bummer because I planned on camping out Sunday night, but I didn't want to take the risk being in the middle of nowhere with this problem.
Anyway, with the old one back in, things look good so far. I think I'll take the 250A alternator back to CAE and see if I can swap it out for another one or if they can sell me a new voltage regulator.
Anyway, with the old one back in, things look good so far. I think I'll take the 250A alternator back to CAE and see if I can swap it out for another one or if they can sell me a new voltage regulator.
tacozord
Adventurer
Last November, I started work on my bed storage. I used 3/4" Baltic birch plywood for the structure and walls and 1/2" Baltic birch plywood for the lids.
The storage is basically made up of a frame and walls. In this image, you can see the basic frame setup. This is front driver side.
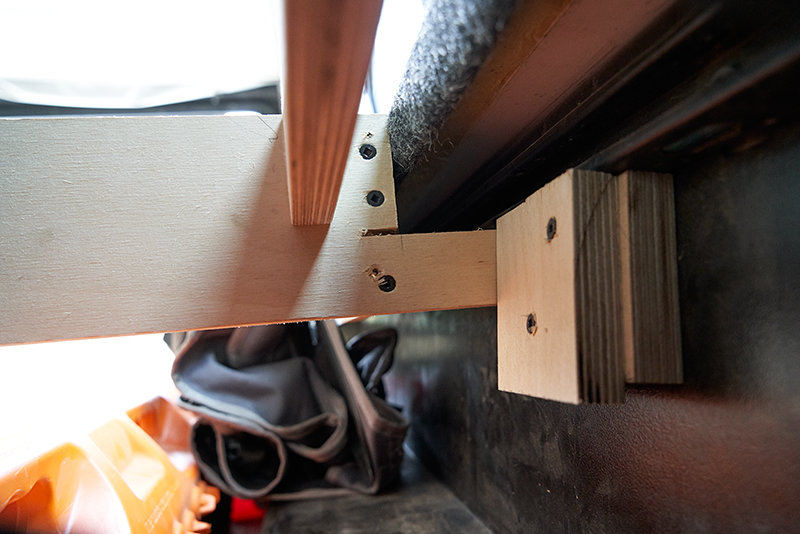
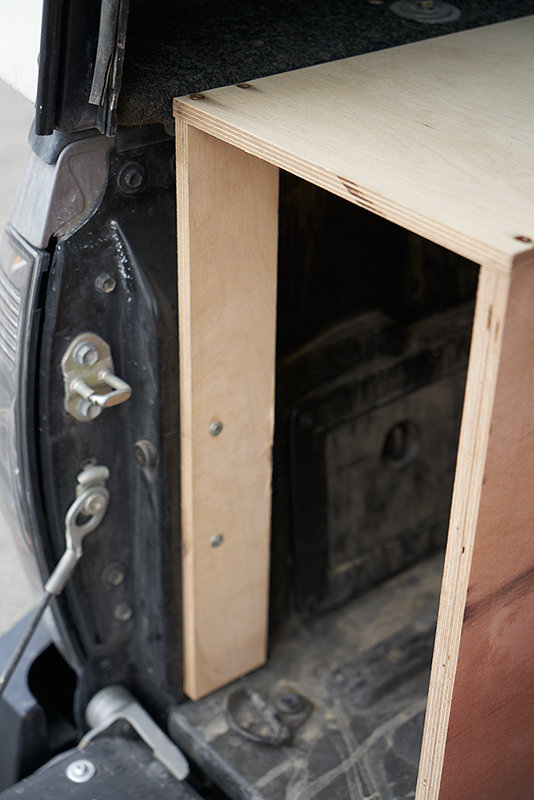
The manner in which I secured the frame in place wasn't necessarily uniform throughout the bed. But generally, I attached small blocks of wood to the bed walls and then attached the frame to these. This image shows the detail of how the frame is attached to the bed sides and how I had to fur out some of the blocks to accommodate the rails and shell. This image is just above the driver-side wheel well.
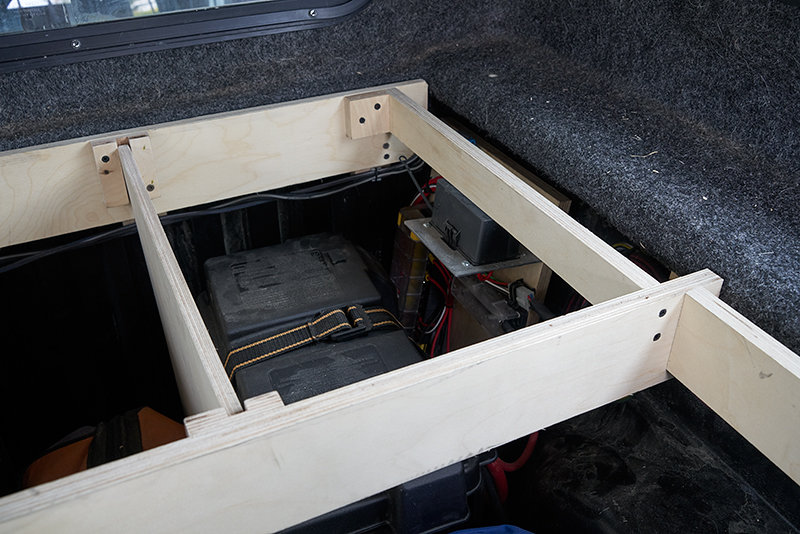
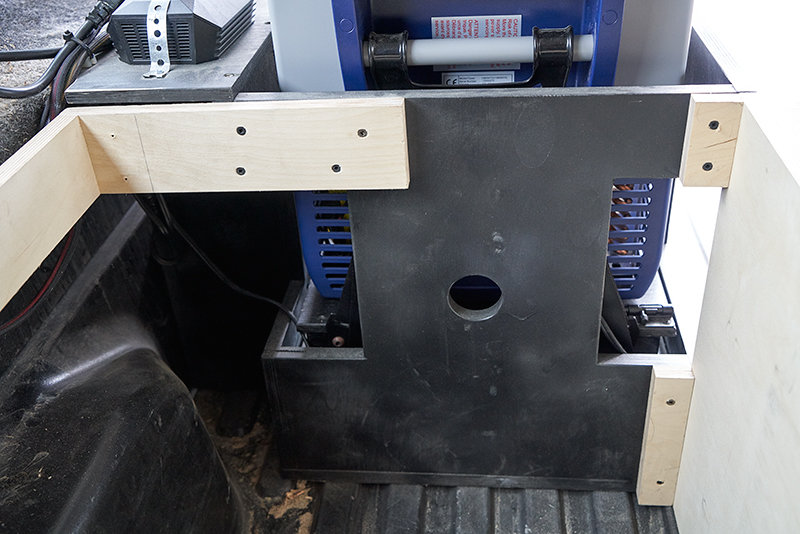
Here's the framing around my aux battery and RTMR. This is front passenger side. Take note that there is a wall to the left of the battery, which is removable, and basically keeps the electrical area isolated.
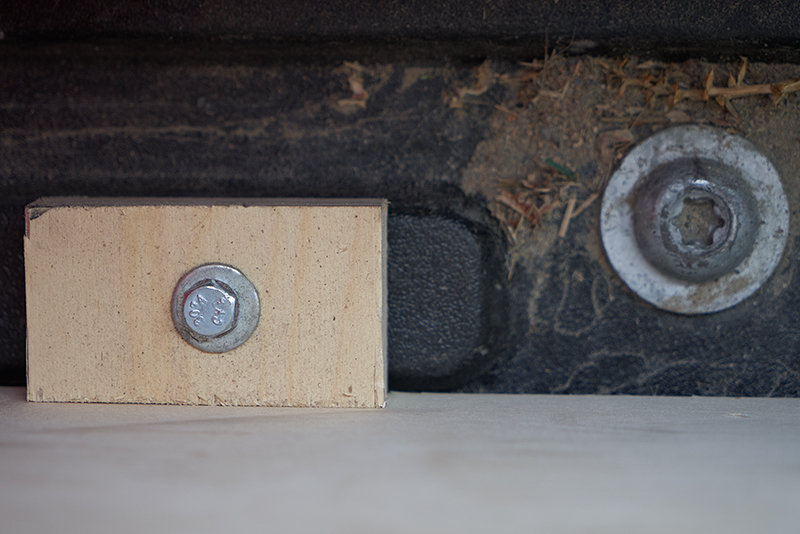
With regards to design, the entire storage area is simply a frame. The only walls are what surround the clear area down the middle of the bed, which you'll see in just a moment. This was done to maximize storage as well as keep the weight down to a minimum. To secure the walls to the bed floor, I used rivet nuts and then attached small blocks of plywood with 1/4-20 bolts. The walls were then screwed to these blocks of wood.
At the rear of the vehicle, I simply attached the plywood to the bed sides using wood screws directly into the fiberglass bed. Worked out great. Notice that I still have access to the OEM storage compartment.
With the fridge slide-out cabinet already installed, I was able to attach my storage framing directly to it.
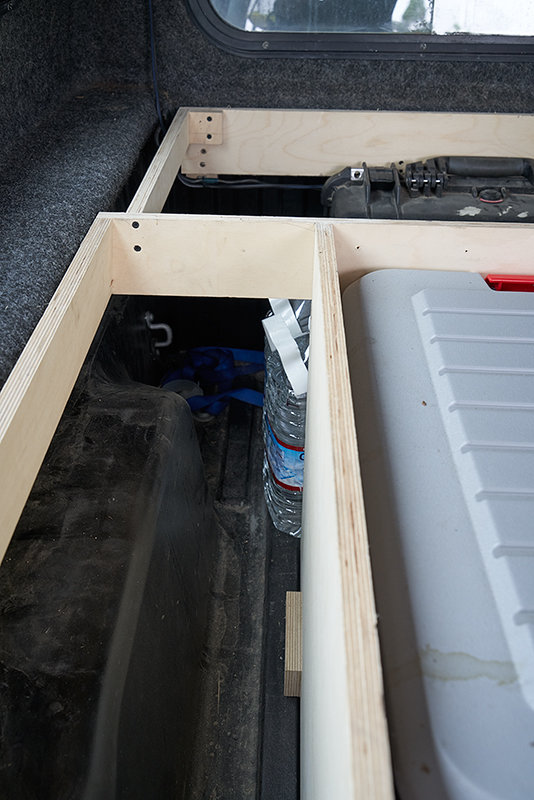
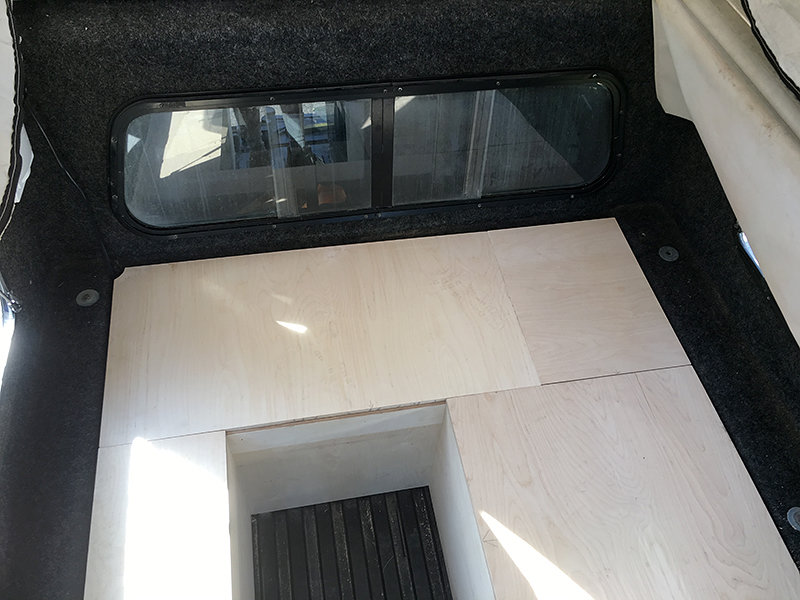
The storage is complete, but not yet painted or covered in carpet. I haven't decided exactly how I want to do this. All of the plywood on top of the frame is removable to allow access to the storage underneath. These are currently held in place with gravity, but I installed small blocks of wood to the underside to keep them from sliding around. Also, this image shows the walls surrounding the clear area down the middle of the bed.
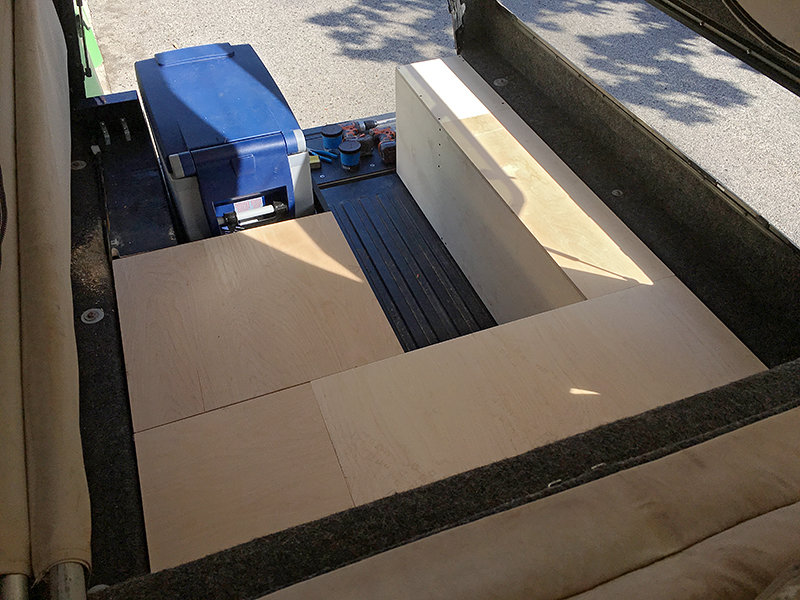
Here's another angle taken from the tent/sleeping area above the cab. Notice that I left a corridor or "hallway" down the middle. This is used for two Action Packer storage boxes while traveling. These are removed when at camp so I retain standing height in the bed. It's also a great bench to sit on.
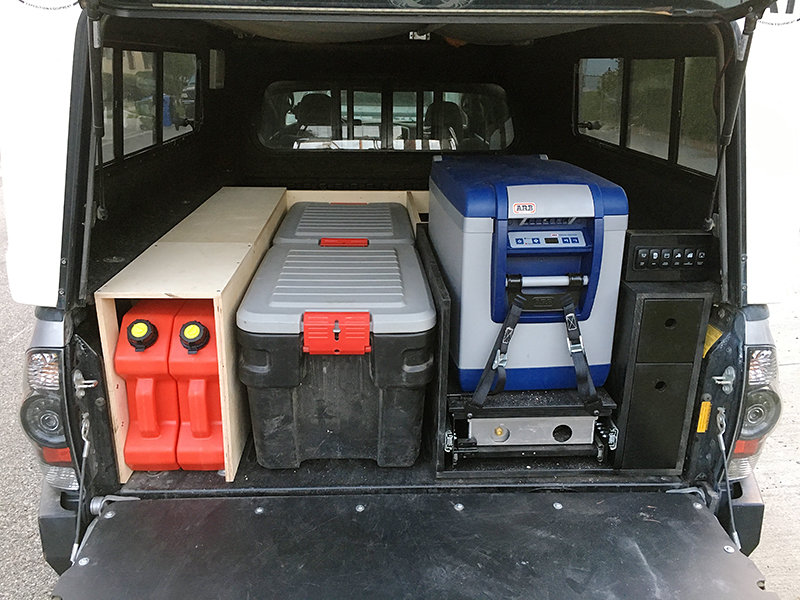
From the rear of the vehicle, you can see how everything is packed in. If you recall earlier from from my post showing my fridge slide-out build, I mentioned how tight the tolerances were. As this image shows, there is no extra room. I had to build the fridge slide-out with the exact measurements of the gas cans, Action Packers, plywood wall thickness, and the width of the drawer slides. That was quite the challenge.
In conclusion, this build has definitely met my needs and I couldn't be happier. I went into it without a clear vision of how to make it work. I just knew what I needed and worked around that. The key was to have enough foresight to think of any potential pitfalls. The prime example is the tight tolerances that I had to keep in mind when I built the fridge slight-out.
Let me know what you think and if you have any ideas of how I could have improved this. Maybe it'll help the next person who wants to do something similar.
The storage is basically made up of a frame and walls. In this image, you can see the basic frame setup. This is front driver side.
The manner in which I secured the frame in place wasn't necessarily uniform throughout the bed. But generally, I attached small blocks of wood to the bed walls and then attached the frame to these. This image shows the detail of how the frame is attached to the bed sides and how I had to fur out some of the blocks to accommodate the rails and shell. This image is just above the driver-side wheel well.
Here's the framing around my aux battery and RTMR. This is front passenger side. Take note that there is a wall to the left of the battery, which is removable, and basically keeps the electrical area isolated.
With regards to design, the entire storage area is simply a frame. The only walls are what surround the clear area down the middle of the bed, which you'll see in just a moment. This was done to maximize storage as well as keep the weight down to a minimum. To secure the walls to the bed floor, I used rivet nuts and then attached small blocks of plywood with 1/4-20 bolts. The walls were then screwed to these blocks of wood.
At the rear of the vehicle, I simply attached the plywood to the bed sides using wood screws directly into the fiberglass bed. Worked out great. Notice that I still have access to the OEM storage compartment.
With the fridge slide-out cabinet already installed, I was able to attach my storage framing directly to it.
The storage is complete, but not yet painted or covered in carpet. I haven't decided exactly how I want to do this. All of the plywood on top of the frame is removable to allow access to the storage underneath. These are currently held in place with gravity, but I installed small blocks of wood to the underside to keep them from sliding around. Also, this image shows the walls surrounding the clear area down the middle of the bed.
Here's another angle taken from the tent/sleeping area above the cab. Notice that I left a corridor or "hallway" down the middle. This is used for two Action Packer storage boxes while traveling. These are removed when at camp so I retain standing height in the bed. It's also a great bench to sit on.
From the rear of the vehicle, you can see how everything is packed in. If you recall earlier from from my post showing my fridge slide-out build, I mentioned how tight the tolerances were. As this image shows, there is no extra room. I had to build the fridge slide-out with the exact measurements of the gas cans, Action Packers, plywood wall thickness, and the width of the drawer slides. That was quite the challenge.
In conclusion, this build has definitely met my needs and I couldn't be happier. I went into it without a clear vision of how to make it work. I just knew what I needed and worked around that. The key was to have enough foresight to think of any potential pitfalls. The prime example is the tight tolerances that I had to keep in mind when I built the fridge slight-out.
Let me know what you think and if you have any ideas of how I could have improved this. Maybe it'll help the next person who wants to do something similar.
soonenough
Explorer
Looks awesome! Thanks for the update!
Forum statistics
Members online
- driver3
- Wakeup2river
- driller
- Northern Tundra
- highwest
- ziggyboy
- NHMachinist
- montypower
- Pacific Northwest yetti
- modernbeat
- LeeGro
- scottymcdonald
- YukonMontanaTannerTrapper
- wallaceg
- watrboy
- Kleavers
- Inspired Adventurist
- Deleted Member 183
- spacecowboy7777
- wrestler034
- HappyWifeHappyLife
- KHow
- Ranchmkt
- danielsk
- orisu
- vick
- Dzik1000
- RoamingGladiator
- Nerdalert2
- jdrake18
- STREGA
- Fenderfour
- camperthingy
- gibberogill
- fisher205
- SDDiver5
- tblopa
- snowshelp
- Iain_U1250
- Markal
- marmotguy
- treygreer
- MOAK
- yota man
- Todd n Natalie
- CJD
- gwittman
- League 4
- Anders
- Parks
Total: 548 (members: 55, guests: 493)