You are using an out of date browser. It may not display this or other websites correctly.
You should upgrade or use an alternative browser.
You should upgrade or use an alternative browser.
Barn Door for JK factory hardtops
- Thread starter jscherb
- Start date
jscherb
Expedition Leader
I'm not familiar with OME grab handles so I searched and came up empty. If you can post a photo I can tell you if they're compatible. As I was searching though, I didn't see any grab handles these wouldn't be compatible with, so unless the OME design is very different from everything else they should work.I absolutely love thisI’ve been looking for
I absolutely love this! Been looking for a convenient place to put my flashlight and Leatherman and this fits the bill perfectly. Do you know if this will fit on the outside of the OME Jeep grab handles? I look forward to this being in production.
Thank you for checking! I’ll keep an eye on the vendor website for when they are available.I'm not familiar with OME grab handles so I searched and came up empty. If you can post a photo I can tell you if they're compatible. As I was searching though, I didn't see any grab handles these wouldn't be compatible with, so unless the OME design is very different from everything else they should work.
jscherb
Expedition Leader
I talked to OO this morning about the few small changes I'm recommending for production; they said no problem and they'll be in production soon.Thank you for checking! I’ll keep an eye on the vendor website for when they are available.
You might want to go to their web site and sign up for their newsletter, they said they would probably make an initial offer of these through the newsletter before they get listed on the site.
jscherb
Expedition Leader
I configure my Jeep a lot of different ways for different adventures and one of the things I've been trying to come up with is a solution for is passing power to things on the roof in such a way that I can power different accessories or have no accessories installed at a particular time. I might have the solar system up there for one adventure, and maybe high-intensity lights for another. How to deliver power to these accessories in such a way that they can be removed and other accessories wired in their place, or nothing installed?
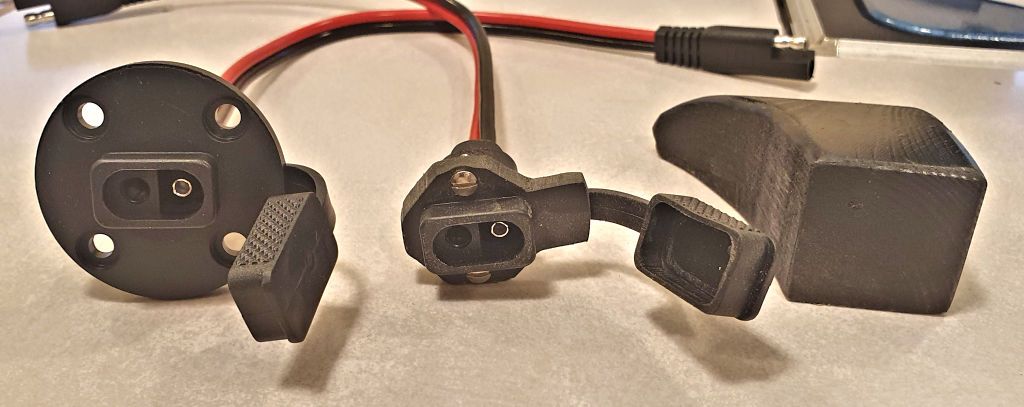
I came up with a solution and this morning I made up a proof-of-concept. The idea is to have a weatherproof connector on the roof, but do it in such a way that it isn't really noticeable with nothing is wired. My solution is a connector housing shaped to match the front of the Cherokee roof rack:
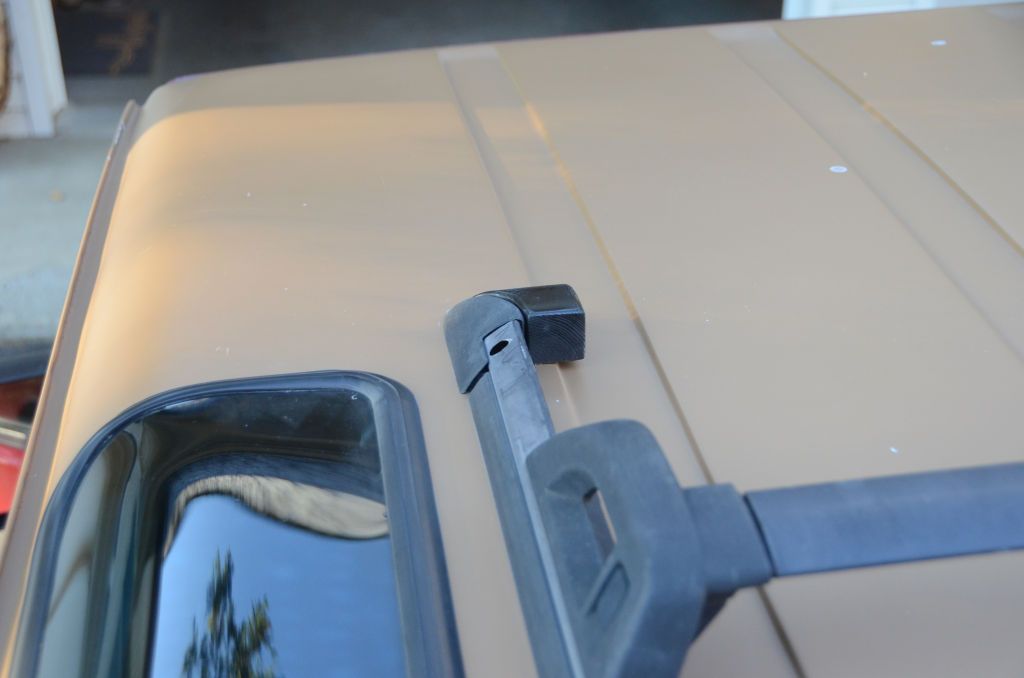
This is just a block of wood for now, and it doesn't take into account the recessed rib in the roof, but it would be molded so that it's hollow and a weatherproof connector would be installed in the back side of it. I'd use a weatherproof SAE connector:
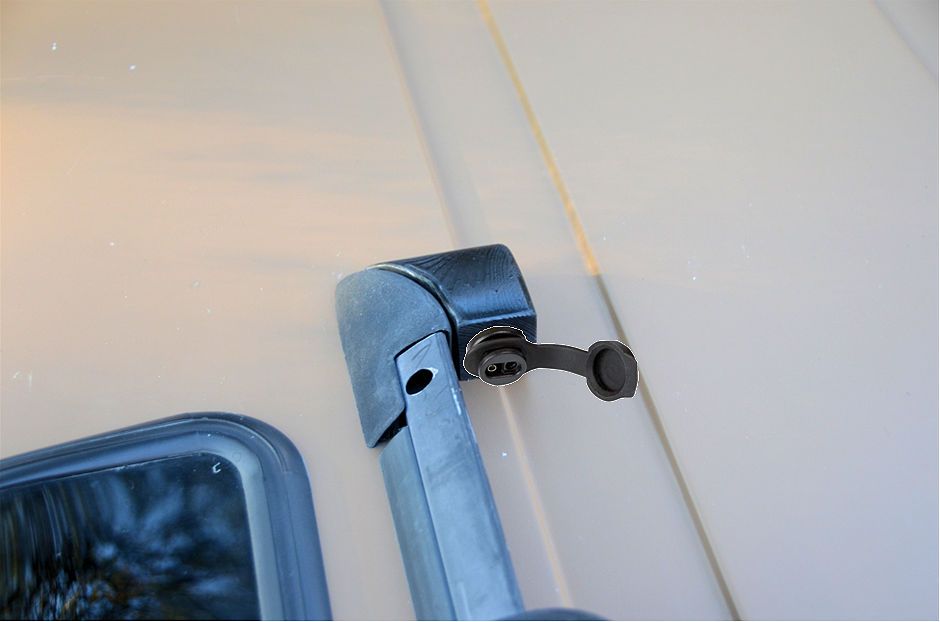
I'd make a pair, left and right versions, so both sides would look the same and I could wire two accessories at the same time. From outside the Jeep, the connector block would hardly be noticeable:
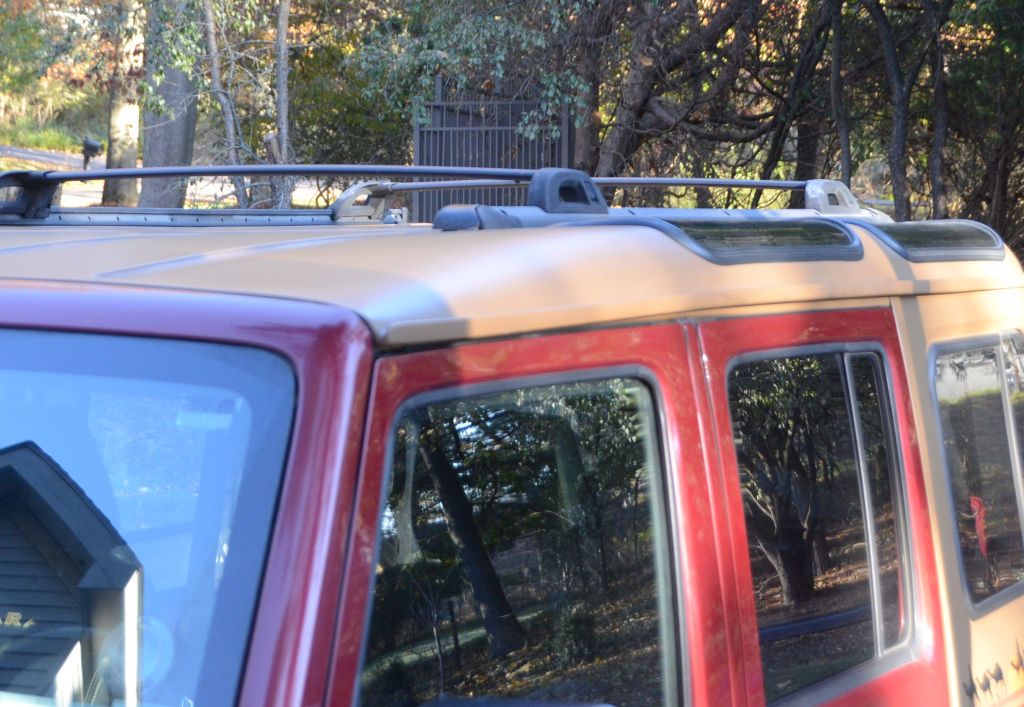
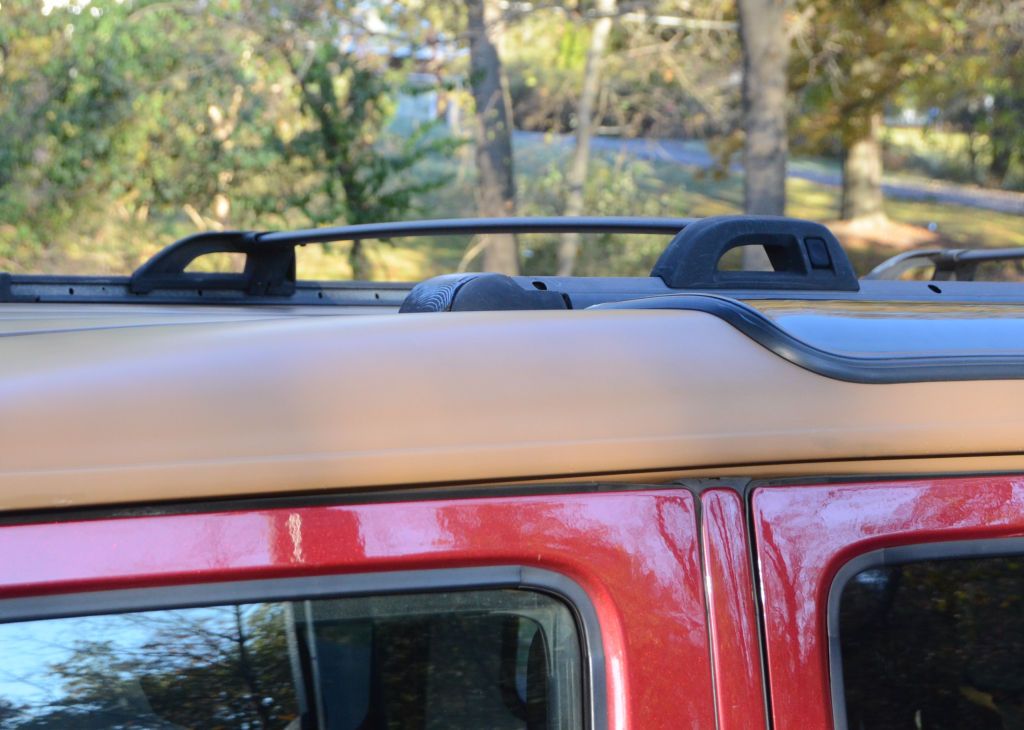
I'm going to order the weatherproof SAE connectors to verify the dimensions and then I'll make left and right molds for the housings and mold some. Since I have Cherokee racks on both my JKU and my LJ, I'll make a pair for each Jeep.
I came up with a solution and this morning I made up a proof-of-concept. The idea is to have a weatherproof connector on the roof, but do it in such a way that it isn't really noticeable with nothing is wired. My solution is a connector housing shaped to match the front of the Cherokee roof rack:
This is just a block of wood for now, and it doesn't take into account the recessed rib in the roof, but it would be molded so that it's hollow and a weatherproof connector would be installed in the back side of it. I'd use a weatherproof SAE connector:
I'd make a pair, left and right versions, so both sides would look the same and I could wire two accessories at the same time. From outside the Jeep, the connector block would hardly be noticeable:
I'm going to order the weatherproof SAE connectors to verify the dimensions and then I'll make left and right molds for the housings and mold some. Since I have Cherokee racks on both my JKU and my LJ, I'll make a pair for each Jeep.
jscherb
Expedition Leader
There was one last detail to take care of before I could declare the solar project completely finished - I wasn't sure the bearings and the cam spacers were stainless because they are attracted to a magnet, so I replaced all the bearings (and wheels) and the cam spacers with stainless parts. In this photo the new parts are installed, the old parts are sitting on the rack, which is on the workbench:
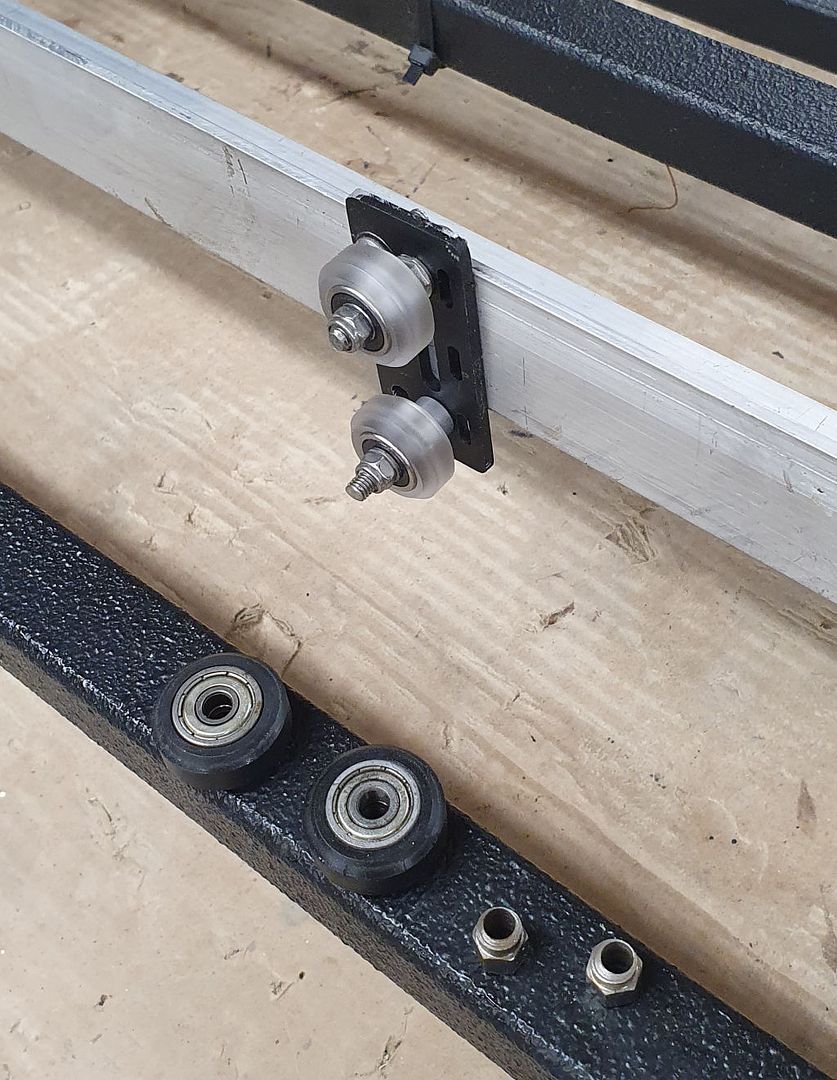
The old parts hadn't rusted after some weeks on the Jeep, so it may be that they're a stainless alloy that's attracted to a magnet, but just to be sure I replaced them.
Now I can declare the solar project 100% complete, and ready for use on either my JKU or my LJ.
The old parts hadn't rusted after some weeks on the Jeep, so it may be that they're a stainless alloy that's attracted to a magnet, but just to be sure I replaced them.
Now I can declare the solar project 100% complete, and ready for use on either my JKU or my LJ.
jscherb
Expedition Leader
Got an email from Indie Campers this morning (https://indiecampers.com/). They are now renting camping-equipped Wranglers out of Los Angeles. These come with a roof top tent and a MORryde Trail Kitchen...
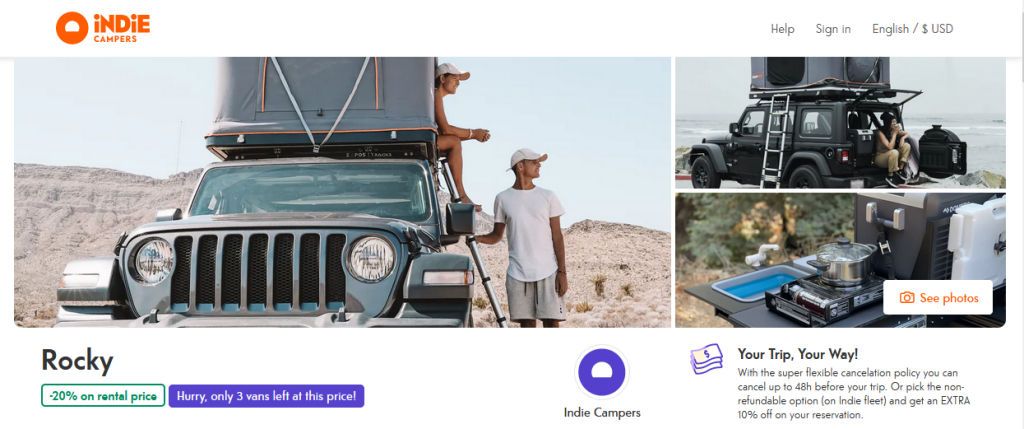
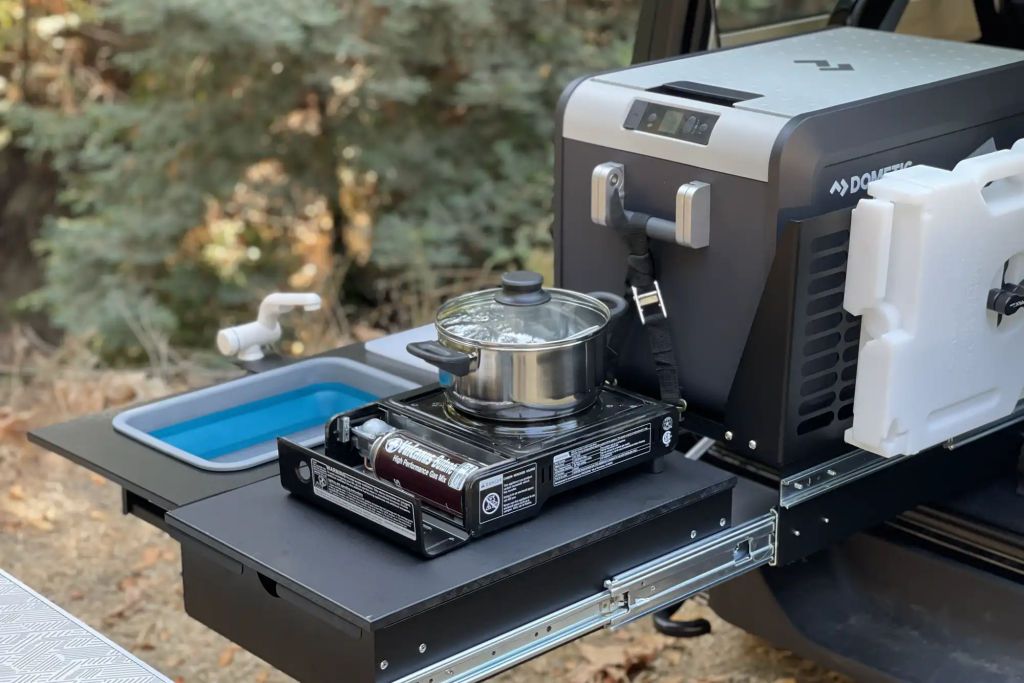
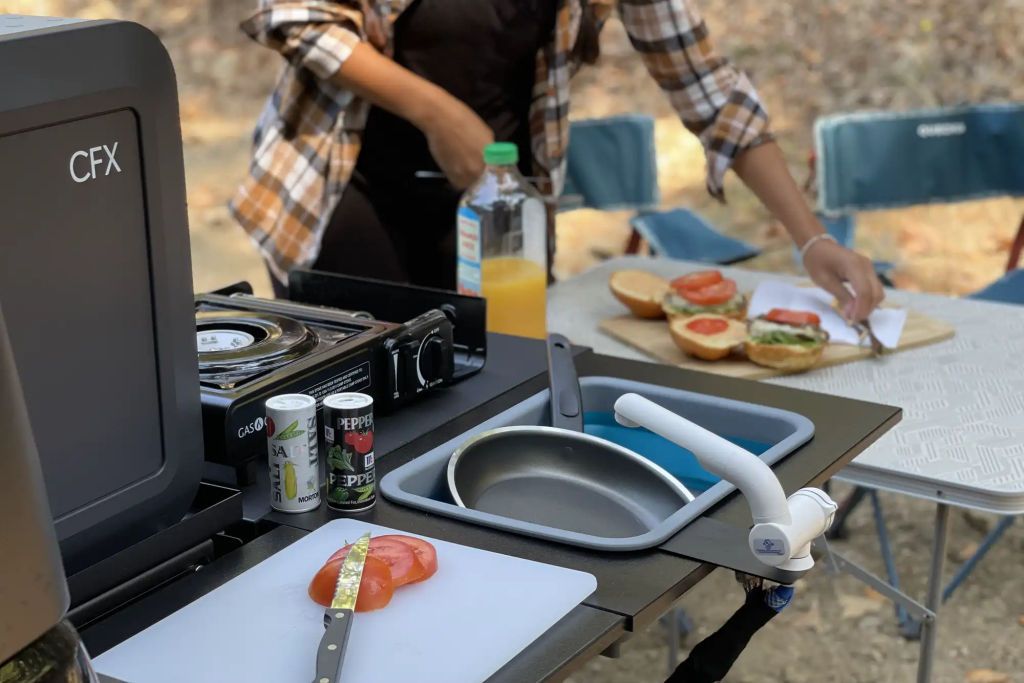
The Trail Kitchen they provide includes the sink option with running water...
Seems pretty reasonable, only $81 per day with 62 miles per day; there are other mileage packages available...
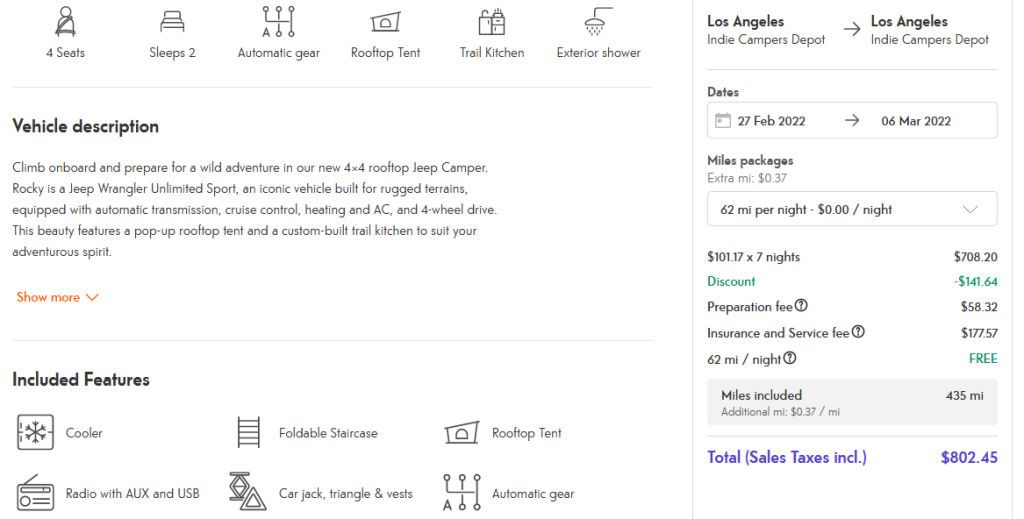
So you can fly to LA, pick up an Indie Camper Wrangler and explore Death Valley and the Mojave (for example) without driving your own Jeep out there.
The Trail Kitchen they provide includes the sink option with running water...
Seems pretty reasonable, only $81 per day with 62 miles per day; there are other mileage packages available...
So you can fly to LA, pick up an Indie Camper Wrangler and explore Death Valley and the Mojave (for example) without driving your own Jeep out there.
jscherb
Expedition Leader
I'm trying to keep the power connection on the roof as small as possible but couldn't find any SAE bulkhead connectors that are small enough so I had to modify larger ones.I configure my Jeep a lot of different ways for different adventures and one of the things I've been trying to come up with is a solution for is passing power to things on the roof in such a way that I can power different accessories or have no accessories installed at a particular time. I might have the solar system up there for one adventure, and maybe high-intensity lights for another. How to deliver power to these accessories in such a way that they can be removed and other accessories wired in their place, or nothing installed?
I came up with a solution and this morning I made up a proof-of-concept. The idea is to have a weatherproof connector on the roof, but do it in such a way that it isn't really noticeable with nothing is wired. My solution is a connector housing shaped to match the front of the Cherokee roof rack:
This is just a block of wood for now, and it doesn't take into account the recessed rib in the roof, but it would be molded so that it's hollow and a weatherproof connector would be installed in the back side of it. I'd use a weatherproof SAE connector:
I'd make a pair, left and right versions, so both sides would look the same and I could wire two accessories at the same time. From outside the Jeep, the connector block would hardly be noticeable:
I'm going to order the weatherproof SAE connectors to verify the dimensions and then I'll make left and right molds for the housings and mold some. Since I have Cherokee racks on both my JKU and my LJ, I'll make a pair for each Jeep.
Now I can make the molds for the housings to match the ends of the Cherokee roof rack rails.
jscherb
Expedition Leader
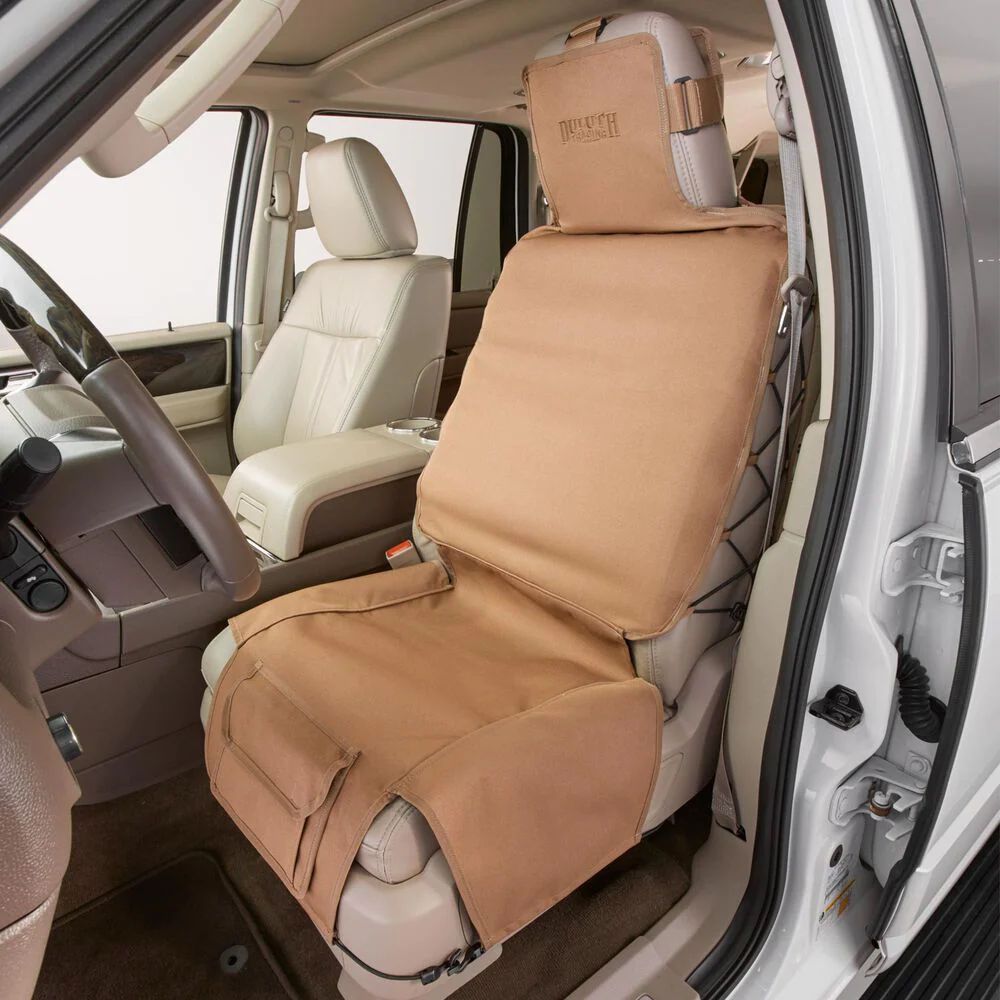
I've been asked by a company (not who you might think) to design new seat covers. The target is somewhere between the simple towel that Quadratec sells and something like the Carhartt cover in the next photo. The towels are about $30 each and aren't much more than a towel with a hole in it for the headrest posts. They need adjustment pretty much any time you get into the Jeep, and they soak up water, but they're cheap. The Carhartt covers are about $260 per pair and they're a very nice polyester fabric with a water-resistant treatment. They're not something you'll be putting on and off as needed for a particular adventure because it takes a little bit of work to install them. Both are in this photo:
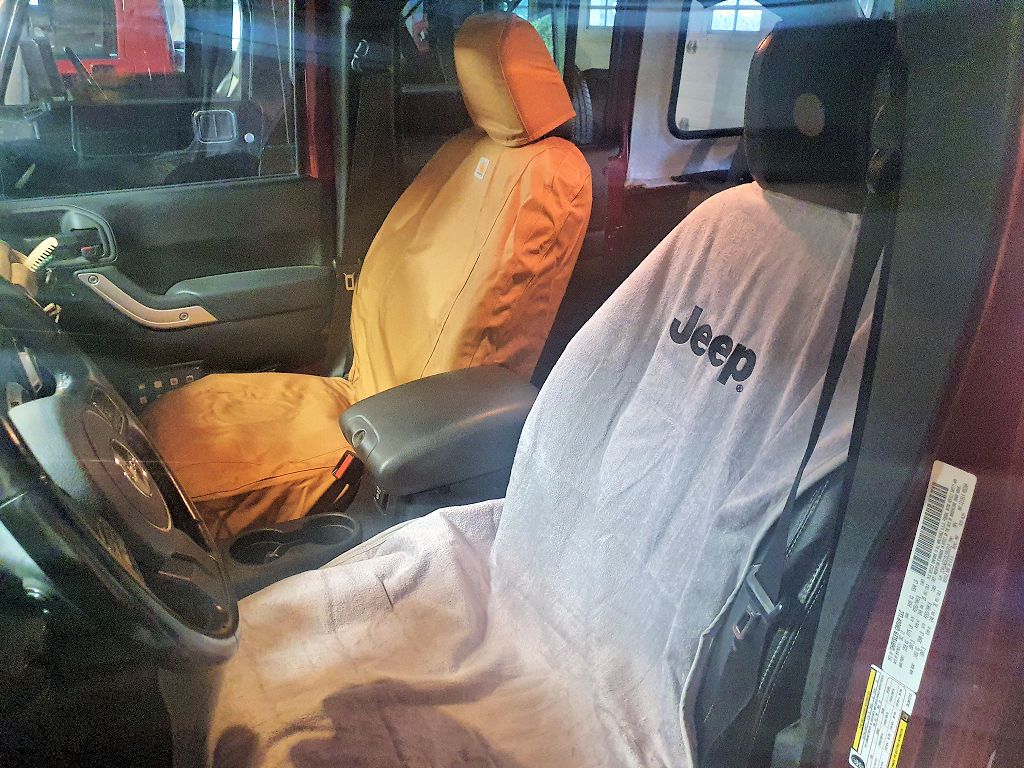
What I've been asked to do is design something in-between - easy enough to put on/off when needed but not as expensive as something like the Carhartt. Something with a good fit (better than just a towel and hopefully better than the Carhartt in the photo above). Made from a durable water-repellent fabric like the Carhartt, not a water-soaking fabric like the towels. The idea is something that you'd put on for an adventure where you might get the seats dirty, and could leave on all the time for daily driving if you wanted to, but easy enough to install that you could only put them on as needed for particular adventures.
Duluth Trading has something along those lines, but the most common complaint in the reviews on their web site is that they don't fit well. They're one-size-fits-all, which I think translates to one-size-hardly-fits-any. Coming up with a design to fit the common Jeep seats well should be easier than Duluth trying to fit everything. Images from the Duluth web site (not a Wrangler):
The Duluth product has a few features that might be worth considering, like pockets on the back and the front:
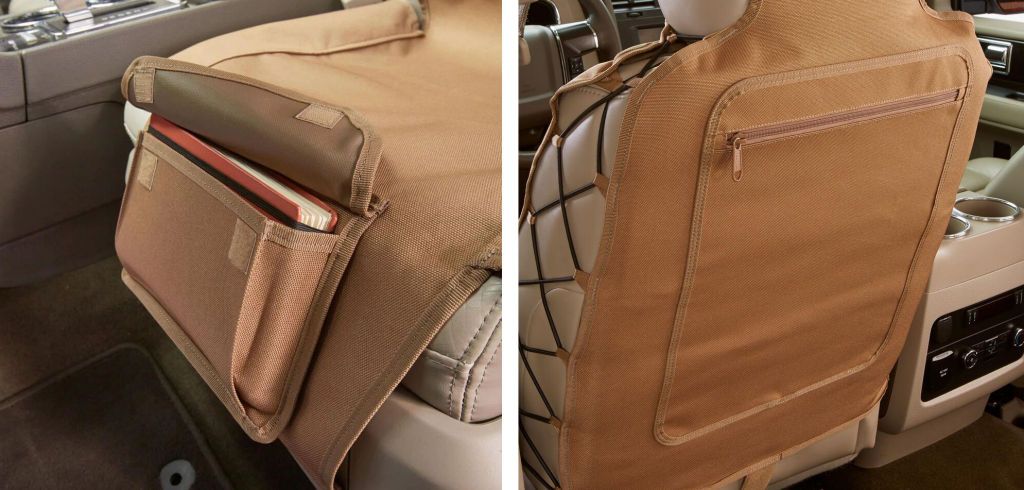
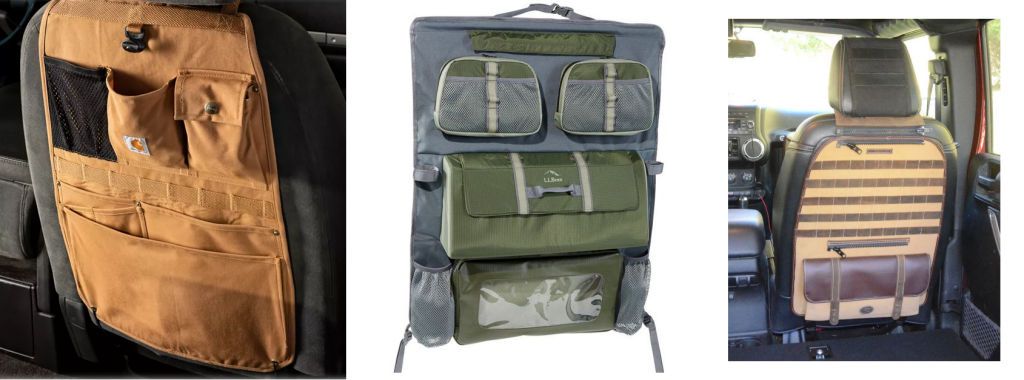
The front pocket looks like it sits a bit high and would interfere with the back of your legs, maybe that's because it's one-size-fits-all and on some other seat it would be positioned better. And maybe more useful than a simple pocket on the back would be something like this Carhartt seat back organizer (left, $60), one from LL Bean (center, $149) or the one I designed a year or so ago (right):
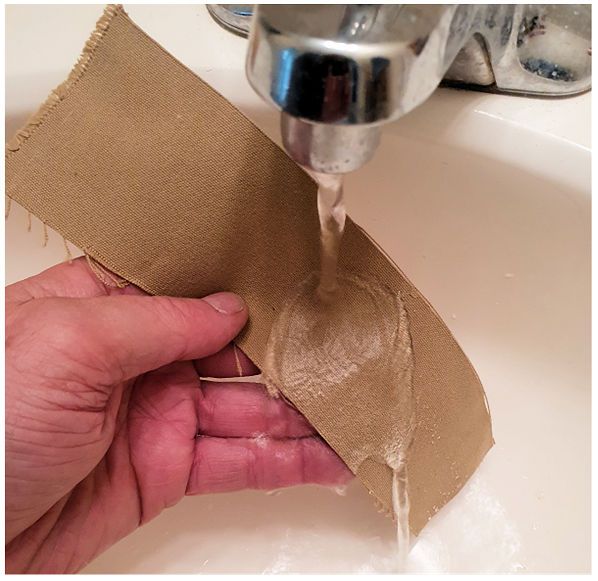
I've found a very nice polyester fabric with DWR (durable water repellent) treatment; it's 12-ounce/sq. yard so thick enough to make a nice, durable seat cover and it's reasonably priced so it wouldn't drive the final price of the seat covers too high:
What do you think of the seat cover idea? (It's not my idea, so if you don't like it don't feel like you'd be insulting me") ). If you think something like this would be useful, what features/styling/etc. would you like to see in it?
). If you think something like this would be useful, what features/styling/etc. would you like to see in it?
What I've been asked to do is design something in-between - easy enough to put on/off when needed but not as expensive as something like the Carhartt. Something with a good fit (better than just a towel and hopefully better than the Carhartt in the photo above). Made from a durable water-repellent fabric like the Carhartt, not a water-soaking fabric like the towels. The idea is something that you'd put on for an adventure where you might get the seats dirty, and could leave on all the time for daily driving if you wanted to, but easy enough to install that you could only put them on as needed for particular adventures.
Duluth Trading has something along those lines, but the most common complaint in the reviews on their web site is that they don't fit well. They're one-size-fits-all, which I think translates to one-size-hardly-fits-any. Coming up with a design to fit the common Jeep seats well should be easier than Duluth trying to fit everything. Images from the Duluth web site (not a Wrangler):
The Duluth product has a few features that might be worth considering, like pockets on the back and the front:
The front pocket looks like it sits a bit high and would interfere with the back of your legs, maybe that's because it's one-size-fits-all and on some other seat it would be positioned better. And maybe more useful than a simple pocket on the back would be something like this Carhartt seat back organizer (left, $60), one from LL Bean (center, $149) or the one I designed a year or so ago (right):
I've found a very nice polyester fabric with DWR (durable water repellent) treatment; it's 12-ounce/sq. yard so thick enough to make a nice, durable seat cover and it's reasonably priced so it wouldn't drive the final price of the seat covers too high:
What do you think of the seat cover idea? (It's not my idea, so if you don't like it don't feel like you'd be insulting me
). If you think something like this would be useful, what features/styling/etc. would you like to see in it?jgaz
Adventurer
Thoughts on the sear cover project:
Given you are designing these for a limited number of seats I’m sure your fit would be much better than the “universal” covers. I’ve found most of these to be less than satisfactory.
Personally, I use a seat cover quite a bit, especially in my truck, so being able to put it on and off quickly would be important to me. I use one when I carry the dog or especially when I finish an off trail hike.
I like your choice of fabric. Want to borrow my dog to see how well it sheds dog hair? Note: His hair sticks to everything like cactus spines. Water repellant would be good for muddy dos and backpacks.
With your talent for design I’m sure your final product would be exceptional. Again though, for the way I use a cover, I don’t need a lot of pockets etc. that would drive the price higher. Others may disagree.
jscherb
Expedition Leader
That's good input, thanks.Thoughts on the sear cover project:
Given you are designing these for a limited number of seats I’m sure your fit would be much better than the “universal” covers. I’ve found most of these to be less than satisfactory.
Personally, I use a seat cover quite a bit, especially in my truck, so being able to put it on and off quickly would be important to me. I use one when I carry the dog or especially when I finish an off trail hike.
I like your choice of fabric. Want to borrow my dog to see how well it sheds dog hair? Note: His hair sticks to everything like cactus spines. Water repellant would be good for muddy dos and backpacks.
With your talent for design I’m sure your final product would be exceptional. Again though, for the way I use a cover, I don’t need a lot of pockets etc. that would drive the price higher. Others may disagree.
Don't have a dog here so won't be able to test that, but the fabric has a very tight weave so maybe dog hair won't be too much of a problem. The company is sending me some fabric so I can sew a prototype, maybe I'll send you a scrap of it as I start the sewing and you can rub it on the dog
.I am trying to keep cost down, so maybe I'll design the base product with a smooth back panel and a pocket/MOLLE panel will be an add-on option. I do a lot of modular designs, so that's something I've been considering.
And thank you for your kind words about whatever small helping of talent I've been given.
Florida Native
Active member
Well that’s the understatement of the year!whatever small helping of talent I've been given.
-Mike
jscherb
Expedition Leader
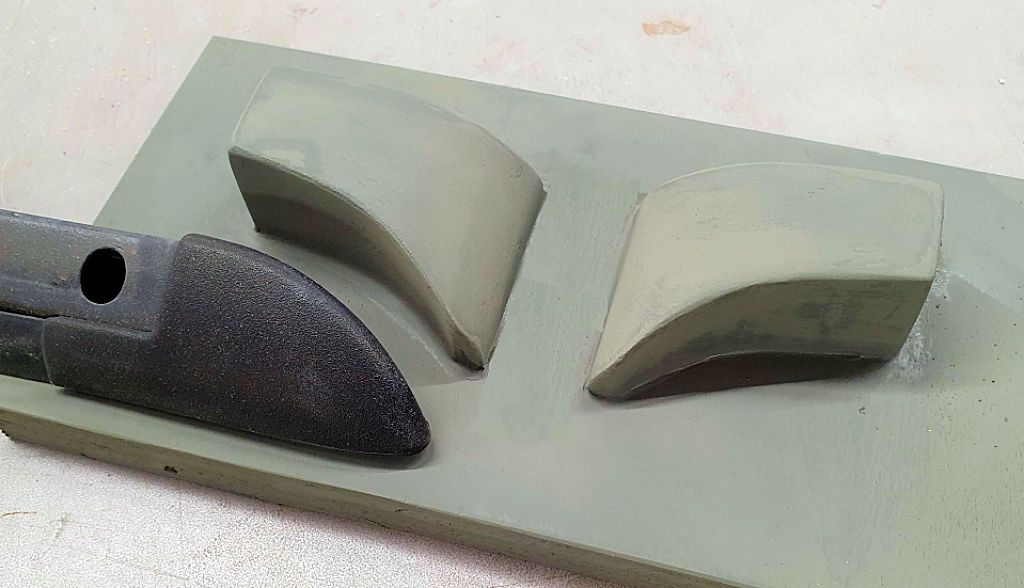
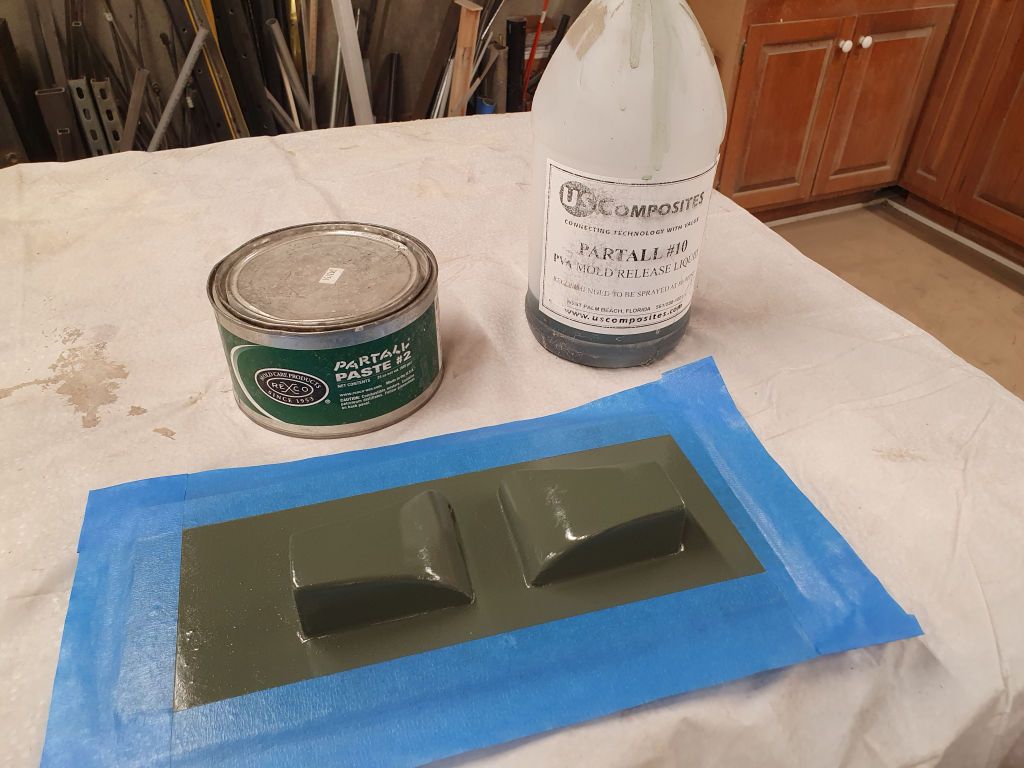
I made the mold for the roof power housings today. Step 1, which I did last night, was to prep the mold master. Several coats of mold release wax are wiped on with a rag, and when the wax has dried a bit, PVA mold release is sprayed on. PVA (polyvinyl acetate) is a water-soluable plastic that protects the mold.
First thing this morning I applied gelcoat. For most fiberglass molds and parts gelcoat is best sprayed on to get a uniform coating, but for something small like this a brush is fine. For most molds I usually use tooling gelcoat, which cures much harder than ordinary gelcoat and is a contrasting color from what will be made in the mold (usually orange), but I'm out of tooling gelcoat so I'm using ordinary gelcoat to make this small mold.
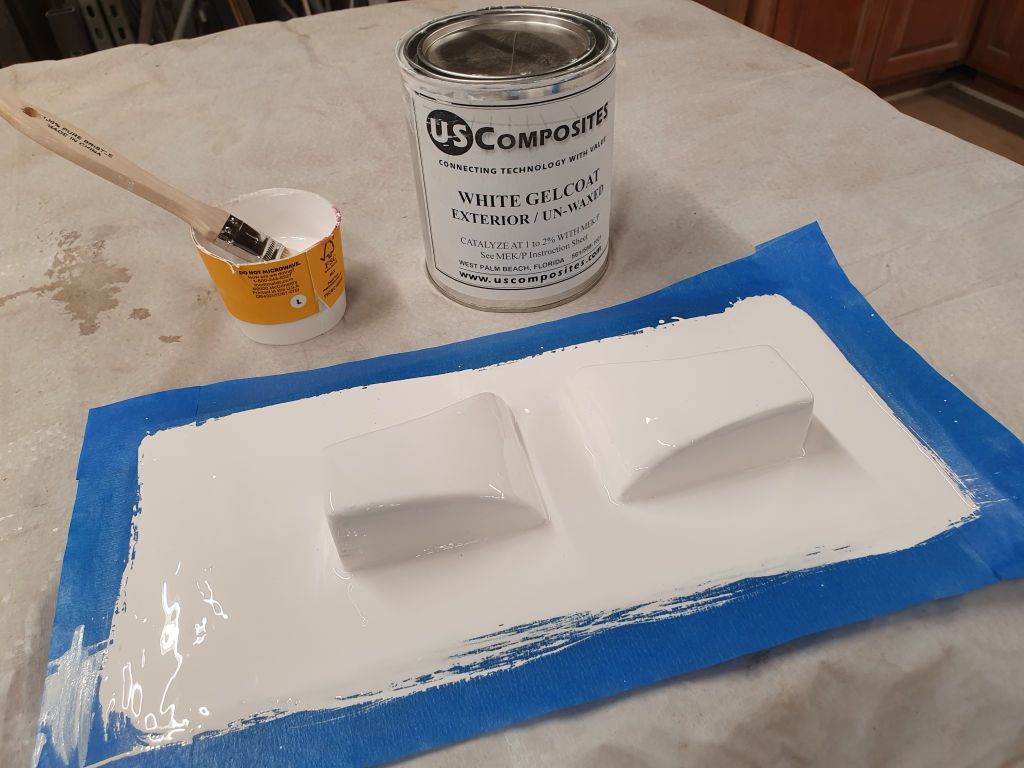
Gelcoat needs to cure a bit before the fiberglas layup can be done, usually about two hours. You can tell it's ready when you can touch it lightly with your finger and your finger comes away clean.
Two hours later, I've done the fiberglass layup.
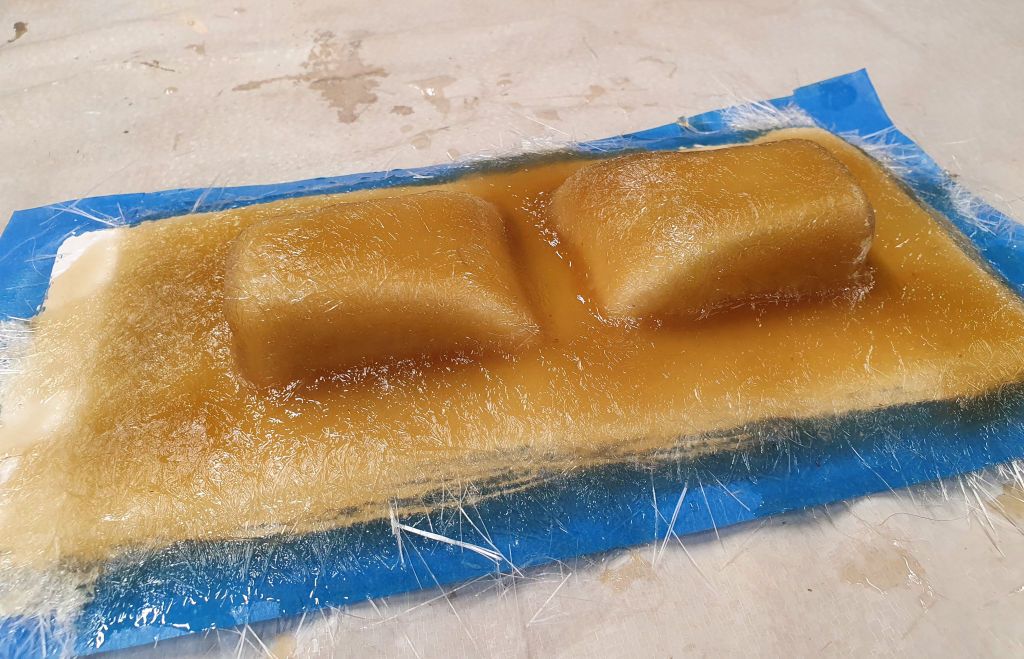
I'll let that cure overnight and tomorrow morning I'll pop the mold off the master and then I'll be ready to mold some parts.
First thing this morning I applied gelcoat. For most fiberglass molds and parts gelcoat is best sprayed on to get a uniform coating, but for something small like this a brush is fine. For most molds I usually use tooling gelcoat, which cures much harder than ordinary gelcoat and is a contrasting color from what will be made in the mold (usually orange), but I'm out of tooling gelcoat so I'm using ordinary gelcoat to make this small mold.
Gelcoat needs to cure a bit before the fiberglas layup can be done, usually about two hours. You can tell it's ready when you can touch it lightly with your finger and your finger comes away clean.
Two hours later, I've done the fiberglass layup.
I'll let that cure overnight and tomorrow morning I'll pop the mold off the master and then I'll be ready to mold some parts.
jscherb
Expedition Leader
Yesterday I received a final Tactical Roll Bar Buddy for my approval. They made the few changes I requested so it's fine.
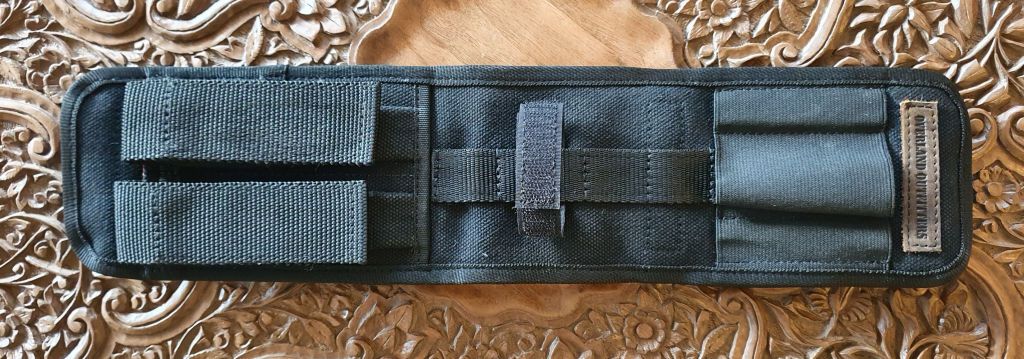
A few ways to use it - a large tactical flashlight goes in the elastic and the other end of the flashlight is held with a velcro strap; also in this photo is a multi-tool, a pocket knife, a tire pressure gauge and a pen.
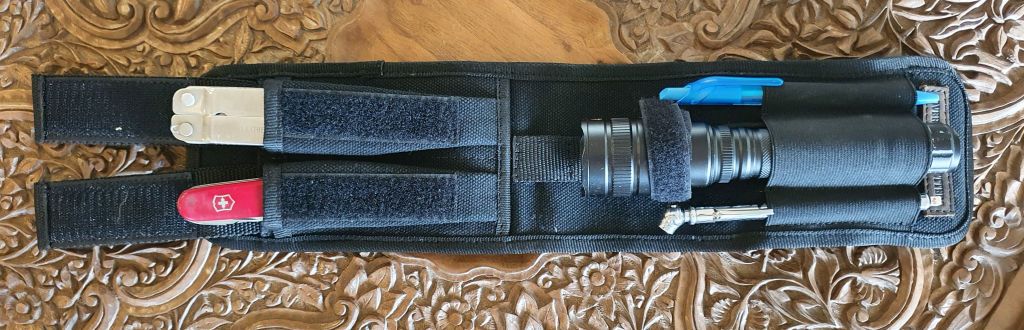
With a smaller flashlight, the velcro strap is removed, leaving a short PALS strip for hanging small MOLLE stuff.
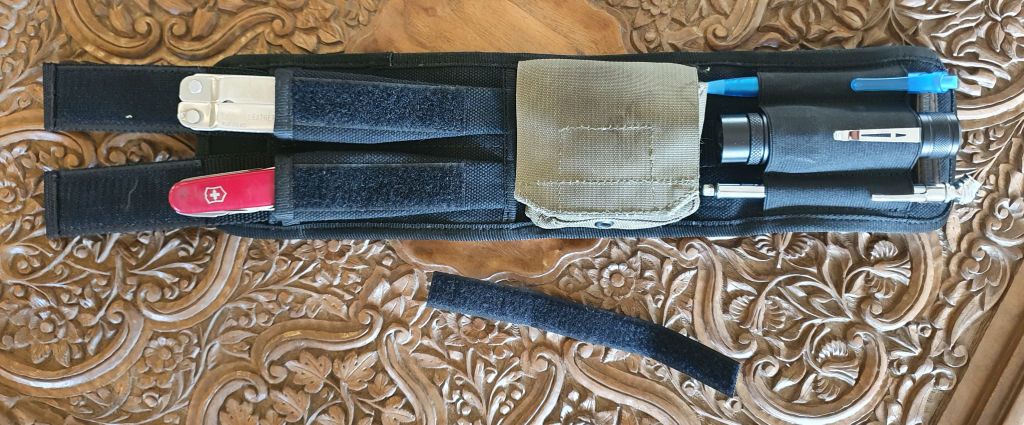
Overland Outfitters tells me these should be on their web site in the next day or two, and they also told me that Quadratec has placed an order so they'll be showing up there soon too. The version with pockets should be in both places soon as well.
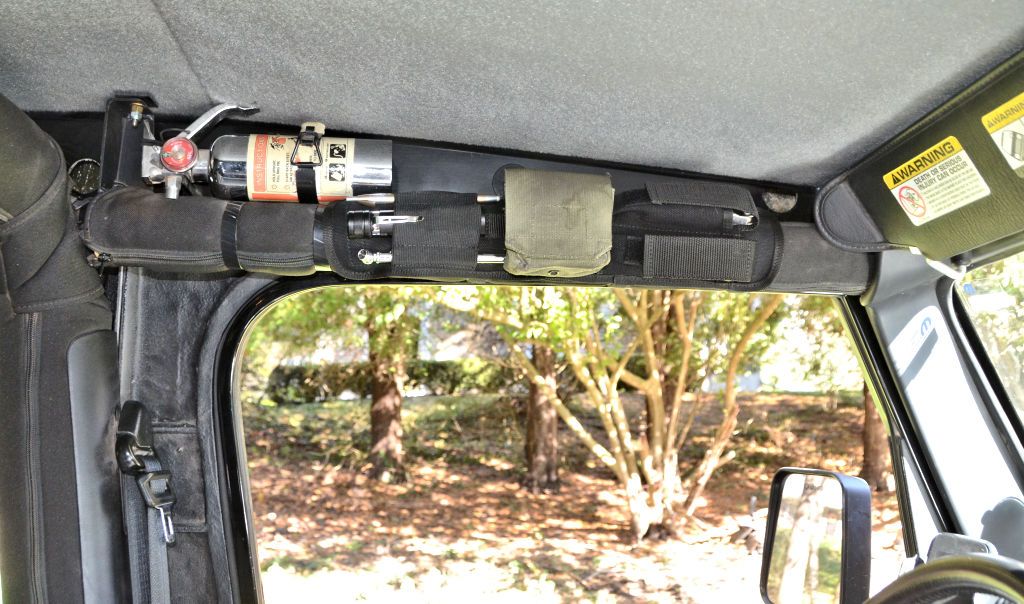
I've put one in each of my three Jeeps already. I've got the tactical version on the driver's side and the pocket version on the passenger side. The tactical version in my LJ:
A few ways to use it - a large tactical flashlight goes in the elastic and the other end of the flashlight is held with a velcro strap; also in this photo is a multi-tool, a pocket knife, a tire pressure gauge and a pen.
With a smaller flashlight, the velcro strap is removed, leaving a short PALS strip for hanging small MOLLE stuff.
Overland Outfitters tells me these should be on their web site in the next day or two, and they also told me that Quadratec has placed an order so they'll be showing up there soon too. The version with pockets should be in both places soon as well.
I've put one in each of my three Jeeps already. I've got the tactical version on the driver's side and the pocket version on the passenger side. The tactical version in my LJ:
Forum statistics
Members online
- llamalander
- Toyaddict
- wanderon
- mark5280
- IdaSHO
- Spatch
- Gsheller
- Deleted Member 183
- cobb ridge
- fastevo
- dnovotny
- Bobmog
- Delsh
- Windaroo
- aknightinak
- Fadeagray
- Wakeup2river
- pat11784
- adamalli
- Rakkasan3187
- kickitup04
- Eb1970
- DirtySocks
- RollingTaco
- Sunseed
- mmth_ski_bum
- Geared4adventure
- lr3man
- 67 Fastback
- andy_d
- NatersXJ6
- poo_head
- ColoradoToy91
- wfv56
- Frisman
- brokenfoot
- sndohio89
Total: 1,007 (members: 42, guests: 965)