You are using an out of date browser. It may not display this or other websites correctly.
You should upgrade or use an alternative browser.
You should upgrade or use an alternative browser.
And it begins. Stump XJ's trailer build.
- Thread starter StumpXJ
- Start date
ocean_explorer
New member
Bruce, very well done modular design and implementation! You have given me some ideas - thank you.
Jim
Jim
slimtwo
Adventurer
Bruce.... nicely done! Yours looks more robust to say the least! Have you had a chance to use it much yet? I have used mine many times now, and after working out a few bugs, its hard to go camping without it!
Thanks, James
Thank you for your comments James, from one craftsman to another not to many people can appreciate the effort that goes into building something like this.
As far as using it, I have only actually had the opportunity to use it the one time since I completed it in October. That last picture was from the trip we did on the Mojave Road. The “Chuck Box” worked very well with the exception that it a little heavy. I built it in two boxes like that so I could load and unload it by myself, however I need to try and lighten it up some. I’m thinking about using a hole saw to lighten it up, then gluing Formica on the top and fold down work surfaces, we’ll see how that works.
I am working on writing up instructions and illustrations to build this camp kitchen. I built the box mostly from my head, and a few sketches, but trying to put my thoughts and sketches on paper so someone else could build one is a lot harder. Have fun with your box, and I’ll do the same.
Happy trails!
StumpXJ
SE Expedition Society
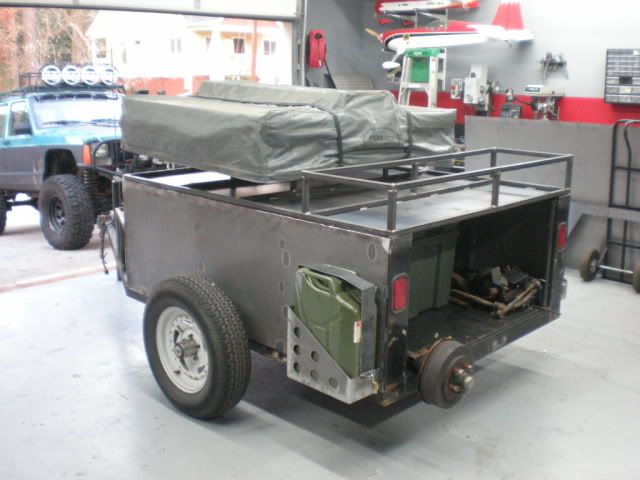
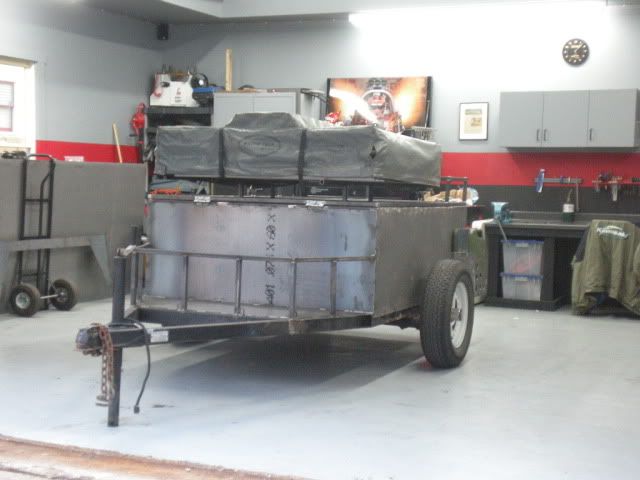
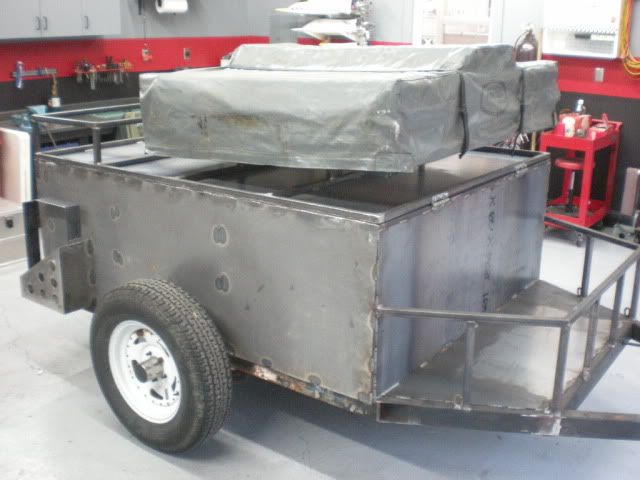
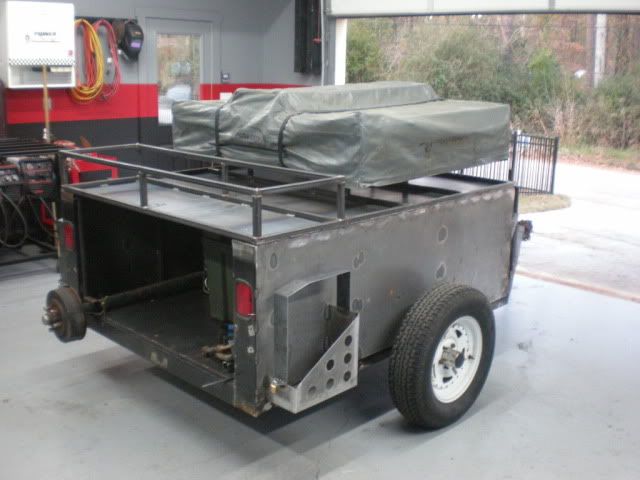
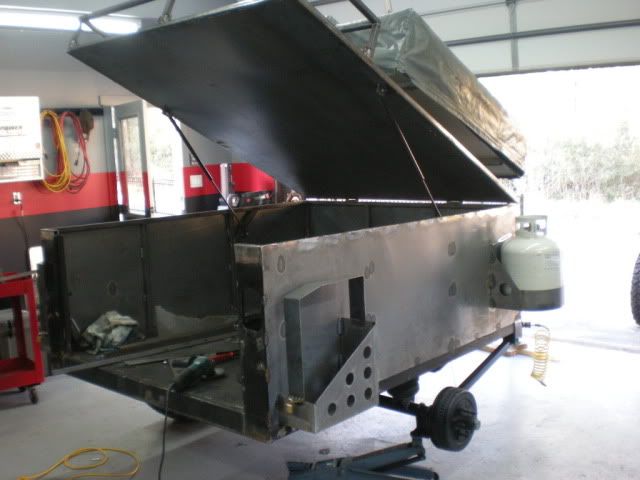
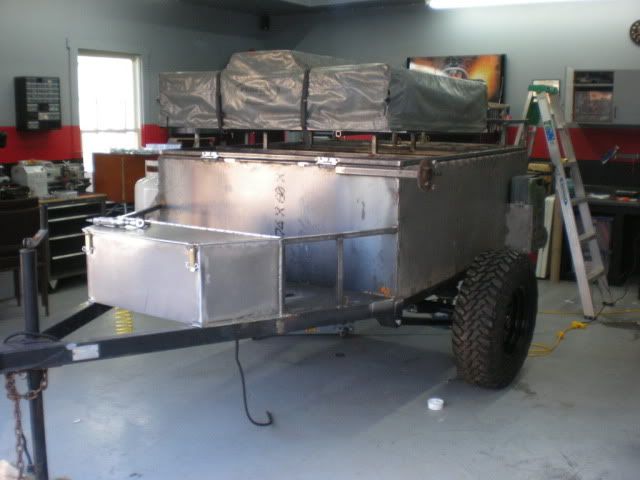
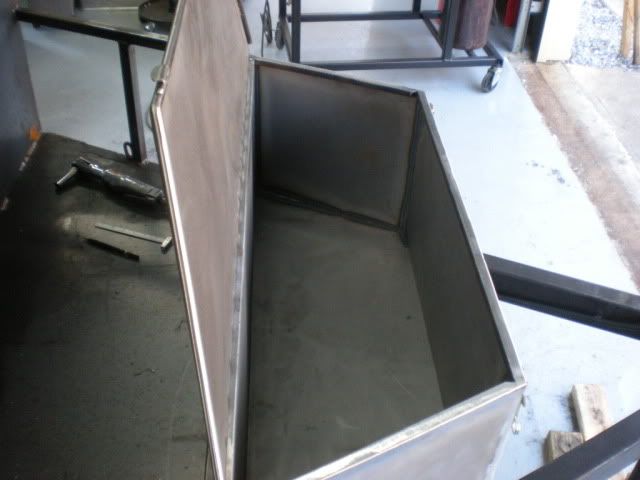
Got a little more work done today, and need to update from last thursday with the lid. I got the lid mounted, and made the rear cargo basket area. I also got the rails on for the RTT. I just threw the RTT on top to see how it all lines up, and so far so good. I wanted the RTT a little higher than normal since I have big hands and it helps to have room under the perimeter of the tent when trying to zip on the cover. Shouldnt be a problem anymore. I need to get a new cover from Fernando, as this one (the old thin style) is trashed.
RTT is just sitting there, not bolted down. It will open over the tongue of the trailer.
Need to get the gas lift struts for the lid. Got it all figured out, just need to find a few bucks.
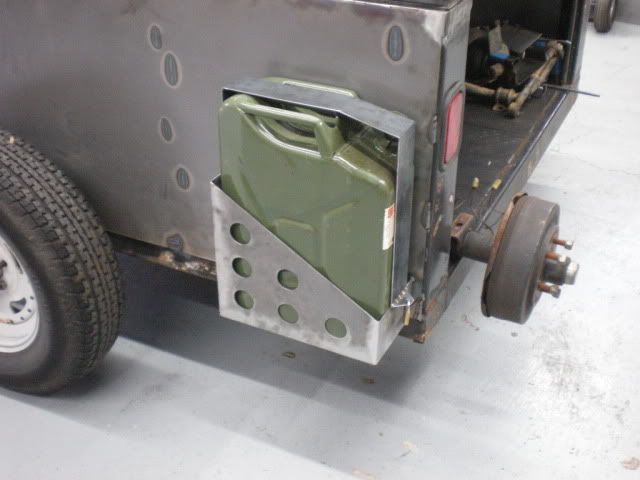
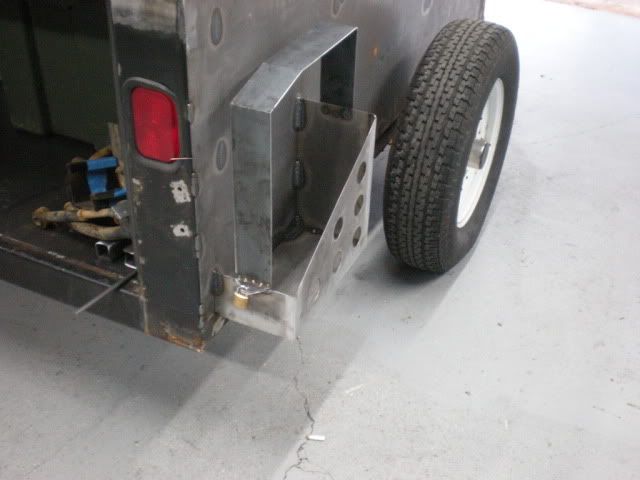
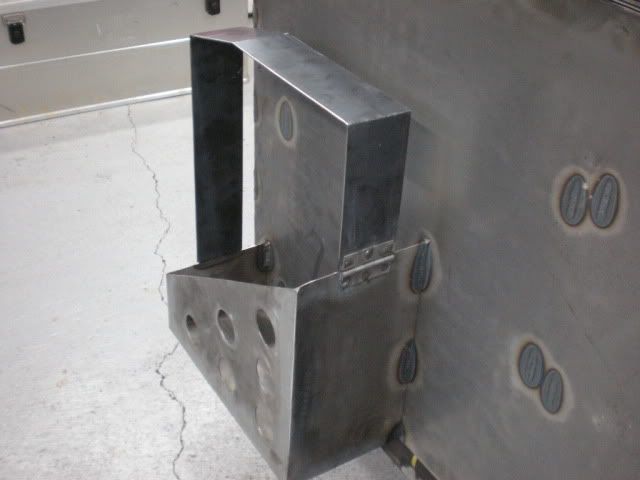
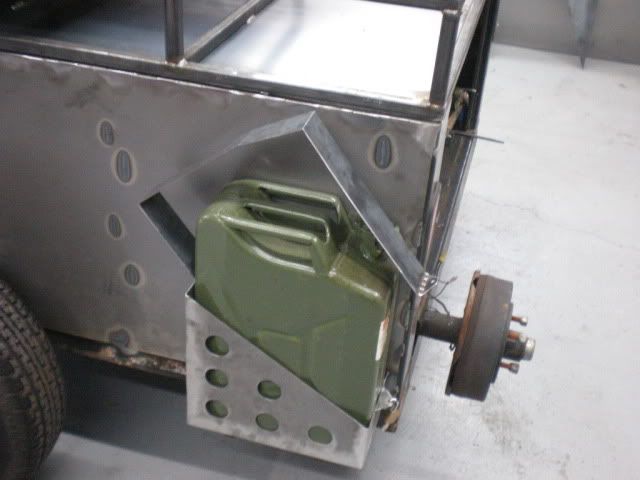
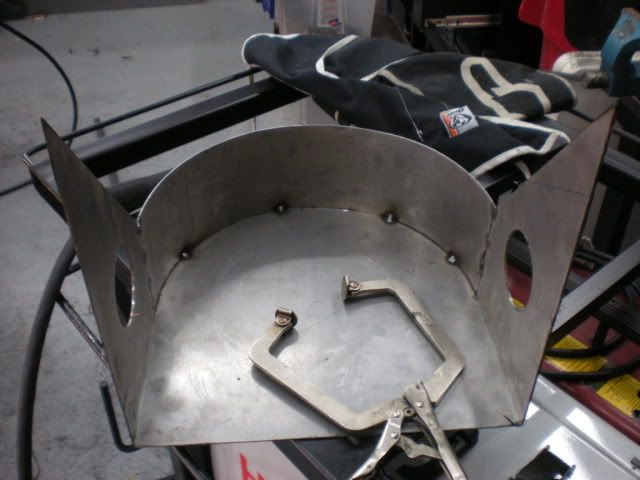
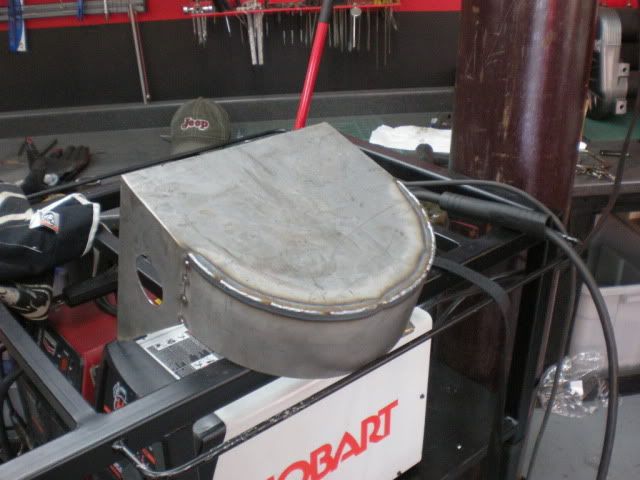
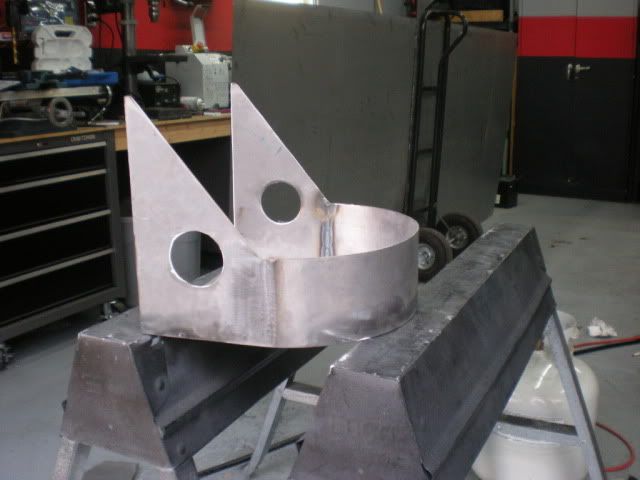
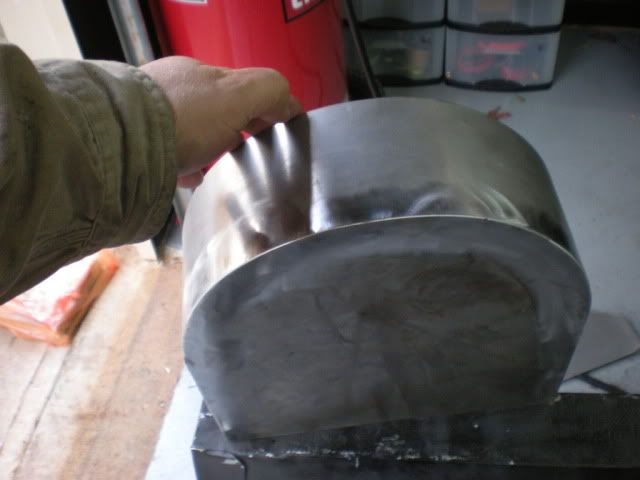
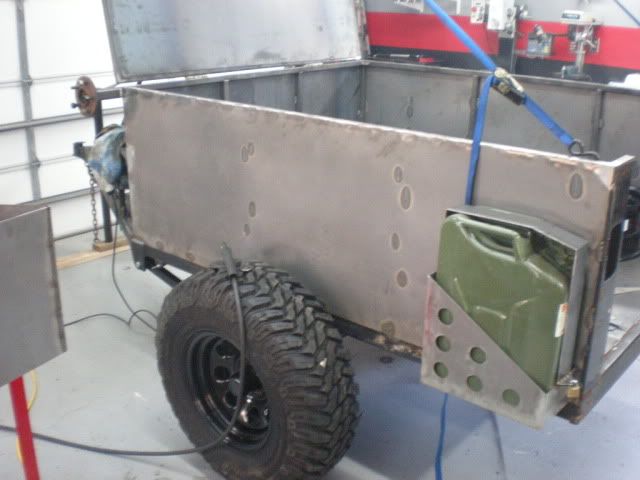
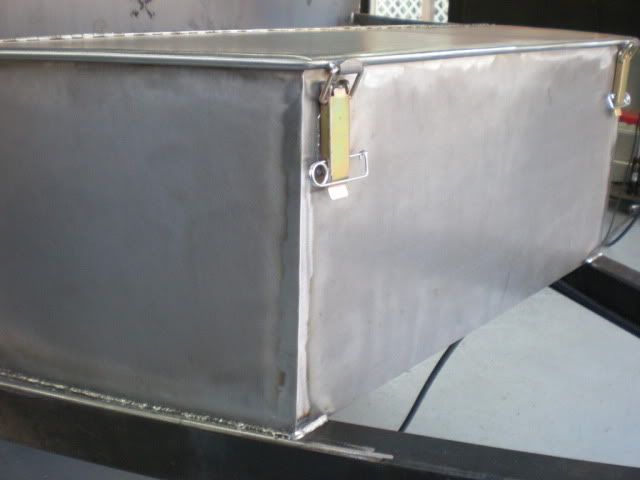
Today, I spent about 4 hours making a couple loackable Jerry can holders. I am happy with them, and they will certainly do the job. For not having a sheetmetal break (brake?), it turned out pretty sweet.
I will probably make the spare holder, and a propane tank on the other side.
RTT is just sitting there, not bolted down. It will open over the tongue of the trailer.
Need to get the gas lift struts for the lid. Got it all figured out, just need to find a few bucks.
Today, I spent about 4 hours making a couple loackable Jerry can holders. I am happy with them, and they will certainly do the job. For not having a sheetmetal break (brake?), it turned out pretty sweet.
I will probably make the spare holder, and a propane tank on the other side.
StumpXJ
SE Expedition Society
Got a little more work done. Most of this 'little' stuff takes more time thatn anything else... but anyway.
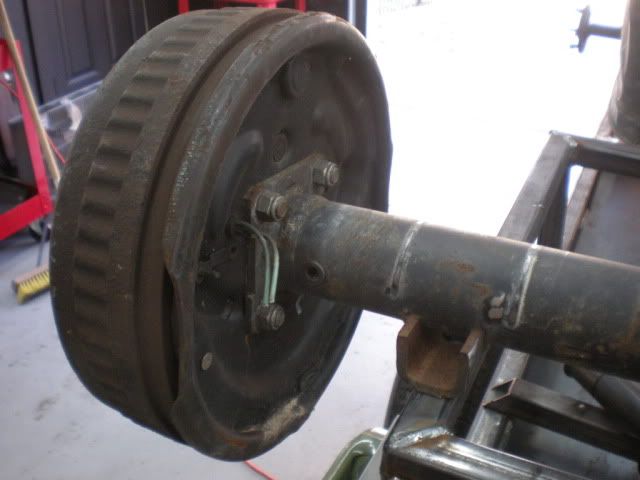
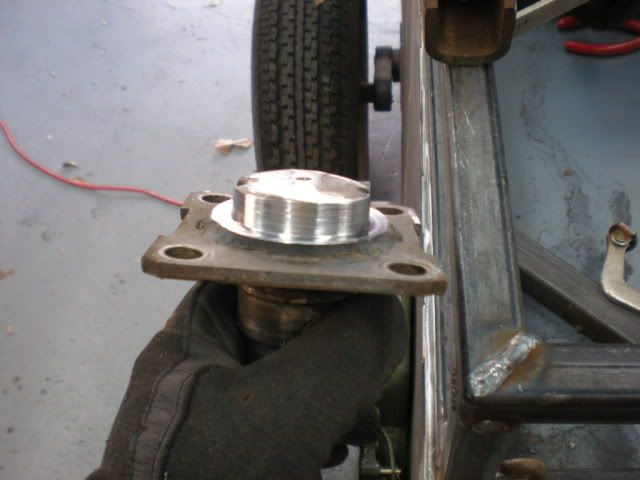
I mentioned in an earlier post that the axle I picked up was too wide. I didnt know this until I got home. I took the sellers word for the measurement he gave me before picking it up, but apparently he is not familiar with how a tape measure works. So, I cut everything loose today and narrowed it 2.5" from each side. I couldnt just cut and sleeve it in the middle since it has the built in camber/bend in the middle and I would like to keep that feature, so I took it off of each end. The spindles are machined to fit snuggly inside of the axle tube then welded, and the brake flange is just welded to the spindle. So, I used the chop saw to get the inside cut square, then I managed to chuck the spindle up in my little lathe and turn down the remaining stub of the axle tubing. so it fits back inside the axle tube. Was a LOT of work for my little lathe, but it got it done. Would have taken 10 minutes in a full size lathe, I spent an hour on each spindle....
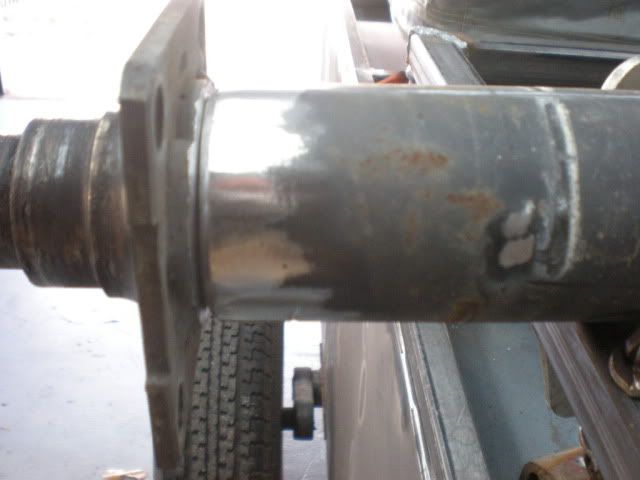
Got it all welded back up nice a solid, and repositioned the springs pads where they were supposed to be for my build.
Re-greased all of the wheel bearings and seals, adjusted the brakes, and torqued everything down. Its ready to be bolted on, but I am still waiting on the bushings for the control arms.
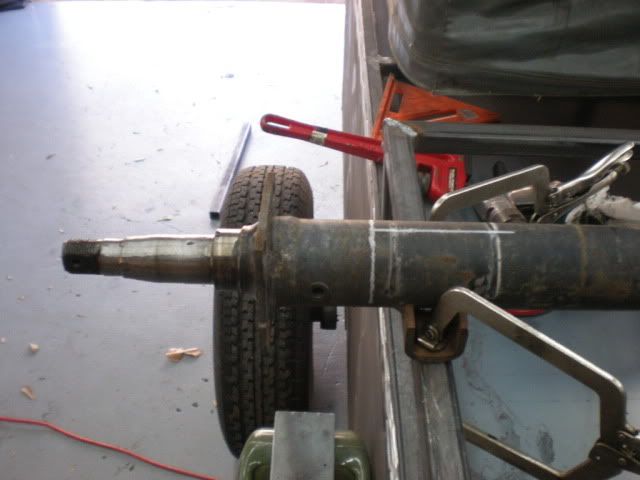
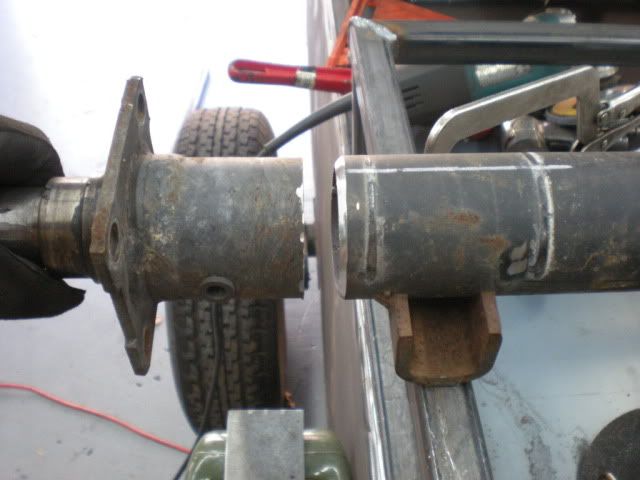
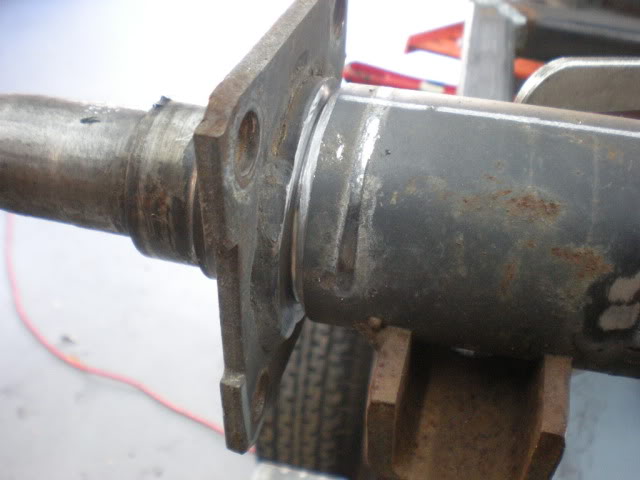
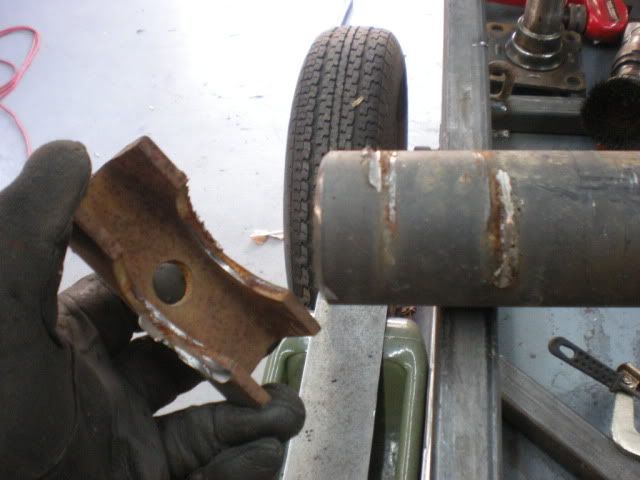

I mentioned in an earlier post that the axle I picked up was too wide. I didnt know this until I got home. I took the sellers word for the measurement he gave me before picking it up, but apparently he is not familiar with how a tape measure works. So, I cut everything loose today and narrowed it 2.5" from each side. I couldnt just cut and sleeve it in the middle since it has the built in camber/bend in the middle and I would like to keep that feature, so I took it off of each end. The spindles are machined to fit snuggly inside of the axle tube then welded, and the brake flange is just welded to the spindle. So, I used the chop saw to get the inside cut square, then I managed to chuck the spindle up in my little lathe and turn down the remaining stub of the axle tubing. so it fits back inside the axle tube. Was a LOT of work for my little lathe, but it got it done. Would have taken 10 minutes in a full size lathe, I spent an hour on each spindle....
Got it all welded back up nice a solid, and repositioned the springs pads where they were supposed to be for my build.
Re-greased all of the wheel bearings and seals, adjusted the brakes, and torqued everything down. Its ready to be bolted on, but I am still waiting on the bushings for the control arms.
StumpXJ
SE Expedition Society
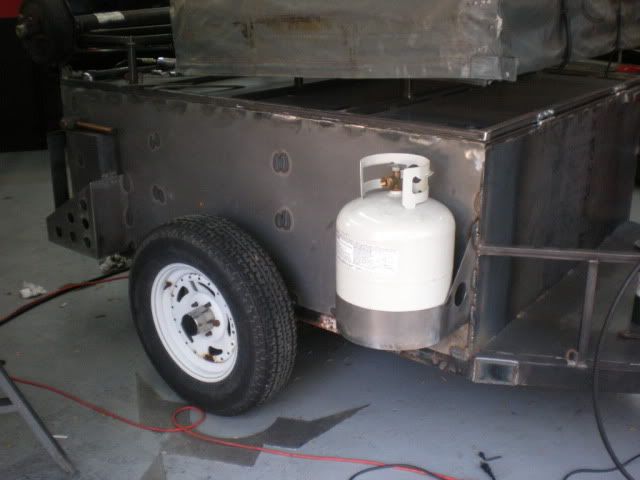
Next up, I fabbed up a mount for my propane bottle, and added a simple little spare tire holder.
The propane mount holds a full size 16.6 pound (everyone calls them 20 pounders) propane bottle that you can swap out/find just about anywhere without worrying about trying to find a place to fill the fancy little 5 pounders. That, and it lasts a long time...
Just got to mount the securing turbuckles, and its done.
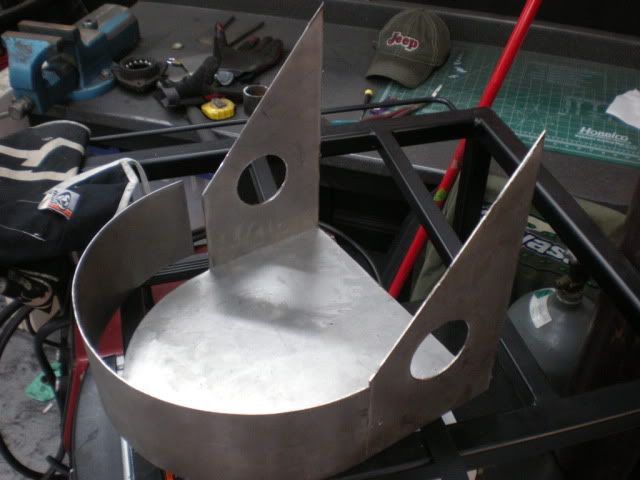

Lastly, I whipped up a simple little sprae tire holder for the front side of the trailer. I had a section of 1.5 x 1.5 x .25wall left over from my suspension arms, and just decided to weld it strait to the front frame area of the trailer. I cut apart an old Unit Bearing/Hub from my Jeep and used the mount flange as the spare holder. Just welded it straight to the tubing and its ridiculously strig at this point, so I think itll be fine. I can cut it off and re-do if I need to later, but for now the KISS method seems like it will work.
This is about the only place I have that will hold the tire (31x10.50) and not get in the way of anything.
~James
The propane mount holds a full size 16.6 pound (everyone calls them 20 pounders) propane bottle that you can swap out/find just about anywhere without worrying about trying to find a place to fill the fancy little 5 pounders. That, and it lasts a long time...
Just got to mount the securing turbuckles, and its done.
Lastly, I whipped up a simple little sprae tire holder for the front side of the trailer. I had a section of 1.5 x 1.5 x .25wall left over from my suspension arms, and just decided to weld it strait to the front frame area of the trailer. I cut apart an old Unit Bearing/Hub from my Jeep and used the mount flange as the spare holder. Just welded it straight to the tubing and its ridiculously strig at this point, so I think itll be fine. I can cut it off and re-do if I need to later, but for now the KISS method seems like it will work.
This is about the only place I have that will hold the tire (31x10.50) and not get in the way of anything.
~James
Hilldweller
SE Expedition Society
You'll be able to use this for Country Fried Weekend next month, won't you?
If there's enough dudes, we'll all throw in $5 to get you a fridge...
If there's enough dudes, we'll all throw in $5 to get you a fridge...
StumpXJ
SE Expedition Society
I couldnt just cut and sleeve it in the middle since it has the built in camber/bend in the middle and I would like to keep that feature, so I took it off of each end.
your axle looks bent now after all that welding. i'd check it out if i were you. should have made a jig for it....
trailer looks good though.
Michaels, most solid axles nowadays have a bend in the middle like I mentioned in the orginal post. This is to set the proper camber for the wheels. The reason I cut off of each end instead of one cut in the center was to keep the factory 'bent' axle like it should be.
Here is a quote from the FAQ section of Dexter axles:
AXLES - Why are some axles bent in the middle?
The upward bend in the axle is called "camber". Camber is the angular relationship of the wheel to the road surface in the vertical plane. Axles are typically built with a pre-determined bend in the tube that compensates for the expected deflection under load.
Thanks! ~James
Last edited:
StumpXJ
SE Expedition Society
Yeah... Steel does some crazy stuff when you weld it. While this isnt my first fabrication rodeo, I dont know anything about trailers either, but im learning as I go!
Bill, I seriously doubt it will be finished by then. I have too much stuff to do, and not enough cash to do it. We will see.
Just a quick list of what would need to be finished before I could take it out.
Suspension and axle set-up (next week)
Tires and wheels ($$$)
Paint (cant do that till all the metal work is finished)
Wiring (cant do that till the paint is finished)
Plumbing (see above)
Hitch/Tongue area on the trailer ($$$)
Make a new rear bumper for my Jeep, since it has no hitch ($$$)
Tongue box for all the goodies ($$$)
etc.
etc.
As much as I would love to use it for Country Fried Weekend, I dont think its gonna happen. Not sure what my camping 'outfit' will consist of that weekend, but I will be there regardless.
~James
StumpXJ
SE Expedition Society
Got quite a bit of work done over the past couple weeks. Thecamera batteries were dead for while, so I didnt get many of the suspension and water tank install while it was upside down, but you should be able to get the gist of it with the below pictures.
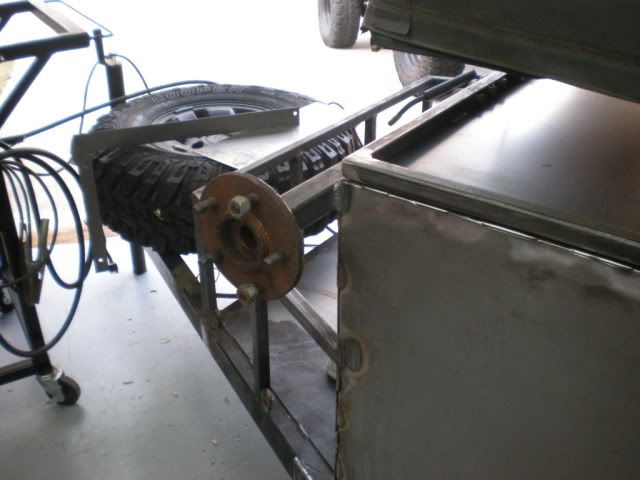
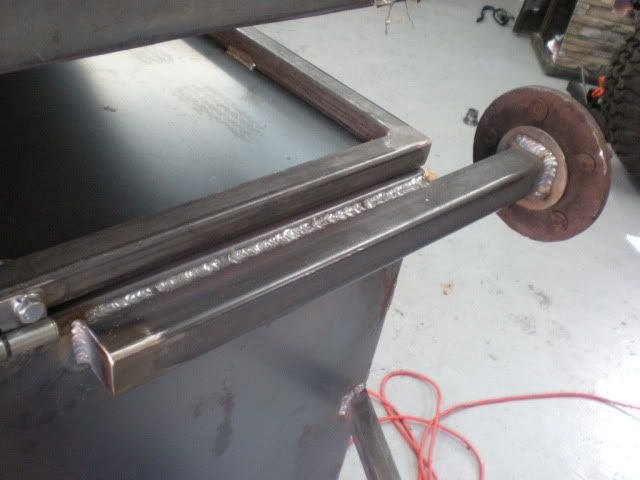
I decided to go ahead and build a custom suspension for it. I used my solid axle that I narrowed, and made a trailing arm set-up with a panhard bar. I used 1.5 (.25 wall) square tubing for the arms, and 1.5 round DOM for the panhard bar. Greaseable poly joints on the arms, and the trackbar/panhard, and everything is in double shear. I used firestone airbags that I had left over from my tacoma. Between making all of the various brackets, machining a few parts, and making/installing the water tank, tank skid, water pump and plumbing, this took an enture weeks worth of work. I still have to bolt on shocks, and should get those finished this week. I also have to track down an airleak in the airbags plumbing since it looses a few pounds overnight. Other than those few things, the bottom is finished, and I have already painted it with rubberized underbody coating.
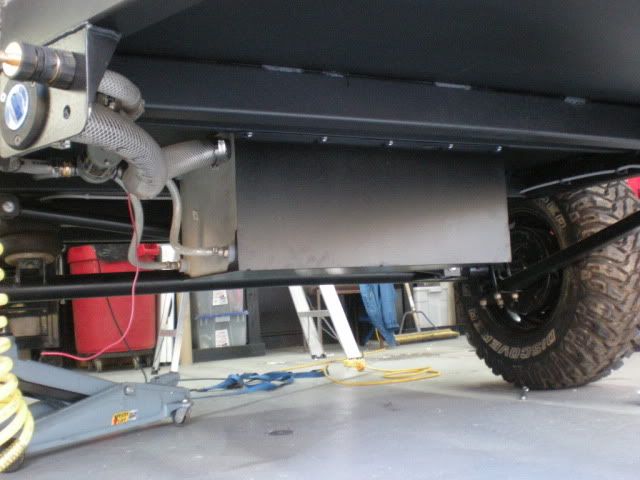
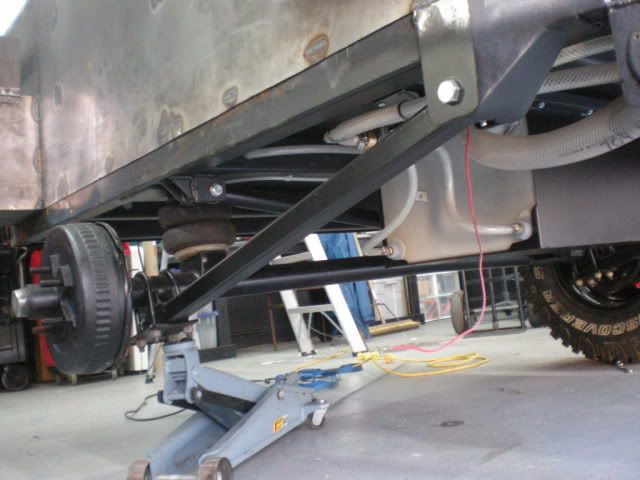


I decided to go ahead and build a custom suspension for it. I used my solid axle that I narrowed, and made a trailing arm set-up with a panhard bar. I used 1.5 (.25 wall) square tubing for the arms, and 1.5 round DOM for the panhard bar. Greaseable poly joints on the arms, and the trackbar/panhard, and everything is in double shear. I used firestone airbags that I had left over from my tacoma. Between making all of the various brackets, machining a few parts, and making/installing the water tank, tank skid, water pump and plumbing, this took an enture weeks worth of work. I still have to bolt on shocks, and should get those finished this week. I also have to track down an airleak in the airbags plumbing since it looses a few pounds overnight. Other than those few things, the bottom is finished, and I have already painted it with rubberized underbody coating.
StumpXJ
SE Expedition Society
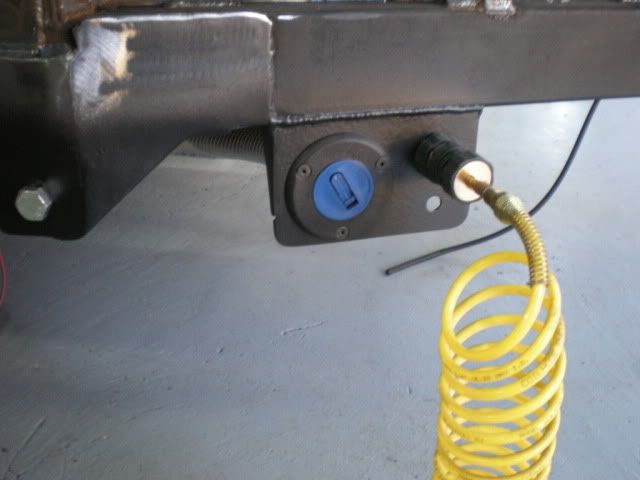
I decided to also make my own tounge box, since I couldnt find the perfect size I needed. This was a fairly easy job, although it took the best part of a day. I have plenty of room for my electrical stuff, including a battery or two. There is a rubber seal that goes around the lid after its all painted.
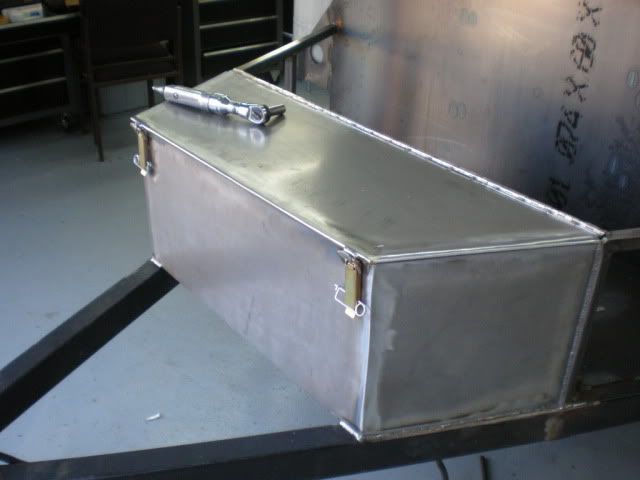
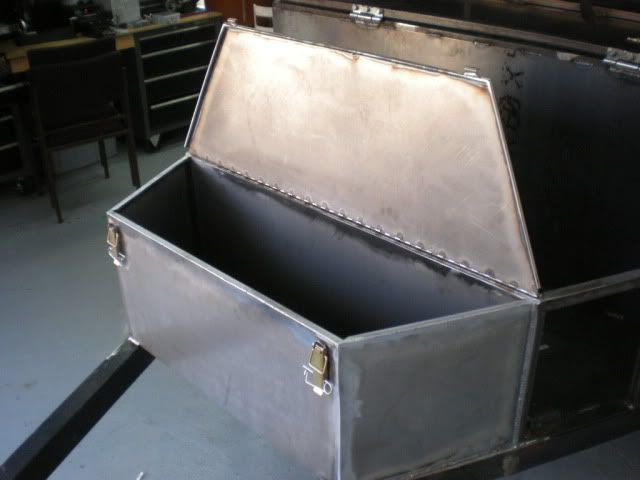
I also oredered, recieved and installed two 250lb gas struts for the lid.
Got it figured out on the 3rd try, and it works like a champ!
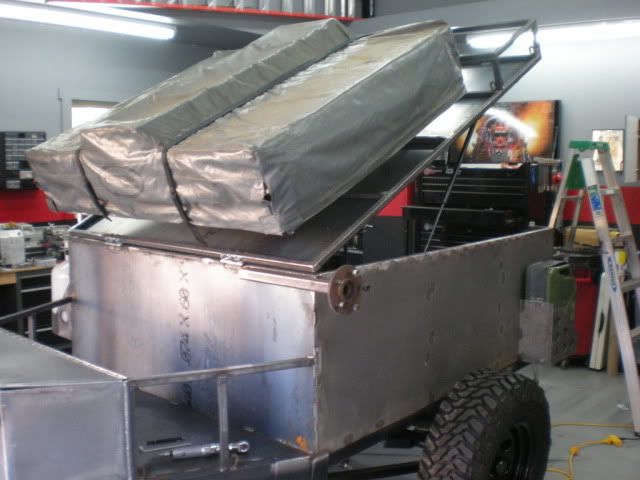
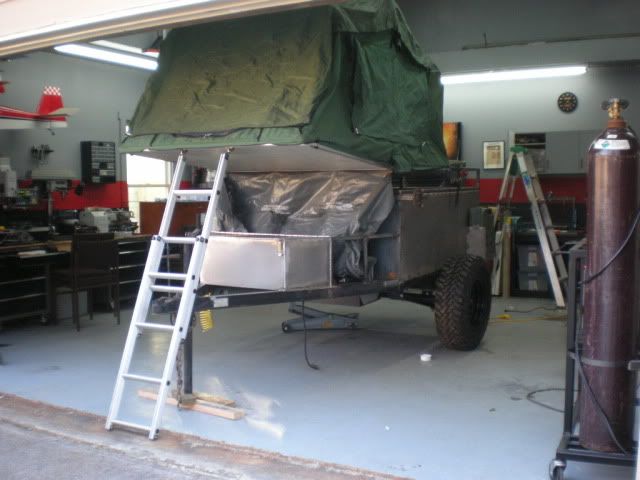
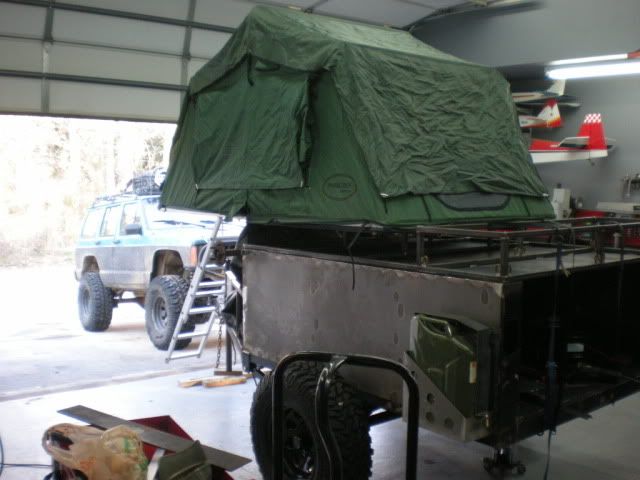
I was also playing around with the tent deployment, and I think it should work perfectly once I get the old standard ball hitch off of the tongue, and my receiver installed. I will be moving the screw jack back a little as well to clear the ladder.
I also oredered, recieved and installed two 250lb gas struts for the lid.
Got it figured out on the 3rd try, and it works like a champ!
I was also playing around with the tent deployment, and I think it should work perfectly once I get the old standard ball hitch off of the tongue, and my receiver installed. I will be moving the screw jack back a little as well to clear the ladder.
RHINO
Expedition Leader
fantastic job so far,,, the laws for trailers must be pretty steep there to do what you did instead of build from scratch. out here its a simple matter of taking the trailer down so they can basically measure it and then its $112 or so for a lifetime reg.
but to my Q, is that your home garage or what? very clean.
are your shearing and bending that sheet yourself?
but to my Q, is that your home garage or what? very clean.
are your shearing and bending that sheet yourself?
Forum statistics
Members online
- bt50
- Kevox
- Chomar
- Howard70
- sancap
- Johnboyy
- rumin8
- smb
- pmkcolorado
- SnoopisTDI
- mark5280
- woodjacob23
- martinet
- 94-RUNNER
- joeaeti
- YukonMontanaTannerTrapper
- TrungH
- Mel.Specs
- TRAVR
- Iain_U1250
- mowgli1313
- CH261XL
- jhl99
- blackhawkip
- srsrogerissrs
- Blackwater
- jchasse
- renottse
- Akdjmojo
- driveby
- kwhitham
- Parks
- hibear62
- bfj
- RES
- Alee210
- Farfrumwork
- goawaymore
- LordExplorer
- Pale-Rider
- leunam
- mo414
- Todd n Natalie
- Bingoman
- LikeABoss
- rdrop
- wrestler034
- 3IMOH
- dizzydom
- Victorian
Total: 944 (members: 55, guests: 889)