You are using an out of date browser. It may not display this or other websites correctly.
You should upgrade or use an alternative browser.
You should upgrade or use an alternative browser.
A trailer for the short bus
- Thread starter jays0n
- Start date
texasnielsen
Outdoorsman
Great write-up and awesome trailer project. Glad to hear it worked so well...
jays0n
Adventurer
Well we were going to sell the trailer and move onto a new project but decided to keep it around and make a few changes to make it even better. We're in the planning stages of a Baja trip next year and I have a "To Do" list already going for the trailer. The plan is to leave Seattle and end in Cabo (or whenever we decide to turn around), giving ourselves a month to get there and back. We will be putting just under 5k miles on the trailer over a 3-4 week period in another country so I want to be sure it's 100% ready, would rather not have the story of an amazing adventure with friends end because a stupid nut/bolt fell off and caused a massive failure. There are a few small things on the list but most important is some suspension work. Much of this work is already done, see the updates below.
threadlock all hardware that doesn't have nylock nuts or lock washers
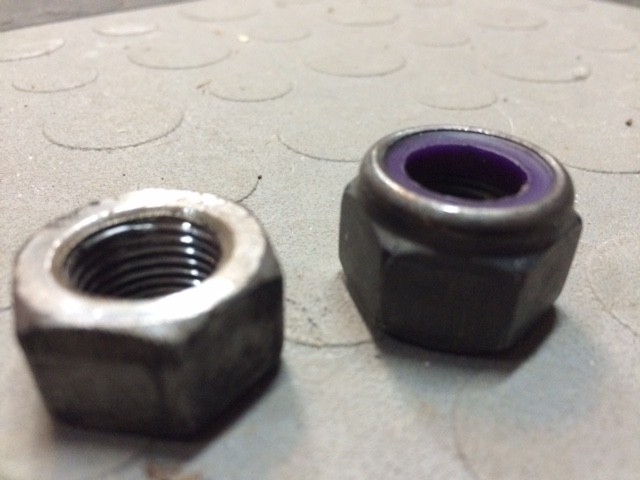
either safety wire shackle nuts or replace with nylock nuts
tighten everything, again and then again
fully stock the "spares" bin
verify all wire looms are tied down securely
check water level in batteries
remove and re-install tonneau cover with bolts instead of clamps
add a light inside the tongue box (electronics hub)
shocks, shocks, shocks
seal all gaps, panel seams, wire access holes, etc.
grind and re-weld any less than ideal welds I made
replace velcro tie down straps on Tepui tent, both inside and outside
add ability to carry more water and fuel
evaluate and adjust tool kit
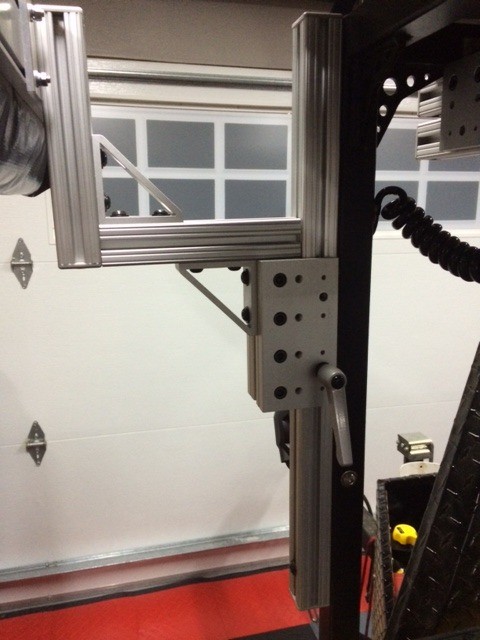
add a 750w inverter and hard wire to an outlet mounted in the tailgate stiffening bracket
modify the overhead rack to be able to move down for travel, lower center of gravity is needed to really take it offroad
add a mount and stowage points for a 20ft telescoping flag pole
I used stainless blind nuts on all of the tub/floor mounting points and was so excited to get the tub mounted I never put thread lock of any sort on them, just antiseize to prevent galling. After putting 3k miles on it they haven't come out, just loosened up a tiny bit. I'll be pulling them one at a time to make sure they don't loosen up again.
I've changed the shackle bolts to the greaseable type but never replaced the "crimp" style lock nuts. They don't back off but they seem to be less tight then I would like. I'll either drill/safety wire them or replace the nuts with nylock versions. UPDATE: Stopped by Tacoma Screw last night and picked up eight grade 8 nylock nuts for the shackles. Got them installed and have 2 spares for the kit.
I will put a tool on EVERY FASTENER before and after some additional shakedown runs next Summer. Honestly I'll probably do that every time we stop for a bit on the trip too Smile UPDATE: Everything is tight!
When I built the Dinoot I put together a kit with at least 1 spare of every fastener on the trailer, I've pilfered it a bit for other projects over the last year so it's time to get it back to being able to cover ANY fastener that may go missing along the way. UPDATE: the spares kit is back to its original glory, the trip won't be stopped for a missing nut or bolt now.
When I did the extensive wiring I was careful to make sure nothing was put in "harms way" and all wiring was tied down with screw in clamps to prevent snagging wires in brush, etc. I just want to get under there and make sure everything is still in good condition. UPDATE: all wiring is secure and looks great, nothing has moved and it seems that won't change anytime soon!
My batteries are going on 3 years old and I don't remember ever checking their water level so I guess I should do that.
I installed a tonneau cover, the issue I've had is that the clamps are holding onto the angled portion of the tub lip and over time this has caused the rails to slip further toward the outside. It hasn't caused any issues but I want to take a closer look at why and see what I can do to prevent it getting worse. UPDATE: someone suggested drilling the rails and mounting it with bolts, did that last night and was able to remove the clamps after, plenty solid and isn't going anywhere now!
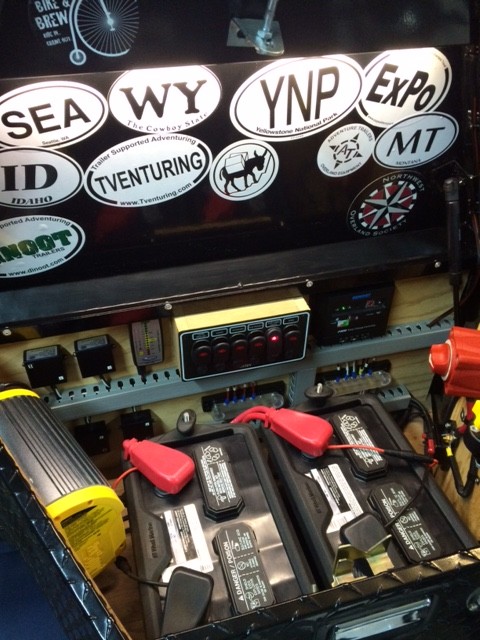
I originally installed a few strip LEDs under the tub lip to indirectly light the inside of the tub for nighttime loading, etc. I had 1 extra and had planned to install it inside the tongue box lid to act as an "under hood" light when dealing with power stuff at night. There is an open position on the switch bank and a great place to put it, just never got to it, probably a 20 minute job with scrap wiring and leftover loom. UPDATE: it was as easy a change as I expected it to be, plenty of light for the whole box and when it's off you wouldn't even know it was there.
The trailer needs shocks, no two ways about it. After the initial build I realized that the leaf springs were quite undersized for the weight, it was bouncing and bottoming out in the wheels wells. I upgraded the springs to a heavier pack, no more bottoming out but that obviously didn't totally solve the bouncing. I'm planning to weld on shock mounts and add basic shocks. With the rear stabilizers, water tanks, accumulator, pump, wiring, etc under there the mounting won't be ideal but will be good enough and should make a huge difference in the handling.
When I joined the tub panels and joined the tub to the floor by myself and getting some kind of caulking under the flanges wasn't really possible, plus I was so excited I kinda forgot to add some. After spending a lot of time on dirt roads and traveling through a few heavy rain storms I realized how much of a mistake that was. I'm sealing up all the seams with black silicone caulking, actually about 1/2 done so far. UPDATE: I spent some time cleaning out the dirt that had accumulated in just about every crack and then filled them with black silicone. Used a drop light in the dark to test for holes big enough to let light in and it seems that I got them all!
I made a few welds when I put this together, I've since gotten a much better welder and have a lot more practice so I'll be grinding down and re-welding those. I'm confident they would hold but will sleep a lot better knowing the few questionable welds are sorted out.
All of the velcro straps on the Tepui tent have started to fail but seeing as they are nicely just screwed on I can easily replace them. I have cam straps to replace the "over the cover" straps and some buckles to replace the ones that hold the tent folded down so you can put the cover over it. I have them, just need to spend some time with the sewing machine to cut and sew them to size. UPDATE: I busted out the sewing machine last night and made up my new straps, so far they seem to do the trick!
For a long trip as this one we need all the water and fuel we can carry. My FJ gets 12-15 mpg towing and worse offroad so the more the better. I have a couple of 2 gallon Rotopax canisters on my tire swing out and am working on a place to mount up to 4 more on the trailer. So far it looks like the left and right sides of the tongue box are ideal spots for them. Either they will be mounted to the actual box or on brackets welded to the rack supports on the front corners. This will give me 4 more gallons of fuel and 4 more gallons of water securely mounted to the trailer. Unfortunately they aren't cheap so I'll have to save my pennies for this addition.
I currently have a decent tool kit that rides in the trailer with everything else. It doesn't cover anything but the fasteners on the trailer itself. I need to go through it and add anything I might need for work on both the trailer or the FJ, probably needs a few things but it's currently pretty complete.
We don't often need 110v power on trips and if we do the FJ has an inverter built in. On this trip we'll have cameras to charge and things like an electric razor to keep charged as well (more than 4 days without a shave is about all I can take). I'm planning to pick up a cheap modified sine wave inverter, mount it in the tongue box, hard wire it to the batteries and to an outlet I'll mount in the passenger side tailgate stiffening bracket (the driver's side contains the 12v power options). The tongue box is getting full so finding space may be a challenge, more to come on this. UPDATE: I was able to shuffle a few things around in the tongue box and found a 750w inverter that would fit in the space I was able to free up. I wired it to an outlet in the back of the trailer so now we have AC power!
Will be chopping up the overhead rack so it can telescope up/down 16" for travel and easier setup. Will be sleeving the square tubing and adding linear actuators to do the heavy lifting. In this I'll have to relocate the LED flood lights and re-route the wiring for the solar panel but both of those should be pretty straightforward and well worth the increase in stability I should see by lowering all that weight.
I need to find a place that I can weld on a mount for a 20' telescoping aluminum flag pole. I'll probably mount some "quick fists" in the trailer to stow the flag pole as well. Now we just have to choose a flag to fly! I'm leaning toward a Jolly Roger of some sort but we'll see.
Picked up nylocks for the shackle bolts, should be much better now.
The LED strip is attached just above the stickers, nice indirect light.
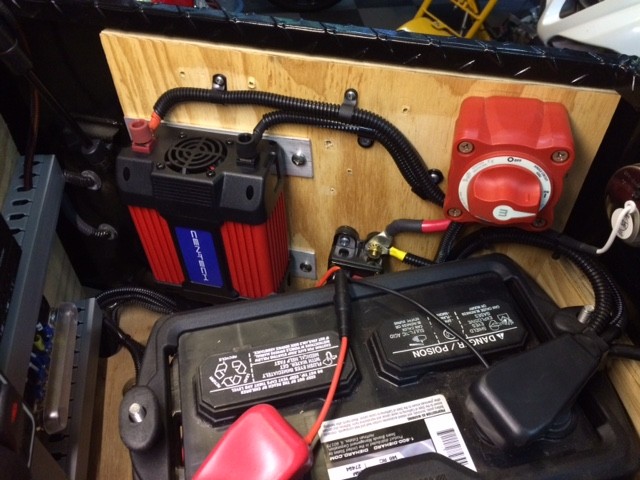
I had to relocate the refrigerator shutoff to free up space for the inverter.
Just a basic harbor freight 750w inverter, it squeezed in nicely after moving the circuit breaker and main shutoff. Made ghetto mounting brackets out of aluminum flat bar and 2 sided tape.
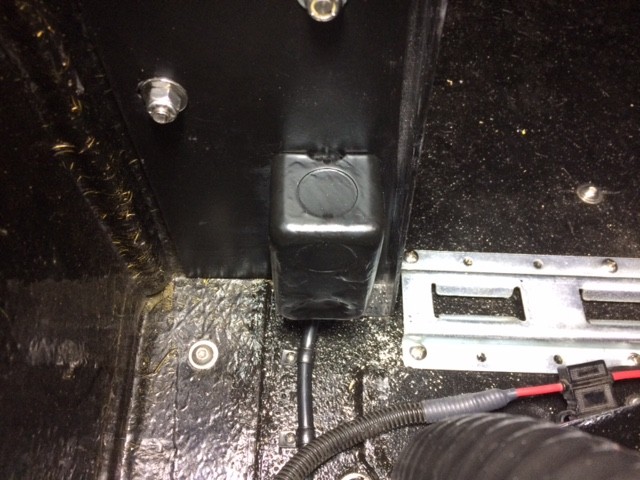
I used an "appliance cord" plugged into the inverter, ran to the back of the trailer and into this box mounted to the tailgate bracket.
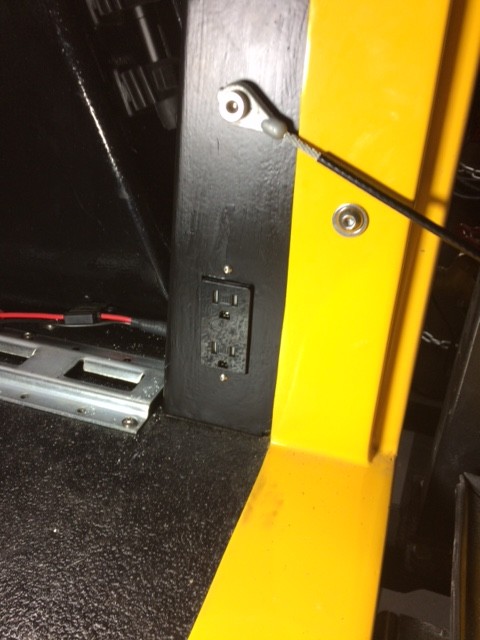
Cut in and mounted this outlet in the passenger side tailgate bracket, drivers side has the 12v outlets and USB chargers.
threadlock all hardware that doesn't have nylock nuts or lock washers
either safety wire shackle nuts or replace with nylock nuts
tighten everything, again and then again
fully stock the "spares" bin
verify all wire looms are tied down securely
check water level in batteries
remove and re-install tonneau cover with bolts instead of clamps
add a light inside the tongue box (electronics hub)
shocks, shocks, shocks
seal all gaps, panel seams, wire access holes, etc.
grind and re-weld any less than ideal welds I made
replace velcro tie down straps on Tepui tent, both inside and outside
add ability to carry more water and fuel
evaluate and adjust tool kit
add a 750w inverter and hard wire to an outlet mounted in the tailgate stiffening bracket
modify the overhead rack to be able to move down for travel, lower center of gravity is needed to really take it offroad
add a mount and stowage points for a 20ft telescoping flag pole
I used stainless blind nuts on all of the tub/floor mounting points and was so excited to get the tub mounted I never put thread lock of any sort on them, just antiseize to prevent galling. After putting 3k miles on it they haven't come out, just loosened up a tiny bit. I'll be pulling them one at a time to make sure they don't loosen up again.
I've changed the shackle bolts to the greaseable type but never replaced the "crimp" style lock nuts. They don't back off but they seem to be less tight then I would like. I'll either drill/safety wire them or replace the nuts with nylock versions. UPDATE: Stopped by Tacoma Screw last night and picked up eight grade 8 nylock nuts for the shackles. Got them installed and have 2 spares for the kit.
I will put a tool on EVERY FASTENER before and after some additional shakedown runs next Summer. Honestly I'll probably do that every time we stop for a bit on the trip too Smile UPDATE: Everything is tight!
When I built the Dinoot I put together a kit with at least 1 spare of every fastener on the trailer, I've pilfered it a bit for other projects over the last year so it's time to get it back to being able to cover ANY fastener that may go missing along the way. UPDATE: the spares kit is back to its original glory, the trip won't be stopped for a missing nut or bolt now.
When I did the extensive wiring I was careful to make sure nothing was put in "harms way" and all wiring was tied down with screw in clamps to prevent snagging wires in brush, etc. I just want to get under there and make sure everything is still in good condition. UPDATE: all wiring is secure and looks great, nothing has moved and it seems that won't change anytime soon!
My batteries are going on 3 years old and I don't remember ever checking their water level so I guess I should do that.
I installed a tonneau cover, the issue I've had is that the clamps are holding onto the angled portion of the tub lip and over time this has caused the rails to slip further toward the outside. It hasn't caused any issues but I want to take a closer look at why and see what I can do to prevent it getting worse. UPDATE: someone suggested drilling the rails and mounting it with bolts, did that last night and was able to remove the clamps after, plenty solid and isn't going anywhere now!
I originally installed a few strip LEDs under the tub lip to indirectly light the inside of the tub for nighttime loading, etc. I had 1 extra and had planned to install it inside the tongue box lid to act as an "under hood" light when dealing with power stuff at night. There is an open position on the switch bank and a great place to put it, just never got to it, probably a 20 minute job with scrap wiring and leftover loom. UPDATE: it was as easy a change as I expected it to be, plenty of light for the whole box and when it's off you wouldn't even know it was there.
The trailer needs shocks, no two ways about it. After the initial build I realized that the leaf springs were quite undersized for the weight, it was bouncing and bottoming out in the wheels wells. I upgraded the springs to a heavier pack, no more bottoming out but that obviously didn't totally solve the bouncing. I'm planning to weld on shock mounts and add basic shocks. With the rear stabilizers, water tanks, accumulator, pump, wiring, etc under there the mounting won't be ideal but will be good enough and should make a huge difference in the handling.
When I joined the tub panels and joined the tub to the floor by myself and getting some kind of caulking under the flanges wasn't really possible, plus I was so excited I kinda forgot to add some. After spending a lot of time on dirt roads and traveling through a few heavy rain storms I realized how much of a mistake that was. I'm sealing up all the seams with black silicone caulking, actually about 1/2 done so far. UPDATE: I spent some time cleaning out the dirt that had accumulated in just about every crack and then filled them with black silicone. Used a drop light in the dark to test for holes big enough to let light in and it seems that I got them all!
I made a few welds when I put this together, I've since gotten a much better welder and have a lot more practice so I'll be grinding down and re-welding those. I'm confident they would hold but will sleep a lot better knowing the few questionable welds are sorted out.
All of the velcro straps on the Tepui tent have started to fail but seeing as they are nicely just screwed on I can easily replace them. I have cam straps to replace the "over the cover" straps and some buckles to replace the ones that hold the tent folded down so you can put the cover over it. I have them, just need to spend some time with the sewing machine to cut and sew them to size. UPDATE: I busted out the sewing machine last night and made up my new straps, so far they seem to do the trick!
For a long trip as this one we need all the water and fuel we can carry. My FJ gets 12-15 mpg towing and worse offroad so the more the better. I have a couple of 2 gallon Rotopax canisters on my tire swing out and am working on a place to mount up to 4 more on the trailer. So far it looks like the left and right sides of the tongue box are ideal spots for them. Either they will be mounted to the actual box or on brackets welded to the rack supports on the front corners. This will give me 4 more gallons of fuel and 4 more gallons of water securely mounted to the trailer. Unfortunately they aren't cheap so I'll have to save my pennies for this addition.
I currently have a decent tool kit that rides in the trailer with everything else. It doesn't cover anything but the fasteners on the trailer itself. I need to go through it and add anything I might need for work on both the trailer or the FJ, probably needs a few things but it's currently pretty complete.
We don't often need 110v power on trips and if we do the FJ has an inverter built in. On this trip we'll have cameras to charge and things like an electric razor to keep charged as well (more than 4 days without a shave is about all I can take). I'm planning to pick up a cheap modified sine wave inverter, mount it in the tongue box, hard wire it to the batteries and to an outlet I'll mount in the passenger side tailgate stiffening bracket (the driver's side contains the 12v power options). The tongue box is getting full so finding space may be a challenge, more to come on this. UPDATE: I was able to shuffle a few things around in the tongue box and found a 750w inverter that would fit in the space I was able to free up. I wired it to an outlet in the back of the trailer so now we have AC power!
Will be chopping up the overhead rack so it can telescope up/down 16" for travel and easier setup. Will be sleeving the square tubing and adding linear actuators to do the heavy lifting. In this I'll have to relocate the LED flood lights and re-route the wiring for the solar panel but both of those should be pretty straightforward and well worth the increase in stability I should see by lowering all that weight.
I need to find a place that I can weld on a mount for a 20' telescoping aluminum flag pole. I'll probably mount some "quick fists" in the trailer to stow the flag pole as well. Now we just have to choose a flag to fly! I'm leaning toward a Jolly Roger of some sort but we'll see.
Picked up nylocks for the shackle bolts, should be much better now.
The LED strip is attached just above the stickers, nice indirect light.
I had to relocate the refrigerator shutoff to free up space for the inverter.
Just a basic harbor freight 750w inverter, it squeezed in nicely after moving the circuit breaker and main shutoff. Made ghetto mounting brackets out of aluminum flat bar and 2 sided tape.
I used an "appliance cord" plugged into the inverter, ran to the back of the trailer and into this box mounted to the tailgate bracket.
Cut in and mounted this outlet in the passenger side tailgate bracket, drivers side has the 12v outlets and USB chargers.
Last edited:
jays0n
Adventurer
Now that I'm getting back into working on the trailer we've expanded the scope a bit, it's time to be able to raise/lower the tent rack. The height/center of gravity and lack of shocks are the trailer's two worst traits. Shocks are in progress and now so is the moving tent rack. I'll be modifying the rack I already have by sleeving the rack's vertical posts and adding linear actuators like Shack did on his build. I've tossed this idea around for 2 years now and after seeing his work well I'm going to pull the trigger and make it happen. I'll have some wiring concerns to deal with (solar and flood lights wiring runs through the rack) but those are pretty easily overcome. I'll probably get started this month by getting the rack moving up/down manually then work on the actuators after the frame is working smoothly. Keep watch for new pics.
jah310
Adventurer
Have you considered putting airbags on? I had a similar issue with dialing in the leaf springs once I started adding water and other stuff I didn't contemplate in the original build plan. I ended up putting some bags underneath the trailer and it solved all my problems. Used a set of monroe shocks and all is good. More infor here towards the bottom of the page.http://www.expeditionportal.com/forum/threads/111076-Jah310-Trailer-Build-Here-goes-!/page11
PS - Totally feel you on the nylocks. I'v had to go through and apply thread lock to random bolts here and there that I skipped due to being too excited during the initial build...
Glad you decided to keep the trailer -it's awesome. Plus your trip down to Baja is going to be sweet. Keep us posted.
Best,
jays0n
Adventurer
Thought about it and may get there after finishing the retrofit of the shocks. At this point for the issues i'm having i really think the shocks are going to solve them but we'll see, either way they have to get done so I'll start there and see where it takes me...
Last edited:
jays0n
Adventurer
I've been slowly gathering parts and working on my Rotopax fuel and water canister mounts for about a week now when i have a few minutes and today i was able to get them mounted and completed, one more thing to mark off the list!
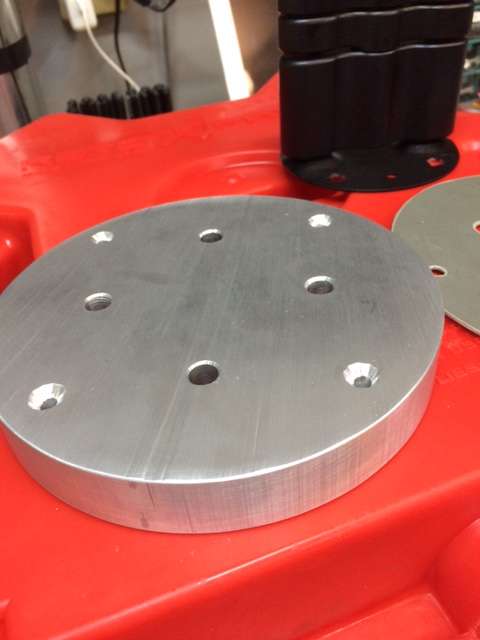
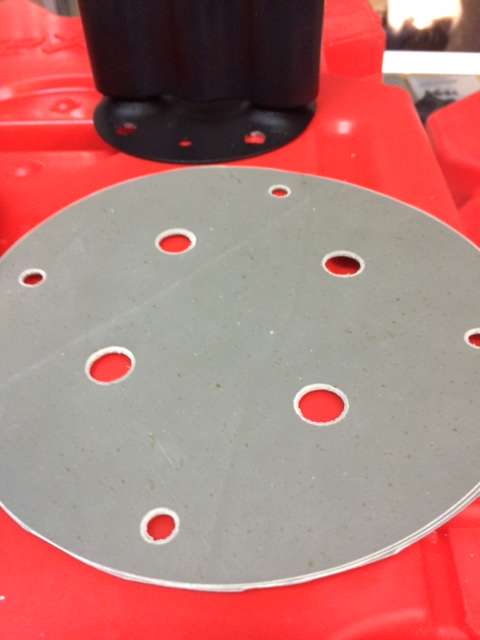
My plan was to mount them to the sides of the tongue box but with the 1/2" overhang the lid creates I had to come up with a way to solidly space the mount out or the lid would hit the canister unless I mounted it lower, which I really didn't like the look of. I was able to source some 6" diameter aluminum round bar in 3/4" slices, I picked up 2 of them for under $20 so not too bad.
I made a paper template on some graph paper for all the holes I needed, outside holes for screws to anchor it to the plywood INSIDE the tongue box and the center holes for the Rotopax mount, these use blind nuts inside the box and sandwich it all together. While i was at it I cleaned up the edges and the surface so it would look presentable.
The surface of the tongue box is diamond plate so for a smooth and tight seal between the spacer and the box I needed a gasket of some sort. I had some roofing rubber left over from making one for something else so i transferred the pattern and punched out holes for all the screws and bolts.
I had to slightly ream the holes out in the Rotopax mounts so i could use the same 5/16-18 stainless button head bolts I used everywhere else on the trailer, trying to keep things consistent and simple.
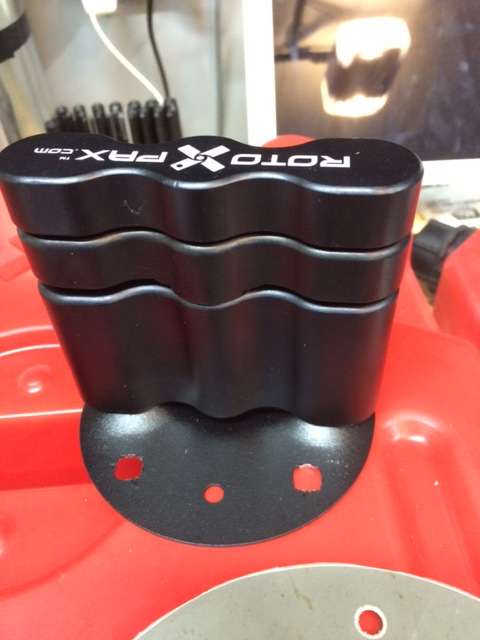
I got everything lined up and measured then mounted the spacers with the screws first, then the bolts and Rotopax mounts after that.
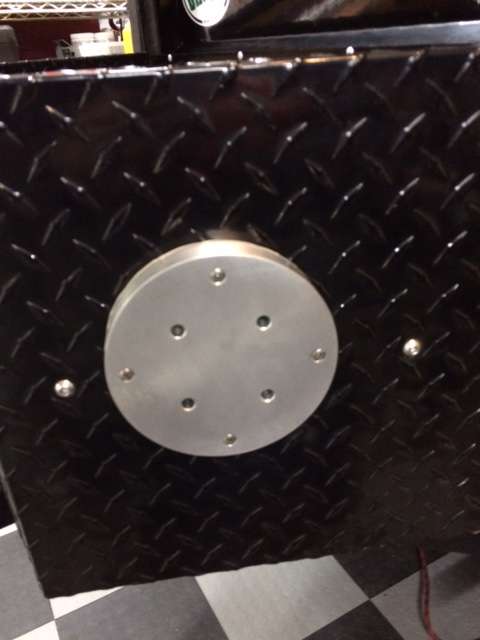
You can see the spacer back there, moves everything out just far enough to clear the lid.
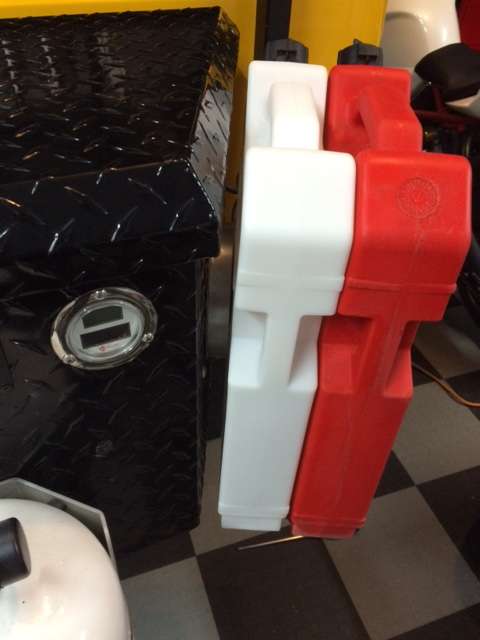
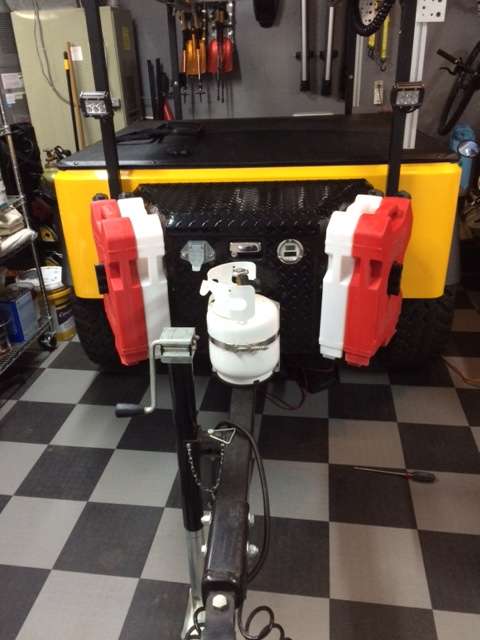
With their pack mount extension I can mount two canisters on each side.
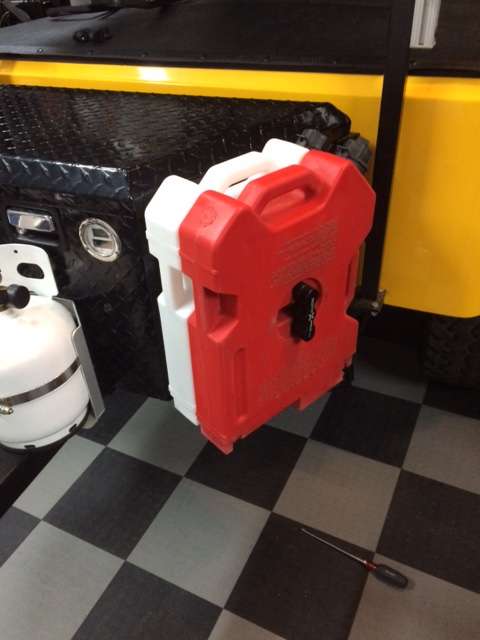
That gives me 4 more gallons of water and 4 more of fuel plus they are interchangeable with the pair I have on the back of my tow rig, couldn't be happier with how it came out and how solid they are mounted.
My plan was to mount them to the sides of the tongue box but with the 1/2" overhang the lid creates I had to come up with a way to solidly space the mount out or the lid would hit the canister unless I mounted it lower, which I really didn't like the look of. I was able to source some 6" diameter aluminum round bar in 3/4" slices, I picked up 2 of them for under $20 so not too bad.
I made a paper template on some graph paper for all the holes I needed, outside holes for screws to anchor it to the plywood INSIDE the tongue box and the center holes for the Rotopax mount, these use blind nuts inside the box and sandwich it all together. While i was at it I cleaned up the edges and the surface so it would look presentable.
The surface of the tongue box is diamond plate so for a smooth and tight seal between the spacer and the box I needed a gasket of some sort. I had some roofing rubber left over from making one for something else so i transferred the pattern and punched out holes for all the screws and bolts.
I had to slightly ream the holes out in the Rotopax mounts so i could use the same 5/16-18 stainless button head bolts I used everywhere else on the trailer, trying to keep things consistent and simple.
I got everything lined up and measured then mounted the spacers with the screws first, then the bolts and Rotopax mounts after that.
You can see the spacer back there, moves everything out just far enough to clear the lid.
With their pack mount extension I can mount two canisters on each side.
That gives me 4 more gallons of water and 4 more of fuel plus they are interchangeable with the pair I have on the back of my tow rig, couldn't be happier with how it came out and how solid they are mounted.
Last edited:
Semi-Hex
Enfant Terrible
I was looking over your wiring diagram and your usage. Do you mind answering a few questions?
Is the second battery mainly the added capacity for the fridge?
I've looked high and low at four channel remote relays... is there a brand name I could go by? I would like to steal your idea.
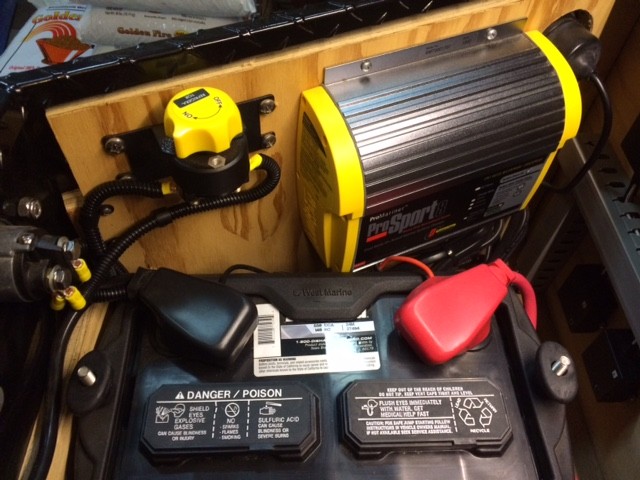
It seems that the ProMariner waterproof 8amp, 2 bank charger is not available to us mere mortals. Did you have a secret in somewhere (or I could go with the ten amp if they are really just for OEM)?
And, did you build your own cables, if so, did you crimp or solder the fittings, if crimp what brand/type of crimper? I saw some really nice welding cable that I could use for the heavy wiring.
That is one of the cleanest builds I have seen yet. Thank you for sharing the pics.
Is the second battery mainly the added capacity for the fridge?
I've looked high and low at four channel remote relays... is there a brand name I could go by? I would like to steal your idea.
It seems that the ProMariner waterproof 8amp, 2 bank charger is not available to us mere mortals. Did you have a secret in somewhere (or I could go with the ten amp if they are really just for OEM)?
And, did you build your own cables, if so, did you crimp or solder the fittings, if crimp what brand/type of crimper? I saw some really nice welding cable that I could use for the heavy wiring.
That is one of the cleanest builds I have seen yet. Thank you for sharing the pics.
jays0n
Adventurer
No problem, love to help.
The batteries are tied together in parallel to provide a total of 160Ah. I would have gone with larger batteries because more capacity is never bad but space in there is limited and a pair of group 34(s) fit well. The two shutoffs tie into the battery bank in parallel and each serve their own purpose, one is for the circuit ran to the fridge and the other is for basically everything else. This allows me to leave the fridge on while traveling but leave the rest powered off, just in case of some issue like a wire getting snagged, etc.
The 4 channel relays and key fobs were from an eBay seller, the fob is now slightly different than mine but the receiver boxes are exactly the same, the price looks the same too, $43.95 with free shipping. Here is a link to one. They also carry a momentary version so be sure I sent you the right one, it would be the on off type as they call it.
I wanted to go with a faster charger but literally couldn't fit anything larger than the 8amp Promariner in the box. Not sure where I ordered mine but I found them online here for you, price looks like what I paid if memory serves me.
All the wiring with the exception of the spade connectors on the lines to the buss bars are soldered, including the large gauge stuff, just safer that way.
Thanks for the compliments and let me know if you have any other questions as your build progresses.
Semi-Hex
Enfant Terrible
I do appreciate the feed back. I fully understand the reasoning behind the second battery. I've been running a group 27 agm battery for three years with a 15 watt solar panel and it has done just fine 90% of the time. It's when we stay in one place for several day that we start getting some issues (the panel isn't accessible when the tent is up). We will be using more electricity now that we are camping more and more into the winter with the short days and the colder nights as well.
I have a very nice tongue box that I am going to convert to my electrical depot, I am going to expand my panels and make them accessible and I really like the remote relays so we can find the blasted trailer when we get back after dark.")
Thank you for the links, I'll be posting up my build as I move along.
I have a very nice tongue box that I am going to convert to my electrical depot, I am going to expand my panels and make them accessible and I really like the remote relays so we can find the blasted trailer when we get back after dark.
Thank you for the links, I'll be posting up my build as I move along.
Forum statistics
Members online
- TravelingDarren
- kletzenklueffer
- Raspy
- jk6661
- YukonMontanaTannerTrapper
- CuStOm
- vavaroutsos
- hmmwv.explorer
- timohardin
- kingdomcamping
- weatherfish
- nunyabizz
- sterlryu
- Uncle Jeffy
- SnoopisTDI
- JaSAn
- Tharnacle
- BajaSurfRig
- twofourexplore
- Clrussell
- MHerboth
- Obsessed2findARuggedHybid
- jdkellogg
- SwimBikeRunPDX
- Rpopma89
- Outono
- MEIronMan207
- xvz12
- Alloy
- Adventr.us
- Mac10
- Spl@t
- gallinastrips
- WOODY2
- Singlespeed92
- MarcusG
- kbsd
- MarcusBrody
- alanymarce
- SiberianSoon
- Alwaysstranded
- matttahoe53
- jboerneke
- nargun
- Timpanzee
- Wakeup2river
- pjm511
- drakoniac
- michaelma9
- peculierboy
Total: 710 (members: 60, guests: 650)